Devices tabs
Info tab (devices)
On the Info tab, you can view and edit basic information about a device in a number of fields.
All devices have an Info tab.
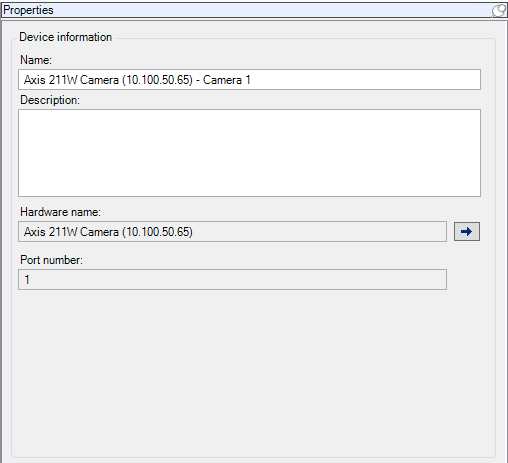
Info tab properties
|
Name |
Description |
|---|---|
| Name |
The name is used whenever the device is listed in the system and clients. When you rename a device, the name is changed globally in the Management Client. |
| Description |
Enter a description of the device (optional). The description appears in a number of listings within the system. For example, when you pause the mouse pointer over the name in the Overview pane. |
| Hardware name |
Displays the name of the hardware, with which the device is connected. The field is non-editable from here, but you can change it by clicking Go To next to it. This takes you to hardware information where you can change the name. |
| Port number |
Displays the port on which the device is attached on the hardware. For single-device hardware, the port number is typically 1. For multi-device hardware, such as video servers with several channels, the port number typically indicates the channel on which the device is attached, for example 3. |
| Short name |
To apply a short name for the camera, enter it here. The maximum length of characters is 128. If you are using smart map, automatically the short name is displayed with the camera on the smart map. Otherwise the full name is displayed. |
| Geo coordinates |
Enter the geographic location of the camera in the format latitude, longitude. The value you enter determines the position of the camera icon on the smart map in XProtect Smart Client. The field is mainly for smart map and third party integrations. |
| Direction |
Enter the viewing direction of the camera measured against a due north point on a vertical axis. The value you enter determines the direction of the camera icon on the smart map in XProtect Smart Client. The default value is 0.0. The field is mainly for smart map and third party integrations. |
| Field of view |
Enter the field of view in degrees. The value you enter determines the field of view of the camera icon on the smart map in XProtect Smart Client. The default value is 0.0. The field is mainly for smart map and third party integrations. |
| Depth |
Enter the depth of the camera in meters or feet. The value you enter determines the depth of the camera icon on the smart map in XProtect Smart Client. The default value is 0.0. The field is mainly for smart map and third party integrations. |
| Preview position in browser |
To verify that you have entered the correct geographic coordinates, click the button. Google Maps will open in your standard Internet browser on the position you specify. The field is mainly for smart map and third party integrations. |
Settings tab (devices)
On the Settings tab, you can view and edit settings for a device in a number of fields.
All devices have a Settings tab.
The values appear in a table as changeable or read-only. When you change a setting to a non-default value, the value appears in bold.
The content of the table depends on the device driver.
Allowed ranges appear in the information box below the settings table:
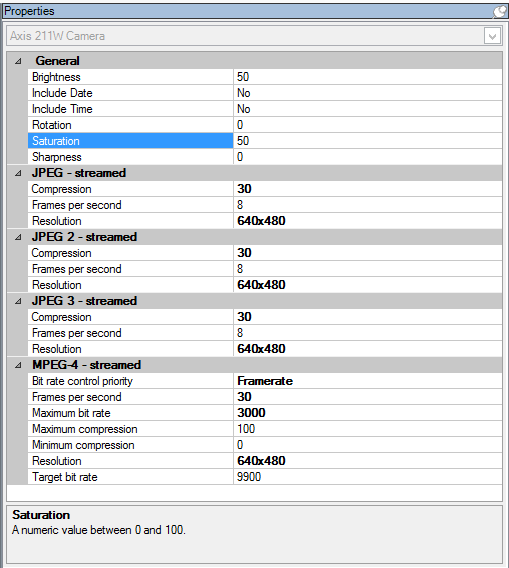
For more information about camera settings, see View or edit camera settings.
Streams tab (devices)
The following devices have a Streams tab:
- Cameras
The Streams tab lists by default a single stream. It is the selected camera's default stream, used for live and recorded video.
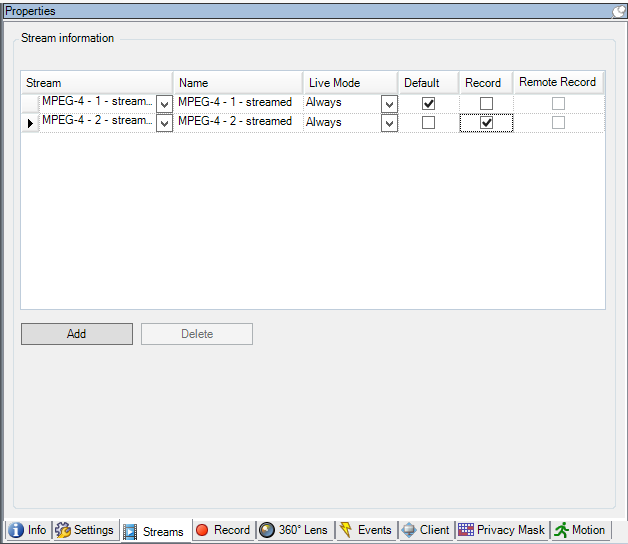
Tasks on the Streams tab
|
Name |
Description |
|---|---|
| Record | Select this check box to change which stream to use for recording. For live streaming, you can set up and use as many live streams as the camera supports, but you can only select one stream for recording at a time. |
| Add |
Click to add a stream to the list. |
Record tab (devices)
The following devices have a Record tab:
- Cameras
- Microphones
- Speakers
- Metadata
Recordings from a device are only saved in the database when you have enabled recording and the recording-related rule criteria are met.
Parameters that cannot be configured for a device are grayed out.
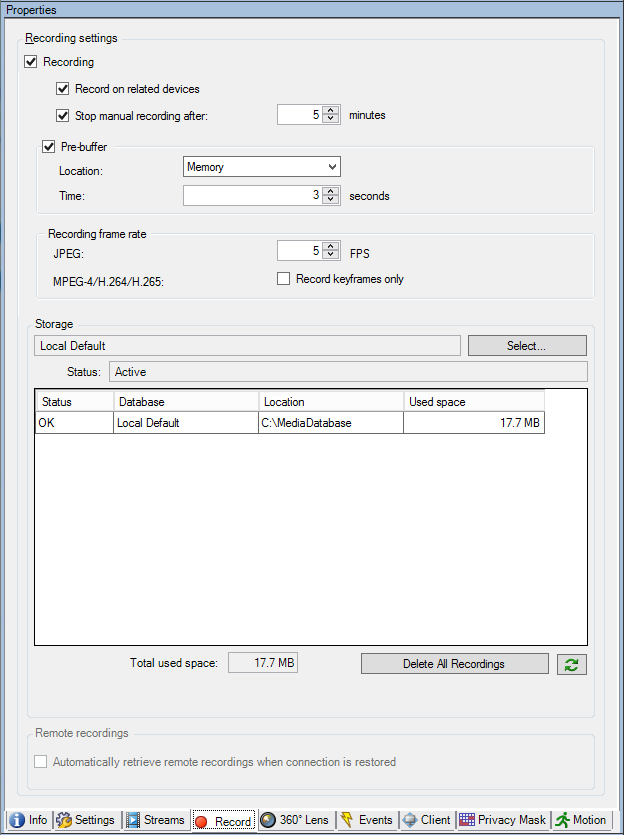
Tasks on the Record tab
|
Name |
Description |
|---|---|
| Recording | |
| Pre-buffer |
Pre-buffering and storage of pre-buffer recordings (explained) |
| Recording frame rate | |
| Storage | |
| Select | Move devices from one storage to another |
| Delete All Recordings |
Use this button if you have added all devices in the group to the same server: |
| Automatically retrieve remote recordings when connection is restored |
Motion tab (devices)
The following devices have a Motion tab:
- Cameras
On the Motion tab, you can enable and configure motion detection for the selected camera.
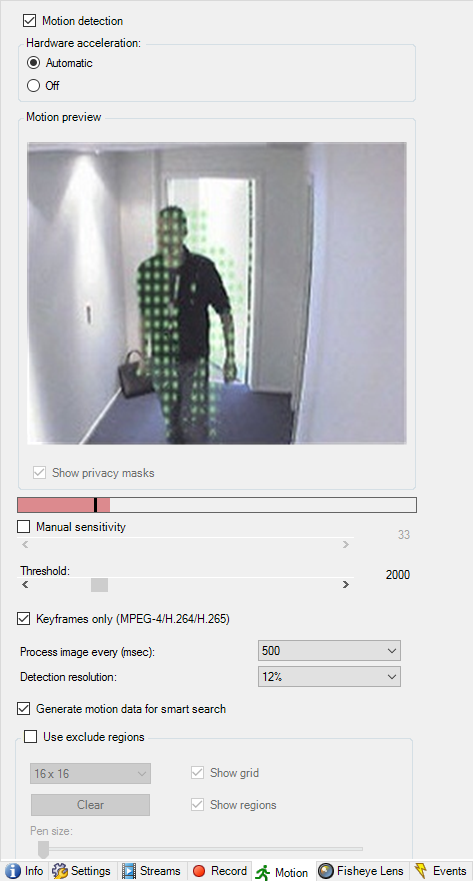
Tasks on the Motion tab
|
Name |
Description |
|---|---|
| Motion detection | |
| Hardware acceleration |
Select Automatic to enable hardware acceleration or select Off to disable the setting. For more information, see Enable or disable hardware acceleration. |
| Privacy masks |
If you have defined areas with permanent privacy masks, you can select the Privacy masks check box to display the privacy masks on the Motion tab. You define areas with privacy masks on the Privacy masking tab (devices). There is no motion detection within areas covered by permanent privacy masks. |
| Manual sensitivity |
Determine how much each pixel in the image must change before it is regarded as motion: |
| Treshold |
Determine how many pixels in the image must change before it is regarded as motion: |
| Keyframes only (MPEG-4/H.264/H.265) |
Select this check box to do motion detection on keyframes only instead of on the entire video stream. Only applies to MPEG-4/H.264/H.265. Motion detection on keyframes reduces the amount of processing power used to carry out the analysis. |
| Process image every (msec) |
Select an image processing interval in this list to determine how often the system performs the motion detection analysis. For example, every 1000 milliseconds are once every second. Default value is every 500 milliseconds. The interval is applied if the actual frame rate is higher than the interval you set here. |
| Detection resolution |
Select a detection resolution in this list to optimize motion detection performance. Only the selected percentage of the image is analyzed, for example 25%. By analyzing 25%, only every fourth pixel in the image is analyzed instead of all pixels. Using optimized detection reduces the amount of processing power used to carry out the analysis, but also means a less accurate motion detection. |
| Generate motion data for smart search |
With this check box enabled, the system generates motion data for the images used for motion detection. For example, if you select motion detection on keyframes only, the motion data is also produced for keyframes only. The extra motion data enables the client user, via the smart search function, to quickly search for relevant recordings based on motion in the selected area of the image. The system does not generate motion data within areas covered by permanent privacy masks, but only for areas with liftable privacy masks (see Motion detection (explained)). Motion detection threshold and exclude regions do not influence the generated motion data.
|
| Use exclude regions |
Exclude motion detection from specific areas of a camera view: |
Presets tab (devices)
The following devices have a Presets tab:
- PTZ cameras that support preset positions
On the Presets tab, you can create or import preset positions, for example:
- In rules for making a PTZ (pan-tilt-zoom) camera move to a specific preset position when an event occurs
- In patrolling, for the automatic movement of a PTZ camera between a number of preset positions
- For manual activation by the XProtect Smart Client users
You assign PTZ permission to roles on the Overall Security tab (see Overall Security tab (roles)) or the PTZ tab (see PTZ tab (roles)).
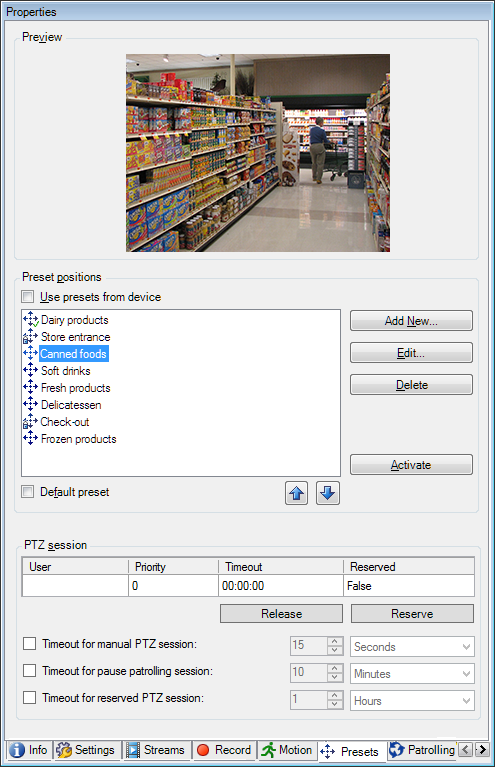
Tasks on the Presets tab
|
Name |
Description |
|---|---|
| New |
Add a preset position for a camera in the system: |
| Use presets from device |
Add a preset position for a PTZ cameras on the camera itself: |
| Default preset |
Assign one of a PTZ camera's preset positions as the camera's default preset position: |
| Edit |
Edit an existing preset position defined in the system: Edit a preset position for a camera (type 1 only) Edit the name of a preset position defined in the camera: |
| Locked |
Select this check box to lock a preset position. You can lock a preset position if you want to prevent users in XProtect Smart Client or users with limited security rights from updating or deleting a preset. Locked presets are indicated with this icon You lock presets as part of adding (see Add a preset position (type 1)) and editing (see Edit a preset position (type 1 only)). |
| Activate |
Click this button to test a cameras preset position: |
| Reserve and Release |
Prevent other users from taking control over the camera and release the reservation. Administrators with security rights to run a reserved PTZ session can run the PTZ camera in this mode. This prevents other users from taking control over the camera. With sufficient rights, you can release other users' reserved PTZ sessions: |
| PTZ session |
Monitor if the system is currently patrolling or a user has taken control: View the status of PTZ cameras and manage timeouts for cameras: |
PTZ session properties
The PTZ session table shows the current status of the PTZ camera.
|
Name |
Description |
|---|---|
| User |
Displays the user that has pressed the Reserved button and currently controls the PTZ camera. If a patrolling session is activated by the system, it displays Patrolling. |
| Priority |
Displays the user's PTZ priority. You can only take over PTZ sessions from users with a lower priority than you. |
| Timeout |
Displays the remaining time of the current PTZ session. |
| Reserved |
Indicates if the current session is a reserved PTZ session or not:
|
The check boxes in the PTZ session section enable you to change the following timeouts for each PTZ camera.
|
Name |
Description |
|---|---|
| Timeout for manual PTZ session |
Specify the timeout period for manual PTZ sessions on this camera if you want the timeout to be different from the default period. You specify the default period in the Tools menu under Options. |
| Timeout for pause patrolling PTZ session |
Specify the timeout period for pause patrolling PTZ sessions on this camera if you want the timeout to be different from the default period. You specify the default period in the Tools menu under Options. |
| Timeout for reserved PTZ session |
Specify the timeout period for reserved PTZ sessions on this camera if you want the timeout to be different from the default period. You specify the default period in the Tools menu under Options. |
Patrolling tab (devices)
The following devices have a Patrolling tab:
- PTZ cameras
On the Patrolling tab, you can create patrolling profiles - the automatic movement of a PTZ (pan-tilt-zoom) camera between a number of preset positions.
Before you can work with patrolling, you must specify at least two preset positions for the camera in the Presets tab, see Add a preset position (type 1).
Patrolling tab, displaying a patrolling profile with customized transitions:
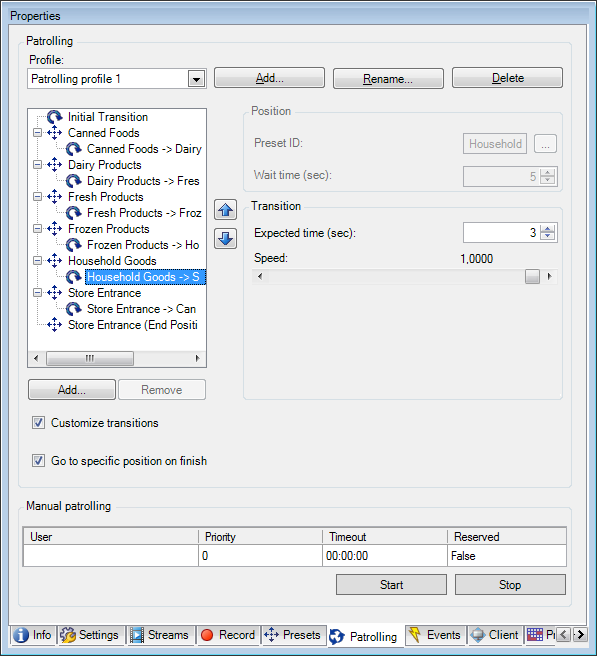
Tasks on the Patrolling tab
|
Name |
Description |
|---|---|
| Add | Add a patrolling profile |
| Preset ID | Specify preset positions in a patrolling profile |
| Wait time (sec) | Specify the time at each preset position |
| Customize transitions | Customize transitions (PTZ) |
| Go to specific position on finish | |
| Manual patrolling | Monitor if the system is currently patrolling or a user has taken control. |
| Start and Stop | Use the Start and Stop buttons to initiate and stop manual patrolling. See Specify PTZ session timeouts for information about how to specify how much time should pass before regular patrolling is resumed for all or for individual PTZ cameras. |
Manual patrolling properties
The Manual patrolling table shows the current status of the PTZ camera.
|
Name |
Description |
|---|---|
| User |
Displays the user who has either reserved the PTZ session or started a manual patrolling and currently controls the camera. If a patrolling session is activated by the system, it displays Patrolling. |
| Priority |
Displays the user's PTZ priority. You can only take over PTZ sessions from users or patrolling profiles with a lower priority than yours. |
| Timeout |
Displays the remaining time of the current reserved or manual PTZ sessions. |
| Reserved |
Indicates if the current session is a reserved PTZ session or not.
|
Fisheye lens tab (devices)
The following devices have a Fisheye Lens tab:
- Fixed cameras with a fisheye lens
On the Fisheye Lens tab, you can enable and configure fisheye lens support for the selected camera.
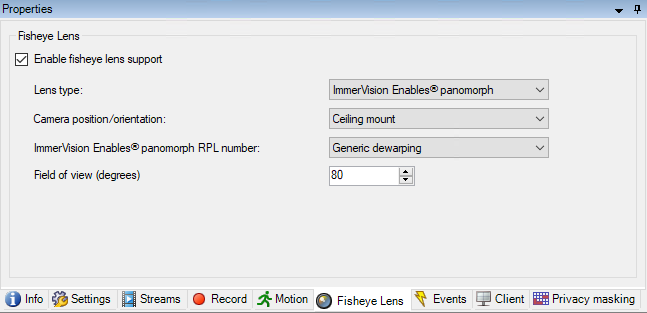
Task on the Fisheye lens tab
|
Name |
Description |
|---|---|
| Enable fisheye lens support | Enable and disable fisheye lens support |
Events tab (devices)
The following devices have an Events tab:
- Cameras
- Microphones
- Inputs
In addition to the system's event, some devices can be configured to trigger events. You can use these events when creating event-based rules in the system. Technically, they occur on the actual hardware/device rather than on the surveillance system.
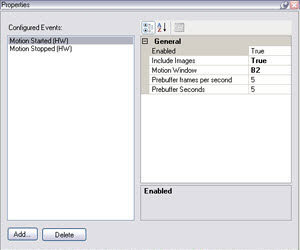
Tasks on the Events tab
|
Name |
Description |
|---|---|
| Add and Delete | Add or delete an event for a device |
Event tab (properties)
|
Name |
Description |
|---|---|
| Configured events |
Which events you may select and add in the Configured events list is determined entirely by the device and its configuration. For some types of devices, the list is empty. |
| General |
The list of properties depends on the device and the event. In order for the event to work as intended, you must specify some or all of the properties identically on the device as well as on this tab. |
Client tab (devices)
The following devices have a Client tab:
- Cameras
On the Client tab you can specify which other devices are viewed and heard when you use the camera in XProtect Smart Client.
The related devices also record when the camera records, see Enable recording on related devices.
You can also enable Live multicast on the camera. It means that the camera multicasts live streams to the clients via the recording server.
Multicast streams are not encrypted, even if the recording server uses encryption.
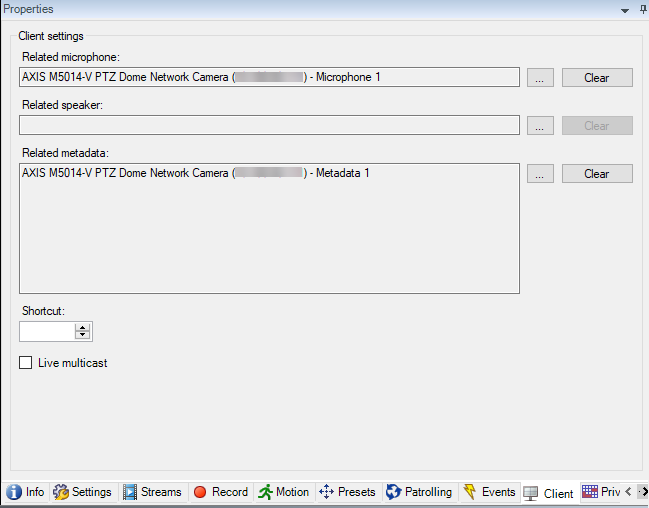
Client tab properties
|
Name |
Description |
|---|---|
| Related microphone |
Specify the microphone on the camera that XProtect Smart Client users by default listen to audio. The XProtect Smart Client user can manually select to listen to another microphone if needed. Specify the microphone that is related to the video push camera for streaming video with audio. The related microphones record when the camera records. |
| Related speaker |
Specify through which speakers on the camera, that XProtect Smart Client users speak by default. The XProtect Smart Client user can manually select another speaker if needed. The related speakers record when the camera records. |
| Related metadata |
Specify one or more metadata devices on the camera, that XProtect Smart Client users receive data from. The related metadata devices record when the camera records. |
| Shortcut |
To ease the selection of cameras for the XProtect Smart Client users, define keyboard shortcuts to the camera.
|
| Live multicast |
The system supports multicast of live streams from the recording server to XProtect Smart Client. To enable multicast of live streams from the camera, select the check box. Live multicasting only works on the stream that you have specified as the camera's default stream on the Streams tab. You must also configure multicasting for the recording server. See Enable multicasting for the recording server. Multicast streams are not encrypted, even if the recording server uses encryption. |
Privacy masking tab (devices)
Available functionality depends on the system you are using. See https://www.milestonesys.com/solutions/platform/product-index/ for more information.
XProtect Essential+ 2018 R1 and onwards does not support privacy masking, so if you upgrade from a system with privacy masks applied, the masks will be removed.
The following devices have a Privacy masking tab:
- Cameras
On the Privacy masking tab, you can enable and configure privacy protection for the selected camera.
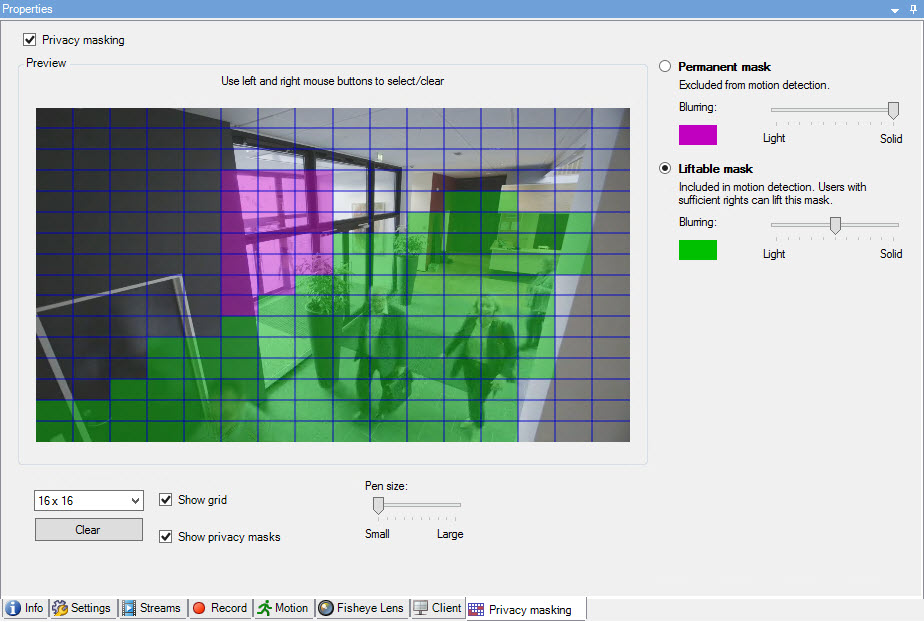
Tasks on the Privacy masking tab
|
Name |
Description |
|---|---|
| Privacy masking | |
| Permanent mask and Liftable mask |
Define, if you want a permanent or liftable privacy mask: |
Tasks related to Privacy masking
|
Task |
Description |
|---|---|
| Change the timeout for lifted privacy masks for the Smart Client profile associated with the role that has the permission to lift privacy masks. | |
| Enable or disable the permission to lift privacy masks for a role. | |
| Create a devices report with information about your cameras' current privacy masking settings. | Create a report of your privacy masking configuration |
Privacy masking tab (properties)
|
Name |
Description |
|---|---|
| Grid size |
The selected grid size determines the density of the grid, regardless whether the grid is visible in the preview or not. Select between the values 8×8, 16×16, 32×32 or 64×64. |
| Clear |
Clears all privacy masks you have specified. |
| Show grid |
Select the Show grid check box to make the grid visible. |
| Show privacy masks |
When you select the Show privacy masks check box (default), permanent privacy masks appear in purple in the preview and liftable privacy masks in green. Milestone recommends that you keep the Show privacy masks box selected so that you and your colleagues can see the current privacy protection configuration. |
| Pen size |
Use the Pen size slider to indicate the size of the selections you wish to make when you click and drag the grid to select regions. Default is set to small, which is equivalent to one square in the grid. |
| Permanent mask |
Appears in purple in the preview on this tab and on the Motion tab. Permanent privacy masks are always visible in XProtect Smart Client and cannot be lifted. Can be used to cover areas of the video that never requires surveillance, like public areas, where surveillance is not allowed. Motion detection is excluded from permanent masks. You specify the coverage of privacy masks as either solid or some level of blurred. The coverage settings apply to both live and recorded video. |
| Liftable mask |
Appears in green in the preview on this tab. Liftable privacy masks can be lifted in XProtect Smart Client by users with sufficient user rights. By default, the privacy masks are lifted for 30 minutes, or until the user apply them again. Be aware that the privacy masks are lifted on video from all the cameras that the user has access to. If the XProtect Smart Client user does not have the right to lift privacy masks, the system asks for a user with permission to authorize the lift. You specify the coverage of privacy masks as either solid or a level of blurred. The coverage settings apply to both live and recorded video. |
| Blurring |
Use the slider to select the blurring level of the privacy masks in the clients or set the coverage to solid. By default, the coverage of areas with permanent privacy masks are solid (nontransparent). By default, liftable privacy masks are medium blurred. You can inform the client users about the appearance of permanent and liftable privacy masks, so they are able to distinguish. |


 .
.