

Investigating incidents
You investigate incidents mainly on the Playback tab using the timeline. However, you can perform advanced searches on the Search tab and use the search results as a starting point for further investigation.
If the incident is associated with an alarm, go to the Alarm Manager tab, or select a view where the Alarm List has been added.
Timeline (explained)
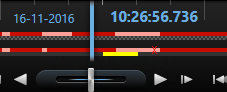
The timeline displays an overview of periods with recordings from all cameras displayed in your current view. Two timelines are displayed in the timeline area:
- The upper timeline shows the recording periods of the selected camera.
- The lower timeline is for all the cameras in the view, including the selected camera. If you have linked floating windows, these will also be included on the lower timeline.
You will see these colors in the timeline:
- Light-red indicates recordings
- Red indicates motion
- Light green indicates incoming audio
- Green indicates outgoing audio
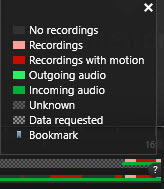
If there are additional sources of data available in your XProtect VMS system, incidents from these sources are shown as markers in other colors. The incidents can appears as pop-ups in the timeline.
To view markers and colors from additional sources, Additional data and Additional markers must either be enabled in the Timeline settings or server-side by your system administrator. See Timeline settings.
For a legend of the color codes, to the far right, click the small question mark.
- Drag the timeline to the right or left to move in time, or use the scroll wheel of your mouse.
- To adjust the range of the timeline, press CTRL and use the scroll wheel at the same time.
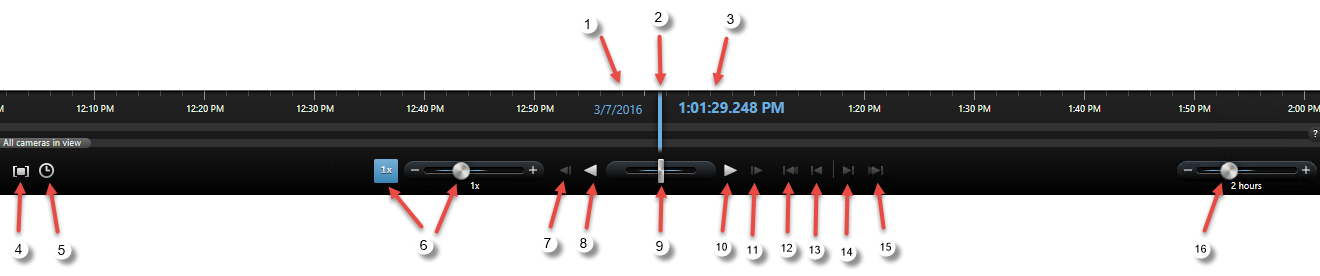
Time navigation controls (explained)
| Number | Description |
|---|---|
|
1 and 3 |
The playback date and time is the time to which all the cameras are tied. When you play back recordings, all cameras in the view will show video from the same time. Some cameras, however, may only record if motion is detected. Also, there may be no recorded video from one or more cameras in the view matching the specified point in time. Then, the last image in the database prior to the specified point in time will be dimmed. |
|
2 |
The time of the timeline is indicated by a blue vertical line. |
|
4 |
|
|
5 |
|
|
6 |
The playback speed slider lets you change the current playback speed. Move the slider to the left for slow motion, and to the right for fast motion. Click 1x for normal speed. |
|
7 |
 Move to the image just before the one currently viewed. Move to the image just before the one currently viewed. |
| 8 |
|
| 9 |
|
| 10 |
 Play forward in time. Play forward in time. |
| 11 |
 Move to the image just after the one currently viewed. Move to the image just after the one currently viewed. |
| 12 |
 Move to the first image in the database for the selected camera. Move to the first image in the database for the selected camera. |
| 13 |
 Move to the first image in the previous sequence. Move to the first image in the previous sequence. |
| 14 |
 Move to the first image in the following sequence. Move to the first image in the following sequence. |
| 15 |
 Move to the last image in the database for the selected camera. Move to the last image in the database for the selected camera. |
| 16 |
 Specify the time span of playback in the timeline. Specify the time span of playback in the timeline. |
 Select a period of time by dragging the start and end time indicators on the timeline - typically when you are exporting video. Click again to see the timeline with no time selected.
 Jump to a specific point in time by specifying the date and time.
 Play backward in time.
  When you click either
 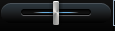 : Adjust the speed. Drag it to the right to increase forward play speed. Drag to the left to increase backward play speed.
Bookmarks in the timeline (explained)
Bookmarks in the timeline are indicated with a blue bookmark icon:  . To view the bookmarked video, place your mouse over the icon.
Viewing recorded video (explained)
There are different ways of viewing recorded video:
Playback tab

On the Playback tab, all cameras in a view display recordings from the same point in time, the master time . However, you can view and navigate recordings from individual cameras independently of the master time. Independent playback must be enabled in the Functions settings.
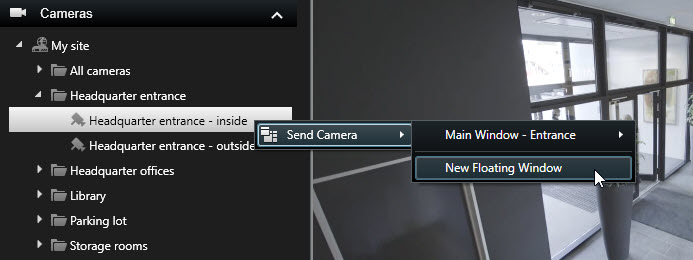
If you are accessing your cameras through the tree structure in the Cameras pane, you can open individual cameras in a new window from the Playback tab.
Particular user rights may be required in order to access the Playback tab, and, depending on your user rights, access to browsing video from some cameras may be restricted.
Live tab
Though the Live tab normally shows live video, you can watch recorded video for individual cameras by clicking the  button in the camera toolbar. This will open a new window where you can browse the recordings. Camera playback must be enabled in the Functions settings.
Search tab
The search results are basically video sequences that you can play back:
- Preview the search results. See also Preview video from search results
- Play back the search results in full screen mode or in a separate window. See also Open search results in separate windows
View recorded video independently of timeline
When you play back video on the Playback tab, all recordings in the view are synchronized with the timeline. For individual cameras, you can play back video independently of the timeline.
You can only use this feature for ordinary single-camera positions, not for hotspots, carousels, or Matrix positions.
In the Settings window > Functions tab, the Independent playback option must be set to Available.
Steps:
- Move your cursor to the bottom of the camera that you want to view recorded video from. On the toolbar that appears, click the Independent Playback button.

The independent playback timeline appears:

- Drag the timeline to set the start time.
- If you want to view recorded video for the selected time on all the cameras in your view at once, on the toolbar, click the View recordings from selected time on Playback tab button:
 . This displays the Playback tab with all cameras synchronized to the time you have selected.

Start search from cameras or views
If you are looking for something specific in one or more video streams, you can start search from a single camera, or from an entire view. The search workspace opens in a new floating window.
Steps:
- Go to the Live or Playback tab.
- To search a single camera:
- Hover over the view item. The camera toolbar appears.
- Click
 . A new Search window opens, and a search for recorded video starts immediately based on the camera in the view item.
- To search all cameras in a view:
- Make sure the correct view is open.
- At the top of the view, click . A new Search window opens, and a search for recorded video starts immediately based on the cameras in the view.
- Depending on your goal, change the time span, search categories and filters, or similar. For more information, see Search for video.
Investigate your search results
There are different ways of investigating incidents that you have found on the Search tab:
- Open the search result in a separate window where the Playback tab is preselected. See also Open search results in separate windows
- Open the search result in a detailed view. Do one of the following:
- In the list of search results, double-click the search result to view it in full screen mode. Double-click again to return to the list of search results.
- If you are previewing your search result in the preview area, double-click inside the video image. The search result opens in full screen mode. Double-click again to return to the preview area.
Timeline and Milestone Interconnect (explained)
If the selected camera is part of a Milestone Interconnect setup, and it is an interconnected device, the timeline for the selected camera displays the retrieval data. Retrievals that have taken place are displayed as recordings. On the timeline, shading lets you quickly identify which periods contain recordings and for which periods you need to request a retrieval (see Retrieve data from Milestone Interconnect) for.
- Dark gray indicates that there are no recordings for the time
- A dark checkerboard pattern indicates that no recordings have been requested and therefore it is unknown whether there are recordings
- Red shading indicates that there is a recording
- A light checkerboard pattern indicates that data has been requested for retrieval

The timeline with dark checkerboard pattern where no recordings have been requested and therefore it is not known whether there are recordings and the lighter checkerboard pattern where video has been requested for retrieval
Retrieve data from Milestone Interconnect
Milestone Interconnect™ allows you to retrieve data from one or more devices belonging to independent VMS systems integrated with your current VMS system. An example is mobile installations on ships or busses that are connected with a central site.
Your XProtect Smart Client is part of a Milestone Interconnect setup and at least one of your cameras supports edge storage, and you have the necessary user rights.
Steps:
- On the Playback tab, in the timeline, click the Time Selection Mode
 button to select the start and end time of the sequence you want to retrieve data for.
 - To the right of the toolbar, click Retrieve to open the Retrieval window.
- Select the relevant camera(s) and then click Start Retrieval.
You can view the progress of your retrieval jobs in the Status window (see Status window (explained)) by clicking the Status button on the Application toolbar.
- To stop a retrieval job that is in progress, either click Stop in the notification area at the top of the workspace area, or in the Status window, next to the job that is in progress.