摄影机与视讯管理软体设定
此部分仅与连接到外部VMS系统的BriefCam产品相关。
[en] Connecting BriefCam to a VMS Server
[en] Make sure the appropriate VMS plug-ins are installed.
[en] Open the Camera Management section (see image below), which lists all connected VMS servers on the left and the servers’ associated cameras on the right.
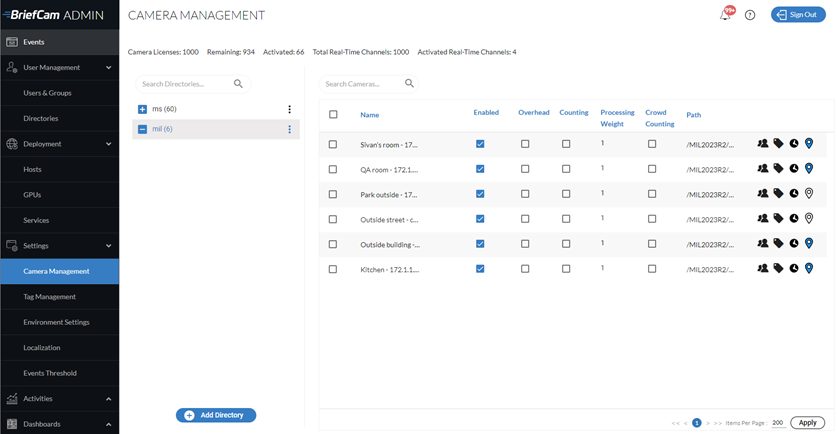
[en] Click the Add directory button to add a VMS server. The Add Directory dialog opens.
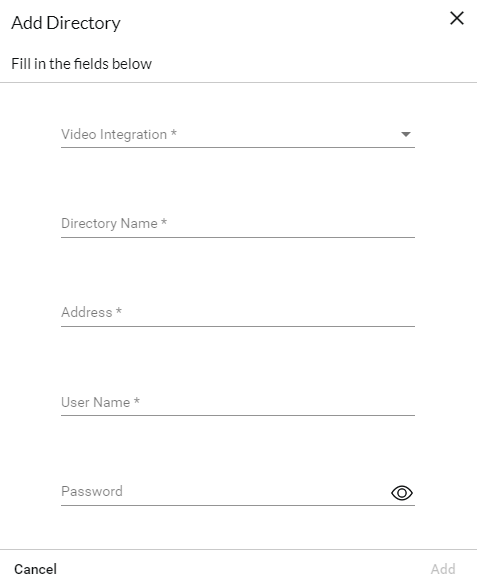
[en] From the Video Integration field, select the appropriate VMS integration option. Different integrations can be added by installing additional VMS-specific plugins.
[en] In the Directory Name field, enter a display name for the user directory. The directories should have different names.
[en] In the Address field, enter the VMS server’s IP/host address. If you are not using the default port (80), add the communication port (the port number may be specified as a suffix to the address, preceded by a colon).
[en] In the User Name and Password fields, enter the VMS server user name and password. This user must have permissions in the VMS to the cameras exposed for BriefCam. Click Add to add the directory.
[en] If you selected Milestone or Genetec, you will also see an RTSP Settings toggle button. These settings can be used to securely define the RTSP credentials for the integration.
[en] To test the connection to the newly added directory, click the zoom (
 ) icon to the right of a directory (VMS server) name and select the Test Connection option.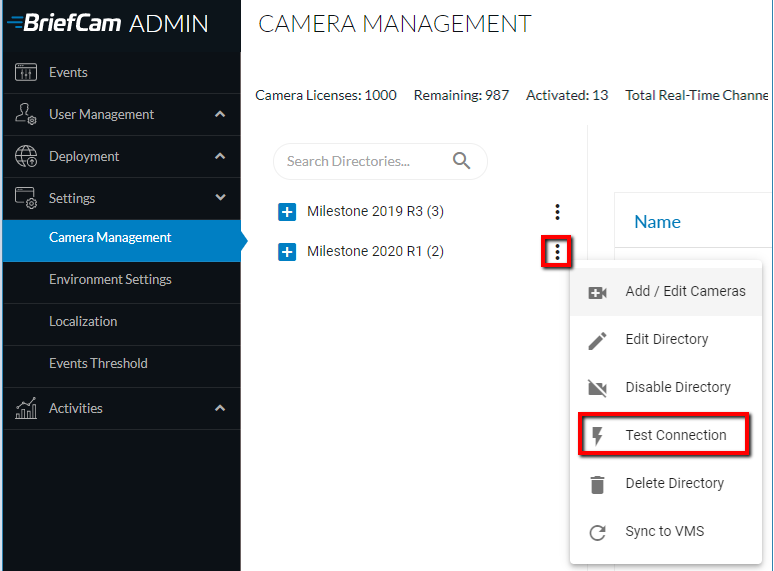
[en] To edit the directory, click the Edit Directory option. When changing the Address field, the new value must point to the existing directory.
[en] To completely disable all cameras associated with a directory, click the Disable Directory option. In a disabled directory, it is not possible to enable individual cameras. If you disable and then enable a directory, all of the associated cameras are also enabled.
[en] To completely remove a VMS directory (assuming that none of the cameras associated with it are currently activated), click the Delete Directory option.
注意
[en] Make sure to click the Apply button to retain any configuration changes.
注意
[en] When using a multi-site deployment (comprised of multiple site systems and a central Hub), video sources are set up in the Sites’ Administrator Consoles and not in the Hub Administrator Console.
摄影机选择与启动
此时,您可以选择,然后启用或停用(视授权条款而定)个别或多个摄影机来源,以便后续处理以产生视讯摘要。
若要启动摄影机,请按一下目录(视讯管理软体伺服器)名称右侧的变焦(
 ),然后选取“新增/编辑摄影机”选项。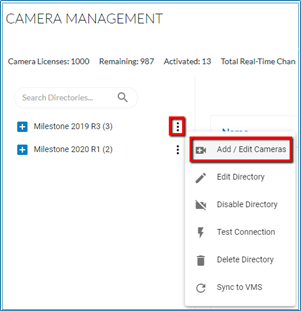
将显示摄影机启动画面,显示与所选VMS目录相关联的摄影机清单。
注意
摄影机启动是一个不可逆转的过程。完成后,除非透过BriefCam支援开启特别核准的请求,否则无法重设启动计数。
在您想要启动的所有摄影机的“已启动”栏中选取核取方块,然后按一下“启动”按钮(位于右下角)。已启动之摄影机的核取方块将呈现灰色。
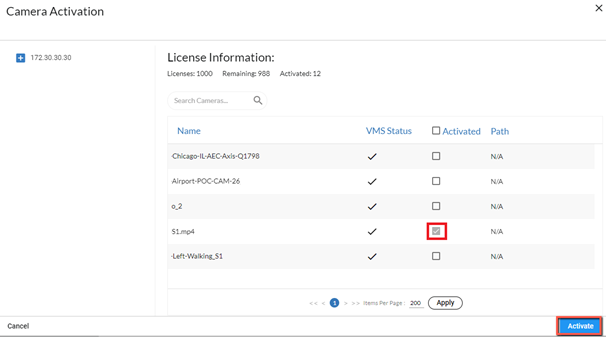
与无法逆转地启动摄影机不同,您可以透过勾选或取消勾选状态栏中的“已启用/已停用”核取方块,停用个别摄影机。停用的摄影机不会显示在BriefCamWeb用户端中。请注意,您也可以从摄影机管理画面启用或停用摄影机。
注意
当VMS伺服器无法使用时,摄影机不会在VMS伺服器再次可用BriefCam时自动启动。若要解决此问题,请重新启动AlertProcessingServices。
[en] Camera Configuration
[en] At the top of the screen, you can see the number of active and remaining camera licenses.
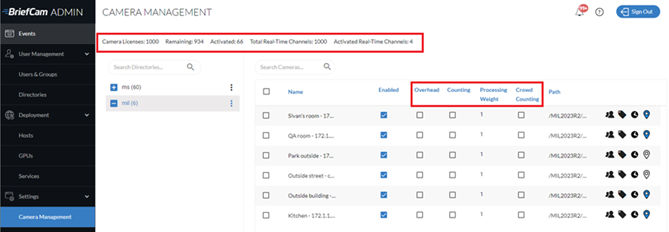
[en] This screen has the following columns:
[en] Overhead
[en] If the camera is set with an overhead angle or is an overhead fisheye camera and the camera is used with the Line Crossing feature, it is recommended to check the Overhead checkbox. This will improve the object extraction accuracy by running the algorithmic engine in a special processing mode that compensates for the warping that overhead cameras introduce. Note that only people are detected on cameras with the Overhead checkbox checked. Vehicles and animals are not detected. In addition, the only metadata generated for people detected in Overhead mode is colors.
[en] Counting
[en] If the camera is set with an overhead angle and is used for people counting, check the Counting checkbox for the cameras. This will improve the people counting accuracy by running the algorithmic engine in a special processing mode that reduces the amount of false object detections, which makes the counting more reliable. This Counting mode, which is available for the OX5 engine, is not the “people counting” feature. Note that vehicles are not detected on Counting cameras.
[en] Processing Weight
[en] The processing weight is how much of the total GPU Processing Capacity is expected to be consumed by this camera. The GPU’s processing capacity is defined in the GPUs screen.
[en] Note that the weighting system only applies to real-time processing. All on-demand tasks are treated as having a processing weight of 1.
[en] Crowd Counting
[en] Crowd counting is only supported for the Linux-based Next-Gen (OX6) engine.
[en] Select the Crowd Counting checkbox to enable the collection of crowd counting data for groups of more than 50 people, by default. This number is configurable using the HeadCount.CrowdCountingThreshold environment setting. The value you enter in this setting appears in the user interface with one more than the entered value (for example, if you enter 60, 61 will appear in the user interface).
[en] By default, crowd counting data is not collected from the camera.
[en] Note that:
[en] Only the Area filter is available with the Crowd Counting filter.
[en] Enabling Crowd Counting on a camera will cause existing rules for that camera to stop sending alerts. Therefore, it is recommended to disable or delete all existing rules for the camera before enabling Crowd Counting.
[en] Disabling Crowd Counting on a camera will turn existing Crowd Counting rules for that camera into People Counting rules. Therefore, it is recommended to disable or delete all existing rules for the camera before disabling Crowd Counting.
[en] Instant REVIEW mode is not supported for Crowd Counting cameras.
[en] Camera Management icons
[en] This screen has the following icons:
[en] Icon | [en] Description |
 | [en] Set permissions for the cameras. See: 摄影机权限. |
 | [en] Assign tags to the camera. See: 将标签指派给摄影机. |
 | [en] Set a time zone. This is only for use in multi-site environments. See: 将时区指派给摄影机. |
 | [en] Set coordinates for outdoor cameras for use in the Cameras view and Fast Track. You can hover over the icon to see a tooltip with the coordinates. Geo-location available in Milestone (all supported versions) and Genetec (v5.8 and above) are automatically set here. You can override the Milestone and Genetec coordinates by clicking on the icon and editing the coordinates. Coordinates can also be set in the BriefCam client. Note that 将摄影机与视讯管理软体同步 will override manually added coordinates. |
 | [en] Hover over this to see the activation time and last modified time information. |
[en] Filtering Cameras
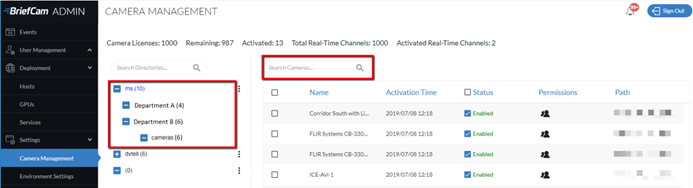
[en] There are two ways to filter the list of cameras.
[en] Use the directory tree on the left to drill down to the camera you are searching for.
[en] Use the Search field to narrow the list even further. The search will search the camera name, camera ID, and tags.
变更摄影机名称
如果您变更摄影机名称,您需要重新定义并再次启动摄影机。
更换摄影机
您可以透过以下方式更换已中断或损坏的摄影机:
将新的摄影机连接到视讯管理软体,并使其与已停止使用或损坏的摄影机拥有相同的摄影机名称。
从中,单BriefCam Administrator Console击“同步到VMS”。
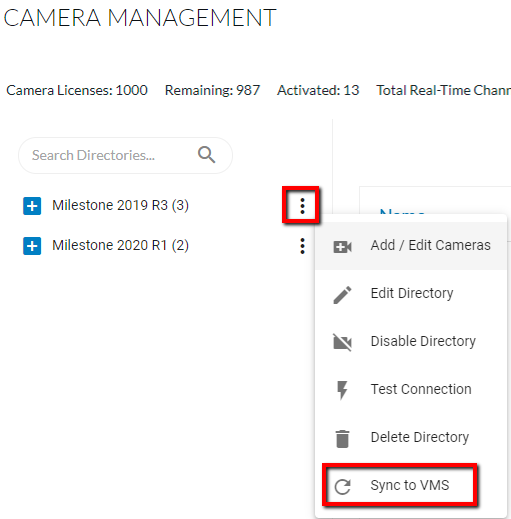
BriefCam将识别更换的相机并激活它。
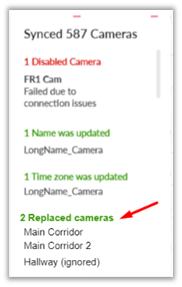
BriefCam将保留所有已更换摄影机的现有设定。
为了使具有实时任务的规则和源重新开始处理,请重新启动中的Alert Processing Server和VSServer服BriefCam Administrator Console务。