

Scripting
Scripting for log in (explained)
You can use scripting to control parts or all of the login procedure in XProtect Smart Client.
- If using Basic authentication or Windows authentication, you can make the XProtect Smart Client login window open with a pre-filled server address and user name fields so users only have to enter a password to log in.
- If using Windows authentication (current user), you can make the XProtect Smart Client connect to the surveillance system automatically, based on the user's current Windows login.
Scripting the login procedure based on Basic authentication or Windows authentication requires that you add non-encrypted, sensitive information to an SCS file that you store locally with the XProtect Smart Client program files:
- Host name
- Username
- Password
Storing non-encrypted information may compromise the security of your system or GDPR compliance. The information in the SCS file can be read:
- By anyone who can access the file
- In the memory footprint of the XProtect Smart Client application that was started by the SCS file or a command-line that delivers the username and password
Milestone recommends that you use Windows authentication (current user). If you must use Basic authentication or Windows authentication, you should limit access to the SCS file.
Scripting for log in - parameters
You can use these parameters:
ServerAddress
Refers to the URL of the Management server that XProtect Smart Client connects to.
The following example shows the XProtect Smart Client login window with http://ourserver in the Server address field:
Client.exe -ServerAddress="http://ourserver"
The default authentication type is Windows authentication (current user). Unless you change this, using the AuthenticationType parameter (described in the following section), the login window automatically displays the current Windows user in the User name field.
Refers to a specific user name.
The following example shows the XProtect Smart Client's login window with http://ourserver in the Server address field, and Tommy in the User name field:
Client.exe -ServerAddress="http://ourserver" -UserName="Tommy"
This parameter is relevant only for Windows authentication and Basic authentication. You use the AuthenticationType parameter to control which authentication method to use.
Refers to a specific password.
The following example shows the XProtect Smart Client's login window with http://ourserver in the Server address field, Tommy in the User name field, and T0mMy5Pa55w0rD in the Password field:
Client.exe -ServerAddress="http://ourserver" -UserName="Tommy" -Password="T0mMy5Pa55w0rD"
This parameter is relevant only for Windows authentication and Basic authentication. You use the AuthenticationType parameter to control which authentication method to use.
Refers to one of XProtect Smart Client's three possible authentication methods: Windows authentication (current user) (called WindowsDefault in startup scripts), Windows authentication (called Windows in startup scripts), or Basic authentication (called Simple in the startup scripts).
The following example shows the XProtect Smart Client login window with http://ourserver in the Server address field, Basic authentication selected in the Authentication field, Tommy in the User name field, and T0mMy5Pa55w0rD (masked by asterisks) in the Password field:
Client.exe -ServerAddress="http://ourserver" -UserName="Tommy" -Password="T0mMy5Pa55w0rD" -AuthenticationType="Simple"
If you use Windows authentication, the example is:
Client.exe -ServerAddress="http://ourserver" -UserName="Tommy" -Password="T0mMy5Pa55w0rD" -AuthenticationType="Windows"
If you use Windows authentication (current user), the UserName and Password parameters would not be necessary, and the example looks like this:
Client.exe -ServerAddress="http://ourserver" -AuthenticationType="WindowsDefault"
Refers to a full path to an .scs script (a script type targeted at controlling the XProtect Smart Client).
The following example uses an .scs script to login:
Client.exe -Script=c:\startup.scs
Example of an .scs script for logging in to http://ourserver with the current Windows user:
<ScriptEngine>
<Login>
<ServerAddress>http://ourserver</ServerAddress>
<AuthenticationType>WindowsDefault</AuthenticationType>
</Login>
</ScriptEngine>
You can use many of the XProtect Smart Client's function calls (see View a list of function calls) to add further functionality to .scs scripts. In the following example, we have added a line so the .scs script from the previous example will also minimize the XProtect Smart Client application:
<ScriptEngine>
<Login>
<ServerAddress>http://ourserver</ServerAddress>
<AuthenticationType>WindowsDefault</AuthenticationType>
</Login>
<Script>SCS. Application.Minimize();</Script>
</ScriptEngine>
Valid parameter formats are:
{-,/,--}param{ ,=,:}((".')value(",'))
Examples:
-UserName Tommy
--UserName Tommy /UserName:"Tommy" /UserName=Tommy -Password 'Tommy'
Scripting HTML page for navigation
You can use scripting to create HTML pages that let you switch between views. HTML pages can be added to your views, so they appear together with video from your cameras.
Example: In an HTML page, you can insert a clickable floor plan of a building that allows operators to simply click a part of the floor plan to instantly switch to a view that displays video from that part of the building.
- If your XProtect VMS system supports Smart Client profiles, you must enable HTML scripting on the required Smart Client profiles in XProtect Management Client.
- If your XProtect VMS system does not support Smart Client profiles, you must enable HTML scripting in the Client.exe.config file.
In the following, you will see examples of HTML pages for XProtect Smart Client navigation:
- A simple HTML page with buttons
- A more advanced HTML page with a clickable image map
- A check list for system administrators outlining the tasks involved in creating and distributing HTML pages to XProtect Smart Client operators
A very quick solution is to create an HTML page with buttons for navigation. You are able to create a wide variety of buttons on the HTML page. In this example, we will just create two types of buttons:
-
Buttons for switching between the XProtect Smart Client's views
Required HTML syntax:
<input type="button" value=" Buttontext" onclick="SCS. Views.SelectView('Viewstatus.Groupname. Viewname');">
Where Viewstatus indicates whether the view is shared or private (if the HTML page is to be distributed to several users, the view must be shared).
Example from a real button:
<input type="button" value="Go to Shared Group1 View2" onclick="SCS. Views.SelectView('Shared.Group1. View2');">
This button would allow users to go to a view called View2 in a shared group called Group1.
Buttons for switching between tabs: Live and Playback Bear in mind that, depending on their user rights, some users may not be able to access all tabs.
Required HTML syntax:
Live tab:
<input type="button" value="Buttontext" onclick="SCS. Application.ShowLive();">Playback tab: <input type="button" value="Buttontext" onclick="SCS. Application.ShowBrowse();">
For advanced users it is possible to create many other types of buttons using the approximately 100 different function calls available for the XProtect Smart Client.
In the following we have created two shared groups in the XProtect Smart Client . We have called them Group1 and Group2. Each group contains two views, called View1 and View2.
We have also created an HTML page with buttons allowing users to switch between our four different views as well as between two of the XProtect Smart Client 's tabs, Live and Playback. When viewed in a browser, our HTML page looks like this:
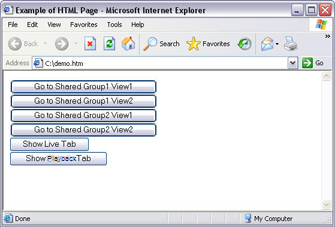
HTML page with buttons for navigating between views and tabs
We have saved the HTML page locally, in this case on the user's C: drive. When the HTML page is to be used for navigation, saving the HTML page locally is necessary to open it in compatibility mode. See also Web page properties .
When saving the HTML page locally, save it at a location to which an unambiguous path can be defined, for example in a folder on the user's C: drive (example: C:\ myfolder\file.htm). Saving the HTML page on the user's desktop or in the user's My Documents folder will not work properly due to the way Windows constructs the path to such locations.
We then imported the HTML page into the required XProtect Smart Client views.
You can also create an HTML page with more advanced content, for example, an image map allowing users to switch between views.
In the following example we have kept the two groups and two views from the previous example. Instead of using buttons, we have created an HTML page with an image of a floor plan, and created an image map based on the floor plan. Viewed in a browser, our HTML page looks like this:
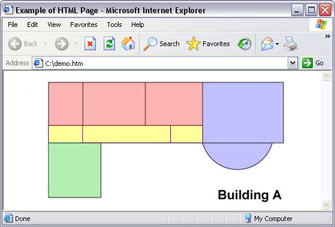
HTML page with image map for navigating between views
For this example, we divided the floor plan into four colored zones, and defined an image map area for each zone. Users can click a zone to go to the view displaying cameras from that zone.
For instance, the red zone on our image map mirrors the Go to Shared Group2 View2 button from the previous example. If you click the red zone, you will go to View2 in Group2.
Importing a navigation HTML page into a view is in principle no different from importing any other type of HTML page into a view in the XProtect Smart Client. See Add web pages to views.
- The HTML page should be stored locally on the operator's computer
- For the navigation to work properly, you may want to import the HTML page into several views
To create and distribute navigation HTML pages to XProtect Smart Client operators, do the following:
- Create the required HTML page. The navigation controls in the HTML page must match the views users see in the XProtect Smart Client. For example, in order for a button leading to View1 to work, a view called View1 must exist in users' XProtect Smart Client installations. If you intend to distribute the HTML page to a group of users, the views in which the HTML page will be used should be placed in shared groups.
- Save the HTML page locally on each computer on which it will be used. When saving the HTML page locally, save it at a location to which an unambiguous path can be defined, for example in a folder on the user's C: drive (example: C:\ myfolder\file.htm). Saving the HTML page on the user's desktop or in the user's My Documents folder will not work properly due to the way Windows constructs the path to such locations.
- Import the HTML page into the required views in XProtect Smart Client. See Add web pages to views.
- Test that the navigation controls on the imported HTML page work as intended.
For information about troubleshooting, see Web pages (troubleshooting).