

Views (configuration)
In setup mode, you can create views and specify which cameras or other types of content should be included in each view. To organize your views, you must create at least one view group. This is often done by your system administrator.
Your ability to edit views and groups depends on your user rights. If you can create the view or group, you can also edit it.
Views and view groups (explained)
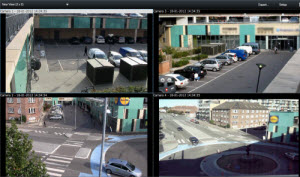
The way video is displayed in XProtect Smart Client is called a view. XProtect Smart Client can handle an unrestricted number of views, allowing you to switch between video from various groups of cameras. Views can hold between one and hundred cameras, but can also contain other types of content, for example images and text.
Views must be contained inside view groups that help you organize your views.
Views are available on the Live and Playback tabs. Views can be private or shared:
- Private views can only be accessed by the user who created them. To make the view private, create it inside the Private folder
- Shared views allow multiple operators to share the same views. Depending on your XProtect VMS system:
- There may be a default folder for shared views named Shared or Default group
- Shared views can be shared by all operators, or access to selected shared views can be given to certain operators. Typically, only a few people in an organization can create and edit shared views, for example the system administrators
Not all users may have access to all cameras on the XProtect VMS system. Some of the features you include in your shared view may not be supported in earlier versions of XProtect Smart Client. Always make sure that the users you want to share with have the necessary rights and are running the same XProtect Smart Client version as yourself.
Your user settings, including information about your views, are stored centrally on the XProtect VMS server, so you can use your views on any computer that has XProtect Smart Client installed.
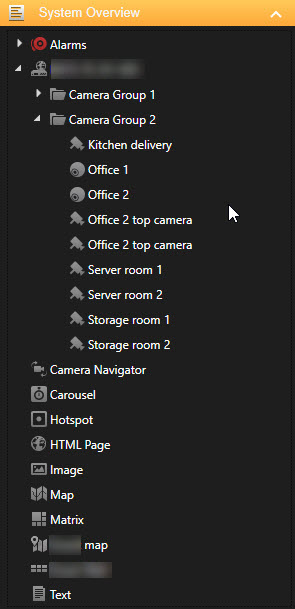
What can views contain?
In setup mode in the System overview pane, you can see the elements that you can add to your views:
| Item | Description |
|---|---|
|
Alarms |
Allows you to show a list of alarms or an alarm preview. Both elements are also available on the Alarm Manager tab. |
| Access Monitor |
Access monitor - with XProtect® Access installed, you can show access monitors in your views, for example for a specific door. |
|
Cameras |
Allows you to show video feed from a live camera or play back video. The cameras appear under the site name, which is defined by your system administrator. |
|
Carousels |
Allows you to shift between cameras at a pace that you define. |
|
Hotspots |
Allows you to show whatever camera is in focus in a high resolution or frame rate. |
|
HTML pages |
Allows you to show a webpage, for example an online news channel. |
|
Images |
Allows you to show an image, for example if you want to distribute a picture of a suspect. |
| LPR |
With XProtect® LPR installed, you can add LPR cameras to views. |
|
Maps |
Allows you to show a floor plan or a geographical area. |
|
Matrix |
Allows you to show a Matrix position. See also Matrix (explained). |
|
Smart maps |
Allows you to navigate your cameras on a geographical map of the world based on one of these online map services:
|
|
Smart Wall controls |
If XProtect Smart Wall has been configured by your system administrator, Smart Wall controls allow you to push cameras and other types of content to your video walls. |
|
Text |
Allows you to show text, for example if you want to provide instructions for other operators. |
|
Transact
|
If XProtect Transact has been installed in your system, you can add point-of-sales systems together with cameras. |
Create view groups
Your XProtect Smart Client may be preconfigured to display view groups that you can add your views to. However, you can create your own view groups to help you organize your views.
Imagine that you have cameras installed on ten different levels in a multi-story building. You decide to create a view group for each level and name them accordingly: Ground floor, First floor, Second floor, and so on.
Steps:
- In setup mode, in the Views pane, select the Private or Shared top-level folder you want to add a group to.
- Click Create new group:

A new group is created named New group.
- Select and click the New group to overwrite the name.
- You can now create views within this group.
Create views
To view or play back video in XProtect Smart Client, first you must create a view, where you add the cameras you need.
Before creating the view, you need a group that you can add the view to. See also Create view groups.
Steps:
- In the right corner, click Setup to enter setup mode.
- In the Views pane, select the group you want to add the view to.
- Click
 to create a new view.
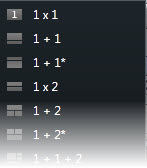
 - Select a layout. The layouts are grouped according to their aspect ratio
 Height/width relationship of an image., and according to whether they are optimized for regular content or content in portrait mode (where the height is greater than the width).
- Enter a name for the view by overwriting the default New View name.
- Click Setup again to exit setup mode. Your changes are saved.
Copy, rename, or delete views or groups
If you have a view and you want to reuse it, you can copy it. You can also copy a group of views or a private view to a shared view.
Steps:
- In setup mode, in the navigation pane, select the view.
- Click Copy, or press CTRL+C.

- Browse to where you want to paste the view and select Paste, or press CTRL+V.

Alternatively, you can select and drag the view to another folder.
- The copied view is by default named the same as the original followed by (2). To change the name, right-click and select Rename.

- To delete a view, right-click and select Delete.

Add cameras and other elements to views
You can add different types of elements to your views, for example cameras. See also What can views contain?
Steps:
- Open the view that you want to modify.
- Click Setup to enter setup mode.
-
In the System overview pane, drag the required element into a view item.
- Fill out any additional information about the element.
- Click Setup again to exit setup mode. Your changes are saved.
For detailed information, see Adding content to views (in detail).
Assign shortcut numbers to views
You can assign shortcut numbers to views to let users select views using standard keyboard shortcuts (see Keyboard shortcuts (overview)).
- Click Setup to enter setup mode.
- In the Views pane, select the view you want to assign a shortcut to.
- In the Shortcut field, specify a shortcut number, and then press ENTER. The shortcut number appears in parentheses in front of the view name.
- Repeat as necessary for other views.
- Click Setup again to exit setup mode. Your changes are saved.
Adding content to views (in detail)
As described in Add cameras and other elements to views, you can add cameras and other types of elements to your views. This section provides more detailed how-tos:
To view video from a camera, first you must add the camera to a view.
- In setup mode, select the view you want to add a camera to.
- In the Overview pane, expand the required server
 to view a list of available cameras from that server.
If a server is listed with a red icon, it is unavailable, in which case you will not be able to view cameras from that server.
-
Select the camera from the list and drag it to a view item inside the view. An image from the camera appears in the selected view item.
If areas in the video are blurred or grayed out, it is because your system administrator has covered these areas with privacy masks
A blurred or solid color that covers an area of the video in the camera view. The defined areas are blurred or covered in live, playback, hotspot, carousel, smart map, smart search, and export modes in the clients. (see Privacy masking (explained)). - You can specify the camera properties (such as quality, frame rateA measure indicating the amount of information contained in motion video. Typically measured in FPS (Frames Per second). and more) in the Properties pane. For more information, see Camera settings.
- For each camera you want to add, repeat the steps above.
- To add multiple cameras to a view, for example all of the cameras from a camera folder, drag the folder to the view. Make sure a sufficient number of view items are available in the view.
You can easily change which cameras are included in your view by dragging a different camera to the view item.
You can display static images in a view. For example, this is useful when you want to share a snapshot of a suspect, or a diagram of emergency exits.
Steps:
- Click Setup to enter setup mode.
-
In the System overview pane, drag the Image item to a view item. A window appears.
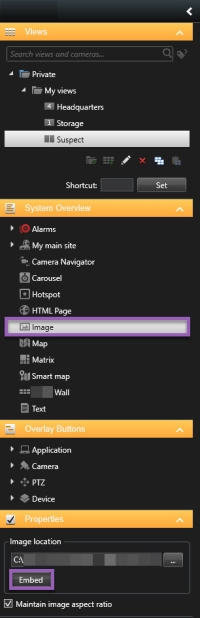
- Locate and then select the image file that you want to add.
- Click Open. The image now appears inside the view item.
- To make the image available to others who cannot access the location of the image file, on the Properties pane, click Embed. The file is stored in the system.
- Click Setup again to exit setup mode. Your changes are saved.
You can add text to one or more a view items inside a view. For example, this is useful when you want to send a message or instructions to operators, or post a work schedule for security personnel. You can use up to 1,000 characters.
Steps:
- Click Setup to enter setup mode.
- On the System overview pane, drag the Text element to the view item, where you want the text to appear. A window appears.
- Enter the text.
- Click Save.
- To change your text after you save it, in setup mode, click Edit text in the Properties pane.
You can insert tables from products such as Microsoft Word and Microsoft Excel, but you cannot make changes to the tables.
You can add web pages to views, for example HTML, PHP, or ASP pages. This is useful, for example, for providing online instructions or showing company web pages in combination with cameras or other types of content.
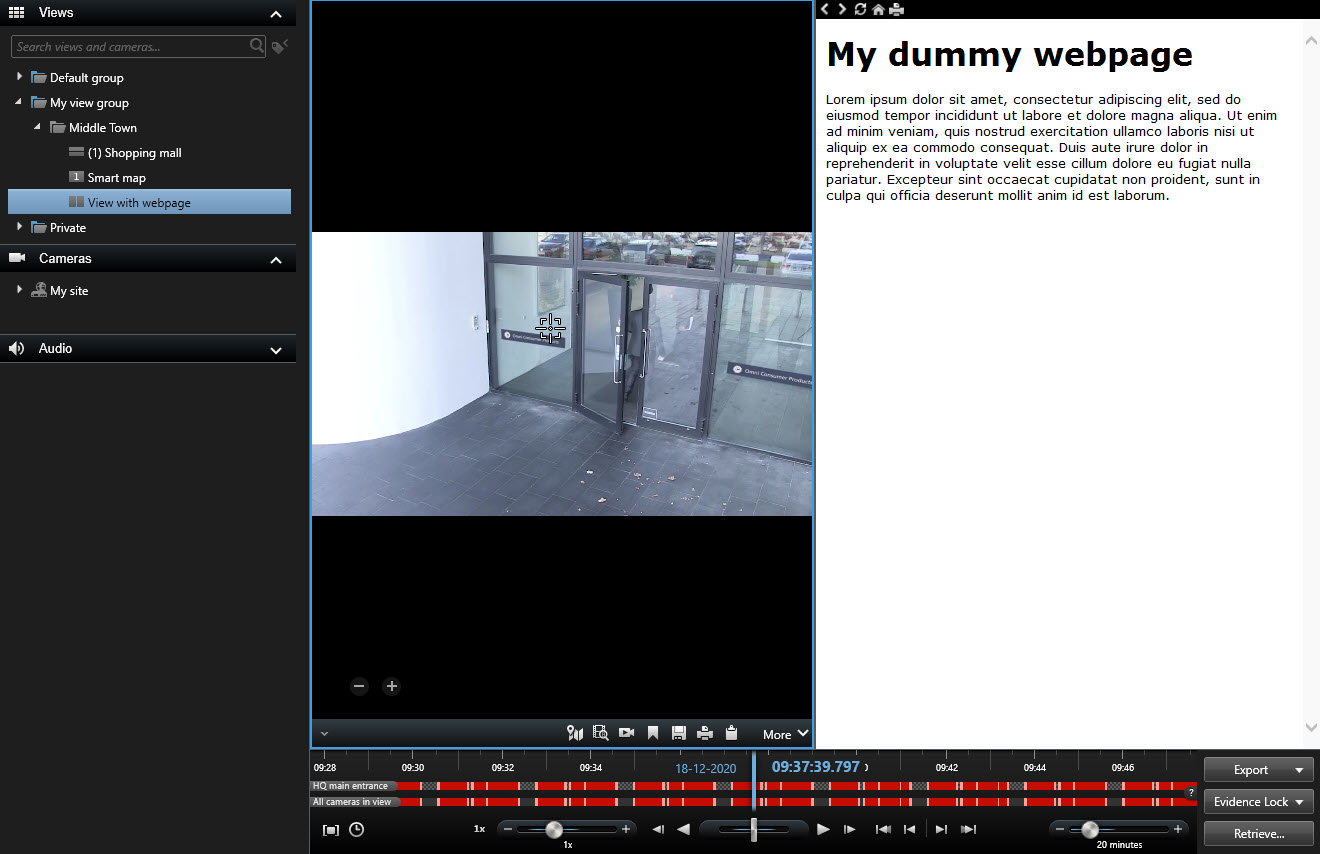
Steps:
- Open the view that you want to modify.
- Click Setup to enter setup mode.
- In the System overview pane, click and drag the HTML page item to one of the view items. A window appears.

-
In the Open field, enter the web address of the web page.
To use a web page stored on your local computer, network, or on an FTP server, make sure that the display mode is set to Compatibility in the properties of the web page. See Web page properties . Otherwise, you will get an error message. See Web pages (troubleshooting).
- Click OK.
- To set the properties, expand the Properties pane.
- Click Setup again to exit setup mode. Your changes are saved.
You cannot navigate the web page in setup mode.
Web page properties
|
Name |
Description |
|---|---|
|
Edit |
Specify a new URL or file location of the web page. |
|
Display mode |
Select the browser engine to render the web page. There are two options:
|
|
Scaling |
Select the scaling of the web page. The optimal scaling depends on the content of the imported web page and how you want to display it This setting is only available in Compatibility mode. |
|
Hide toolbar |
Select the check box to hide the navigation toolbar that gets inserted above each imported web page.
|

You can activate speakers, events, output![]() Data going out of a computer. On IP surveillance systems, output is frequently used for activating devices such as gates, sirens, strobe lights, and more., and more through overlay buttons
Data going out of a computer. On IP surveillance systems, output is frequently used for activating devices such as gates, sirens, strobe lights, and more., and more through overlay buttons![]() A button appearing as a layer on top of the video when you move your mouse cursor over individual camera positions in views on the Live tab. Use overlay buttons to activate speakers, events, output, move PTZ cameras, start recording, clear signals from cameras. which appear when you move your mouse over individual camera positions in views on the Live tab.
A button appearing as a layer on top of the video when you move your mouse cursor over individual camera positions in views on the Live tab. Use overlay buttons to activate speakers, events, output, move PTZ cameras, start recording, clear signals from cameras. which appear when you move your mouse over individual camera positions in views on the Live tab.
You can add as many buttons as needed.
- Click Setup to enter setup mode.
- In the Overlay buttons pane, select and drag the action onto the camera view item.
- When you release the mouse, the overlay button appears. To resize the button, drag the handles that appear.
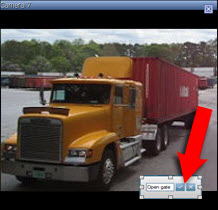
- To change the text of the overlay button, double-click the text, overwrite it, and then select the check box
 to save. To undo, click the cancel button
  . When you save, the text scales to the largest possible size on the button.
 - Click Setup again to exit setup mode. Your changes are saved.