

XProtect Smart Client – Player
XProtect Smart Client – Player is a light version of XProtect Smart Client that can be included with exported video data. XProtect Smart Client – Player lets the recipient view the exported files without having surveillance software installed.
XProtect Smart Client – Player is also automatically included in video archives and recording database folders to ensure availability of recordings if the disk with the recordings is removed.
You can use XProtect Smart Client – Player to view video data and archives and to repair corrupted databases. The application has many of the features of the XProtect Smart Client and looks similar.
Overview of XProtect Smart Client – Player
| Number | Description |
|---|---|
|
1 |
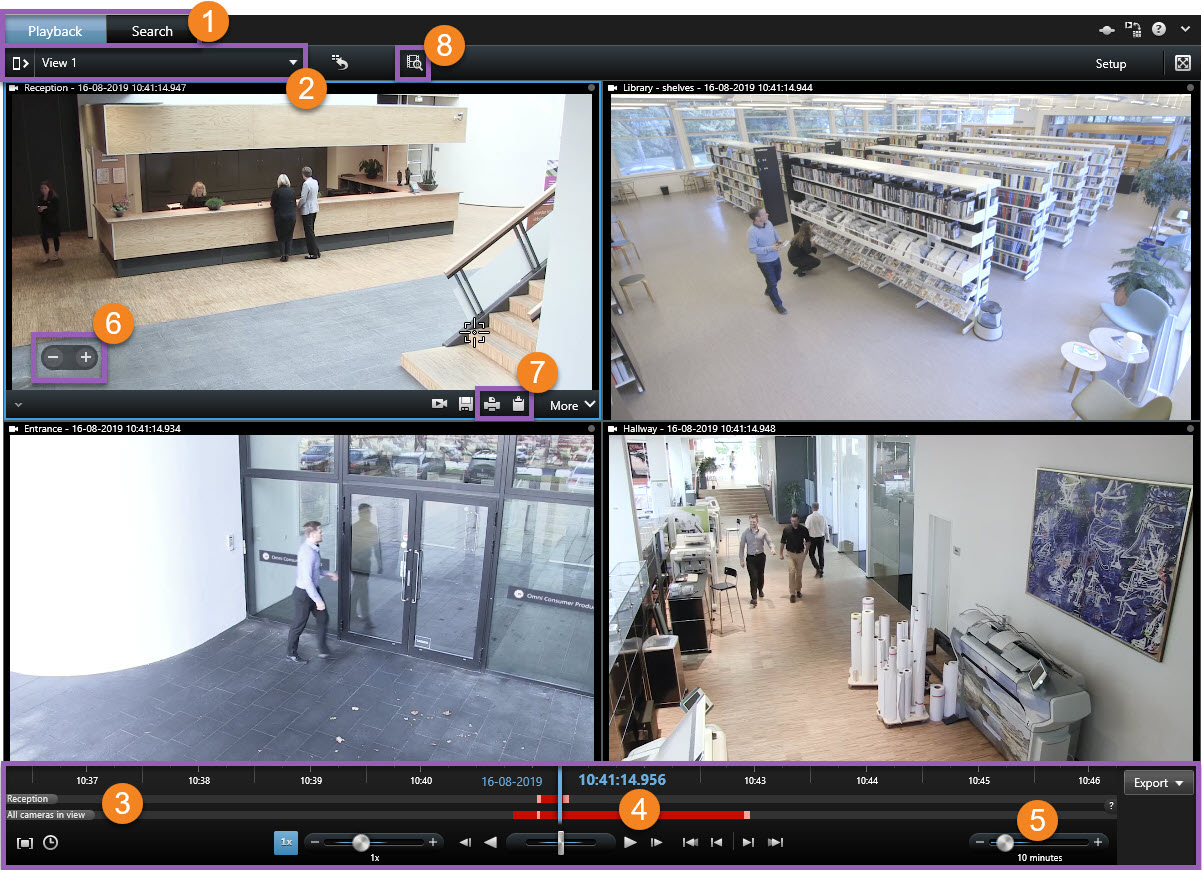
Investigate the exported recordings on the Playback tab, and run searches on the Search tab. |
|
2 |
Select the view that contains the cameras that you are interested in. |
|
3 |
Drag the timeline back and forth to browse the recorded video. See Timeline (explained). |
|
4 |
Use the time navigation controls to play back video or jump to a specific moment in time. See Time navigation controls (explained). |
|
5 |
Change the timespan. The range is five minutes to four weeks. |
|
6 |
Zoom in or out. |
|
7 |
Copy a still image |
|
8 |
Start search in a new search window with the cameras in the current view preselected. |
Search in XProtect Smart Client – Player
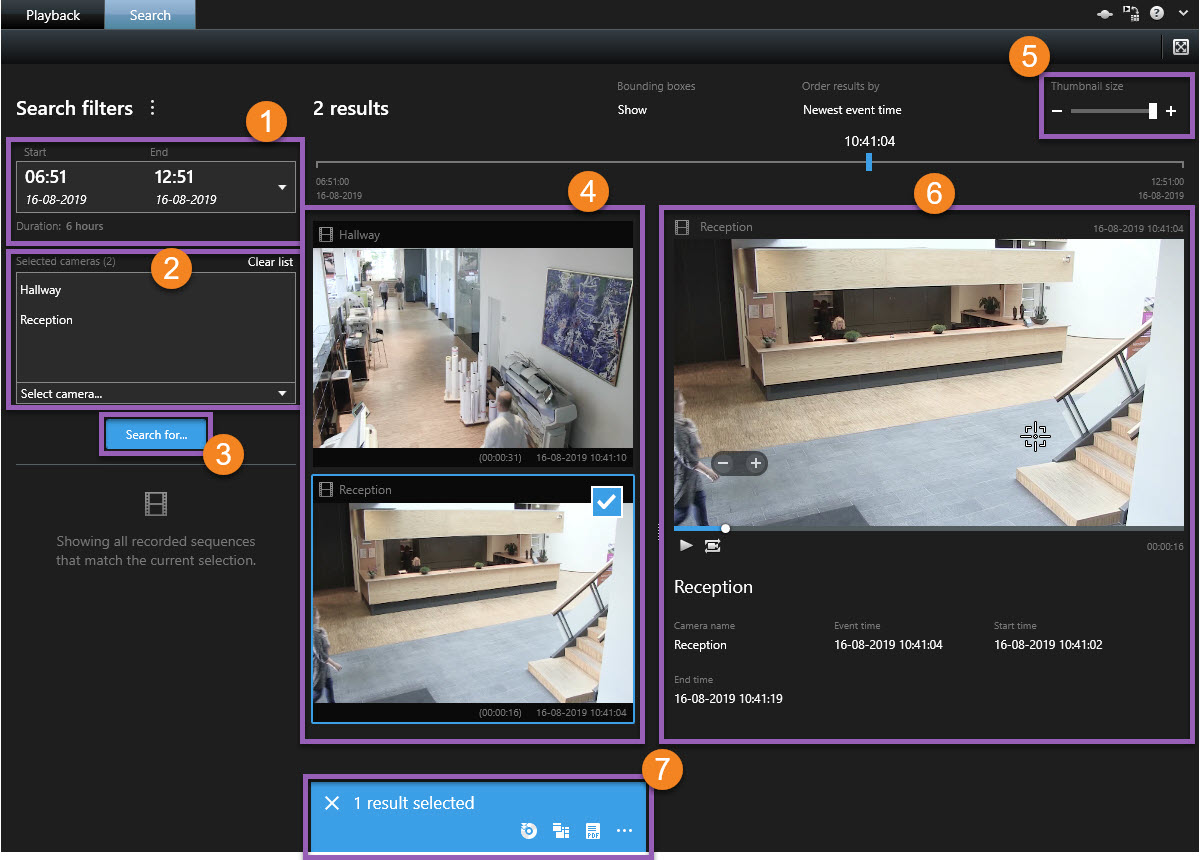
On the Search tab, you can search the recordings included in the export, for example if you want to search a subset of the cameras.
You can search for recordings, motion, and bookmarks.
| Number | Description |
|---|---|
|
1 |
The timespan is set automatically based on the export timespan. You can define your own timespan, for example Custom interval. |
|
2 |
Add the cameras that you want to search. |
|
3 |
Specify what to search for, for example Motion. You can combine search categories. |
|
4 |
Review the list of search results. Scroll to view the next or previous search results. |
|
5 |
Use the Thumbnail size slider to make the thumbnail images smaller or bigger. |
|
6 |
Play back video from the search results. |
|
7 |
Take further action based on your search results, for example create PDF reports to share or print evidence. The action bar appears when you select the blue check box inside the search results. |
For more information about the features on the Search tab, see Search for video.
Verify digital signatures
If you are reviewing video evidence in Smart Client – Player, and the exported material has digital signatures, you can verify that the recording has not been tampered with since it was recorded, or since the export was made, or both.
Digital signing does not work for XProtect Smart Client 2017 R1 or earlier that connects to XProtect VMS 2017 R2 or newer. The video export will not succeed.
- In XProtect Management Client, signing has been turned on for the recording server
- In XProtect Smart Client, during the export process, the XProtect format and Include digital signature check boxes were selected
Steps:
- On the toolbar, click the Verify Signatures button. The Manual verification window appears. Here you can see the devices selected for the export.
- Click Verify to start the verification process. The system checks the authenticity of the recording signature and the export signature.
- To verify that you can rely on the verification of the recording signature:
- In the Recording signatures column, click the Verified link. The Certificates dialog appears.
- Compare the value of the public_key and signature with the corresponding values in the PublicKey.xml file (C:\Program Files\Milestone\Management Server\Tools\CertificateIssuer). If the values differ, the recording has been modified.
- To verify that you can rely on the verification of the export signature:
- In the Export signatures column, click the Verified link. The Certificates dialog appears.
- Compare the value of the public_key and signature with the corresponding values in the Public Key Certificate.xml file (<export destination folder>\<export name>\Client Files\Data\Mediadata\<camera name>\<camera name>\Export signatures). If the values differ, the export material has been modified.
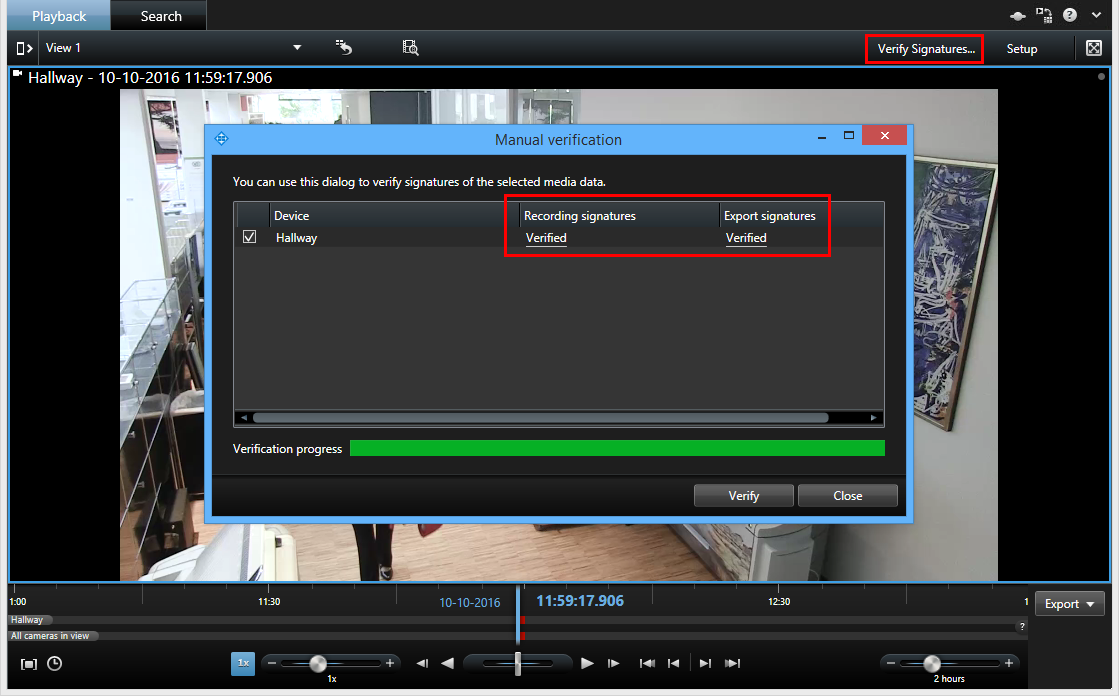
A database can be verified, partially verified (if some of the files have not had signatures attached), or not signed.
View database or previously exported evidence
The Open Database wizard lets you open a database from an archive or previously exported material and add it to your project. The Open Database wizard also repairs corrupted databases automatically.
Steps:
- Click the Setup button in the upper-right corner. The panes on the left-hand side turn orange.
- Expand the Overview pane.
-
Click
 . The Open Database wizard appears.
Do not attempt to open a live database or live archive because it can damage your system.
-
Select the folder containing the relevant files. When you select a database, the name of the device appears next to the Camera, Microphone, or Speaker field.
If the system cannot identify a camera, for example, if you open archived recordings, the name will be Unknown and all three types of devices will be added as Unknown devices (even if they don't exist) with the database file name assigned. If there is no device, the field contains N/A.
-
If the database you are trying to open is corrupted, the wizard can repair it.
- After adding the database, you can see whether or not the database contains digital signatures. Then you can verify the authenticity of the recordings. See Digital signatures (explained).