

Manage servers wizard
Now that you have your software library in place and a list of remote servers, you can start updating or configuring the selected servers. Milestone Software Manager has a built-in, dedicated wizard for this purpose.
To carry out a remote update of all or selected remote servers:
- In the navigation pane, select Surveillance Servers. This opens the Surveillance Servers window. Make sure you have selected one or more servers in the list.
- Run a test of your remote server connection (see Test servers). Only proceed if this test is successful.
-
Click Manage Servers in the lower right corner. This starts the Software Management Wizard. Click Next.
With the Software Management Wizard you can upload, uninstall and/or install software packages easily. The wizard lets you do everything in one run, or if you prefer, upload first, then uninstall and finally install packages. Or you can do any combination by running the wizard as many times as needed. However, provided a run of the wizard contains more than one task, the task sequence is always the same, first upload, then uninstall and finally install.
The wizard interface is divided into the following areas:
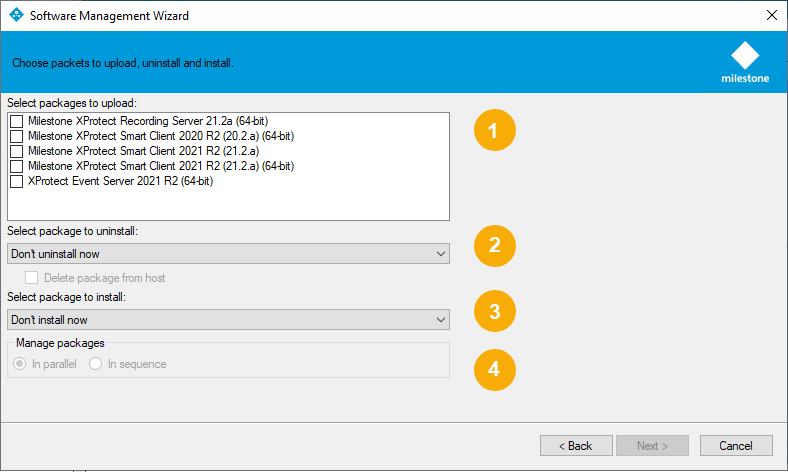
- 1 - Upload - lets you select the installer files to upload to the selected remote servers. You can select one or more files, or leave the check box empty. An installer file must be uploaded before it can be installed or uninstalled.
- 2 - Uninstall - lets you select the software to uninstall, or leave the field empty. Selecting Delete package from host will furthermore remove the installer file after the product has been uninstalled (see Important information) (at that point, the installer file is no longer needed).
- 3 - Install - lets you select software to install, or leave the field empty.
- 4 - Manage - lets you select how to schedule the upload, uninstallation and installation tasks on the remote servers. Select either In parallel or In sequence. If the tasks are scheduled in parallel, the task sequence will occur simultaneously on all the remote computers, and if the tasks are scheduled sequentially, the servers will be updated one at the time.
If you update in sequence, note that it will take somewhat longer than updating in parallel (see Important information). However, updating in sequence might be desirable if network resources are limited or for testing the result of the process in small scale before rolling it out wide scale.
Click Next.
- If you are installing software, read and accept the end-user license agreement. When done, click Next.
- Next - if you are uninstalling or installing software - enter parameters for the selected uninstall and install processes.
If the field is left blank, the existing value or default value will be used.
 Smart Client:
Name Description Installation path The location where the product is installed. For example: {drive}:\{foldername}\ and environment variables (such as "%PROGRAMFILES%"). Language The language to install the product in. Event Server:Name Description Installation path The location where the product is installed. For example: {drive}:\{foldername}\ and environment variables (such as "%PROGRAMFILES%"). Management Server URL The hostname of the management server. For example: http://{hostname}/ or {IPaddress}. System configuration password Protect the overall system configuration by assigning a system configuration password. After you assign a system configuration password, backups are protected by this password. The password settings are stored on the computer that is running the management server in a secure folder. Service account name The Event Server is installed as a Windows service. You must provide a user name that will be used to launch the service. If blank, “Network Service” user will be used.
Default value is NT AUTHORITY\NETWORK SERVICE.
The Service account name must correspond with the language of the selected operating system.
English
Simplified Chinese
Traditional Chinese
Korean
Japanese
RussianNT AUTHORITY\NETWORK SERVICE French AUTORITE NT\SERVICE RÉSEAU German NT-AUTORITÄT\NETZWERKDIENST Italian NT AUTHORITY\SERVIZIO DI RETE Portuguese AUTORIDADE NT\SERVIÇO DE REDE Spanish NT AUTHORITY\SERVICIO DE RED SQL connection string The connection parameters used by the Event Server when connecting to the SQL database. Modify the provided connection string with values for data source and catalog.
Default value is Data Source=localhost;initial catalog='Surveillance';Integrated Security=SSPI.
Skip registration To register the service to the management server during the installation. If "true", the Event Server service is registered. If "false", the registration is skipped.
Default value is "true".
Enable server-to-server encryption Enables encrypted (https) communication between services (Management Server, Recording Server, Data Collector). Certificate thumbprint for server-to-server encryption The thumbprint for the certificate to use when encrypted server-to-server communications is enabled. Recording Server:Name Description Server type Select recording server or failover. Installation path The location where the product is installed. For example: {drive}:\{foldername}\ and environment variables (such as "%PROGRAMFILES%"). Recording server name The name of a recording server. The name is used in the Management Client. The default name is the server name. Management Server hostname The hostname of the management server to which a recording server should connect. Management Server port The port of the management server to which the recording server should connect.
Default value is 80.
Media Database The path to the media database where video is initially recorded. For example: {drive}:\{foldername}\ (drive = local or network drive). Windows user or system account type The 'logon as' account type for the Recording Server Service.
Select System account or User account.
User name for the account The service account for the Recording Server and Data Collector services. For example: (network service), {domain}\{username} (user account) or {username} (local user in a workgroup).
Possible values are 'NT AUTHORITY\NETWORK SERVICE', 'NT AUTHORITY\LocalService', 'NT AUTHORITY\SYSTEM' or a domain/Windows user name.
The User name for the account must correspond with the language of the selected operating system.
English
Simplified Chinese
Traditional Chinese
Korean
Japanese
RussianNT AUTHORITY\NETWORK SERVICE French AUTORITE NT\SERVICE RÉSEAU German NT-AUTORITÄT\NETZWERKDIENST Italian NT AUTHORITY\SERVIZIO DI RETE Portuguese AUTORIDADE NT\SERVIÇO DE REDE Spanish NT AUTHORITY\SERVICIO DE RED Password for the account The password for the Domain user. It should be left empty if a system account is entered in user name. Management Server reachable States if the Management Server is reachable by the recorder installation.
If Reachable, it retries to connect to a management server that is offline during installation when the management server is online again. If Not reachable, it does not retry to connect to the management server.
Click Next.
Now, you are presented with an overview of your selections (what to upload, uninstall, install and how) and the services that will be affected. Review, accept and click Next.Next step shows progress for individual servers. From here, it is also possible to cancel individual processes by clicking Stop.
If an installation or uninstallation is stopped mid-process, it is recommended to redo the installation/uninstallation. When a process is canceled, it might be too late for some parts to be canceled (it might already be successfully installed or uninstalled) but it might not be too late for others. This might give a result that seems OK, but sub-parts might not be working.
-
When all processes are done, click Next.
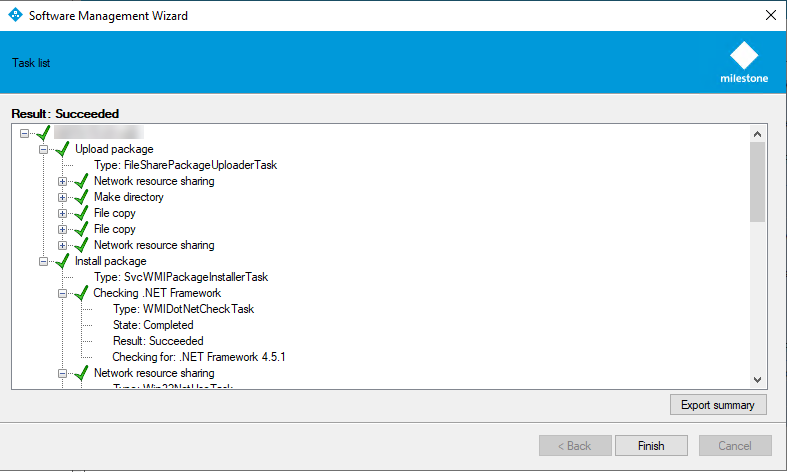
Results for the entire update process are shown. Expand to view details.
To export results to other programs for further editing/distribution, click Export Summary.
When done, click Finish.