Motorola Solutions IndigoVision Integration
Integration Summary
VMS Partner | Product | Version | Last Tested BriefCam Version | Integration Level | H.265 Support |
Motorola Solutions | IndigoVision Control Center | 19.4 | 2024 R2 HF4 (including Classic and Next-Gen engine) | Real time alerts integration (L2a) | No |
Motorola Solutions | IndigoVision Control Center | 19.1 | 2023 M1 | Real time alerts integration (L2a) | Yes |
Motorola Solutions | IndigoVision Control Center | 18.2 | 2023 M1 | Real time alerts integration (L2a) | Yes |
Note
The IndigoVision plugin supports IndigoVision's Video Stream Manager.
Prerequisite Configuration
In order for theBriefCam plugin to connect to the Control Center Site Database and be enabled to fetch video, the following conditions should be met:
The same Windows user (local user) should be configured on all machines (BriefCam Server, BriefCam Database and the machine hosting the Control Center Site Database). The user must have administrator privileges on the machine hosting the BriefCam Server. In case of BriefCam distributed environment setup, you can use the default BCUser that is created during installation and create the same user on the machine hosting the Control Center Site Database.
The VMS user must be configured with the Use password authentication as shown in the image below (and not with the Use Windows authentication, which is the default).
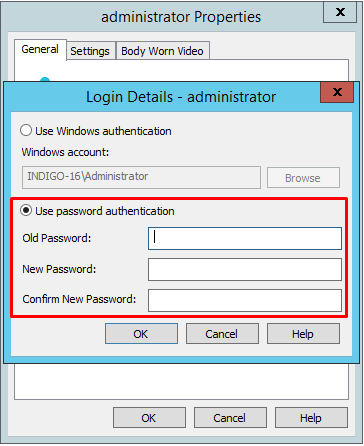
The user should have access to the
Control Center Site Databasefolder.The Control Center Site Database folder should be manually configured in the
BriefCam.Indigo17Integration32.inifile located atC:\Program Files\BriefCam\BriefCamServer\32\pluginswhere theDbFolderPathparameter points to the location of the Site Database as such\\<[IP or HostName]\FolderName>, for example:DbFolderPath = \\172.1.1.122\ControlCenterDB. Make sure to remove the semicolon (;).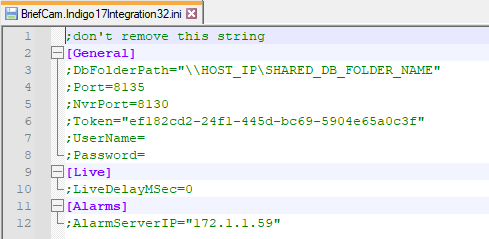
The steps for the above configurations are as follows:
On the machine hosting the Control Center Site Database, navigate to the DB folder IndigoSiteDB and share this folder with the user (for example: bcuser) that is available on all machines. Grant the user full share and access permissions.
On the machines hosting the BriefCam Server or BriefCam Database, add the IP/host name (with the relevant credentials) of the machine hosting the Control Center Site Database:
Navigate to: Control Panel->User Accounts->Credentials Manager.
Verify that the hostname and user's credentials are entered correctly in the Windows Credentials Manager.
Click Add a Windows Credential.
You will be prompted with three fields to fill in: the IP/host name of the machine hosting the Control Center Site Database, the Windows username (of the user that has access to the Control Center Site Database folder), and the password. Be sure to enter the details correctly.
On the BriefCam Server, set the VSService to log on using the username you have already configured with access to the Control Center Site Database folder:
Open the Services dialog through the Start menu or the Task Manager.
Locate the VSService service on the list and right click. Click Properties.
On the Log On tab, click the This account radio button.
Enter the username and password for the user that has access to the Control Center Site Database folder.
Confirm that the user account (for example: bcuser) exists both on the operating system (OS) level and within the IndigoVision Video Management System (VMS).
Post Installation Script
For new installations, after installing this VMS plugin you need to run a script that gives the BCUser user permissions to access the relevant files.
In all places where the plugin is installed:
Open PowerShell as administrator.
Navigate to the following folder:
cd {where briefcam server is installed}\tools\post_plugin_installationRun the following command:
.\set_permissions_for_plugins.ps1
H.265 Support for IndigoVision 18.2 or Above
The IndigoVision integration includes H.265 support for version 18.2 and above. For this to work correctly, you need to do the following:
When cameras are added via the VSM, add them to the Top Site.
In the Camera Properties, set the ONVIF profile for each camera to the H265 profile.
Set the Recording Job with an ONVIF Profile that supports H265.
This is applicable for Continuous Recording and Motion Detect Recordings.
Connecting to IndigoVision
IndigoVision version 17.2 supports the following SDKs, which are both installed as part of the IndigoVision plugin:
SiteDB SDK v17.2
Video SDK v18
IndigoVision version 19.1 and above supports the following SDKs, which are both installed as part of the IndigoVision plugin:
SiteDB SDK v19.2
Video SDK v19.2
To connect to IndigoVision, carry out the following steps:
Register the
IvVideoSDK.dllfile by opening the command line as administrator and running the following:Regsvr32 /i "c:\program files\briefcam\briefcam server\32\BriefCam.Indigo17Integration32\IvVideoSDK.dll"Run IndigoVision’s Site Database Server Setup tool and create a new service token.
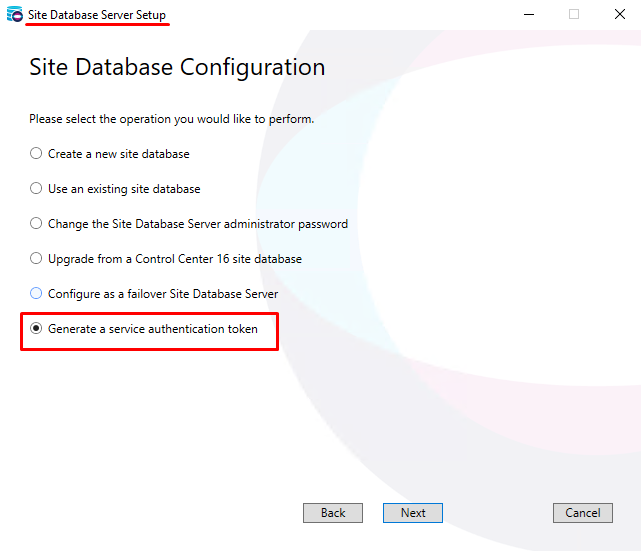
After generating the authentication token, make sure that you click Next and Finish for the changes to take effect.
Open the
BriefCam.Indigo17Integration32.inifile, located atC:\Program Files\BriefCam\BriefCam Server\32\plugins, and do the following:In the
Tokenparameter, enter the token and uncomment the row.In the
UsernameandPasswordparameters, enter the Windows user credentials for the user connecting to IndigoVision's database and uncomment these rows.
Sending Alerts to IndigoVision
Alerts can be sent to IndigoVision’s Control Center. To enable this functionality, carry out the steps below.
Open the following ports:
On the BC server side, standard port 8130 inbound rule
On the VMS side, UDP port 49301 inbound rule
Open the
IndigoCamerasMap.jsonfile, located at:C:\Program Files\BriefCam\BriefCam Server\32\plugins. This file maps between the cameras and the alarms.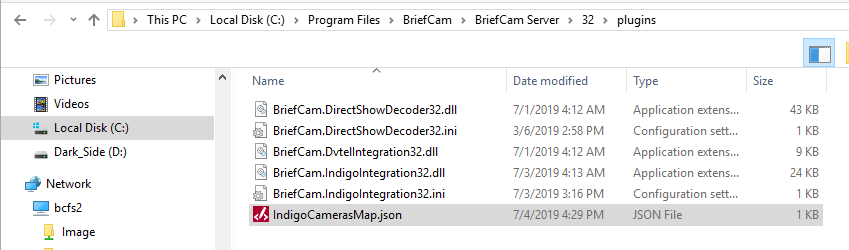
Map BCUser to IndigoVision by mapping either the camera (
CameraId) to IndigoVision’s Source ID (SourceId) or by mapping BriefCam’s rules (RuleName) to IndigoVision’s Source ID (SourceId).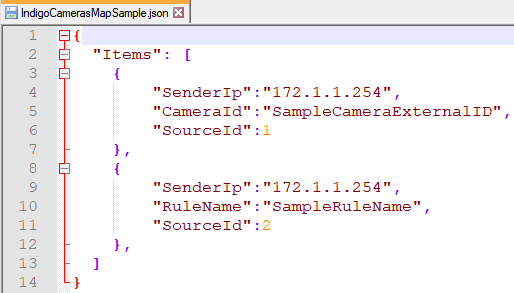
Open the IndigoVision Control Center’s administrator client.
While in Setup mode, open the Alarms Explorer tab.
Click the Top Site.
Open the External Systems view.
Right-click and select New External System.
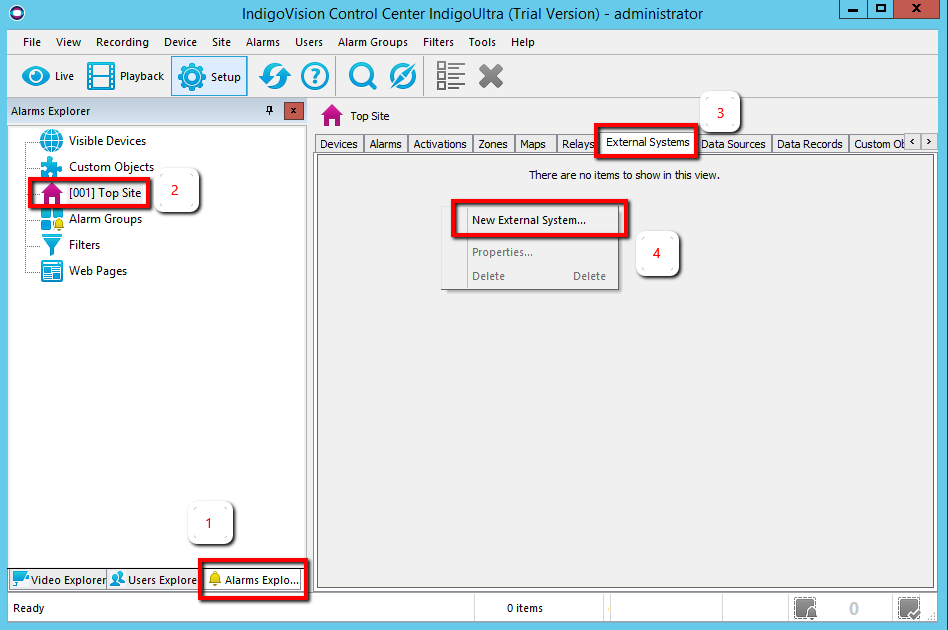
Name the new external system BriefCam and add the BCUser server IP Address (or if the BCUser server is on a different network, the default gateway of the current network).
Right click the top site, click New Zone and name the zone:
BriefCam zone.Click OK.
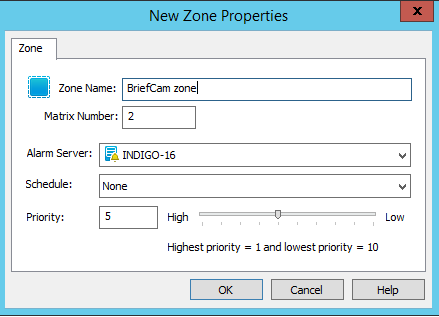
Right click on the new zone and click Set.
For each camera, carry out the following steps:
From the Video Explorer tab select a camera and write down the camera’s name, and service ID.
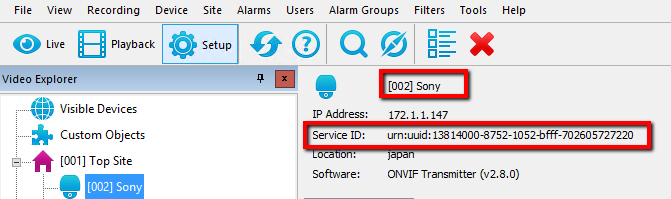
From the Alarms Explorer tab, right-click BriefCam zone and select New Detector.
Set the detector type to External.
Set the name using the camera name from step 5a and click Next.
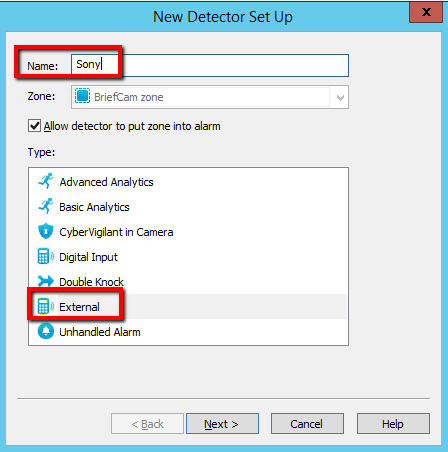
Select the BriefCam external system that you created in step 4.
Write down the Input Number (the event ID).
Click Next.
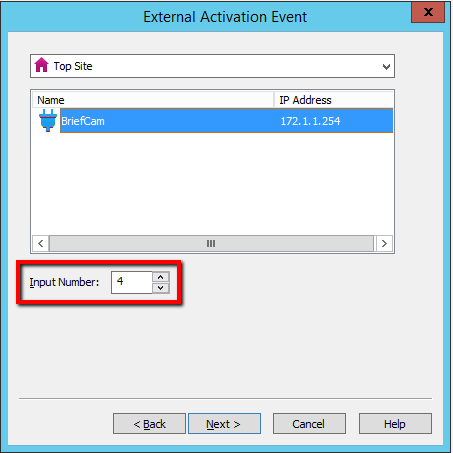
Click Next, click Next again and click Finish.
Go to the
IndigoCamerasMap.jsonfile from step 2.Add a new row under Items by copying the existing row and replace the following values:
Replace the value in
CameraIdwith the Service ID from step 5a.Replace the value in
SourceIdwith the Input Number (event ID) from step 5f.Replace the value in
SenderIpwith the BriefCam server IP address.

In the BriefCam Administrator Console’s Environment Settings section, there are three settings relevant for sending alerts outside of BriefCam:
To send alerts outside of BCUser, set the Respond.AlertsPublishingEnabled setting to true.
To send alerts to a VMS, check that the Respond.AlertsPublishingToVMSEnabled setting is set to true.
To change the polling interval, use the Respond.AlertsPublishingIntervalInMilliseconds setting.
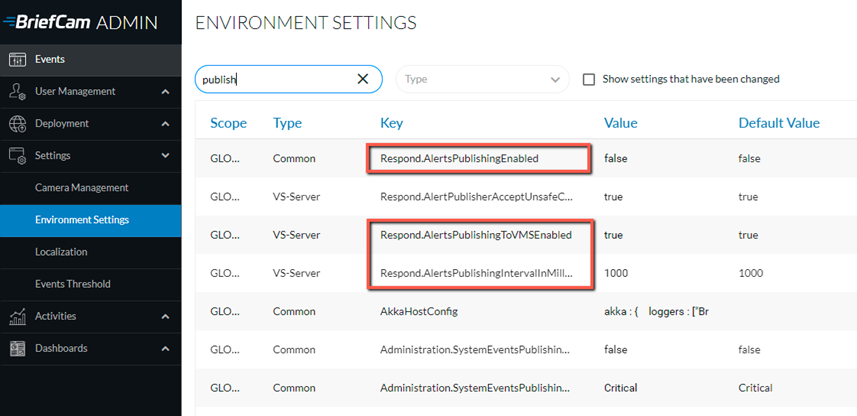
If you make changes to the settings, you need to restart or start the VSServer service.
When the IndigoVision plug-in is installed, the BriefCam.Indigo17Integration32.ini file is created at: C:\Program Files\BriefCam\BriefCam Server\32\plugins.
Set the AlarmServerIP parameter and remove the semicolon (;). (The other parameters are defined in the section above).
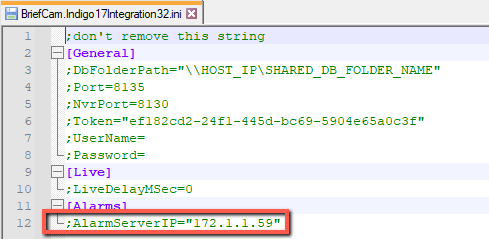
By default, BCUser sends an alarm to IndigoVision and no further configurations are required to make the alarm appear in the IndigoVision client.
Note that only alerts produced by the IndigoVision connected cameras will be sent to the IndigoVision server.
Known Limitations
Bounding boxes when playing the original video are displayed with an offset.
The RESPOND module for the IndigoVision VMS is only supported on cameras that are on the actual VMS (ControlSiteDb / NVR) and not cameras that are added through the gateway.