Milestone Integration
VMS Partner | Product | Version | Last Tested BriefCam Version | Integration Level | H.265 Support |
Milestone | XProtect | 2026 R1 | 2025 R1 SP1 (including Classic and Next-Gen engine) | Workflow integration (L4) | Yes |
Milestone | XProtect | 2025 R3 | 2025 R1 SP1 (including Classic and Next-Gen engine) | Workflow integration (L4) | Yes |
Milestone | XProtect | 2025 R2 | 2025 R1 (including Classic and Next-Gen engine) | Workflow integration (L4) | Yes |
Milestone | XProtect | 2025 R1 | 2024 R2 HF5 | Workflow integration (L4) | Yes |
Milestone | XProtect | 2024 R2 | 2024 R2 HF5 | Workflow integration (L4) | Yes |
Milestone | XProtect | 2024 R1 | 2024 R2 HF5 | Workflow integration (L4) | Yes |
Milestone | XProtect | 2023 R3 | 2024 R2 HF4 (including Classic and Next-Gen engine) | Workflow integration (L4) | Yes |
Milestone | XProtect | 2023 R2 | 2024 M1 | Workflow integration (L4) | Yes |
Milestone | XProtect | 2023 R1 | 2023 M1 (including Classic and Next-Gen engine) | Workflow integration (L4) | Yes |
Milestone | XProtect | 2022 R3 | 2023 M1 (including Classic and Next-Gen engine) | Workflow integration (L4) | Yes |
Milestone | XProtect | 2022 R2 | 6.4 HF2 | Workflow integration (L4) | Yes |
Prerequisites
Note
To install the SSO provider, BriefCam Open API (BOA), which is licensed separately, must be used on the BriefCam Server.
Ports Required
The following ports should be available when installing the plugins:
Port # |
80, 554, 8030, 8080, and 9090 |
Milestone Integration Plugins
BriefCam Milestone Plugin Installation
To integrate BriefCam and Milestone, you need to install the Milestone plugin.
For OX5 environments, install the Milestone plugin on every machine where the BriefCam Server, On-Demand processing server, or Real-Time processing server is installed.
For OX6 environments, install the Milestone plugin on every machine running the VMS Agent and VSServer service.
Run the VMS Integration Plugin Installation by right-clicking on the BriefCamMilestonePlugin_sep_<version number>.exe file and selecting Run as administrator.
Click the Get Started button.
Read and accept the License Agreement terms. Click Next.
Select the path to the plugin installation directory. Note that it should be the same directory as the
BriefCam Serverdirectory. By default, it is set toC:\Program Files\BriefCam\BriefCam Server\. Click Next.If you do not want to enable SSO on the BriefCam Embedded XProtect Client, leave the Configure the Milestone SSO Provider service checkbox unchecked and click Next.
If you want to enable the BriefCam Embedded XProtect Client:
Check the Configure the Milestone SSO Provider service checkbox. Note that on all other machines with the Processing Server or Alert Processing Server, do not select the checkbox.
If the Milestone SSO Provider and BriefCam Web services are installed on the same machine, the SSO provider address should be localhost. For example:
http://localhost:8030/MilestoneSSO/.If the Milestone SSO Provider and BriefCam Web services are installed on different machines, enter the SSO provider address. The SSO provider address should point to the host running the Milestone SSO Provider service. for example:
http://briefcam-server:8030/MilestoneSSO/.Verify that the provided URLs are correct by clicking the Verify URLs button.
Click Install.
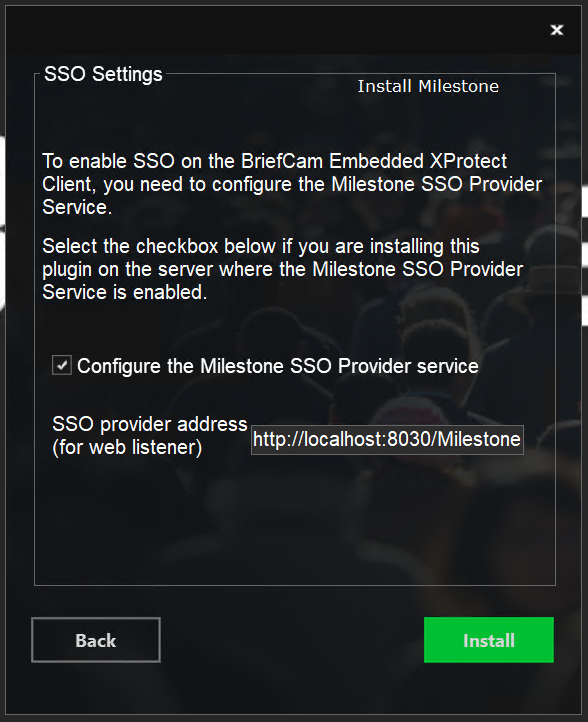
The SSO provider configuration is saved in the
<BCServer>\MilestoneSSOProvider\MilestoneSSOProvider.exe.configfile. If you need to modify the configuration, open and edit this file. Note that in some cases a copy of this file may also exist under the <BCServer> directory - do not try to edit it because it is not used.If your organization will be using BriefCam’s RESPOND module, install Milestone’s Open Network Bridge component. This allows the Milestone plugin to fetch video stream from the Milestone VMS. The component is not included in the standard Milestone management + recorder installer.
To download the component, go to: https://www.milestonesys.com/downloads/ and click the Download Software option. Log in with your Milestone user and password and from the Product field, select Milestone Open Network Bridge.
When configuring Milestone’s Open Network Bridge, a user and password is created. Make a note of these, because you will need them when configuring the Milestone directory in the BriefCam Administrator Console.
Post-Installation Steps for BriefCam 2025 R1 SP1
After installing the Milestone plugin, you need to replace the installed
BriefCam.VideoNative.dllfile with a newer version.Download the newest version of the file by clicking here.
Unzip the downloaded file.
Stop all BriefCam services.
Copy the new
BriefCam.VideoNative.dllfile and save it to the BriefCam Server installation folder(C:\Program Files\BriefCam\BriefCam Server). When prompted, allow it to replace the existing file.Start all BriefCam services.
Milestone Embedded Client Installation
To embed BriefCam in the Milestone XProtect Smart Client, you will install three plugins:
Milestone
Milestone Embedded Client
Management Client for Milestone.
The following are the steps for installing a Milestone Embedded Client:
STEP 1: Install the Milestone plugin on the BriefCam Server(s).
STEP 2: Install the Milestone Embedded Client.
On each of the XProtect Smart Client machines where you want to embed BriefCam, right-click the
BriefCamEmbeddedClientForMilestoneXProtect_sep_<version number>.exefile and select Run as administrator.In the Welcome screen, click Get Started.
Accept the terms of the license agreement.
Click Next and the following screen will appear.
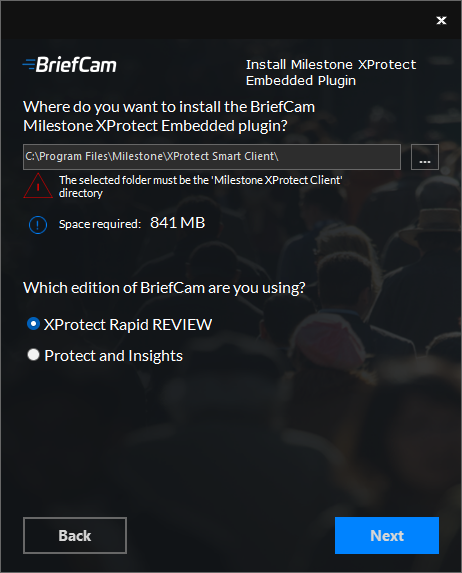
Select the installation destination path. Note that the installation path must be the same directory where Milestone XProtect Smart Client is installed.
Select which edition of BriefCam you are using.
Click Next and then click Install.
In the BriefCam Administrator Console's Environment Settings, set the Milestone SSO Provider environment setting: SSOEndpoint:
If the Milestone SSO Provider and BriefCam Web services are installed on the same machine, check that the SSOEndpoint environment setting is set to
localhost.If the Milestone SSO Provider and BriefCam Web services are installed on different machines, check that the SSOEndpoint environment setting is set to the BriefCam server’s IP or hostname (and not
localhost).
If the hostname cannot be resolved, add the BriefCamserver to the
hostsfile on each of the XProtect Smart Client machines where you embed BriefCam.Navigate to the
hostsfile, located at:C:\Windows\System32\drivers\etc\hosts.Open the
hostsfile with a text editor (like Notepad) as an administrator.Add the following line to the
hostsfile: <BriefCam server IP> <BriefCam server name>
STEP 3: Install BriefCam’s Management Client for Milestone plugin.
On the same computer on which the Milestone XProtect Management Client is installed, right-click on the
BriefCamMilestoneXProtectManagementClient_sep_<version number>.exefile and select Run as administrator.In the Welcome screen, click Get Started.
Read the license, accept the License Agreement terms, and click Next.
Select the installation destination path and click Install.
Log into the Milestone XProtect Management Client.
Right-click on the Roles section and add a new role, for example: BriefCam Users as shown in the image below.
Make sure that the new role is selected and click the BriefCam tab at the bottom of the screen. In the Milestone XProtect Management 2023 R1, the tab is named MIP
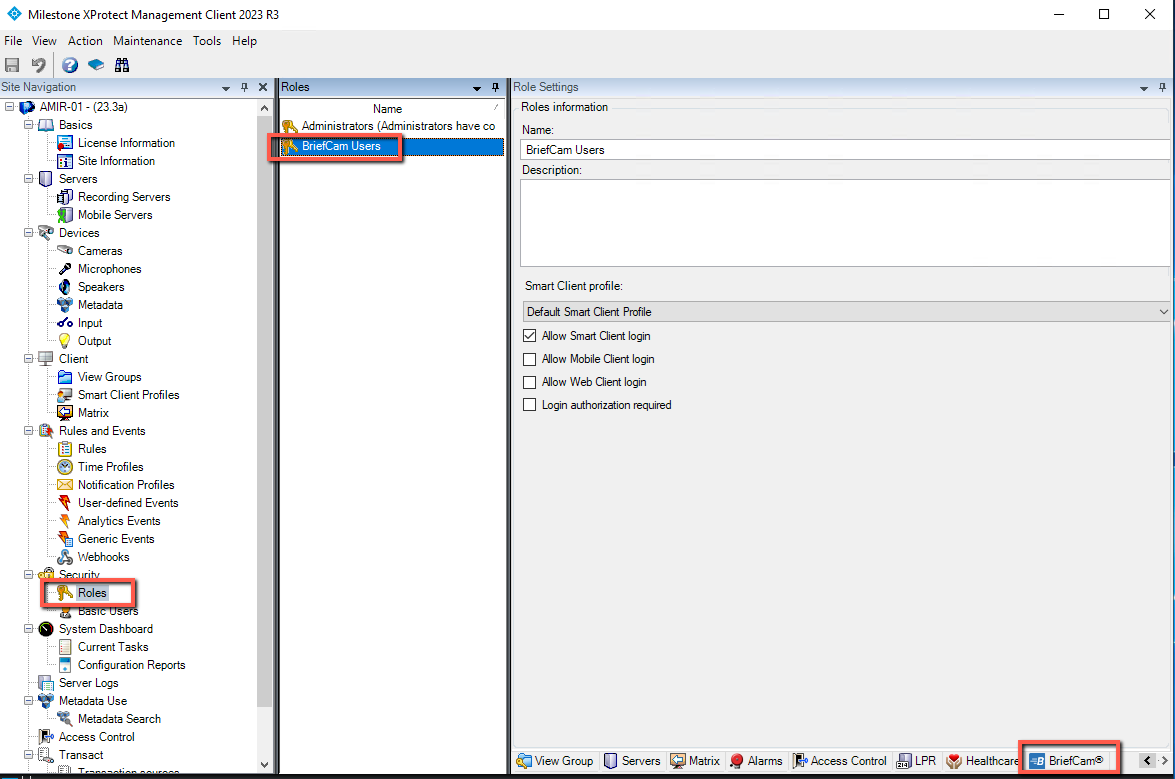
From the Role Settings section, select the BriefCam role, as shown in the image below.
Give these users access to BriefCam by selecting the Allow access to video analytics platform checkbox.
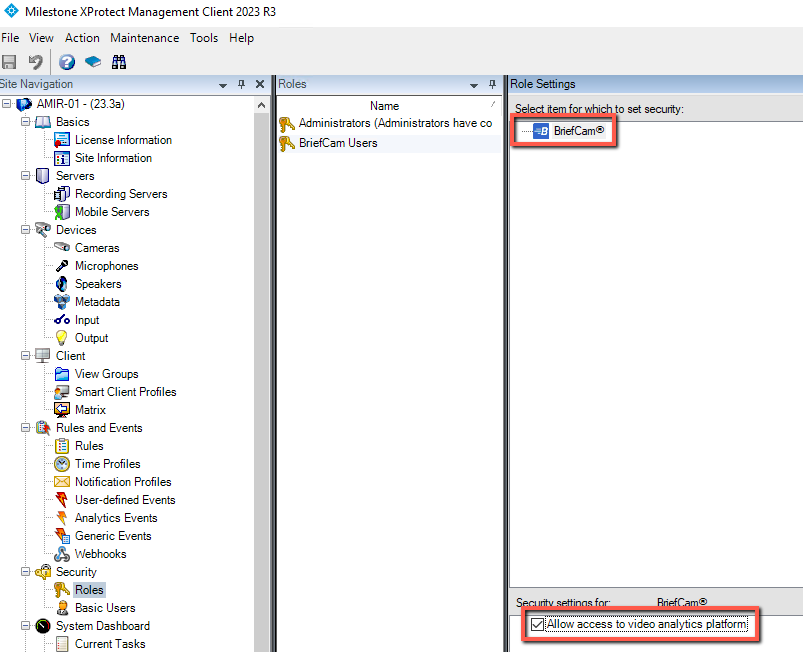
You will now set up BriefCam addresses that will be used by the Embedded Client for SSO login.
Navigate to MIP Plugins -> BriefCam -> BriefCam > Configurator tab.
In the Client site address field, enter the BriefCam client address.
In the BOA Server address field, enter the BOA service address.
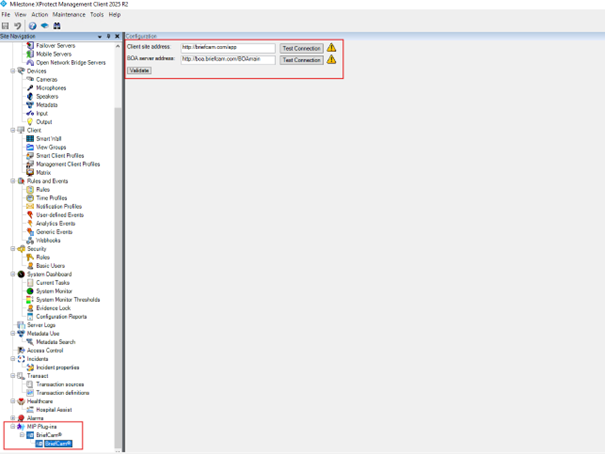
If you want to verify that the URLs are correct, you can click the Test Connection button for each of the added addresses.
Click the button.
Save the changes.
The address settings can be overwritten in the BriefCam.MilestoneEmbeddedViewer.dll.config file. Any changes you make in this file will replace the default values and be applied going forward.
In the appSettings section there are two values:
serverAddress– address of the BriefCam Client serverboaServerAddress– address of the BOA service
For embedded environments, you will now connect the Milestone XProtect Smart Client to the BriefCam server as described in the Connecting Milestone XProtect Smart client to the BriefCam Server section.
Connecting Milestone XProtect Smart client to the BriefCam Server
To establish a connection from the Milestone XProtect Smart Client to the BriefCam Server:
Carry out the Initial Set Up as described in the BriefCam Administrator Guide.
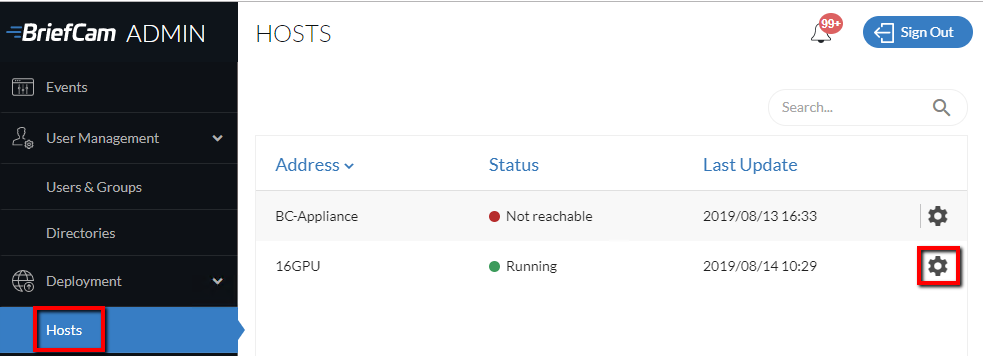
In the BriefCam Administrator Console, open the Deployment section and then Hosts.
Find your host and click on its gear icon.
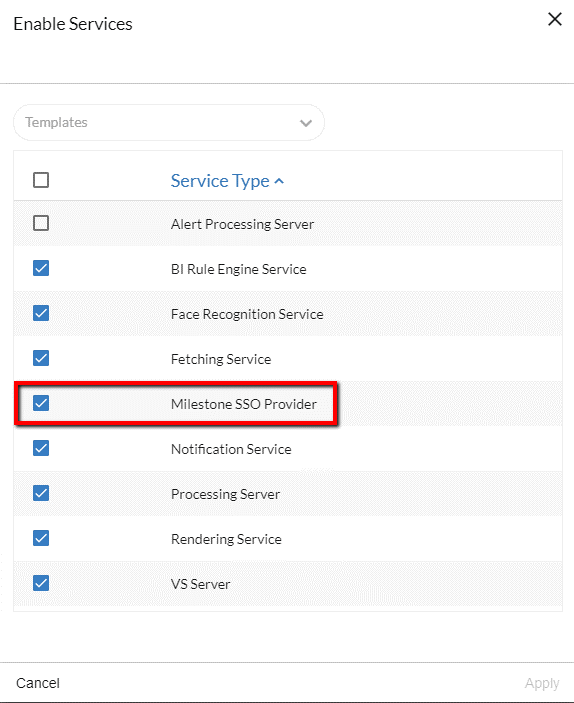
Select the Milestone SSO Provider service and click Apply.
If the Milestone SSO is deployed on a machine that is not the BCServer machine, you need to carry out the following steps:
Open the BriefCam Administrator Console and verify that the SSOEndpoint environment setting point to the hostname running the Milestone SSO Provider.
On the machine running the Milestone SSO Provider, verify that the
AuthenticatorAddresskey in theMilestoneSSOProvider.exe.configfile (located at:C:\Program Files\BriefCam\BriefCam Server\<MilestoneSSOProvider) points to the hostname running the Milestone SSO Provider (for example:http://BCServer:8030/MilestoneSSO/).On the machine running the Milestone SSO Provider, verify that the BriefCam user that runs the BriefCam services has the necessary permissions to open up a listener, by running the following command in PowerShell as Admin:
netsh http show urlaclYou should see a
Reserved URLvalue and aUservalue, for example:
If such an entry does not exist, run the following command (replacing the url and user values with your environment’s values):
netsh http add urlacl url=http://BCServer:8030/MilestoneSSO user=bcuserIf you made any changes as part of this step, restart the Milestone SSO provider services on the server and the IIS on the Web services machine.
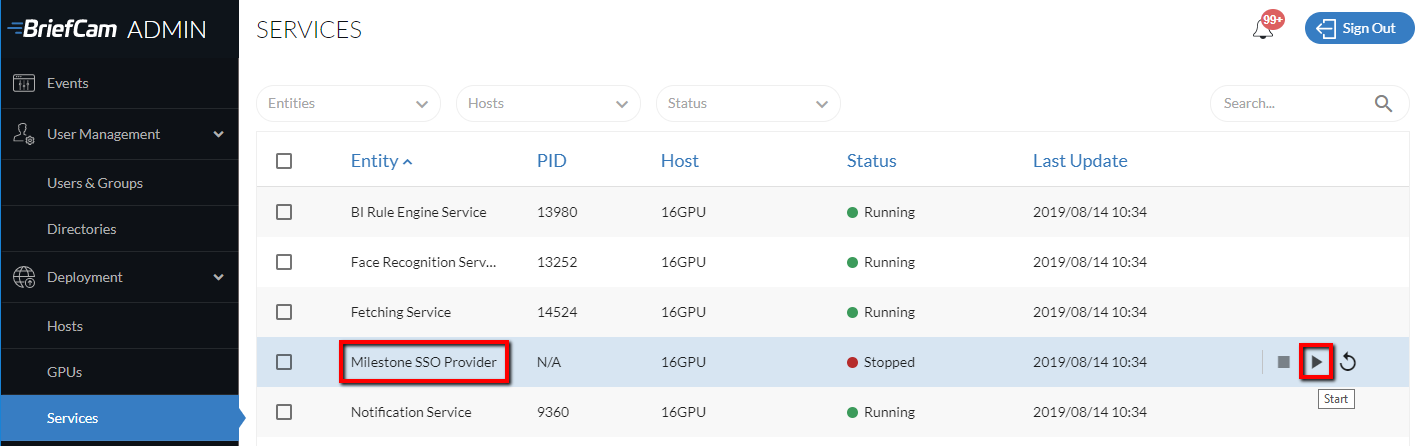
In the Services section, start the Milestone SSO Provider service.
Note
User names are automatically created by the SSO when logging into the Milestone client using the Basic authentication or Windows Authentication method.
Windows authentication (Client SSO login)
To enable Windows authentication for Client SSO login:
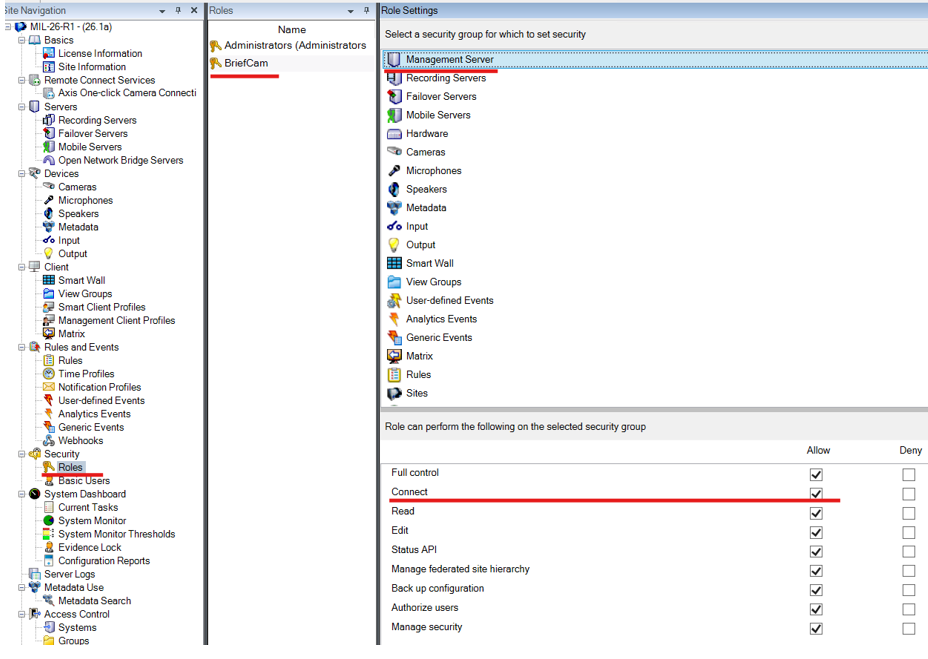
Add the user running the BriefCam Windows services to a group that has the Management Server > Connect permission allowed.
Note
The BriefCam Windows user's password, used to log in to Milestone VMS, will expire after a given time. This will prevent the SSO service from logging in and validating the token used for logging in the current Windows user. If this issue occurs, update the BriefCam Windows user password on the Milestone VMS machine.
If the Milestone XProtect version is not Corporate (Professional or below), the user running the BriefCam Windows services should be added to the Administrator group because there is no such permission available.
If the user running the BriefCam Windows services is not a domain user but a normal Windows user, on the VMS server machine, a Windows user with the same username and password must be created, and then added to a role with the Connect permission allowed.
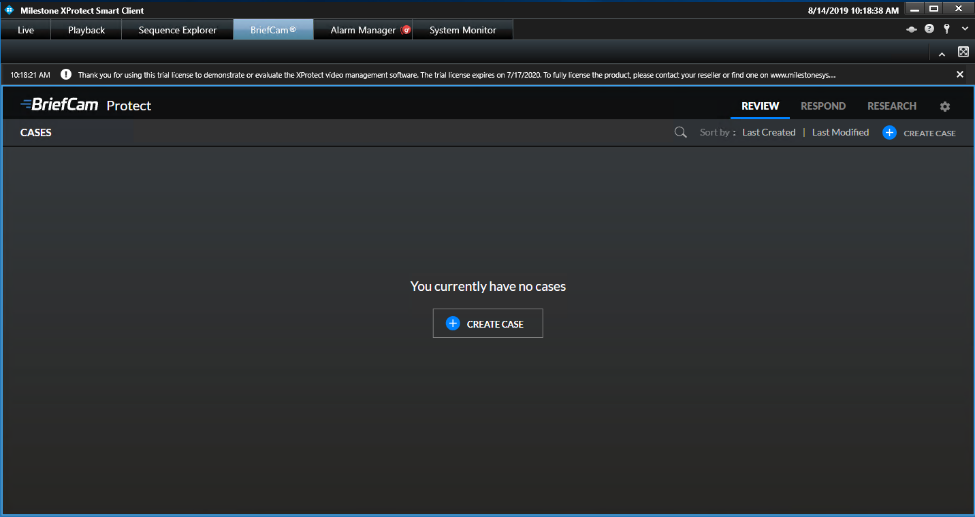
Viewing the BriefCam Tab in Milestone
Launch XProtect Smart Client and log into the Milestone server.
Once it is up and running, a BriefCam® tab will appear in the XProtect client’s main application window.
Click the BriefCam® tab and you will be automatically logged into the embedded BriefCam client.
Note
Bookmarks created within BriefCam will not be displayed on the Milestone XProtect Smart Client application.
Hostname Resolution for the Milestone Server
If the machines are in a domain, the hosts will be successfully resolved.
If they are not in a domain, the Milestone VMS address needs to be resolved either by using <VMSServerAddress> or <VMSServerAddress>.<DomainAddress>.
One of the entries must be added to the hosts file. These entries should include both the hostname itself, or the hostname appended with .domain address, such as: "<milestone-server-name>" or "<milestone-server-name>.<domain address>". Replace "<milestone-server-name>" with the actual hostname of your Milestone server.
To modify the hosts file:
Navigate to the
hostsfile, located at: C:\Windows\System32\drivers\etc\hosts.Open the
hostsfile with a text editor (like Notepad) as an administrator.Add one of the following two lines to the
hostsfile:<Milestone server IP> <Milestone server name><Milestone server IP> <Milestone server name>.<domain address>Remember to substitute the example hostname and IP address with your specific values.
Save the
hostsfile.From the BriefCam Administrator Console’s Camera Management section, edit the Milestone directory by setting the Address field to the full address name added in the hosts file: <Milestone server name> or <Milestone server name>.<domain address>.
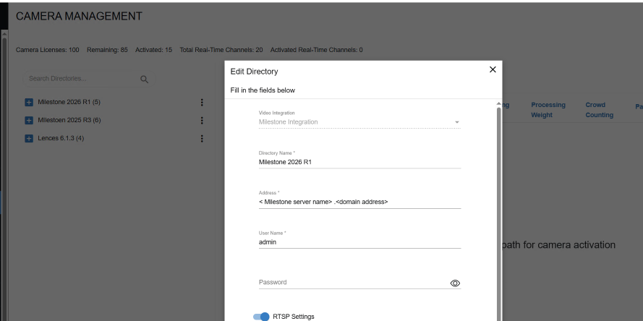
To find the address that needs to be resolved:
In the Milestone XProtect Management Client, right-click on the server in the menu and click .
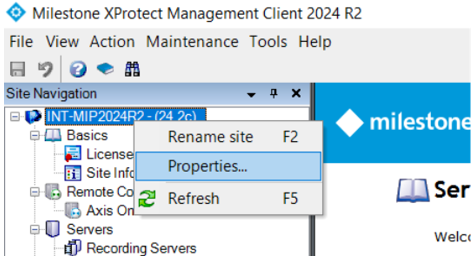
On the Site Properties window's URLs section, you will find the address that needs to be resolved in the Alternate Addresses field.
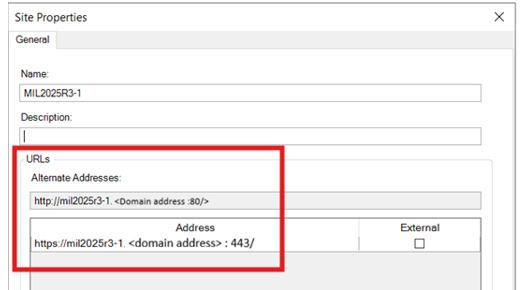
Sending Alerts to Milestone
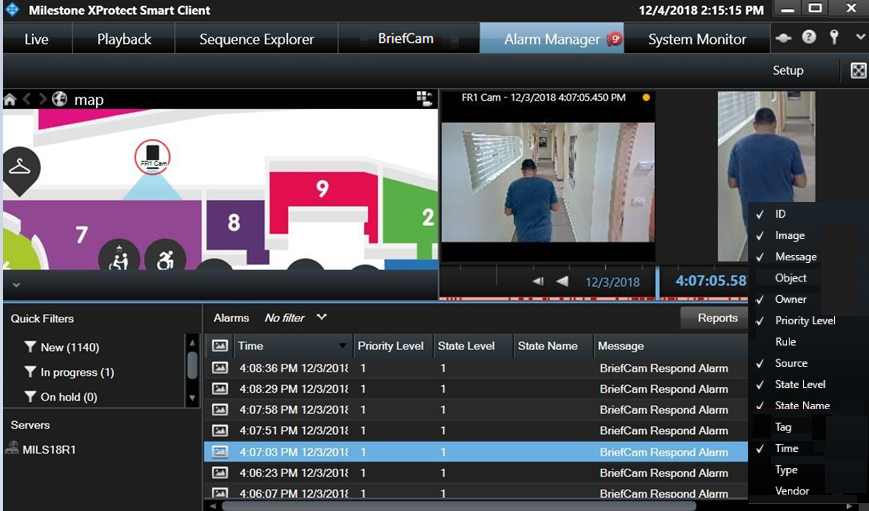
Alerts can be sent to Milestone’s Alarm Manager.
In the BriefCam Administrator Console's Environment Settings section, there are three settings relevant for sending alerts outside of BriefCam:
To send alerts outside of BriefCam, set the Respond.AlertsPublishingEnabled setting to true.
To send alerts to a VMS, check that the Respond.AlertsPublishingToVMSEnabled setting is set to true.
To change the polling interval, use the Respond.AlertsPublishingIntervalInMilliseconds setting.
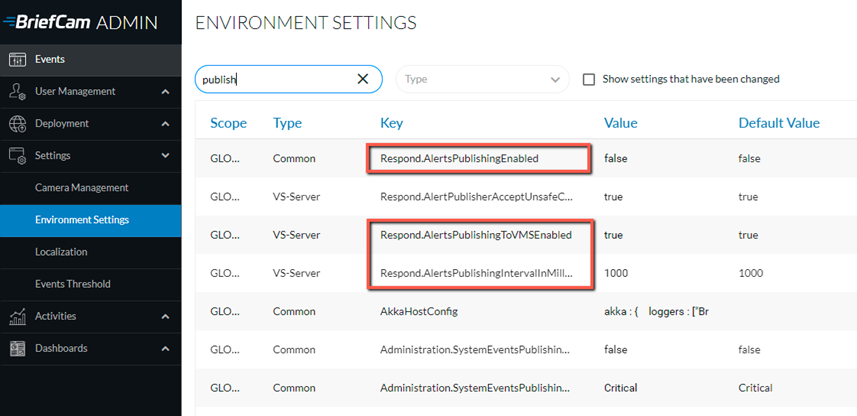
If you make changes to the settings, you need to restart or start the VSServer service.
Note
Only alerts produced by the Milestone connected cameras will be sent to the Milestone server.
Sending Analytic Events to Milestone
Milestone can receive Analytic Events from BriefCam.
To send analytic events (instead of alerts), you need to make changes on both the BriefCam and Milestone side:
BriefCam Configuration
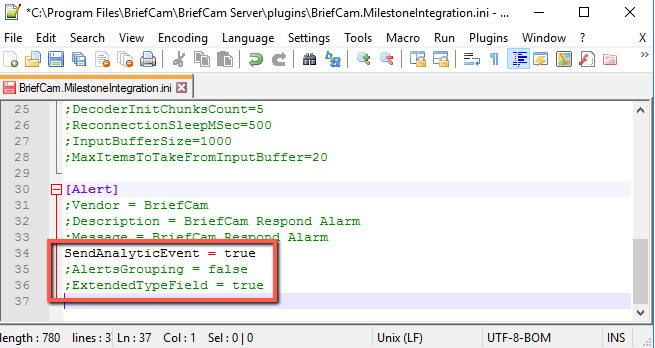
Open the BriefCam.MilestoneIntegration.ini file, which is located at:
C:\Program Files\BriefCam\BriefCam Server\plugins.Change the SendAnalyticEvent to true and remove the semicolon (;).
If you do not want to send data about the Class and Color and Person Attributes, change the ExtendedTypeField to false and remove the semicolon (;).
The AlertsGrouping parameter lets you set what happens when an object triggers multiple rules:
true – A single alert is sent out for multiple rules.
false – One alert is sent for each rule.
Milestone Configuration
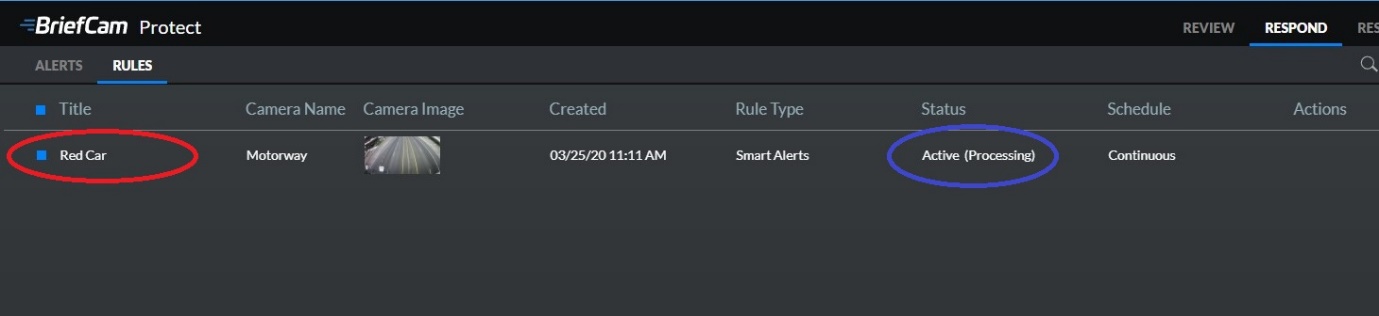
Within the XProtect Client’s BriefCam tab, navigate to RESPOND and create a rule.
Make a note of the Title and check that the Status is Active (Processing).
Open the Milestone XProtect Management Client.
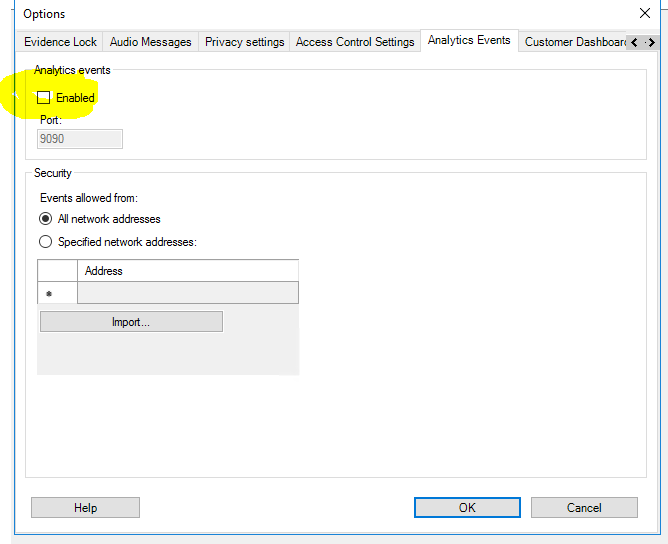
From the Tools menu, select Options.
Open the Analytics Events tab, select the Enabled checkbox, and click OK.
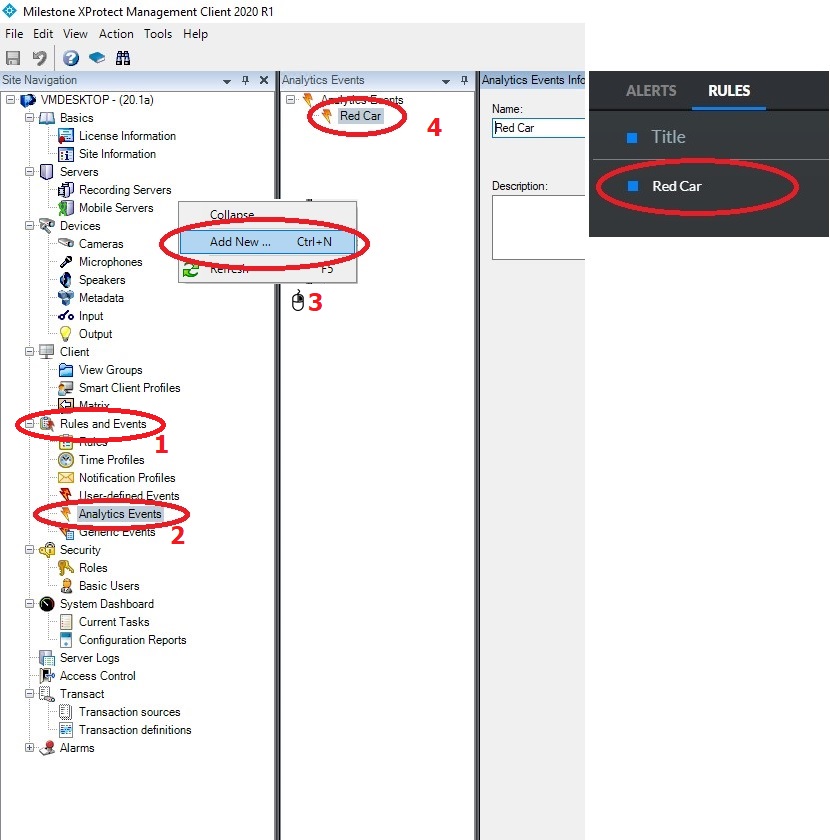
From the Site Navigation pane, open the Rules and Events folder.
Right-click on the Analytics Events entry.
Select Add New.
Name the analytics even with the exact same name as the rule created in BriefCam (making sure that the spaces and upper/lower cases are all identical).
Navigate to Rules and Events > Rules, right-click and add a new rule.
To trigger an event from a BriefCam Analytic Event, under Perform action on event, select the Analytic Event created in the step above.
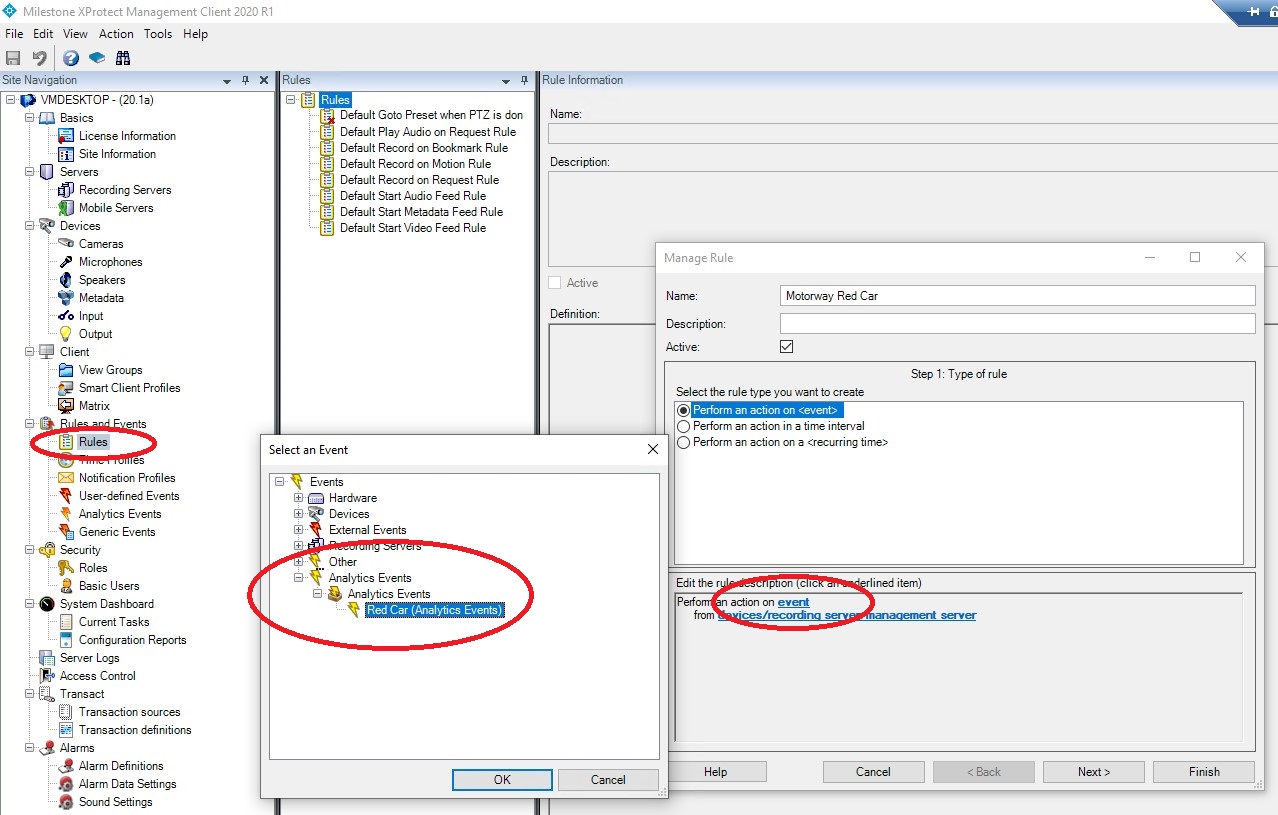
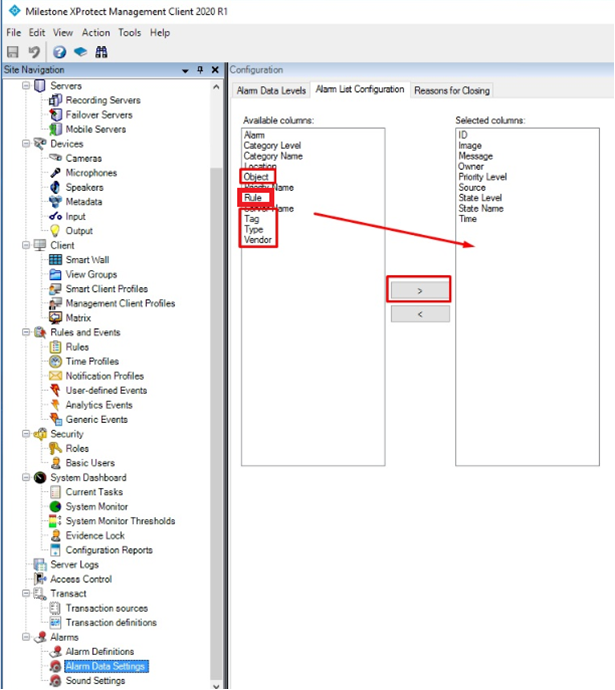
Complete the rule with the camera and actions of your choosing. For example, if you want the rule name to appear, from the Available columns, select Rule and click the
 icon to move it to the Selected columns.
Note that the Object and Type columns will only appear if the
ExtendedTypeFieldsetting in theBriefCam.MilestoneIntegration.inifile is set totrue(for more details, see the BriefCam Configuration section above).The table below shows what is sent from BriefCam to Milestone when a specific Milestone action is used.
Milestone Action
Data Sent from BriefCam to Milestone
Example
Object
Class (Class Data)
Person (Man)
Type
Color and Person Attributes (if the class is Person)
A combination of the following fields: Lower Wear, Upper Wear, Hat, Bag. In the form of FieldName: Value,
Color: Red,
Lower Wear: Long, Upper Wear: Long Sleeves, Hat: No,
Bag: No
Tag
For Face Recognition (FR) alerts:
List name (face name)
For License Plate Recognition (LPR) alerts:
List name (license plate number)
Others: Empty
For FR alerts:
Suspects (Frank Smith)
For LPR alerts:
Restricted Cars (2175834)
Descriptions / Instructions
For FR / LPR alerts:
Confidence: []
Others: Empty
Confidence for Suspects1 (Frank Smith) = 81%, Confidence for Suspects2 (Frank Smith) = 37%,
Vendor
BriefCam
BriefCam
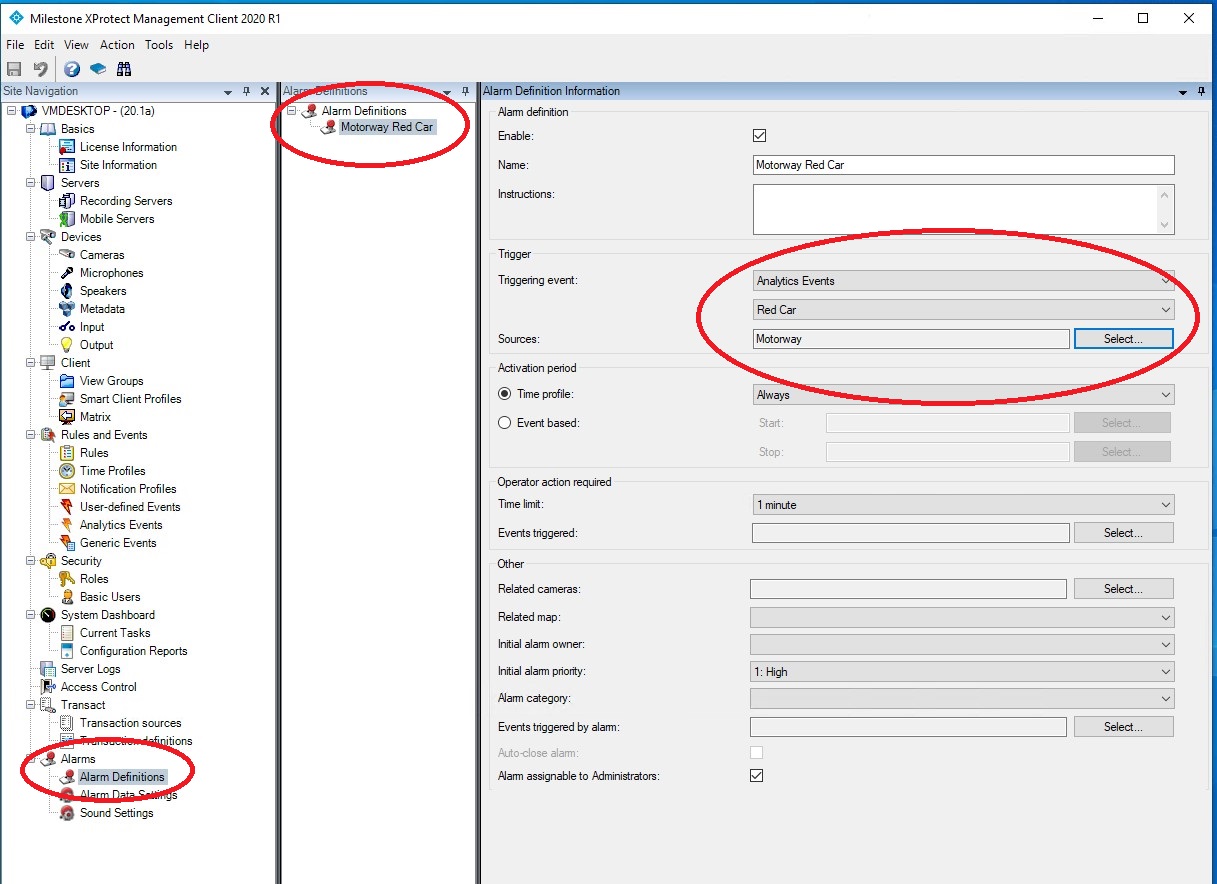
To trigger alarms into the Alarm Manager, navigate to Alarms > Alarm Definitions.
Right-click and add a new alarm.
From the Triggering Event field, select Analytics Event and your desired Analytics Event previously created, followed by the related camera.
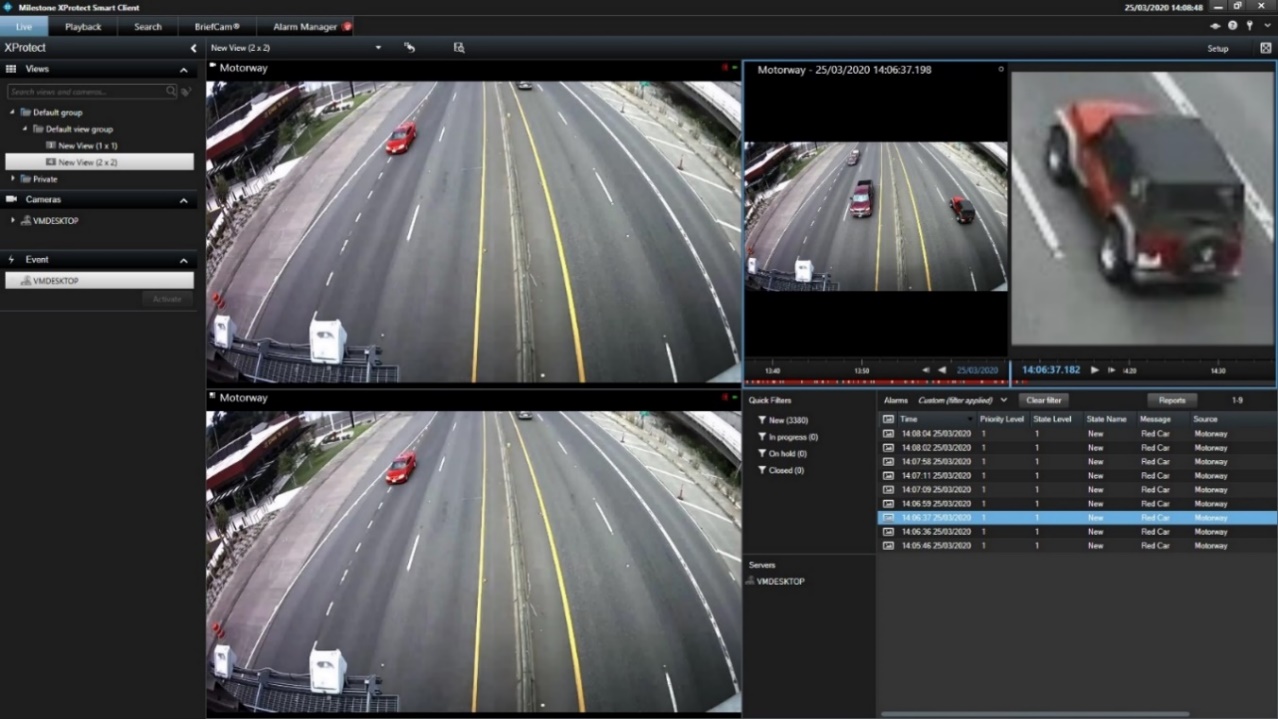
Alarm Events and thumbnails will now appear in the Alarm Manager (as shown in the image below).
Creating a VIDEO SYNOPSIS® Directly from Milestone
If you installed the enhanced BriefCam XProtect® client, you can create a synopsis directly from Milestone.
When you are viewing a video in Milestone (in the Live tab, Playback tab and a floating image), you can click the BriefCam icon at the bottom right of the screen. This will create a new VIDEO SYNOPSIS® in BriefCam.
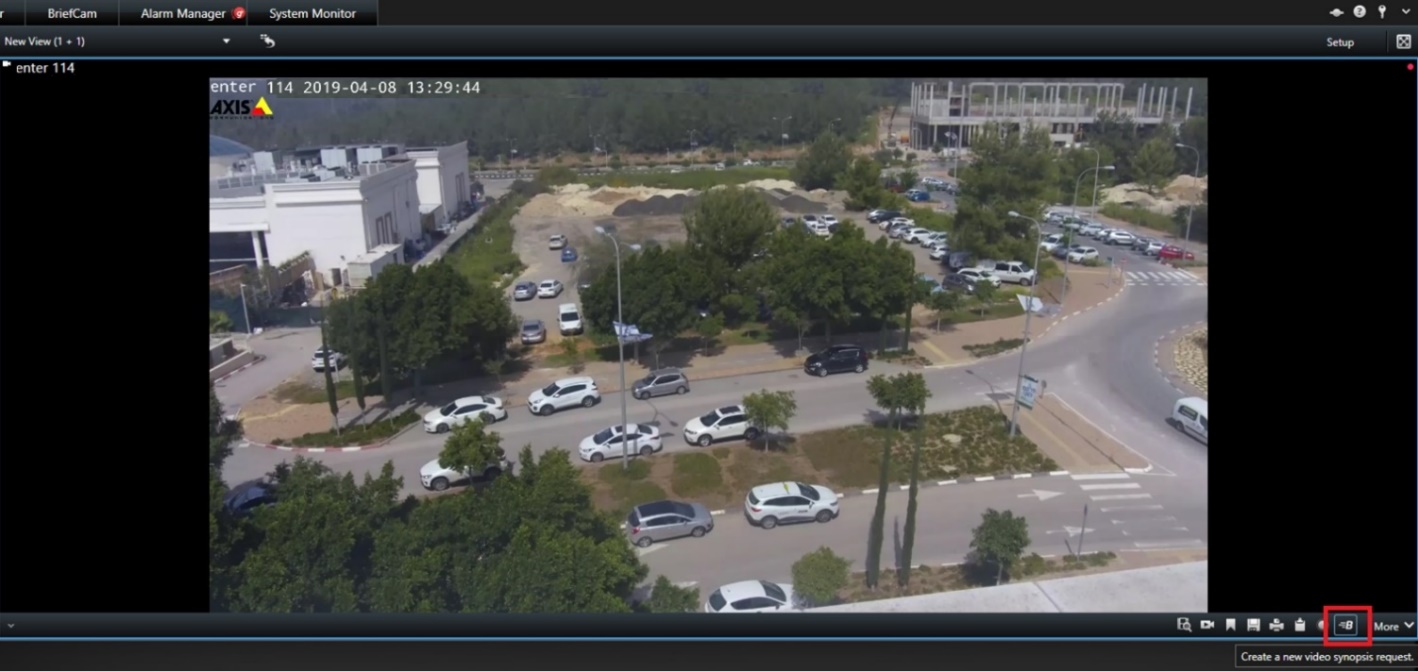
Click the BriefCam icon and the following screen will appear.
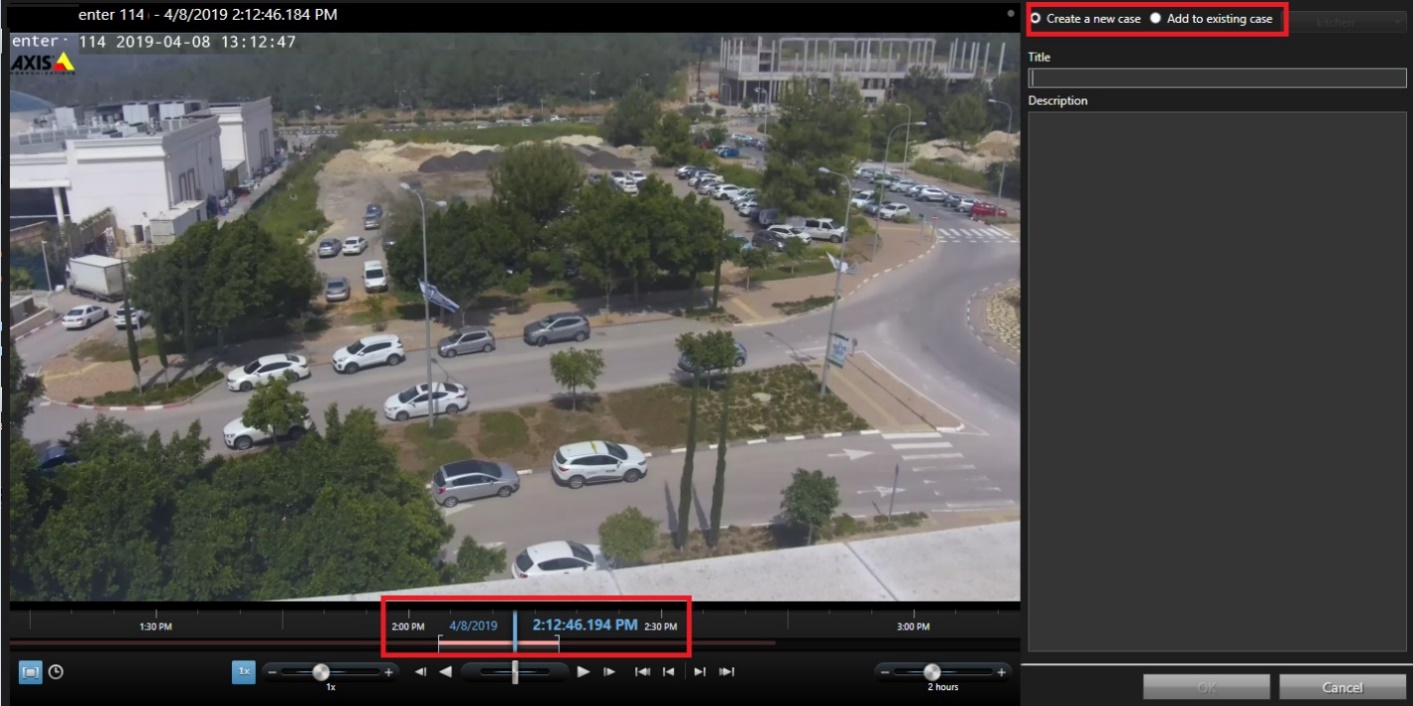
Adjust the time frame using the slider button.
At the top right of the screen, select either to Create a new case or Add to existing case, and then click OK.
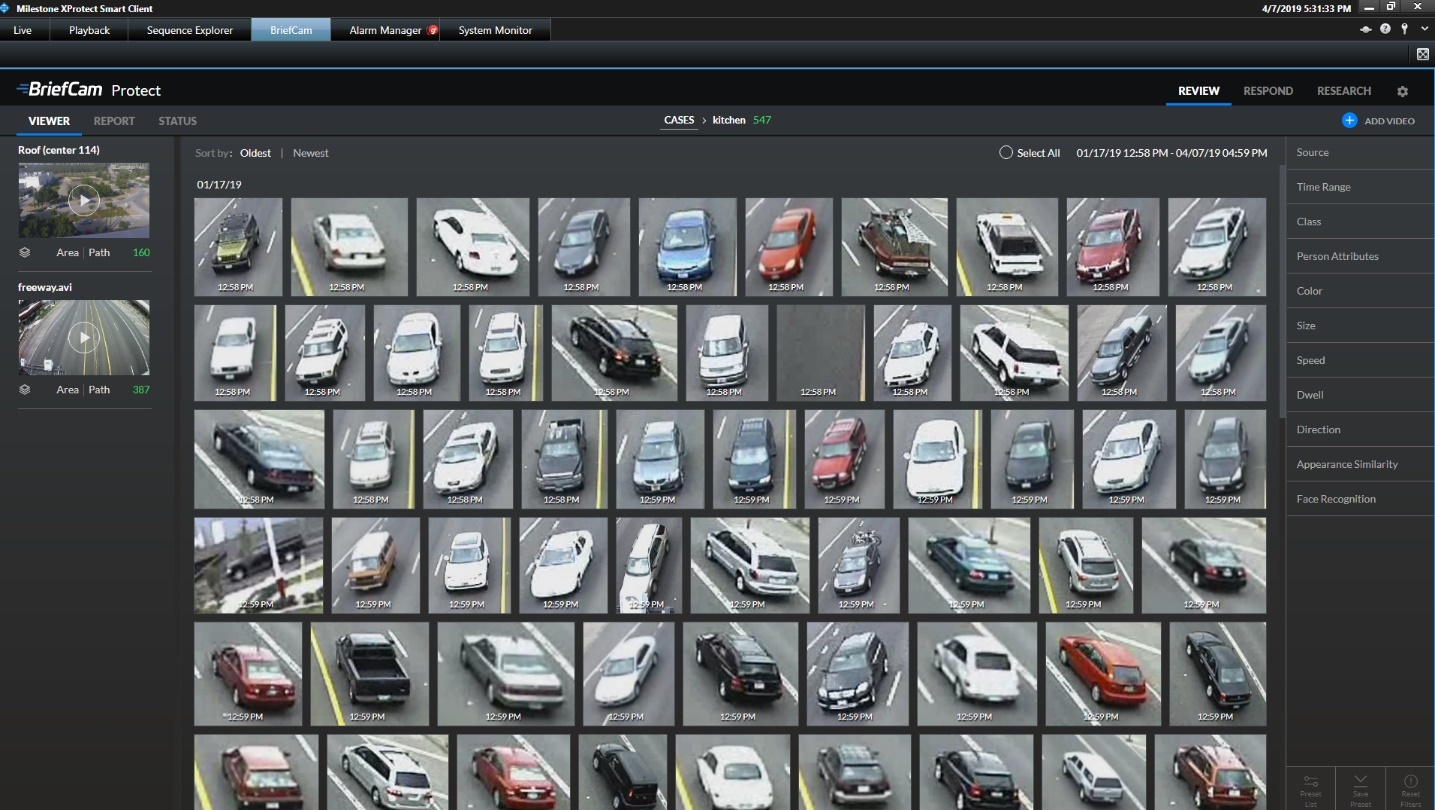
You will then see at the bottom of the screen the BriefCam icon  and see the progress of the synopsis’s processing. Click the BriefCam icon to navigate to the BriefCam tab and to the correct case.
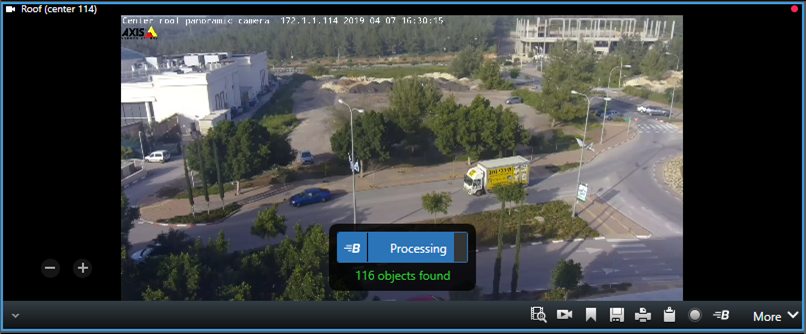
You will see a screen, such as the one below.
Non-Masked Video from Milestone
It is now possible to pull non-masked video from the Milestone VMS even if a liftable mask was configured in the VMS.
To enable this feature:
Open the
BriefCam.MilestoneIntegration.inifile, which is located at:C:\Program Files\BriefCam\BriefCam Server\plugins.Set the LiftPrivacyMask setting to true and remove the semicolon (;).
In the BriefCam Administrator Console, restart the VS Server service.
For Milestone 2025 R1 and above, L2 rules for cameras with a permanent or liftable Milestone mask do not work under an RTSP stream. Only the SDK stream supports rules for cameras with Milestone masks.
Setting Up Multiple RTSP Bridges
You can configure the Milestone plugin to utilize multiple RTSP bridges for efficient camera stream management. This approach, similar to adding extra lanes to a highway, distributes camera streams across multiple bridges (servers) to improve overall performance and reduce the load on any single bridge. This allows you to manage more cameras effectively.
To set up multiple RTSP bridges:
Open the
BriefCam.MilestoneIntegration.inifile, which is located at:C:\Program Files\BriefCam\BriefCam Server\plugins.Find the RtspBridge section. If it is not in the .ini file, add the following to the file:
[RtspBridge]
;DefaultRtspServerCapacity =
;DirectoryRtspBridges =
Optional. Set the
DefaultRtspServerCapacitysetting to the default number of cameras that each RTSP bridge can handle. For example, if you know that each bridge can typically handle 10 cameras, set the value to 10. Leave it blank to use the plugin’s default value. If you change the default value, remove the semicolon (;) from the beginning of the row.Set the
DirectoryRtspBridgessetting. This setting uses a JSON structure to define the mapping between Milestone VMS addresses and their corresponding RTSP bridges. Remove the semicolon (;) from the beginning of the row.
The structure of the mapping is:
Key – The address of the Milestone VMS.
Value – A list of RTSP bridges associated with the Milestone VMS. Each bridge can optionally have a "Capacity" value defining its camera handling limit. You can configure RTSP bridges for multiple VMSs, by adding additional MilestoneVMSAddress sections in the JSON file.

Example DirectoryRtspBridges Configurations
Here are example configurations for the DirectoryRtspBridge setting (JSON format):
Single VMS with multiple bridges (default capacity) – example 1:
[RtspBridge] ; Set the default capacity for each bridge (optional) ; DefaultRtspServerCapacity= (recommended channel limit per bridge) DirectoryRtspBridges = { "MilestoneVMSAddress": [ {"BridgeAddress": "BridgeIPAddress1"}, {"BridgeAddress": "BridgeIPAddress2"}, {"BridgeAddress": "BridgeIPAddress3"}, {"BridgeAddress": "BridgeIPAddress4"}, {"BridgeAddress": "BridgeIPAddress5"}, {"BridgeAddress": "BridgeIPAddress6"} ] }
This example shows how to configure the plugin for a single Milestone VMS with multiple RTSP bridges. We'll assume each bridge can handle the recommended number of cameras.
The configuration ensures all available bridges are used to distribute the total number of channels from the VMS for efficient management.
If
DefaultRtspServerCapacityis not defined, the plugin will use its internal default for bridge capacity, which is 100.The DirectoryRtspBridges section assigns all bridges to the single VMS address, ensuring all available resources are utilized.
Single VMS with multiple bridges (default capacity) – example 2:
DirectoryRtspBridges = { "MilestoneVMSAddress": [ # Single VMS entry {"BridgeAddress": "BridgeIPAddress1"}, {"BridgeAddress": "BridgeIPAddress2"}, {"BridgeAddress": "BridgeIPAddress3"}, {"BridgeAddress": "BridgeIPAddress4"}, {"BridgeAddress": "BridgeIPAddress5"}, {"BridgeAddress": "BridgeIPAddress6"} ], "DefaultRtspServerCapacity": 240 # Default capacity for each bridge }
This configuration assumes all 15 recorders/archivers are working under a single Milestone VMS server.
We have 6 bridges, and each bridge can handle approximately 240 channels (according to Milestone).
Therefore, all 6 bridges are assigned to the single "MilestoneVMSAddress" entry.
This configuration ensures all 1,200 channels can be distributed across the available bridges for efficient management.
By setting the DefaultRtspServerCapacity to 240, the plugin will prioritize assigning a maximum of 240 channels to each bridge during camera distribution. This helps ensure a balanced workload across the bridges and avoids overloading any single bridge.
Single VMS with multiple bridges (custom capacity):
DirectoryRtspBridges = {"MilestoneVMSAddress": [{"BridgeAddress": "BridgeIPAddress1", "Capacity": 1 }, {"BridgeAddress": "BridgeIPAddress2", "Capacity": 2 }, {"BridgeAddress": "BridgeIPAddress3", "Capacity": 3 } ]}
In this scenario, you have a single VMS with three bridges with custom capacities: "BridgeIPAddress1" can handle 1 camera, "BridgeIPAddress2" can handle 2, and "BridgeIPAddress3" can handle 3 cameras.
Multiple VMSs with multiple bridges (default capacity):
DirectoryRtspBridges = {"MilestoneVMSAddress": [{"BridgeAddress": "BridgeIPAddress1" }, {"BridgeAddress": "BridgeIPAddress2" }, {"BridgeAddress": "BridgeIPAddress3" } ], "MilestoneVMSAddress1": [{"BridgeAddress": "BridgeIPAddress4" }, {"BridgeAddress": "BridgeIPAddress5" }, {"BridgeAddress": "BridgeIPAddress6" } ]}
This scenario demonstrates multiple Milestone VMS servers. The first VMS ("MilestoneVMSAddress") has three default-capacity bridges, while the second VMS ("MilestoneVMSAddress1") has three bridges with unspecified capacities (assuming default values).
Multiple VMSs with multiple bridges (custom capacity):
DirectoryRtspBridges = {"MilestoneVMSAddress": [{"BridgeAddress": "BridgeIPAddress1", "Capacity": 1 }, {"BridgeAddress": "BridgeIPAddress2", "Capacity": 2 }, {"BridgeAddress": "BridgeIPAddress3", "Capacity": 3 } ], "MilestoneVMSAddress1": [{"BridgeAddress": "BridgeIPAddress4", "Capacity": 1 }, {"BridgeAddress": "BridgeIPAddress5", "Capacity": 2 }, {"BridgeAddress": "BridgeIPAddress6", "Capacity": 3 } ]}
Camera Distribution
This plugin uses the DirectoryRtspBridges JSON data to distribute cameras to available RTSP bridges. It takes into account bridge capacities and sorts cameras by display names (or IDs if names are identical).
For example, for one Milestone VMS with 100 cameras, 10 RTSP bridges and a bridge default capacity of 10, 10 cameras will be mapped for each RTSP bridge.
Bridge Selection Priority
Bridges defined in the .ini file's DirectoryRtspBridges section have priority over those configured through the plugin's Directory Settings.
Additionally, any RTSP bridge defined in either the .ini file or the Directory Settings will be added to the pool of bridges used by the plugin. This means that even if a bridge is not included in the DirectoryRtspBridges JSON list, it can still be used for camera distribution if capacity allows. For example, if you have a bridge defined only in the Directory Settings and it has available capacity, the plugin might assign cameras to it.
Known Limitations
For Milestone 2025 R1 and above, L2 rules for cameras with a permanent or liftable Milestone mask do not work under an RTSP stream. Only the SDK stream supports rules for cameras with Milestone masks.
The BriefCam Server stops extracting new objects while Milestone archives data. It restarts automatically, but there is a temporary delay of a few minutes.
In Milestone Embedded integrations, a rule with a comma (,) in the name is sent as two different alerts (identical) from two different rules.
On the Milestone client, a white screen sometime appears instead of the BriefCam tab. To resolve this issue, run MilestoneSSOProvider under a domain user that is recognized by Milestone.
In BriefCam 2023 R2 integrations, when installing or upgrading, recordings are sometimes not fetched for high resolution cameras. . To solve this issue, copy all files and directories from
<BC server>\MilestoneSDK\and paste them (with override) into the <BC server> directory.After upgrading the BriefCam Milestone plugin, a white screen appears for a few seconds in the Milestone 2020 R3 - XProtect Smart Client. To resolve this issue, wait a few seconds or move to another tab and then back to the BriefCam tab.
In Milestone 2020 R3 integrations, when retrying after fetching failed, an error similar to the following appears in the FetchingService log (but does not have any effect on the user):
ERROR - Removed old \\19AIO562\BriefCam\ServerData\VideoData\VideoFiles\FetchedFiles \22\05-05-2021 12_05_00\Project.scp [In: BriefCam.MilestoneIntegration.MipsVideoExporter. ExportFolderClean]
The Milestone Embedded SSO Authentication fails on distributed environments. To solve this issue:
In the BriefCam Administrator Console’s SSOEndpoint environment setting, change localhost to the hostname running the Milestone SSO Provider.
On the machine running the Milestone SSO Provider, give the BriefCam user that runs the BriefCam services a specific permission to open up a listener, by running the following command in PowerShell as Admin (replace the url and user values with your environment’s values):
netsh http add urlacl url=http://BCServer:8030/MilestoneSSO user=bcuser
Restart the Milestone SSO provider services on the server and the IIS on the Web services machine.
See also: VMS Integration Issues