Genetec Integration
VMS Partner | Product | Version | Last Tested BriefCam Version | Integration Level | H.265 Support | Distributed VMS Support | Additional License Required |
Genetec | Security Center | 5.14.0 | 2025 R1 SP3 (Classic engine) | Client integration (L3) | Yes | Yes | Yes. See the Genetec Licenses section below. |
Genetec | Security Center | 5.13.3 | 2025 R1 SP1 (including Classic and Next-Gen engine) | Client integration (L3) | Yes | Yes | |
Genetec | Security Center | 5.13 | 2025 R1 (including Classic and Next-Gen engine) | Client integration (L3) | Yes | Yes | |
Genetec | Security Center | 5.12 | 2024 M1 (including Classic and Next-Gen engine) | Client integration (L3) | Yes | Yes | |
Genetec | Security Center | 5.11.3 | 2024 R2 HF4 (including Classic and Next-Gen engine) | Client integration (L3) | Yes | Yes | |
Genetec | Security Center | 5.11 | 2023 M1 (including Classic and Next-Gen engine) | Client integration (L3) | Yes | Yes | |
Genetec | Security Center | 5.10.4 | 6.4 | Client integration (L3) | Yes | Yes | |
Genetec | Security Center | 5.10.3 | 6.4 | Client integration (L3) | Yes | Yes |
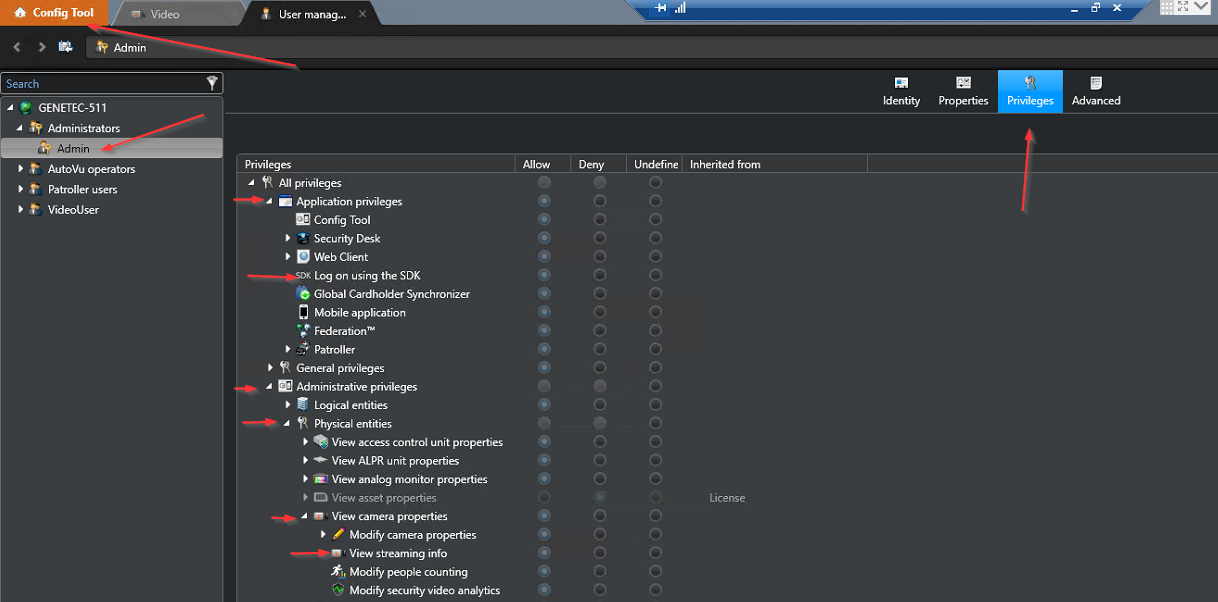
The following privileges are required on the Genetec side to connect to BriefCam:
To be able to connect:
Application privileges -> Log on using the SDK
To retrieve a list of cameras:
Administrative privileges -> Physical entities -> View camera properties -> View streaming info
For live streams:
Action privileges -> Cameras -> View live video
For fetching:
Action privileges -> Cameras -> View playback -> Export video
For alerts:
Administrative privileges -> Alarm management -> View alarm properties -> Modify alarm properties -> Add alarms
Action privileges -> Alarms -> Trigger alarms
Administrative privileges -> System management -> View user properties
Administrative privileges -> System management -> View server properties
The following ports should be available when installing the plugin.
Server | Port # | Description | |
Real-Time Processing Server | 654 | Used for live streams. | |
5500 | Used for live streams. | ||
VSServer, Fetching Server | 605 | Used for connecting to Genetec (Get Cameras, etc.) and sending alerts. | |
606 | Used in multi-server configurations for connecting to Genetec (Get Cameras, etc.) and sending alerts (same role as 5500). For multiple recorders, an additional 605+ port is required for every recorder. | ||
654 | Used by the OX6.RealTime Service for live streams | ||
5500 | Used by the VSServer and Fetching Service for connecting to Genetec (Get Cameras, etc.) and sending alerts. |
The following Genetec certificates are required for the integration with BriefCam to work properly. They are used for the SDK connection between the BriefCam integration and the Genetec Security Center.
The licenses should be ordered from Genetec (see Genetec part numbers in the table below).
Genetec Security Center license:
Server Certificate
Genetec Security Center Part#: GSC-1SDK-BRIEFCAM-VSEnterprisS
A Genetec Security Center license is required for every BriefCam component that integrates with the Genetec SDK as described in the table below.
Component | Description | Number of Licenses |
VSServer service | Used by BriefCam for camera management | 1 for each VSServer service installed on a machine. 1 additional spare license, as unexpected shutdowns can cause the certificate to be taken for 15 minutes, which means that the BriefCam servers will not be able to connect during that time. |
Fetching service | Used by BriefCam’s REVIEW & RESEARCH modules to fetch on-demand videos | 1 for each Fetching service running on a machine. |
Real-time processing | Used by BriefCam’s RESPOND & RESEARCH modules to process real-time videos | 1 for each Alert Processing Service. Note that on a multi-GPU server, each GPU will use a separate Alert Processing Service. Therefore, a multi-GPU server will consume multiple licenses, 1 per GPU. |
Example: A system with 1 server (with all of the BriefCam components installed on it) with 4 GPUs (2 for on-demand, 2 for Real-Time) will consume the following licenses:
Component | Number of Licenses |
VSServer service | 2 |
Fetching service | 1 |
Real-time processing | 2 |
TOTAL # of Licenses: | 5 |
Client Certificate
Genetec Security CenterPart#: GSC-1SDK-BRIEFCAM-VSEnterprisC
BriefCam Component: 1 per Embedded Client deployed (license per Security Desk client). The client certificate is required in order that the embedded BriefCam client will appear within the Genetec Security Desk application’s Video Synopsis tab.
The table below shows you which plugin file to use and which SDKs you will need installed on every machine where any of the following BriefCam services are installed: VSServer service, Processing Server service, and Alert Processing Server service. It does not need to be installed on the client PC.
Genetec Security Center Version | Required Security Center SC SDK | |
5.13.3 | 5.7 SR6 + 5.13 NoteAfter installing the Genetec plugin, check that the SDK directory in the |
|
5.13 | 5.7 SR6 + 5.13 NoteAfter installing the Genetec plugin, check that the SDK directory in the |
|
5.12 | 5.7 SR6 + 5.12 NoteAfter installing the Genetec plugin, check that the SDK directory in the |
|
5.11.3 | 5.7 SR6 + 5.11.3 NoteAfter installing the Genetec plugin, check that the SDK directory in the |
|
5.11 | 5.7 SR6 + 5.11 NoteAfter installing the Genetec plugin, check that the SDK directory in the |
|
5.10.3, 5.10.4 | 5.7 SR6 + 5.10 NoteAfter installing the Genetec plugin, check that the SDK directory in the |
|
When installing the Genetec plugin, in the Genetec SDK Path field, enter the path to the SDK listed in the table above for your version of Genetec. Use the second Genetec v5.7 SDK path for the 5.7 SR6 SDK. The plugins that do not have
sepin the name have slightly different names for these fields.After the installation is completed, open the BriefCam Administrator Console.
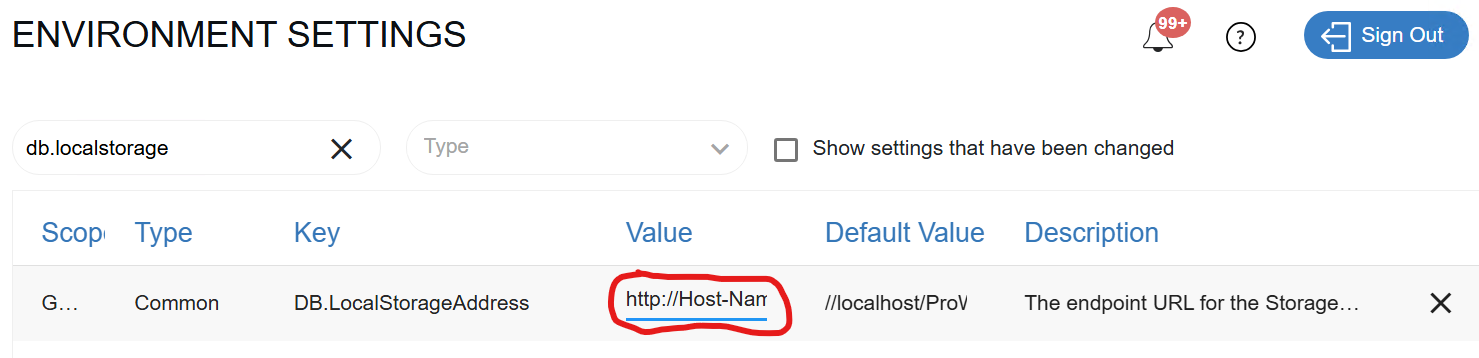
In the DB.LocalStorageAddress environment setting, add a prefix, either
http:orhttps:to the value.
The following section describes the installation and configuration that need to be performed to allow the BriefCam web client application to become embedded in the Genetec Security Desk Application.
After installing the Genetec plugin and the relevant SDK on the BriefCam Server, you are ready to install the Genetec Embedded Client.
On the same computer where the Genetec Security Desk Application is installed, run the Embedded Integration Plugin Installation by right-clicking the
BriefCamEmbeddedClientForGenetecSecurityCenter_7.0.xxx.exefile and selecting Run as administrator.The installation checks for prerequisites. If anything is missing, you will be prompted to install the missing prerequisites and click Install.
In the Welcome screen, click Get Started.
Read and accept the License Agreement terms and click Next.
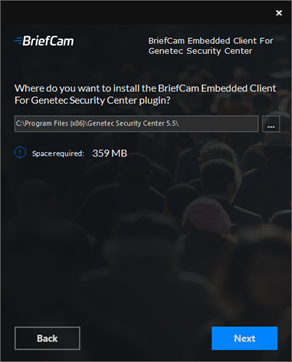
Select the installation destination path and click Next.
Note that the installation path must be the same directory where Genetec Security Desk Application is installed.
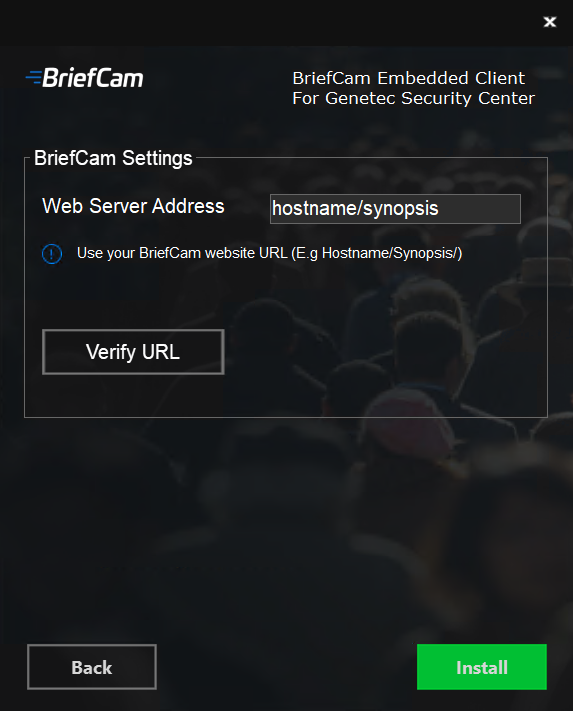
In the Web Server Address field, enter the BriefCam Web Application URL. For https environments, add https:// to the beginning of the URL.
Change the word synopsis to
app.Verify that the provided URL is correct by clicking the Verify URL button (both IP address or hostname values can be specified).
The URL will be saved in
BriefCam.GenetecEmbeddedViewer.dll.config, which is located by default inC:\Program Files (x86)\Genetec Security Center x\Plugins\BriefCam.Once the installation is complete, the URL configuration can be modified manually as needed.
For example:
<appSettings> <add key="serverAddress" value="x.x.x.x/app/" /> </appSettings>Note
Both IP address or hostname values can be specified.
Click Install.
Your installation is now complete. Click Finish.
To establish a connection from the BriefCam client embedded in the Genetec Security Desk Application to the BriefCam Server:
Launch the Genetec Security Desk Application and log in to the Genetec server.
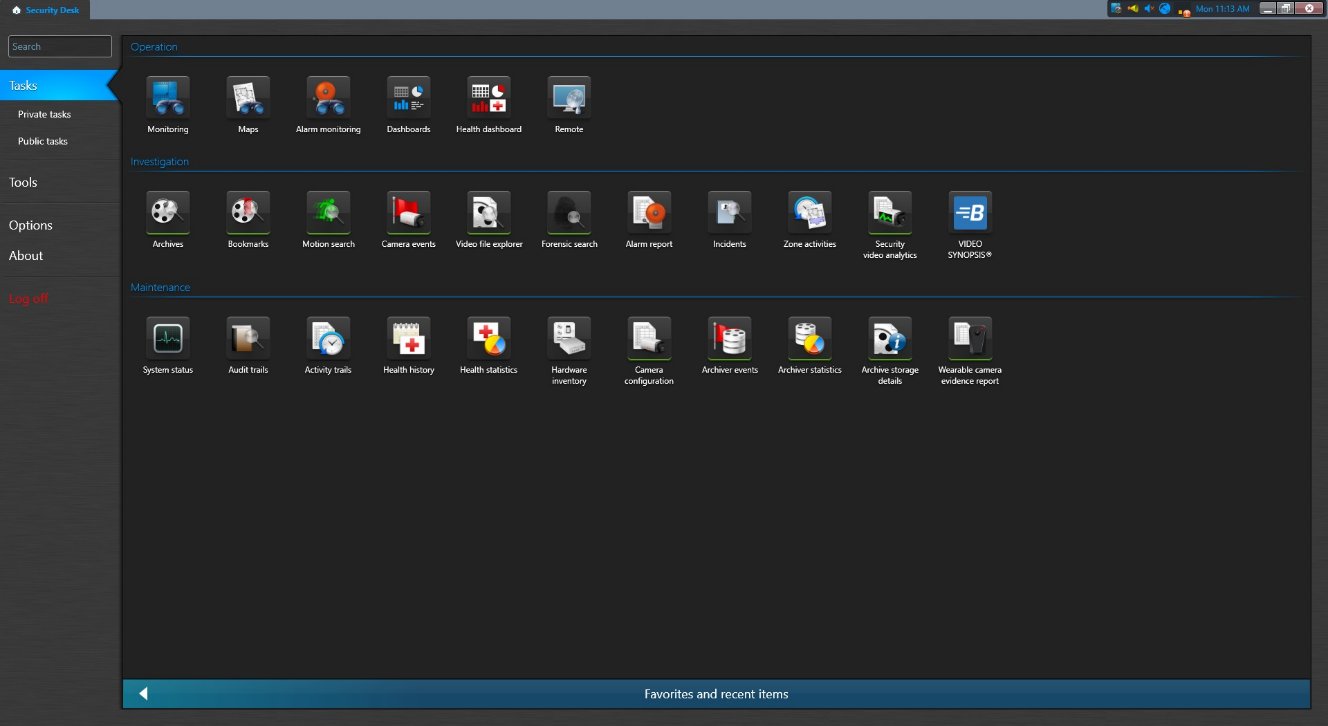
Once it is up and running, access the Genetec Security Desk main Tasks view. A VIDEO SYNOPSIS icon for an embedded BriefCam client will appear under the Integration section. Click the VIDEO SYNOPSIS icon to access the embedded BriefCam client in a separate application tab.
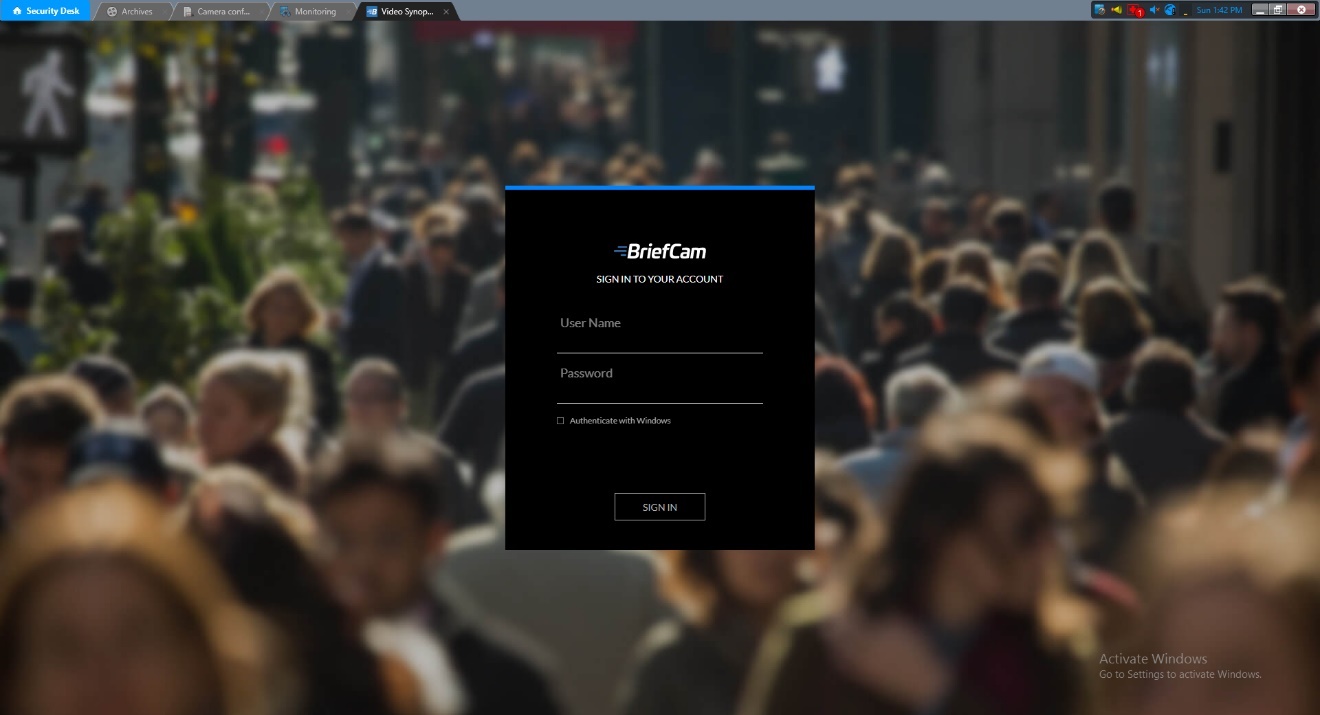
You will be asked to log into BriefCam upon clicking the VIDEO SYNOPSIS icon. Enter your username and password and click Sign In.
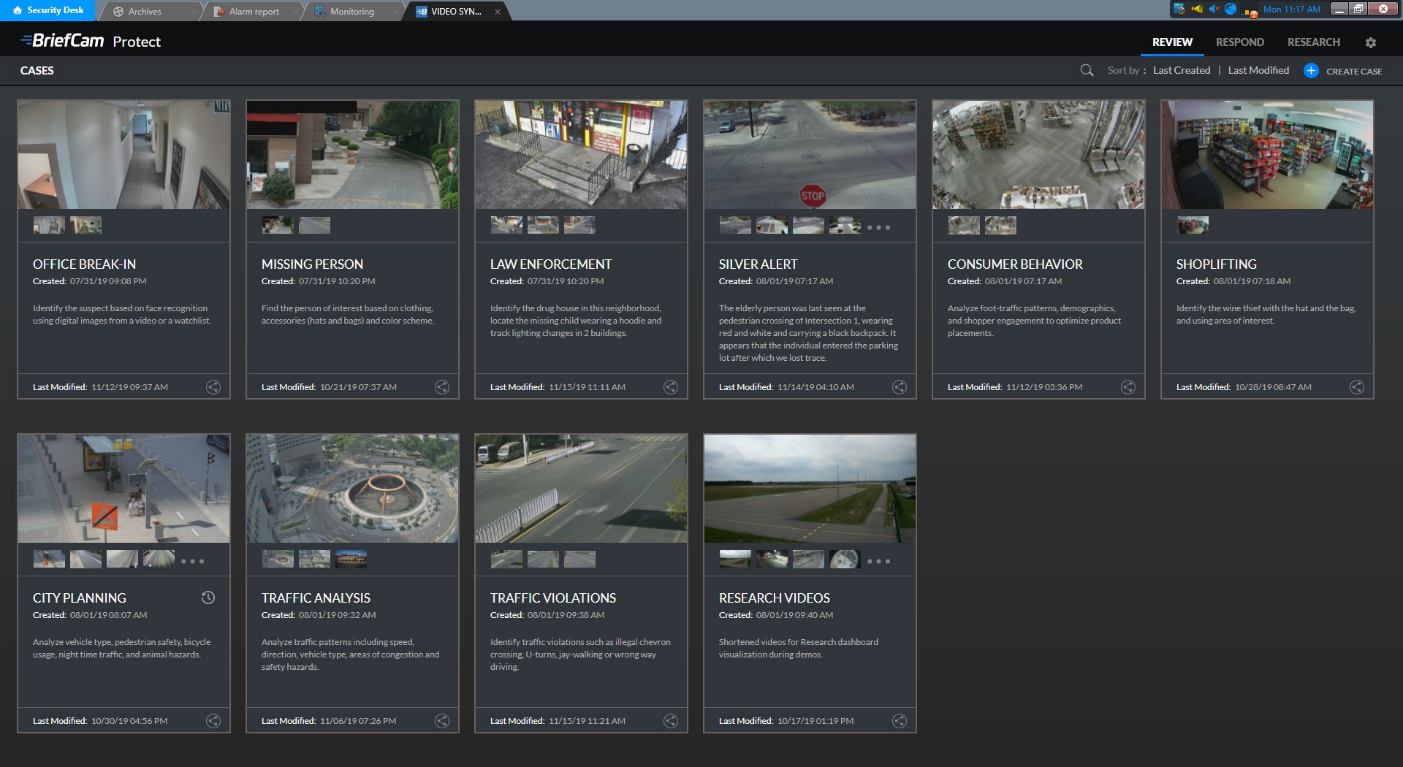
Upon logging in, the embedded BriefCam client will appear within the Genetec Security Desk application’s VIDEO SYNOPSIS tab.
Note
Bookmarks created within BriefCam will not be displayed on Genetec Security Desk application.
To run a silent installation of the BriefCamGenetecPlugin.exe file, use the following command line:
{ GenetecInstaller file name} /qn APPDIR="$env:ProgramFiles\briefcam" SDK_PATH="{path to 5.8 SDK}" SD_5_7_PATH="{path to 5.7 SDK}"
To run a silent installation of the BriefCamGenetecPlugin5_9.exe file, use the following command line:
./{ GenetecInstaller file name} /qn APPDIR="$env:ProgramFiles\briefcam" SDK_PATH="{path to 5.9 SDK}" SD_5_7_PATH="{path to 5.7 SDK}"
Silent Installation of Genetec Embedded Client
To run a silent installation of the Genetec Embedded Client, use the following command line (if you want to install a newer version, see the next section below):
.\{Genetec embedded client installer} /qn BC_WEB_SERVER_ADDRESS="{host of BriefCam web}/app"
Silent Installation of Genetec Embedded Client – Upgrade
To install a newer version, you need to uninstall the previous version.
Open CMD as administrator and run the following command:
wmic product get nameYou will get a list of installed programs on your machine. Execute:
wmic product where name="<program_name>" call uninstall
Where <program_name> is the name of the plugin you want to uninstall exactly as listed from the first command. For example:
wmic product where name="BriefCam Embedded Client for Genetec SecurityCenter 64bit" call uninstall
Next time you uninstall this program, you can call just the second command, since you already know the exact name of the program.
Note
Make sure to consult the “Maximum number of Media Gateway camera streams” section in the Genetec “Security Center System Requirements” guide in order to make sure your Genetec VMS is properly configured to support live stream requests by BriefCam.
To pull real-time streams from Genetec to create alerts in BriefCam:
Make sure that the Genetec portal is configured to enable RTSP and that the authentication is on.
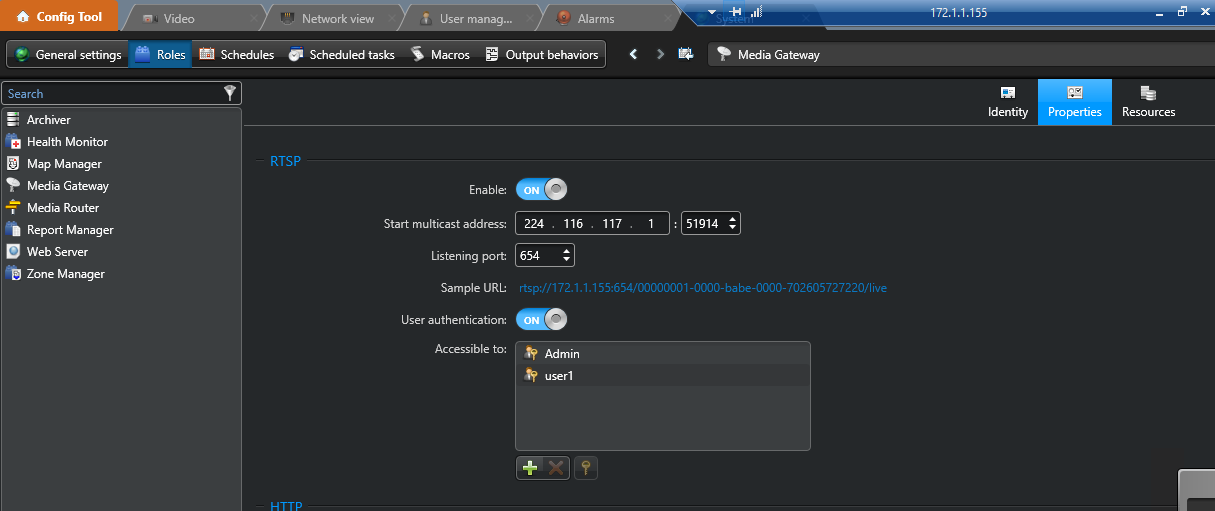
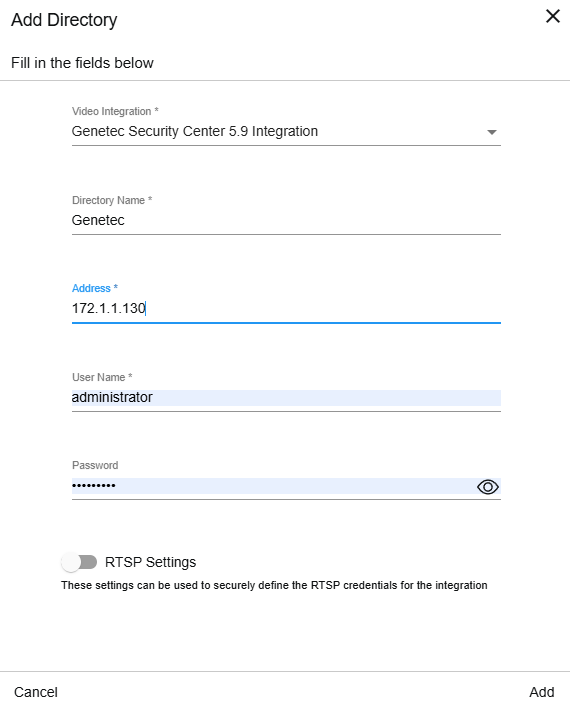
In the BriefCam Administrator Console, when adding a directory, you need to enter the following information:
Video Integration – Select the Genetec integration you will be using.
Directory Name – Enter a name for the directory. The name will be displayed to the end users when selecting cameras.
Address – Enter the address of the Genetec directory server (host name or IP address).
User Name – Enter a user name that will be used to authenticate the Genetec directory.
Password – Enter the password for the user above.
Note that RTSP-based integrations do not work when user’s credentials include the @ sign.
RTSP Settings – Turn on this toggle. Since the RTSP’s User authentication is on, you need to enter the RTSP credentials. The RTSP user name, password and address will be used for authentication to the RTSP server.
If Genetec Auxiliary Archiver is configured on the VMS and BriefCam is configured to connect to it, then every request from the VMS will automatically fetch video from the auxiliary archiver. If you want to connect to Genetec Auxiliary, make sure to edit the BriefCam.GenetecSc52Fetcher32.ini file, which is located by default at C:\Program Files\BriefCam\BriefCam Server\32\plugins – Set the ;UseAuxiliaryArchiver = false parameter to true, uncomment the line and save the file.
Alerts can be sent to Genetec Security Center’s Alarm monitoring tab.
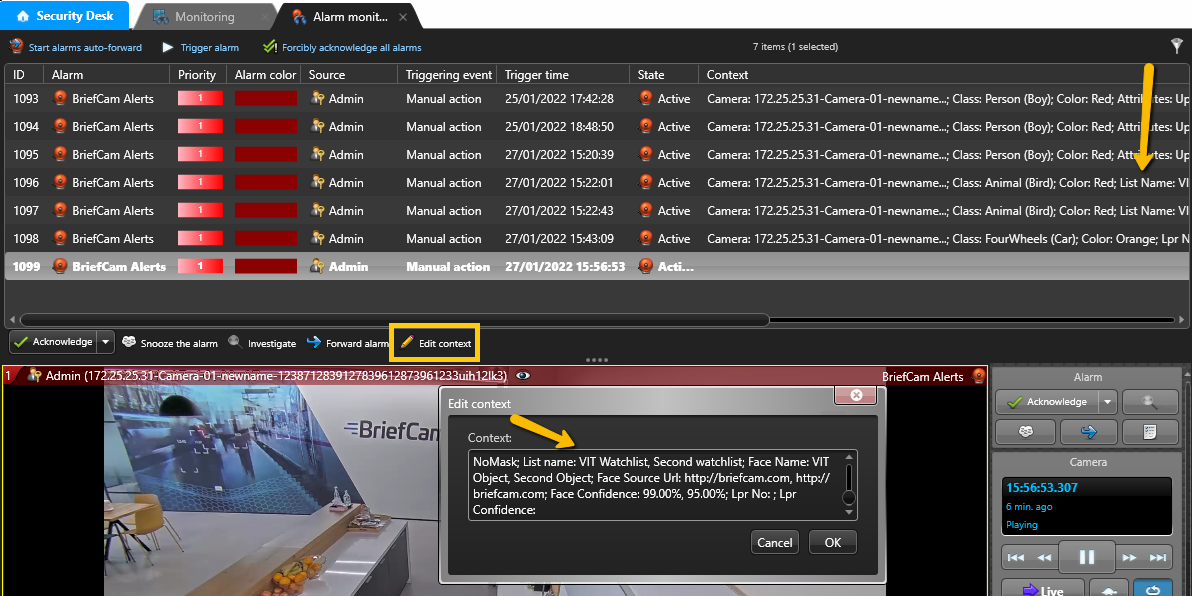
The following information is sent to Genetec:
Camera Name
Class
Color
Person Attributes (Upper Wear, Lower Wear, Bag, Hat, Mask)
Watchlist
Face Recognition/License Plate Recognition Identity Name
Confidence
On the Genetec-side you need a full admin user.
In the Environment Settings section, there are three settings relevant for sending alerts outside of BriefCam (see the image below):
To send alerts outside of BriefCam, set the Respond.AlertsPublishingEnabled setting to true.
To send alerts to a VMS, check that the Respond.AlertsPublishingToVMSEnabled setting is set to true.
To change the polling interval, use the Respond.AlertsPublishingIntervalInMilliseconds setting.
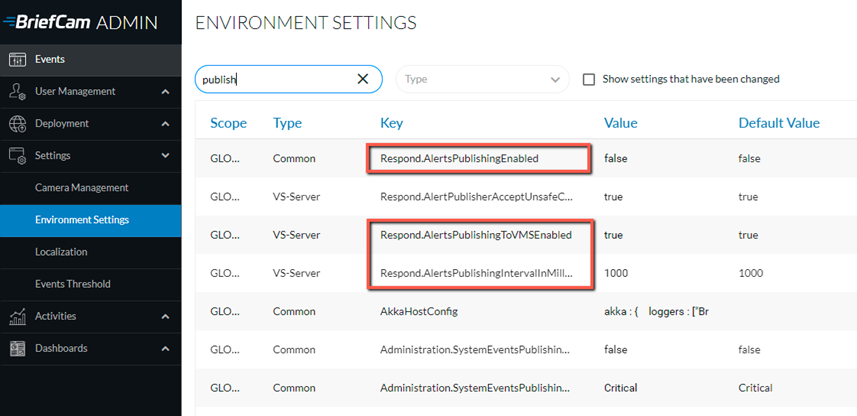
If you make changes to the settings, you need to restart or start the VSServer service.
When the Genetec plug-in is installed, the BriefCam.GenetecSc58Fetcher.ini file or the BriefCam.GenetecSc59Fetcher.ini file is created at: C:\Program Files\BriefCam\BriefCam Server\plugins. The [Alerts] section contains a number of parameters including:
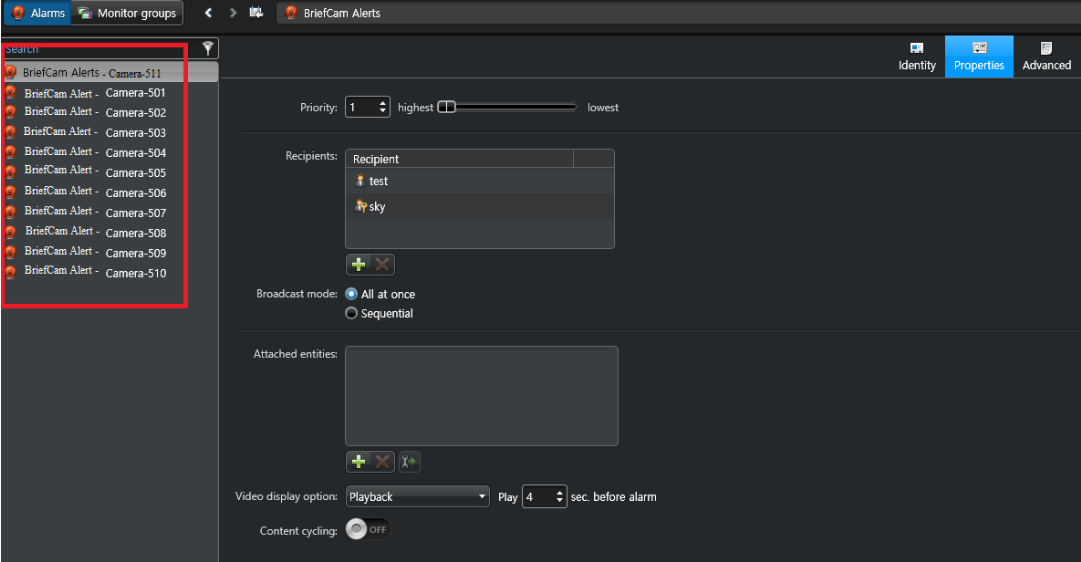
DefaultAlarmName– This parameter is used as the connection between BriefCam and Genetec.TruncateCameraName– This parameter lets you send a unique alarm identifier for each camera.
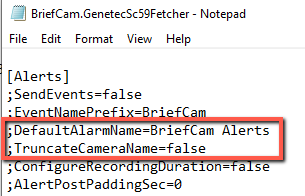
If the TruncateCameraName parameter does not exist in the .ini file, the default behavior will be as if the parameter is set to false. If the parameter is set to true, every alarm sent to Genetec will have the following identifier:
<DefaultAlarmName> - <Camera name> for example: BriefCam Alarm - Camera-55.
Note
If you expect a large number of alarms to occur simultaneously, set the ReactivationThresholdSec parameter to 0. This ensures that no alerts are missed.
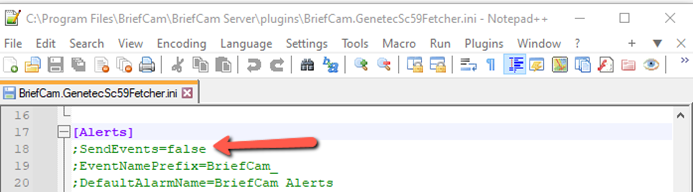
You can send events instead of alerts. You do this by setting the SendEvents parameter to true and uncommenting the row by removing the semicolon (;). The parameter is in the BriefCam.GenetecSc58Fetcher.ini file or the BriefCam.GenetecSc59Fetcher.ini file, which is located by default at: C:\Program Files\BriefCam\BriefCam Server\plugins.
To activate geolocation features in the BriefCam system, add the following section to the BriefCam.GenetecSc59Fetcher.ini file, which is located by default at: C:\Program Files\BriefCam\BriefCam Server\plugins.
[General]
GeoLocationEnabled = true
Note
Genetec automatically handles load balancing internally as long as all servers belong to the same Media Gateway role. In this setup, the manual configuration steps described below are not required.
If you are not using Genetec's built-in load balancing, you can manually connect multiple Genetec gateways to BriefCam to share the load of managing your cameras. This is done by adding entries to the BriefCam.GenetecSc59Fetcher.ini file’s Media Gateways section.
The syntax for adding the entries is:
<username:password@MediaGatewayAddress=NumberOfSupportedCameras>
Note that the username and password should be the same for each of the gateways.
For example:
[MediaGateways]

username:password@1.0.0.0:654=100

username:password@1.0.0.1:654=100

username:password@1.0.0.2:654=100
This configures three gateways with the username/password combination and assigns a capacity of 100 cameras to each.
By default, BriefCam uses the live stream for all cameras. You can change this for individual cameras or globally.
Global Stream Type
Locate the
DefaultStreamProfileparameter in theBriefCam.GenetecSc59Fetcher.inifile.Set the desired stream type. The valid options are:
live(default)archiving(recording)highres(high resolution)lowres(low resolution)remote
Individual Camera Stream
Edit the
GenetecCamerasMap.jsonfile. This file contains a list of cameras identified by theirCameraNameorCameraId.Specify the desired
StreamTypefor each camera.
Finding Camera Information
CameraName: Look for it in the Genetec VMS.CameraId: Look for it using BriefCam’s Video Integration Tester (VIT) in the External ID column. This is mainly used if you have two cameras with the same name.
For example:
    {
    "CameraName": "Kitchen Camera",
    "StreamType": "lowres"
    }
Additional Notes
The GenetecCamerasMap.json file structure employs a JSON array named Items that contains these camera objects. An example with an empty object is provided below to illustrate the format:
{
"Items": [
{
"CameraName": "",
/* OR */
"CameraId": "",
/* live, archiving, highres, lowres, remote */
"StreamType": ""
}
]
}Two different versions of the Genetec plugin installed on the same machine will not work with BriefCam.
Bounding boxes when playing the original video are not supported.
In Genetec integrations, video rotation is not currently working. To resolve this issue, configure the camera to send a non-rotated video to Genetec.
In Genetec 5.10 integrations, there are errors when trying to connect to the live camera for the first time or after a server restart. To resolve this issue, restart IIS (by opening the Windows services, right-clicking on the World Wide Web Publishing Service and clicking Restart).
In Genetec 5.10 integrations, when the Rtsp url was entered in the directory connection setting's Password field: 'VmsPassword RtspUsername:RtspPassword@GenetecRtspServer', alerts were not sent in some scenarios. To solve this issue, set
LiveStreamWarmupFrameCount=19 in the plugin's config file and Live.GetLiveImageRetryInterval=500 in the BriefCam Administrator Console’s Environment Settings.In Genetec 5.10.2 integrations on H.265 cameras, a gray frame is displayed instead of a RESPOND live image. To solve this issue, the camera's Key frame interval in images must not be larger than the LiveStreamWarmupFrameCount value in the
BriefCam.GenetecSc59Fetcher.inifile.