Dallmeier Integration
Integration Summary
VMS Partner | Product | Version | Last Tested BriefCam Version | Integration Level | H.265 Support | Additional License Required |
Dallmeier | SeMSy | 5 | 2024 R2 HF4 | Integration for on-demand and real-time (L2) | Yes | A floating license is required for each recorder. |
Dallmeier | SeMSy | 5 | 2024 M1 (for the Next-Gen engine) | Integration for on-demand and real-time (L2) | Yes | A floating license is required for each recorder. |
Licenses
A Dallmeier floating license is required for each recorder used by the BriefCam Server. To acquire these licenses, please contact the Dallmeier Support team.
Dallmeier SeMSy III Installation and Configuration
After running the plugin, you need to configure the BriefCam.Dallmeier.SeMSy3.ini file, which by default is located at: C:\Program Files\BriefCam\BriefCam Server\plugins.
Note
If you have more than one physical server running the BriefCam server service all the configurations in the BriefCam.Dallmeier.SeMSy3.ini files (including the connection strings) should be identical.
Recorder and Recorders Sections
This integration supports many recorders and you need to enter the credentials for each of the recorders in the BriefCam.Dallmeier.SeMSy3.ini file.
Remember to remove the semicolon ( ; ) from the beginning of each row that you change.
If all the recorders share the same credentials:
Set the credentials in the
DefaultUserNameandDefaultPasswordfields, as shown in the image below.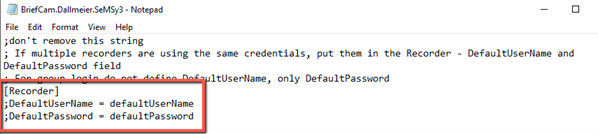
If you are using group login:
Set the
DefaultPasswordonly. Leave theDefaultUserNamerow as is.
If each recorder has its own credentials:
If all or some of the recorders have different credentials than the default, list each of them in the [Recorders] section with the recorder name, IP address, username and password.
Note that:
Each recorder name needs to be unique.
If the recorder is using group login, use two sets of double quotes (" ") for the
Username.
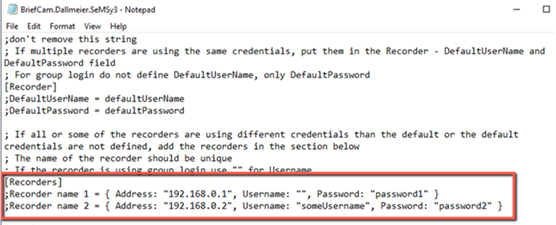
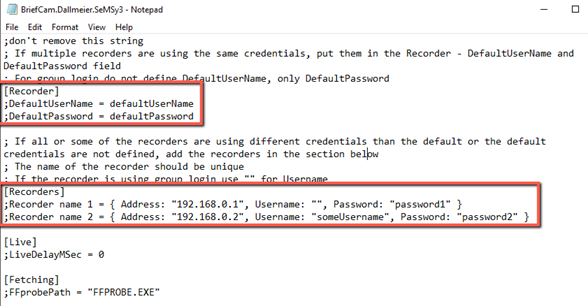
If some of the recorders have their own credentials:
Set the shared credentials in the
DefaultUserNameandDefaultPasswordfields.For the recorders with credentials different than the default, add each of them to the
[Recorders]section.
Live Section
When a live image is received from the recorder/camera, the time of the frame is also received. If this time is invalid, BriefCam will set the frame time to the current time minus the value set in the LiveDelayMSec parameter. For example, if a frame is received with time 01/01/1900 00:00:00, BriefCam will override this time to the current time of the machine and will subtract the configured delay, which by default is 0.
Fetching Section
The FFprobePath parameter is the path to the ffprobe.exe file, which is located in the BriefCam server folder. The default path is set to the BriefCam server path.
Database Section
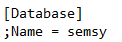
If the database name is not semsy (the default), change it in the Database section and remove the semicolon.
Cameras
You only need to add the main directory in the BriefCam Administrator Console. You do not need to add the recorders separately. For information about adding a directory, see the BriefCam Administrator Guide's Camera and VMS Configuration section.
When adding the directory in BriefCam, use the credentials that are used for connecting to the database via the Dallmeier SeMSy 3 DB Configuration Tool.
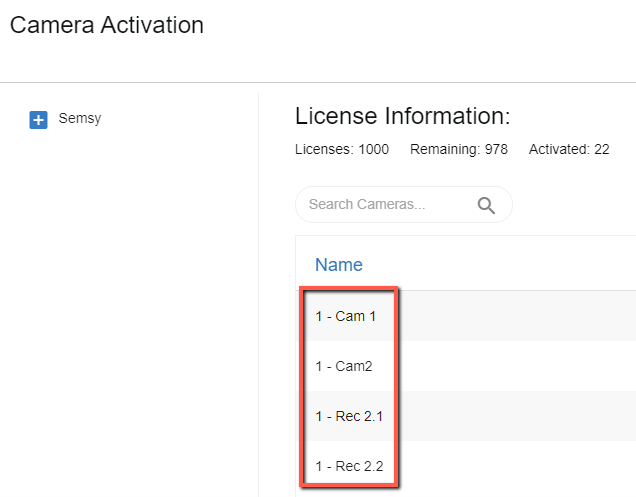
In the BriefCam Administrator Console, the camera names from the VMS will be prefixed by the area code and a hyphen. In the image below, the area code is 1.
Send Alerts to the Dallmeier SeMSy III Database
Note
The alerts are sent to the database only and do not appear in the Dallmeier VMS interface.
To configure the sending of BriefCam alerts to the Dallmeier SeMSy III database, carry out the following steps:
Enable the sending of alerts outside of BriefCam, by opening the BriefCam Administrator Console and setting the Respond.AlertsPublishingEnabled environment setting to true.
On the machine where you ran BriefCam’s SeMSy III plugin, open the
BriefCam.Dallmeier.SeMSy3.inifile (located, by default, at:C:\Program Files\BriefCam\BriefCam Server\plugins).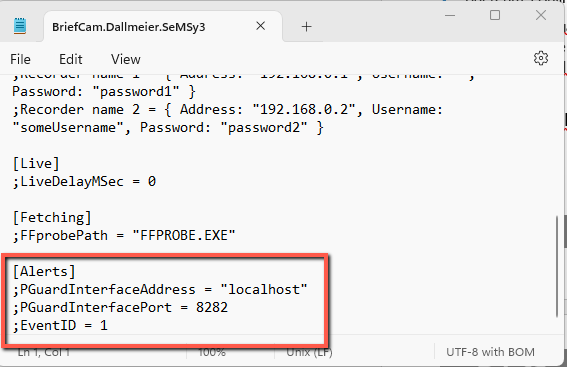
Set the following three parameters and remove the semicolon from the beginning of each of the rows:
PGuardInterfaceAddress– The IP address or hostname of the machine where the PGuardInterface service is installed (localhost by default).PGuardInterfacePort– The HTTP port for the PGuardInterface service (configured during the installation of the service; 8282 by default).EventID– This is the subalarm ID that needs to be created in PGuard in the “10036 External message” section. This can be any number from 1 to 99999 as long as it is not already in use. See Dallmeier’s PGuardInterface documentation for additional information.
In the BriefCam Administrator Console, start/restart the VSServer service.
Received Alerts
The alerts received in the Dallmeier SeMSy III database will appear as a list of comma-separated values in the following order:
Alert IDTimestamp- UTC time in UNIX timestamp format (seconds since 01-01-1970)Rule NameAlert Type- "FA" for fast alerts; "SA" for smart alertsType- "FR" for face recognition alerts; "LPR" for license plate recognition alerts; "GEN" for other alertsObject ClassConfidence %DescriptionImage URLWatchlistLicence PlateColorUpper WearLower WearBagHatMask
Additional notes:
If any of the values are empty, the comma delimiters in the message will still appear.
When the alert message’s limit of 254 characters is reached, data pruning will occur to ensure that the alert can be sent.
Data pruning may occur in the following fields: Rule Name, Image URL, and Watchlist.
Dallmeier SeMSy 5 Installation and Configuration
Working with SeMSy 5 on Distributed Environments
If you are working with SeMSy 5 on a distributed environment, you will need to carry out the following steps:
STEP 1. Create a Virtual Workstation in SeMSy 5 Config
To connect to the Core Server in a SeMSy 5 Distributed installation, there needs to be a Workstation provided, as part of the credentials.
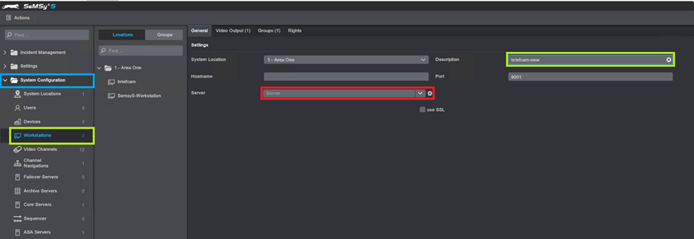
This is done by creating a Virtual Workstation as follows:
In the SeMSy 5 Config Mode application, open the System Configuration folder.
Click on the Workstations menu.
In the Description field, enter a name for the workstation. Only a name for the workstation is needed. Do not select a server from the Server drop-down, it needs to remain empty.
STEP 2. Create a New Admin User for BriefCam in SeMSy 5
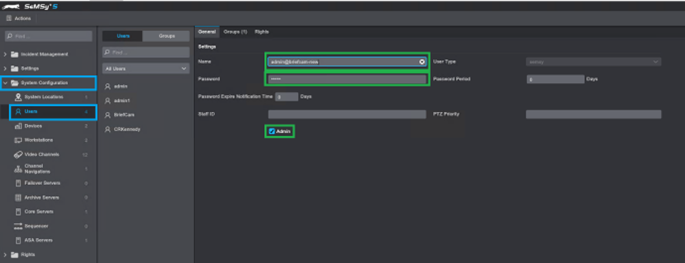
In the SeMSy 5 Config Mode application, open the System Configuration folder.
Click the Users menu.
Add a new user.
In the User field, enter the username using the following syntax:
[REST API user]@[workstation name]Where the
REST API useris the username configured for accessing the Rest API (this is in the Site Login User found in the SeMSy Setup app) and theworkstation nameis the newly created workstation name from STEP 1 above (Create a Virtual Workstation in SeMSy 5 Config).For example:
admin@briefcam-newIn the Password field, create a password.
Give the new user Admin rights by checking the Admin checkbox.
Cameras
To add cameras:
Open the BriefCam Administrator Console.
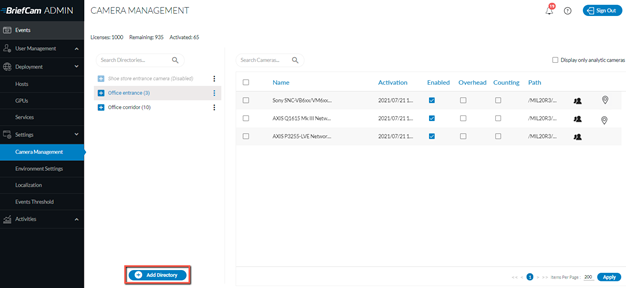
Open the Camera Management section (see image below), which lists all connected VMS servers on the left and the servers’ associated cameras on the right.
Click the Add Directory button.
The Edit Directory screen will open:
Note
You only need to add the main directory in the BriefCam Administrator Console. You do not need to add the recorders separately.
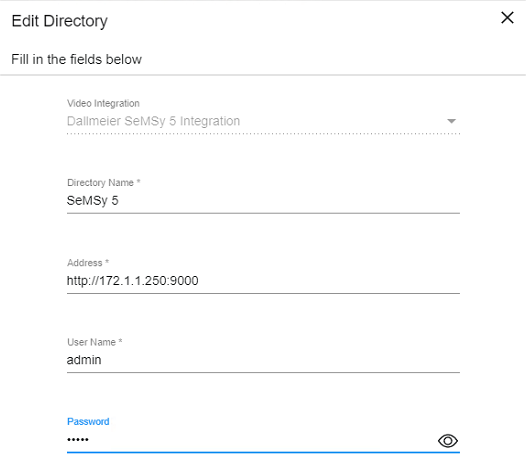
From the Video Integration field, select Dallmeier SeMSy 5 Integration.
In the Directory Name field, enter a name.
In the Address field, enter the following URI schema, which is needed for connecting to the SeMSy 5 REST Server:
The URI schema is
http(s)://{SeMSy5-address}:{RestServerPort}You’ll find the RestServerPort in the SeMSys 5 Setup application’s SeMSy Core tab. The default port is
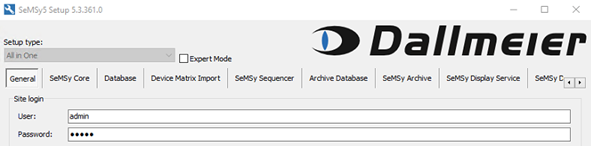
9000.In the User Name and Password fields, enter the SeMSy5 Site Login User and User Name and Password. You’ll find these in the SeMSy 5 Setup application’s General tab (as shown in the image below). If you are using a distributed environment, enter the user and password that you created in the SeMSy 5 Config Mode application (see STEP 2. Create a New Admin User for BriefCam in SeMSy 5 above).
In the BriefCam Administrator Console, the camera names from the VMS will be prefixed by the area code and a hyphen. In the image below, the area code is 1.
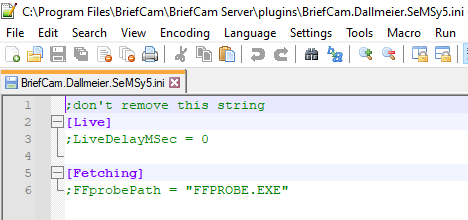
After running the plugin, you can configure the BriefCam.Dallmeier.SeMSy5.ini file, which by default is located at: C:\Program Files\BriefCam\BriefCam Server\plugins.
Live Section
When a live image is received from the recorder/camera, the time of the frame is also received. If this time is invalid, BriefCam will set the frame time to the current time minus the value set in the LiveDelayMSec parameter. For example, if a frame is received with time 01/01/1900 00:00:00, BriefCam will override this time to the current time of the machine and will subtract the configured delay, which by default is 0.
Fetching Section
The FFprobePath parameter is the path to ffprobe.exe file, which is located in the BriefCam server folder. The default path is set to the BriefCam server path.
Note
Dallmeier SeMSy 5 was certified with the Dallmeier Recorder version 9.15.12.
Known Limitations
Motion detection is not currently supported.