Site Deployment
Prerequisites:
BriefCam installation (without RESEARCH) as described in the BriefCam Installation Guide.
NGINX is mandatory in every deployment of the Linux-based OX6 engine.
HTTPS is highly recommended but depends on the organization’s policies. If HTTPS is used, the organization needs to provide the certificates.
Log into the BriefCam Administrator Console.
From the Settings section, open the Environment Settings screen.
You’ll now configure the system to run as a site.
Set the Multisite.Mode environment setting to Site.
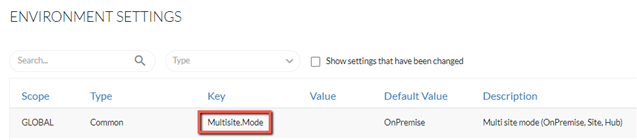
You’ll now define the Site ID.
In the Site.Id environment setting, enter the ID that you received from your Hub administrator. (The site registration is done on the Hub. For additional information, see the Registering a Site on the Hub section.) Note that you no longer need to input a site name like you did in previous versions because the site name is updated every five minutes from the Hub. The time interval is configurable using the Multisite.SyncSiteDataPollingIntervalInMinutes environment setting.
You’ll now configure the base URL for the Hub.
Set the Multisite.HubBaseExternalUrl environment setting to the base URL of the Hub (the FQDN of the NGINX on the Hub) followed by:
/OutboundAPIGateway/. For example:http://company.multisite.hub/OutboundAPIGateway/.You’ll now enable the sending of RESPOND alerts and configure where they’ll be published.
Set the Respond.AlertsPublishingEnabled environment setting to true.
Set the Respond.ExternalUrlUploadAlerts environment setting to the URL of the Hub (the FQDN of the NGINX on the Hub). For example:
http://company.multisite.hub/ OutboundAPIGateway/AlertProcessing/process-alert.You’ll now configure where RESEARCH data is published.
Set the Nexus.HubBIGatewayAddress environment setting to the URL of the Hub (the FQDN of the NGINX on the Hub). For example:
http://company.multisite.hub/hubBIGateway/. Make sure that the URL has a slash (/) at the end.
Now you will start the relevant BriefCam services:
From the Deployment section, open the Hosts screen.
On the Windows host, click on the settings icon and select the Multi-site Site template.
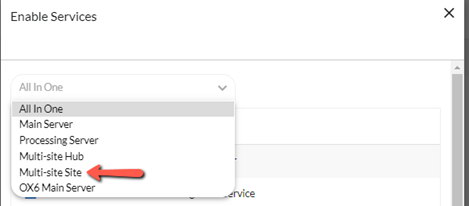
If your environment is running the Linux-based OX6 engine, in addition to the services that were selected when you selected the template in the step above, select all the OX6 services.
Open the Services section and start all the services.
Note
To show time zones correctly, it is highly recommended that the site and all its cameras are in the same time zone.
Setting Up GPUs and Adding Cameras and Users
To continue with the deployment, you’ll now set up your GPUs and add cameras and users. For information about these steps, see the BriefCam Administrator Guide.