Konfiguration av kamera och VMS
Denna del är endast relevant för BriefCam produkter anslutna till externa VMS-system.
[en] Connecting BriefCam to a VMS Server
[en] Make sure the appropriate VMS plug-ins are installed.
[en] Open the Camera Management section (see image below), which lists all connected VMS servers on the left and the servers’ associated cameras on the right.
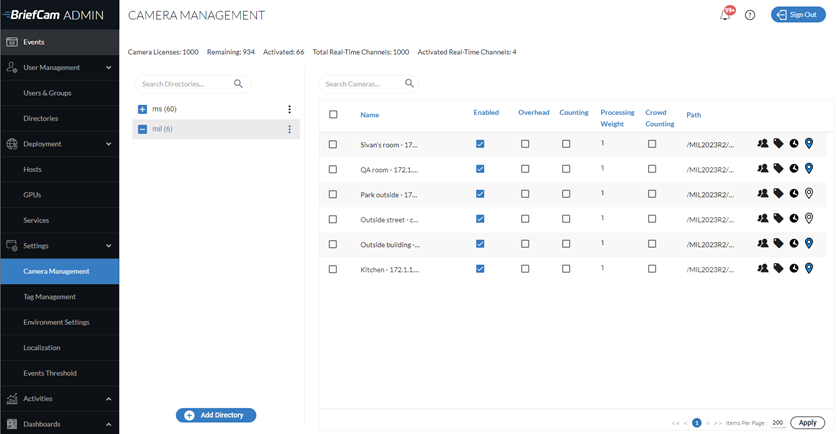
[en] Click the Add directory button to add a VMS server. The Add Directory dialog opens.
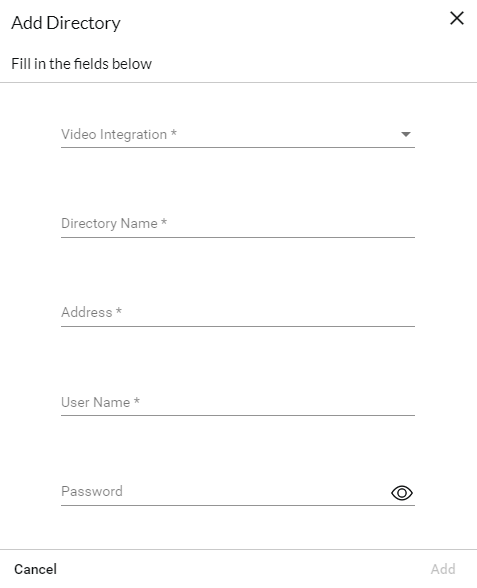
[en] From the Video Integration field, select the appropriate VMS integration option. Different integrations can be added by installing additional VMS-specific plugins.
[en] In the Directory Name field, enter a display name for the user directory. The directories should have different names.
[en] In the Address field, enter the VMS server’s IP/host address. If you are not using the default port (80), add the communication port (the port number may be specified as a suffix to the address, preceded by a colon).
[en] In the User Name and Password fields, enter the VMS server user name and password. This user must have permissions in the VMS to the cameras exposed for BriefCam. Click Add to add the directory.
[en] If you selected Milestone or Genetec, you will also see an RTSP Settings toggle button. These settings can be used to securely define the RTSP credentials for the integration.
[en] To test the connection to the newly added directory, click the zoom (
 ) icon to the right of a directory (VMS server) name and select the Test Connection option.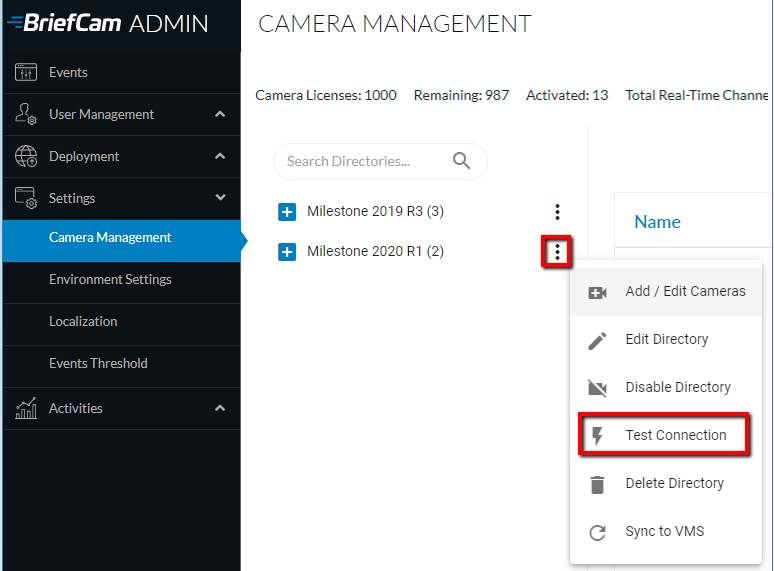
[en] To edit the directory, click the Edit Directory option. When changing the Address field, the new value must point to the existing directory.
[en] To completely disable all cameras associated with a directory, click the Disable Directory option. In a disabled directory, it is not possible to enable individual cameras. If you disable and then enable a directory, all of the associated cameras are also enabled.
[en] To completely remove a VMS directory (assuming that none of the cameras associated with it are currently activated), click the Delete Directory option.
Notera
[en] Make sure to click the Apply button to retain any configuration changes.
Notera
[en] When using a multi-site deployment (comprised of multiple site systems and a central Hub), video sources are set up in the Sites’ Administrator Consoles and not in the Hub Administrator Console.
Kameraval och aktivering
Vid det här laget kan du välja, sedan aktivera eller inaktivera (med förbehåll för licensvillkor) individuella eller flera kameraflöden som sedan kan bearbetas för att generera videosynopser.
För att aktivera kameror, klicka på zoomikonen (
 ) till höger om namnet på en katalog (VMS-server) och välj alternativet Lägg till / Redigera kameror.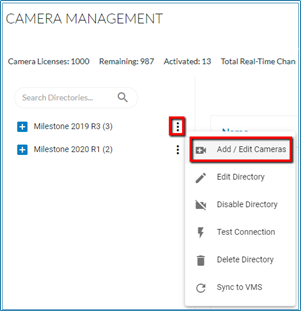
Skärmen Kameraaktivering visas med en lista över kamerorna associerade med vald VMS-katalog.
Notera
Kameraaktiveringen är en process som är irreversibel. När det är gjort kan aktiveringsantalet inte återställas såvida inte en särskild godkänd begäran öppnas med BriefCam support.
Markera kryssrutan i kolumnen Aktiverade för alla kameror som du vill aktivera och klicka på knappen Aktivera (som finns i det nedre högra hörnet). Kryssrutan för kameror som redan är aktiverade kommer att bli utgråad.
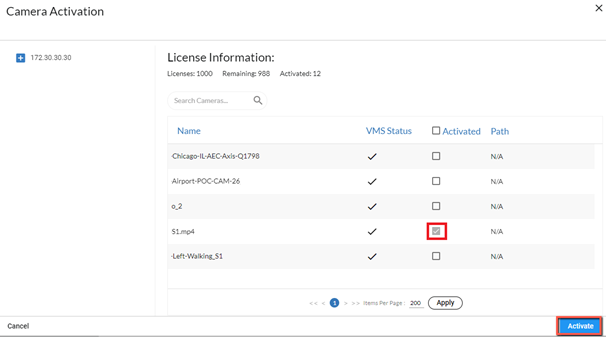
I stället för att aktivera en kamera, som är irreversibel, kan du inaktivera individuella kameror genom att markera eller avmarkera kryssrutan Aktiverad/Inaktiverad i kolumnen Status. Inaktiverade kameror kommer inte att visas i BriefCam webbklienten. Observera att du även kan aktivera och inaktivera kameror från skärmen Kamerahantering.
Notera
När en VMS-server blir otillgänglig, aktiveras inte kamerorna automatiskt på BriefCam när VMS-servern blir tillgänglig igen. Starta om AlertProcessingServices för att lösa problemet.
[en] Camera Configuration
[en] At the top of the screen, you can see the number of active and remaining camera licenses.
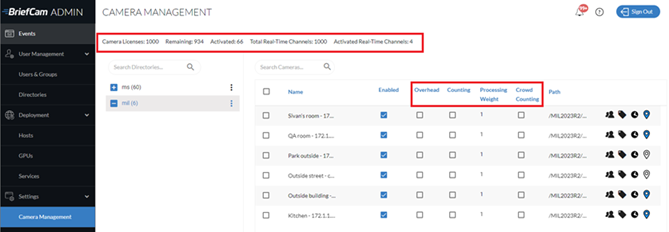
[en] This screen has the following columns:
[en] Overhead
[en] If the camera is set with an overhead angle or is an overhead fisheye camera and the camera is used with the Line Crossing feature, it is recommended to check the Overhead checkbox. This will improve the object extraction accuracy by running the algorithmic engine in a special processing mode that compensates for the warping that overhead cameras introduce. Note that only people are detected on cameras with the Overhead checkbox checked. Vehicles and animals are not detected. In addition, the only metadata generated for people detected in Overhead mode is colors.
[en] Counting
[en] If the camera is set with an overhead angle and is used for people counting, check the Counting checkbox for the cameras. This will improve the people counting accuracy by running the algorithmic engine in a special processing mode that reduces the amount of false object detections, which makes the counting more reliable. This Counting mode, which is available for the OX5 engine, is not the “people counting” feature. Note that vehicles are not detected on Counting cameras.
[en] Processing Weight
[en] The processing weight is how much of the total GPU Processing Capacity is expected to be consumed by this camera. The GPU’s processing capacity is defined in the GPUs screen.
[en] Note that the weighting system only applies to real-time processing. All on-demand tasks are treated as having a processing weight of 1.
[en] Crowd Counting
[en] Crowd counting is only supported for the Linux-based Next-Gen (OX6) engine.
[en] Select the Crowd Counting checkbox to enable the collection of crowd counting data for groups of more than 50 people, by default. This number is configurable using the HeadCount.CrowdCountingThreshold environment setting. The value you enter in this setting appears in the user interface with one more than the entered value (for example, if you enter 60, 61 will appear in the user interface).
[en] By default, crowd counting data is not collected from the camera.
[en] Note that:
[en] Only the Area filter is available with the Crowd Counting filter.
[en] Enabling Crowd Counting on a camera will cause existing rules for that camera to stop sending alerts. Therefore, it is recommended to disable or delete all existing rules for the camera before enabling Crowd Counting.
[en] Disabling Crowd Counting on a camera will turn existing Crowd Counting rules for that camera into People Counting rules. Therefore, it is recommended to disable or delete all existing rules for the camera before disabling Crowd Counting.
[en] Instant REVIEW mode is not supported for Crowd Counting cameras.
[en] Camera Management icons
[en] This screen has the following icons:
[en] Icon | [en] Description |
 | [en] Set permissions for the cameras. See: Kamerabehörigheter. |
 | [en] Assign tags to the camera. See: Tilldela En Tagg till En Kamera. |
 | [en] Set a time zone. This is only for use in multi-site environments. See: Tilldela En Tidszon till En Kamera. |
 | [en] Set coordinates for outdoor cameras for use in the Cameras view and Fast Track. You can hover over the icon to see a tooltip with the coordinates. Geo-location available in Milestone (all supported versions) and Genetec (v5.8 and above) are automatically set here. You can override the Milestone and Genetec coordinates by clicking on the icon and editing the coordinates. Coordinates can also be set in the BriefCam client. Note that Synkronisera kamerorna med VMS will override manually added coordinates. |
 | [en] Hover over this to see the activation time and last modified time information. |
[en] Filtering Cameras
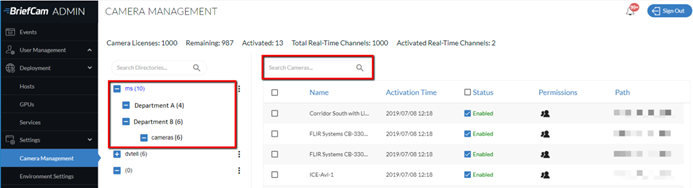
[en] There are two ways to filter the list of cameras.
[en] Use the directory tree on the left to drill down to the camera you are searching for.
[en] Use the Search field to narrow the list even further. The search will search the camera name, camera ID, and tags.
Ändra en kameras namn
Om du ändrar en kameras namn behöver du definiera om och aktivera kameran igen.
Ersätta En Kamera
Du kan ersätta utgångna eller trasiga kameror enligt följande:
Anslut den nya kameran till VMS och ge den samma kameranamn som den utgångna eller trasiga kameran.
Klicka BriefCam Administrator Consolepå Synka till VMS från.
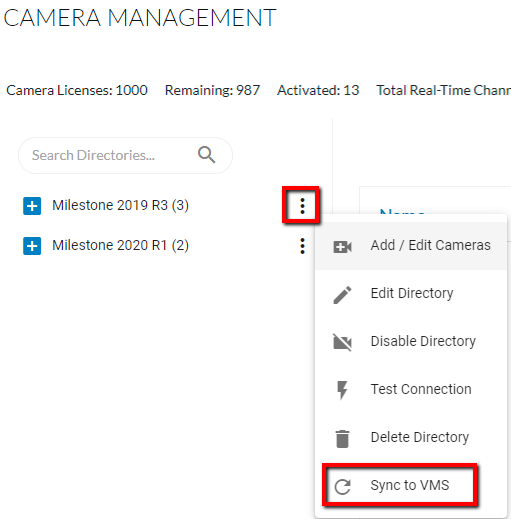
BriefCam kommer att identifiera den utbytta kameran och aktivera den.
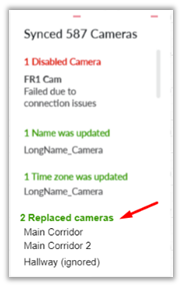
BriefCam behåller alla befintliga inställningar för de utbytta kamerorna.
För att regler och källor med uppgifter i realtid ska börja behandlas igen, startar du om Alert Processing Server och VSServer-tjänsterna i BriefCam Administrator Console.