Конфигурация камеры и VMS
BriefCam Эта часть относится только к продуктам, подключенным к внешним системам VMS.
[en] Connecting BriefCam to a VMS Server
[en] Make sure the appropriate VMS plug-ins are installed.
[en] Open the Camera Management section (see image below), which lists all connected VMS servers on the left and the servers’ associated cameras on the right.
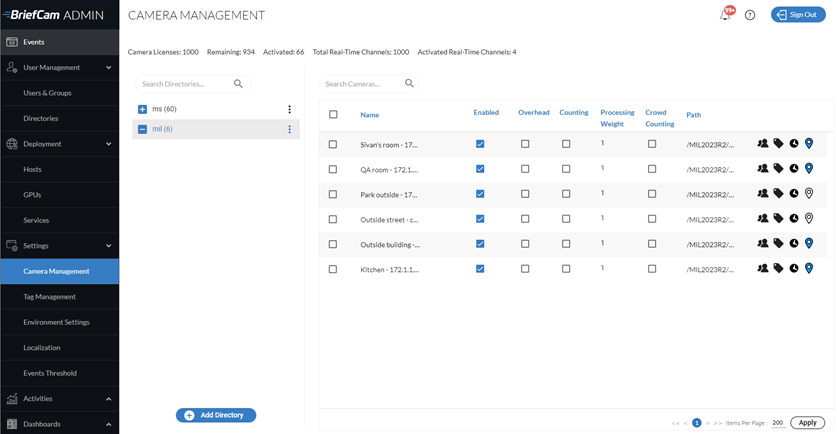
[en] Click the Add directory button to add a VMS server. The Add Directory dialog opens.
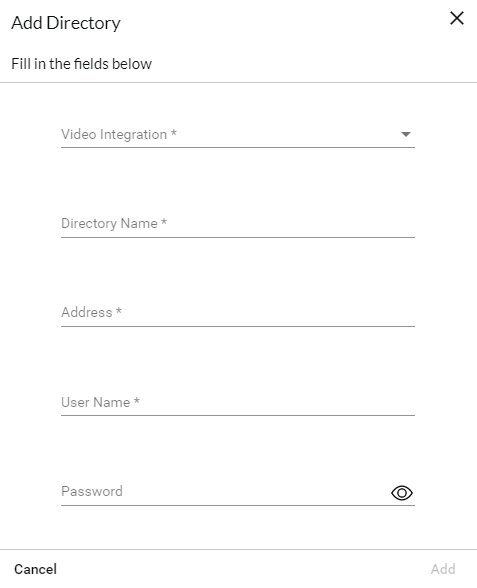
[en] From the Video Integration field, select the appropriate VMS integration option. Different integrations can be added by installing additional VMS-specific plugins.
[en] In the Directory Name field, enter a display name for the user directory. The directories should have different names.
[en] In the Address field, enter the VMS server’s IP/host address. If you are not using the default port (80), add the communication port (the port number may be specified as a suffix to the address, preceded by a colon).
[en] In the User Name and Password fields, enter the VMS server user name and password. This user must have permissions in the VMS to the cameras exposed for BriefCam. Click Add to add the directory.
[en] If you selected Milestone or Genetec, you will also see an RTSP Settings toggle button. These settings can be used to securely define the RTSP credentials for the integration.
[en] To test the connection to the newly added directory, click the zoom (
 ) icon to the right of a directory (VMS server) name and select the Test Connection option.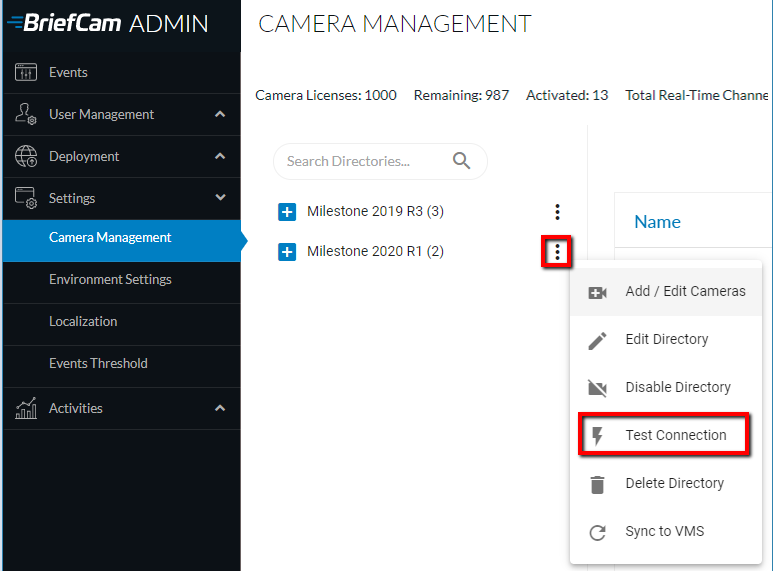
[en] To edit the directory, click the Edit Directory option. When changing the Address field, the new value must point to the existing directory.
[en] To completely disable all cameras associated with a directory, click the Disable Directory option. In a disabled directory, it is not possible to enable individual cameras. If you disable and then enable a directory, all of the associated cameras are also enabled.
[en] To completely remove a VMS directory (assuming that none of the cameras associated with it are currently activated), click the Delete Directory option.
Примечание
[en] Make sure to click the Apply button to retain any configuration changes.
Примечание
[en] When using a multi-site deployment (comprised of multiple site systems and a central Hub), video sources are set up in the Sites’ Administrator Consoles and not in the Hub Administrator Console.
Выбор и активация камеры
На этом этапе можно выбрать, затем включить или отключить (в соответствии с условиями лицензирования) отдельные или несколько потоков с камер, которые впоследствии можно обработать для создания видеосинопсисов.
 Для активации камер нажмите значок увеличения () справа от имени каталога (сервера VMS) и выберите опцию "Добавить/изменить камеры" .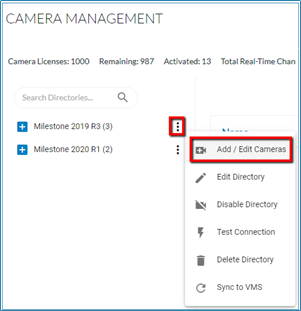
Появится экран активации камеры со списком камер, связанных с выбранным каталогом VMS.
Примечание
Активация камеры — процесс необратимый. BriefCam После этого количество активаций можно сбросить только после того, как в службе поддержки будет открыт специальный утвержденный запрос.
Установите флажки в столбце "Активировано" для всех камер, которые нужно активировать, и нажмите кнопку "Активировать" (расположена в правом нижнем углу). Галочка для уже активированных камер будет неактивна.
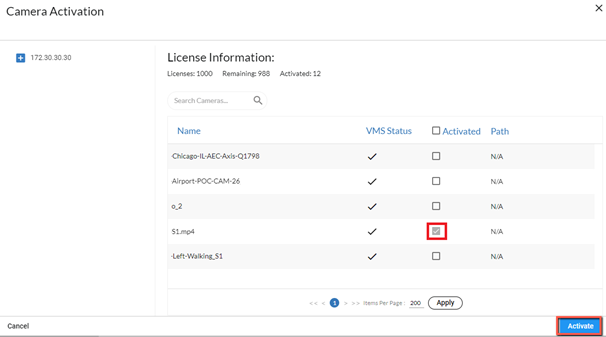
В отличие от необратимой активации камеры, можно отключить отдельные камеры, установив или сняв флажок Включено/Отключено в столбце Статус. BriefCam Отключенные камеры не будут отображаться в веб-клиенте. Обратите внимание, что вы также можете включать и отключать камеры на экране управления камерами.
Примечание
BriefCam Когда сервер VMS становится недоступным, камеры не активируются автоматически, когда сервер VMS снова становится доступным. Для решения этой проблемы перезапустите AlertProcessing Services.
[en] Camera Configuration
[en] At the top of the screen, you can see the number of active and remaining camera licenses.
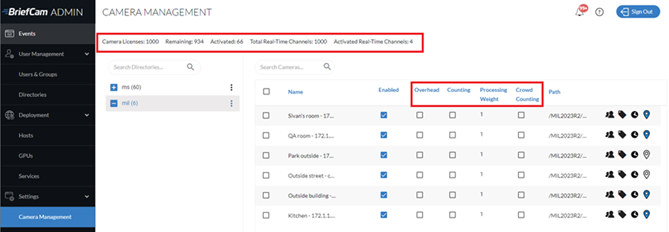
[en] This screen has the following columns:
[en] Overhead
[en] If the camera is set with an overhead angle or is an overhead fisheye camera and the camera is used with the Line Crossing feature, it is recommended to check the Overhead checkbox. This will improve the object extraction accuracy by running the algorithmic engine in a special processing mode that compensates for the warping that overhead cameras introduce. Note that only people are detected on cameras with the Overhead checkbox checked. Vehicles and animals are not detected. In addition, the only metadata generated for people detected in Overhead mode is colors.
[en] Counting
[en] If the camera is set with an overhead angle and is used for people counting, check the Counting checkbox for the cameras. This will improve the people counting accuracy by running the algorithmic engine in a special processing mode that reduces the amount of false object detections, which makes the counting more reliable. This Counting mode, which is available for the OX5 engine, is not the “people counting” feature. Note that vehicles are not detected on Counting cameras.
[en] Processing Weight
[en] The processing weight is how much of the total GPU Processing Capacity is expected to be consumed by this camera. The GPU’s processing capacity is defined in the GPUs screen.
[en] Note that the weighting system only applies to real-time processing. All on-demand tasks are treated as having a processing weight of 1.
[en] Crowd Counting
[en] Crowd counting is only supported for the Linux-based Next-Gen (OX6) engine.
[en] Select the Crowd Counting checkbox to enable the collection of crowd counting data for groups of more than 50 people, by default. This number is configurable using the HeadCount.CrowdCountingThreshold environment setting. The value you enter in this setting appears in the user interface with one more than the entered value (for example, if you enter 60, 61 will appear in the user interface).
[en] By default, crowd counting data is not collected from the camera.
[en] Note that:
[en] Only the Area filter is available with the Crowd Counting filter.
[en] Enabling Crowd Counting on a camera will cause existing rules for that camera to stop sending alerts. Therefore, it is recommended to disable or delete all existing rules for the camera before enabling Crowd Counting.
[en] Disabling Crowd Counting on a camera will turn existing Crowd Counting rules for that camera into People Counting rules. Therefore, it is recommended to disable or delete all existing rules for the camera before disabling Crowd Counting.
[en] Instant REVIEW mode is not supported for Crowd Counting cameras.
[en] Camera Management icons
[en] This screen has the following icons:
[en] Icon | [en] Description |
 | [en] Set permissions for the cameras. See: Разрешения камеры. |
 | [en] Assign tags to the camera. See: Присвоение метки камере. |
 | [en] Set a time zone. This is only for use in multi-site environments. See: Назначение часового пояса камере. |
 | [en] Set coordinates for outdoor cameras for use in the Cameras view and Fast Track. You can hover over the icon to see a tooltip with the coordinates. Geo-location available in Milestone (all supported versions) and Genetec (v5.8 and above) are automatically set here. You can override the Milestone and Genetec coordinates by clicking on the icon and editing the coordinates. Coordinates can also be set in the BriefCam client. Note that Синхронизация камер с VMS will override manually added coordinates. |
 | [en] Hover over this to see the activation time and last modified time information. |
[en] Filtering Cameras
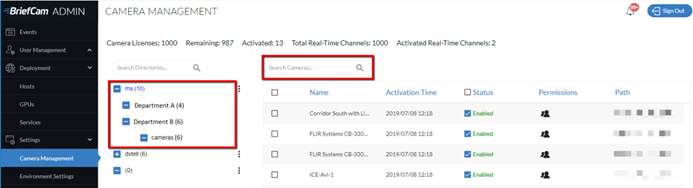
[en] There are two ways to filter the list of cameras.
[en] Use the directory tree on the left to drill down to the camera you are searching for.
[en] Use the Search field to narrow the list even further. The search will search the camera name, camera ID, and tags.
Изменение имени камеры
При изменении имени камеры ее необходимо заново определить и активировать.
Замена камеры
Прекращенные или сломанные камеры можно заменить следующим образом:
Подключите новую камеру к ПО для управления видео и задайте для нее то же имя, что и для снятой с производства или сломанной камеры.
BriefCam Administrator ConsoleВ нажмите "Синхронизировать с VMS".
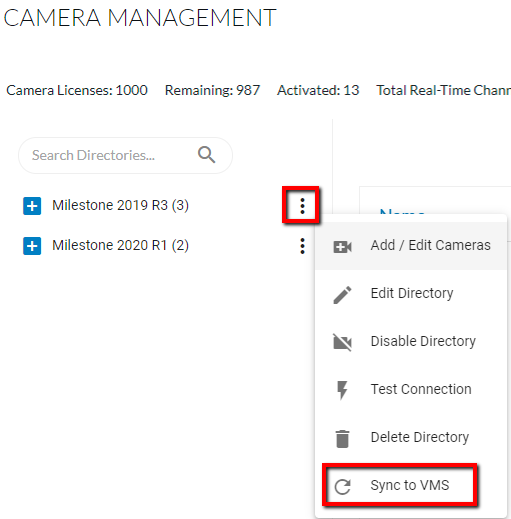
BriefCam определит замененную камеру и активирует ее.
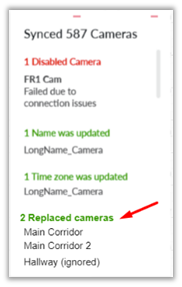
BriefCam сохранит все существующие настройки для замененных камер.
BriefCam Administrator ConsoleЧтобы Правила и источники с задачами реального времени снова начали обрабатываться, перезапустите Alert Processing Server и службы VSServer в приложении.