

Deploying Milestone AI Bridge (Kubernetes)
Milestone AI Bridge can be deployed, maintained and operated using Kubernetes or Docker Compose to manage the Milestone AI Bridge containers. This section of the Milestone AI Bridge documentation describes how you can use Kubernetes and the Milestone AI Bridge Helm charts to do this.
Linux and Windows
The majority of Intelligent Video Analytics (IVA) applications are designed as Linux programs and run on various Linux distributions. For this reason, the processing server will invariably utilize a Linux operating system, typically Ubuntu Linux, while the XProtect Management Client requires the Microsoft Windows operating system.
The installation and configuration instructions will therefore be different depending on the operating system.
Example of a Milestone AI Bridge installation and an IVA application
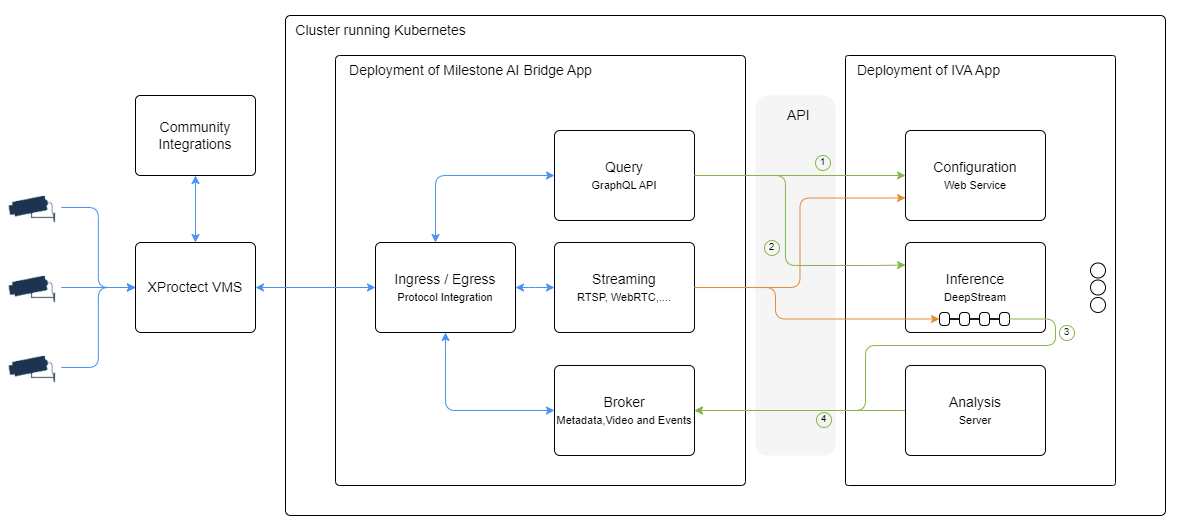
This is one example of a simple deployment of the Milestone AI Bridge in connection with the XProtect VMS and an Intelligent Video Analysis (IVA) application.
There are two deployments: the Milestone AI Bridge itself and the IVA application.
The API's that the Milestone AI Bridge expose to the IVA application are all internal to the cluster network and cannot be accessed from the outside (unless deployed in debug mode). However, all communication going into the cluster and leaving the cluster must be secured.
Milestone recommends all traffic between the Milestone AI Bridge and the XProtect VMS is encrypted using TLS encryption.
For more information, see Securing the Milestone AI Bridge connection (Kubernetes)
Install prerequisites
For Milestone AI Bridge 3.0.0 or newer when running our NGINX gateway fabric service, run the Bash command rm -f Chart.lock && helm dependency update
The Kubernetes application and the Helm application must both be installed on your machine.
For more information, see How to install Kubernetes client (external link) and How to install Helm charts (external link).
Configure the XProtect Management Client machine
You must configure the XProtect Management Client to communicate with the processing server through the Milestone AI Bridge.
If you have not yet installed the Milestone XProtect Processing Server Admin Plugin on your XProtect Management Client machine, you should do so now. See Install the Milestone XProtect Processing Server Admin Plugin for more information.
To configure your XProtect Management Client for communication with the processing server you must also create an XProtect basic user and assign the new basic user the administrator role.
See Create a basic user for Milestone AI Bridge
Install Milestone AI Bridge
After you have created a basic user with the Administrator role in your XProtect Management Client, you can install the Milestone AI Bridge application.
To install Milestone AI Bridge, you should:
-
Fetch the Helm chart of the Milestone AI Bridge
-
Unpack the Helm chart
-
Fetch any dependencies of the Helm chart
-
Deploy the Milestone AI Bridge application
Create a namespace called aibridge (optional)
The examples in this guide refer to the aibridge namespace. To better align with the code snippets and examples, you can create a namespace called aibridge.
You can use your own namespace instead of aibridge but you must then replace all instances of the aibridge namespace with your own namespace in the examples.
On your machine, open a terminal and run the following command to create the aibridge namespace:
kubectl create namespace aibridge
Fetch and install the Helm chart of the Milestone AI Bridge
The Helm chart is used to facilitate the installation of Milestone AI Bridge including potential dependencies as well as manage the Kubernetes YAML files used to configure your Milestone AI Bridge installation.
To fetch the Helm chart
On your machine, open a terminal and run the following commands:
helm pull oci://public.ecr.aws/milestonesys/aibridge --version 3.0.0
When the command is executed successfully, the aibridge-3.0.0.tgz tar file will be located in your local folder.
Unpack the Helm chart
You can now unpack Helm chart in the aibridge-3.0.0.tgz file located in your local folder.
On your machine, open a terminal and run the following command:
tar -zxvf aibridge-3.0.0.tgz
The Helm chart will be unpacked and a new folder named aibridge created. The aibridge folder will be used by the commands in the following steps.
Fetch any dependencies of the Helm chart
The Helm chart contains a collection of files that are used as resources for Milestone AI Bridge application as well as the deployment files for the Milestone AI Bridge application itself.
On your machine, open a terminal, navigate to the aibridge folder and run following command to fetch any dependencies of the Helm chart:
helm dependency build .
When the command is run, the following output will be displayed in the terminal:
Hang tight while we grab the latest from your chart repositories...
...Successfully got an update from the "nvdp" chart repository
...Successfully got an update from the "ingress-nginx" chart repository
...Successfully got an update from the "nvidia" chart repository
Update Complete. ⎈Happy Helming!⎈
Saving 1 charts
Downloading nginx-gateway-fabric from repo oci://ghcr.io/nginx/charts
Pulled: ghcr.io/nginx/charts/nginx-gateway-fabric:2.5.0
Digest: sha256:ae7893e08fa1cf952b27a34b8366318ae276cfbedcee4debd43822379fc2cbfb
Deleting outdated charts
Deploy the Milestone AI Bridge application
Deploy Milestone AI Bridge using values.yaml settings
Once all dependencies of the Helm chart have been fetched, you must determine how the Milestone AI Bridge is to connect to your XProtect VMS and if your XProtect VMSis running in a secured (using https) or unsecured (using http) state .
If you are connecting to a VMS running in a secured state
If you are connecting Milestone AI Bridge to a VMS running in a secured state, you must first configure Kubernetes to connect securely by doing the following:
-
Create a Kubernetes configmap object
-
Create the Kubernetes secrets
-
Edit the values.yaml file
-
Deploy the Milestone AI Bridge application
Create a Kubernetes configmap object
On your machine, open a terminal and run the following command to create a Kubernetes configmap object:
kubectl create configmap vms-authority \
--from-file=path/to/vms-authority.crt \
-n aibridge
If you deploy the Milestone AI Bridge inside a namespace, you must create the Kubernetes Secret inside the same namespace. If you have created your own namespace, replace the aibridge namespace with your namespace after the -n parameter.
The file vms-authority.crt must contain the VMS CA certificate in PEM format.
All certificates must use the PEM format and must be named with the .crt file extension. For more information, see Ubuntu manual - certificates
Create the server-tls and vms-credentials Kubernetes secrets
Once the ConfigMap object has been created, run the following command to create the server-tls Kubernetes secret:
kubectl create secret tls server-tls \
--cert=path/to/server.crt \
--key=path/to/server.key \
-n aibridge
If you deploy the Milestone AI Bridge inside a namespace, you must create the Kubernetes Secret inside the same namespace. If you have created your own namespace, replace the aibridge namespace with your namespace after the -n parameter.
When the server-tls Kubernetes secret has been created, run the following command to create the vms-credentials Kubernetes secret:
kubectl create secret generic vms-credentials \
--from-literal='username=<username>'
--from-literal='password=<password>'
-n aibridge
where <username> is the new XProtect basic user and <password> is the password of the new XProtect basic user.
Deploy the Milestone AI Bridge application
Run the following command to deploy the Milestone AI Bridge application:
helm install aib . -n aibridge
The parameters defined in the values.yaml files will automatically be used.
If you are connecting to a VMS running in an unsecured state
If you are connecting Milestone AI Bridge to a VMS running in a unsecured state, you must do the following:
-
Create a Kubernetes secret
-
Edit the values.yaml file
-
Deploy the Milestone AI Bridge application
Create a Kubernetes Secret
Create a Kubernetes Secret to help authenticate the XProtect basic user.
On your machine, open the terminal and run the following command:
kubectl create secret generic vms-credentials \
--from-literal='username=<username>'
--from-literal='password=<password>'
-n aibridge
where <username> is the new XProtect basic user and <password> is the password of the new XProtect basic user.
If you deploy the Milestone AI Bridge inside a namespace, you must create the Kubernetes Secret inside the same namespace. If you have created your own namespace, replace the aibridge namespace with your namespace after the -n parameter.
Edit the values.yaml file
Before deploying the the Milestone AI Bridge application, you must edit the settings in the values.yaml file to conform to your organization's characteristics, including the following settings:
-
vms > url
-
general > externalIP
-
general > externalHostname
-
ingress-nginx > controller > service > externalIPs
Other settings in the values. yaml file that may be relevant to your organization's requirements may also have to be adjusted.
For more information, see Configuring Milestone AI Bridge (Kubernetes)
Deploy the Milestone AI Bridge application
Run the following command to deploy the Milestone AI Bridge application:
helm install aib . -n aibridge
The parameters defined in the values.yaml files will automatically be used.
You can append the command above with the --debug parameter to display the status information of the deployment on your screen. This enables you to follow the different steps of the deployment as they are run.
Deploy Milestone AI Bridge using custom settings
If you want to deploy Milestone AI Bridge and set your own parameters during the deployment, navigate to the aibridge folder and run the following command:
helm install aib . -n aibridge \
--set vms.url=<url-of-xprotect-management-server> \
--set general.externalIP=<kubernetes-cluster-ip-address> \
--set general.externalHostname=<kubernetes-cluster-hostname> \
--set-json 'nginx-gateway-fabric.nginx.service.patches=[{"value":{"spec":{"externalIPs":["<external-ip-address-of-cluster>"]}}}]'
where
-
aib is the release name of the deployment. You can specify any name for deployment you like.
-
<url-of-xprotect-management-server> is the URL of your XProtect management server.
-
<kubernetes-cluster-hostname> is the hostname of your Kubernetes cluster.
-
<ip-address-of-cluster> is the IP address of your Kubernetes cluster.
Defining custom settings is more cumbersome, can be more error-prone, and is not generally recommended.
Disable an NGINX fabric gateway controller
Milestone AI Bridge employs an NGINX gateway fabric controller and by default the Helm chart is set up to automatically deploy an NGINX gateway fabric controller during Milestone AI Bridge deployment.
You can disable the automatic deployment of an NGINX gateway fabric controller by adding the following option to the deployment terminal command:
--set nginx-gateway-fabric.enabled=false --skip-crds
If you disable the NGINX gateway fabric controller, you must deploy the controller to the Kubernetes cluster manually.
Manually deploy an NGINX Gateway Fabric controller to the Kubernetes cluster
To manually deploy the NGINX gateway fabric controller to the Kubernetes cluster we must first perform the following steps in the control-plane node:
helm repo add ingress-nginx https://kubernetes.github.io/ingress-nginx
helm repo update
kubectl create namespace nginx
helm install --namespace nginx --generate-name --set controller.service.externalIPs={<ip-address-of-cluster>} ingress-nginx/ingress-nginx --version 4.1.4
where <ip-address-of-cluster> is the IP address of your Kubernetes cluster or the IP address of the load balancer if Milestone AI Bridge is deployed on a multi-node Kubernetes cluster.
The ingress template files for Milestone AI Bridge are compatible with ‘ingress-nginx’ helm package version 4.1.4 but not the newer versions.
To manually deploy the NGINX gateway fabric controller to the Kubernetes cluster we must first perform the following steps in the control-plane node.
-
Install Gateway API CRDs. The Gateway API resources from the standard channel must be installed before deploying nginx-gateway-fabric. The version below is pinned to match nginx-gateway-fabric 2.5.0:
kubectl kustomize "https://github.com/nginx/nginx-gateway-fabric/config/crd/gateway-api/standard?ref=v2.5.0" | kubectl apply -f -
-
Install nginx-gateway-fabric. Install nginx-gateway-fabric 2.5.0 in its own namespace.
-
On a single node k8s cluster:
helm install ngf oci://ghcr.io/nginx/charts/nginx-gateway-fabric \ --version 2.5.0 \ --create-namespace -n nginx-gateway \ --set nginx.service.type=LoadBalancer \ --set nginx.service.externalTrafficPolicy=Local \ --set-json 'nginx.service.patches=[{"value":{"spec":{"externalIPs":["<ip-address-of-cluster>"]}}}]' -
MetalLB (multi-node cluster):
helm install ngf oci://ghcr.io/nginx/charts/nginx-gateway-fabric \
--version 2.5.0 \
--create-namespace -n nginx-gateway \
--set nginx.service.type=LoadBalancer \
--set nginx.service.externalTrafficPolicy=Local \
--set-json 'nginx.service.patches=[{"value":{"spec":{"loadBalancerIP":"<kubernetes-cluster-ip-address>"}}}]'
After running the these commands you should be able to install Milestone AI Bridge running:
helm install aib . -n aibridge --set nginx-gateway-fabric.enabled=false --skip-crds --debug
Replace `<kubernetes-cluster-ip-address>` with the MetalLB load balancer IP.
The NGINX gateway fabric template files for Milestone AI Bridge are compatible with ‘nginx-gateway-fabric’ helm package version 2.5.0.
-
Persistence for stateful components
Milestone AI Bridge defines PersistentVolumeClaims (PVCs) for stateful components so their data can survive pod restarts, node reboots, and rescheduling events. Namely for Kafka and Fuseki components.
In the current deployment, PVC-backed persistence is used for Kafka and Fuseki. To make these PVCs usable, a storage provisioner must be installed in the Kubernetes cluster.
The required storage provisioner depends on whether the cluster is running as a single-node or multi-node deployment.
Single-node cluster
-
Install local-path-provisioner on the Kubernetes node:
kubectl apply -f https://raw.githubusercontent.com/rancher/local-path-provisioner/v0.0.35/deploy/local-path-storage.yaml
-
Set the storage class in the Helm values file (values.yaml) to: storageClass: "local-path"
Multi-node cluster
-
Install the required package on each Kubernetes node: apt-get install open-iscsi
-
Then deploy Longhorn from the control-plane node:
kubectl apply -f https://raw.githubusercontent.com/longhorn/longhorn/v1.11.1/deploy/longhorn.yaml
For additional details, see the Longhorn documentation at https://longhorn.io/docs/.
-
After Longhorn is installed, set the storage class in the Helm values file (values.yaml) to: storageClass: "longhorn"