Workspaces in XProtect Smart Client
XProtect Smart Client comes with a set of dedicated tabs allowing you to perform your daily surveillance tasks. Some of these tabs are standard and others require XProtect add-ons.
Finally, some tabs may be custom-made through the MIP SDK![]() Short for "Milestone Integration Platform software development kit". and specific to your XProtect VMS system. Functionality that depends on MIP SDK is not documented in the current manual.
Short for "Milestone Integration Platform software development kit". and specific to your XProtect VMS system. Functionality that depends on MIP SDK is not documented in the current manual.
Standard tabs (overview)
- The Live tab for viewing live video. See also Live tab (explained)
- The Playback tab for viewing recorded video. See also Playback tab (explained)
- The Search tab for making advanced searches for video and metadata. See also Search tab (explained)
- The Exports tab for exporting video data. See also Exports tab (explained)
- The Alarm Manager tab for investigating and managing alarms. See also (see Alarm Manager tab (explained)
- The System Monitor tab for viewing system information. See also (see System Monitor tab (explained)
If some of the tabs are unavailable, it is because you do not have the rights required to access all these tabs.
Add-on tabs (overview)
- The Access control tab for controlling your access control system and associated cameras. See also Access control tab (explained)
- The LPR tab for identifying vehicles by their license plates and for investigating LPR related events. See also LPR tab (explained)
- The Transact tab for monitoring and investigating transactional data in combination with the associated video streams. See also Transact tab (explained)
The Incidents tab for saving and updating incident projects and for incident management. See also Incidents tab (explained)
These tabs are visible only if you have acquired base licenses for:
- XProtect Transact
- XProtect LPR
- XProtect Access
- XProtect Incident Manager (base license included with XProtect Corporate)
All tabs (in detail)
Live tab (explained)
On the Live tab, you can view live video feeds, and work with audio,
carousels![]() A particular position for viewing video from several cameras, one after the other, in a view in XProtect Smart Client., hotspots
A particular position for viewing video from several cameras, one after the other, in a view in XProtect Smart Client., hotspots![]() A particular position for viewing magnified and/or high quality camera images in XProtect Smart Client views., Matrix
A particular position for viewing magnified and/or high quality camera images in XProtect Smart Client views., Matrix![]() Product available as an add-on to XProtect surveillance systems. With XProtect Incident Manager, you can document and manage incidents within XProtect Smart Client., smart map
Product available as an add-on to XProtect surveillance systems. With XProtect Incident Manager, you can document and manage incidents within XProtect Smart Client., smart map![]() A map functionality that uses a geographic information system to visualize devices (for example, cameras and microphones), structures, and topographical elements of a surveillance system in geographically accurate, real-world imagery. Maps that use elements of this functionality are called smart maps., pan-tilt-zoom (PTZ) control, digital zoom,
independent playback, and more.
A map functionality that uses a geographic information system to visualize devices (for example, cameras and microphones), structures, and topographical elements of a surveillance system in geographically accurate, real-world imagery. Maps that use elements of this functionality are called smart maps., pan-tilt-zoom (PTZ) control, digital zoom,
independent playback, and more.
Here, you can also enter setup mode, where you can set up views for your cameras and other types of content.
Playback tab (explained)
On the Playback tab, you can investigate recorded video by playing it back, start search from any camera or view, and then document what you find by exporting evidence. To protect the evidence from being deleted from the database, you can also add evidence locks to recorded video.
The timeline gives you advanced features for browsing recorded video and jumping to a specific date and time.
You can also:
- Listen to audio when connected to selected Milestone surveillance systems
- If your
XProtect VMS supports smart map
 A map functionality that uses a geographic information system to visualize devices (for example, cameras and microphones), structures, and topographical elements of a surveillance system in geographically accurate, real-world imagery. Maps that use elements of this functionality are called smart maps., you can get access to the cameras in your system in a geographical interface, which is easy to navigate
 - Use hotspotsA particular position for viewing magnified and/or high quality camera images in XProtect Smart Client views., digital zoom, or
carouselsA particular position for viewing video from several cameras, one after the other, in a view in XProtect Smart Client., navigate
fisheye lensA lens that allows the creation and viewing of 360° panoramic images. images, print
images, and more
Search tab (explained)
On the Search tab, you can search across the different types of data available in
your VMS![]() Incident defined on surveillance system to trigger an alarm in XProtect Smart Client. If your organization uses the feature, triggered alarms are displayed in views that contain alarm lists or maps. system. This includes:
Incident defined on surveillance system to trigger an alarm in XProtect Smart Client. If your organization uses the feature, triggered alarms are displayed in views that contain alarm lists or maps. system. This includes:
- Video recordings in general
- Recordings with motion
- Recordings with motion in selected areas
- Bookmarks
- People
- Vehicles
- Video recordings with alarms
- Video recordings with events
For each search category, you can apply filters to refine your search.
From the search results, multiple actions are available. For more information, see Actions available from search results (overview).
Exports tab (explained)
On the Exports tab, you can export video data.
First, you add the sequences that you want to export to the Export list. Next, for each item on the Export list, you can change the time span by clicking the Start time and the End time. See also Export video, audio, and still images.
You can choose which formats to use for the export, and for each format, you can change the Export settings. See also Export settings.
After you click the Export button, you specify an Export name and an Export destination. Then, you can create the export.
The exports that you create are stored in the folder that you specified in the Create export window > Export destination field. See also View exported video.
Alarm Manager tab (explained)
On the Alarm Manager tab, you can view and respond to incidents or technical problems that have triggered an alarm. The tab displays an alarm list, an alarm preview, and a smart map or map if one is available.
Incidents tab (explained)
On the Incidents tab, you can view and update your incident projects and manage your incidents. You typically add sequences and various textual information to your incident projects to document and prove what happened when an incident occurred.
For improved incident management, you can:
- Filter the list of incident projects to find the relevant incident project quickly
- See the status, type, start and end time, and description of the different incident projects
- Keep your incident projects updated with the latest actions and other development in the management of the incidents
- Generate reports and export the incident projects' sequences to share the evidence internally or externally
System Monitor tab (explained)
On the System Monitor tab, you can get a visual overview of the current state of your system servers, cameras, other devices, and the computer running XProtect Smart Client.
By default, the tiles represent Recording servers, All servers, Failover servers, and All cameras. Your system administrator specifies the tiles and the threshold value for each state.
Here is a description of the colors used:
- Green: Normal state. Everything is running normally
- Yellow: Warning state. At least one monitoring parameter is above the defined value for the Normal state
- Red: Critical state. At least one monitoring parameter is above the defined value for the Normal and Warning state
If a tile changes color and you want to identify the server or parameter that caused the change, click the tile. This opens an overview in the bottom of the screen. Click the Details button for information about why the state changed.
If a tile displays a warning sign, a data collector for one of your monitored servers or cameras may not be running. If you place your mouse above the tile, the system shows you when it last collected data for the relevant tile.
Access control tab (explained)
On the Access control tab, you can investigate access control events with search and filtering, and view the associated video recordings and access control data. You can also monitor door states, investigate cardholders, and create reports.
You can drag the Access control tab to its own separate floating window, while you keep the main window in the background to watch multiple views simultaneously. You can also sort columns and drag the columns to different positions.
You can search for, filter, sort, and review data related to:
- Events: Logs the events with a time stamp, event type, the associated door or access control unit, and cardholder name if available. If your XProtect VMS system integrates with multiple access control systems, the list displays from which access control system the event was triggered
- Doors: Lists the doors, access points and other access control units in each access control system, and their current state
- Cardholders: Lists the cardholders in each access control system and their details
Depending on your access control system, you may be able to connect to the access control system applications via the Access control Administration button in the top right corner to, for example, specify access rights or manage cardholders.
LPR tab (explained)
On the LPR tab, you can investigate LPR![]() Short for "license plate recognition". events from all your LPR cameras and view the
associated video recordings and license plate recognition data. Keep match lists updated and create reports.
Short for "license plate recognition". events from all your LPR cameras and view the
associated video recordings and license plate recognition data. Keep match lists updated and create reports.
The tab includes an LPR event list and an LPR camera preview. In the preview, you can view video associated with LPR event details. Below the preview, information about the license plate appears together with details from the match list and the license plate style that it is associated with.
You can filter the event list according to the period, country module, LPR camera, match list, or license plate style. Use the Search registration number field to search for a particular license plate registration number. By
default, this list shows LPR events from the last hour.
You can specify and export a report of relevant events as PDF.
You can make updates to the existing match lists by using the Match List function.
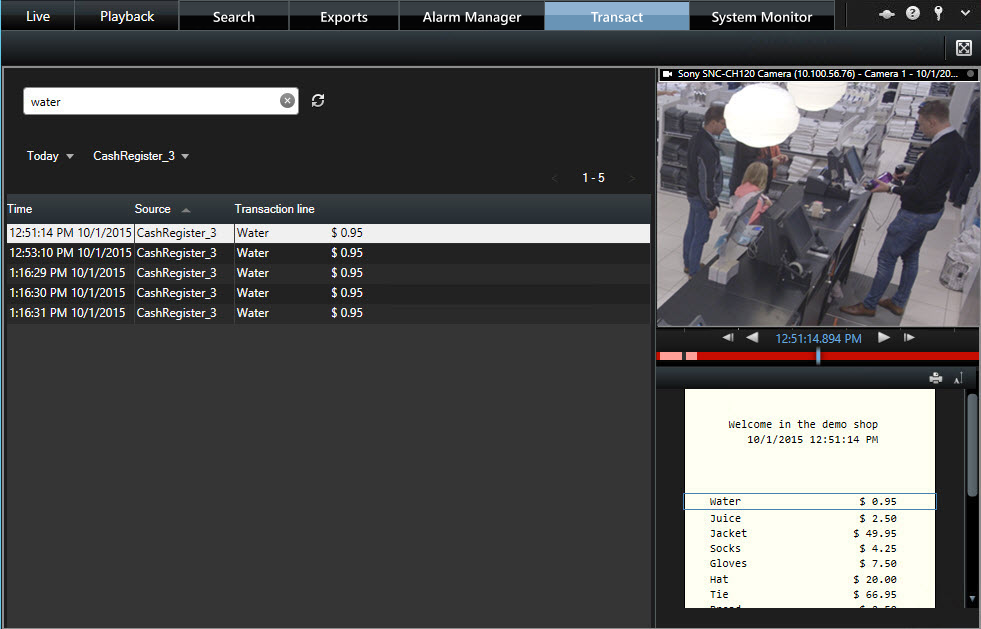
Transact tab (explained)
On the Transact tab, you can investigate transactions through search and filtering, and view receipts and video recordings in a combined view.
There is a search field and two filters:
- Search field: enter your search words here to perform a free text search. The search returns transaction lines that contain your search words and does not distinguish between upper and lower case letters. In the receipt, the transaction lines matching the search are highlighted
- Time interval: use this filter to specify the time interval, for example Last 7 days. You can also set a custom interval by your own choice. By default, the filter is set to Today
- Source: use this filter to select the transaction sources you want to view transactions for. By default, the filter is set to All