Creating video evidence
There are several ways of documenting incidents and events in XProtect Smart Client, for example by exporting recordings and creating single still images from the video stream.
You can lock video evidence to prevent it from being deleted, or you can export the locked video.
Export video, audio, and still images
To share video evidence, you can export video and associated audio in different formats. You can also export still images and other types of data that—depending on your XProtect VMS system—may be available.
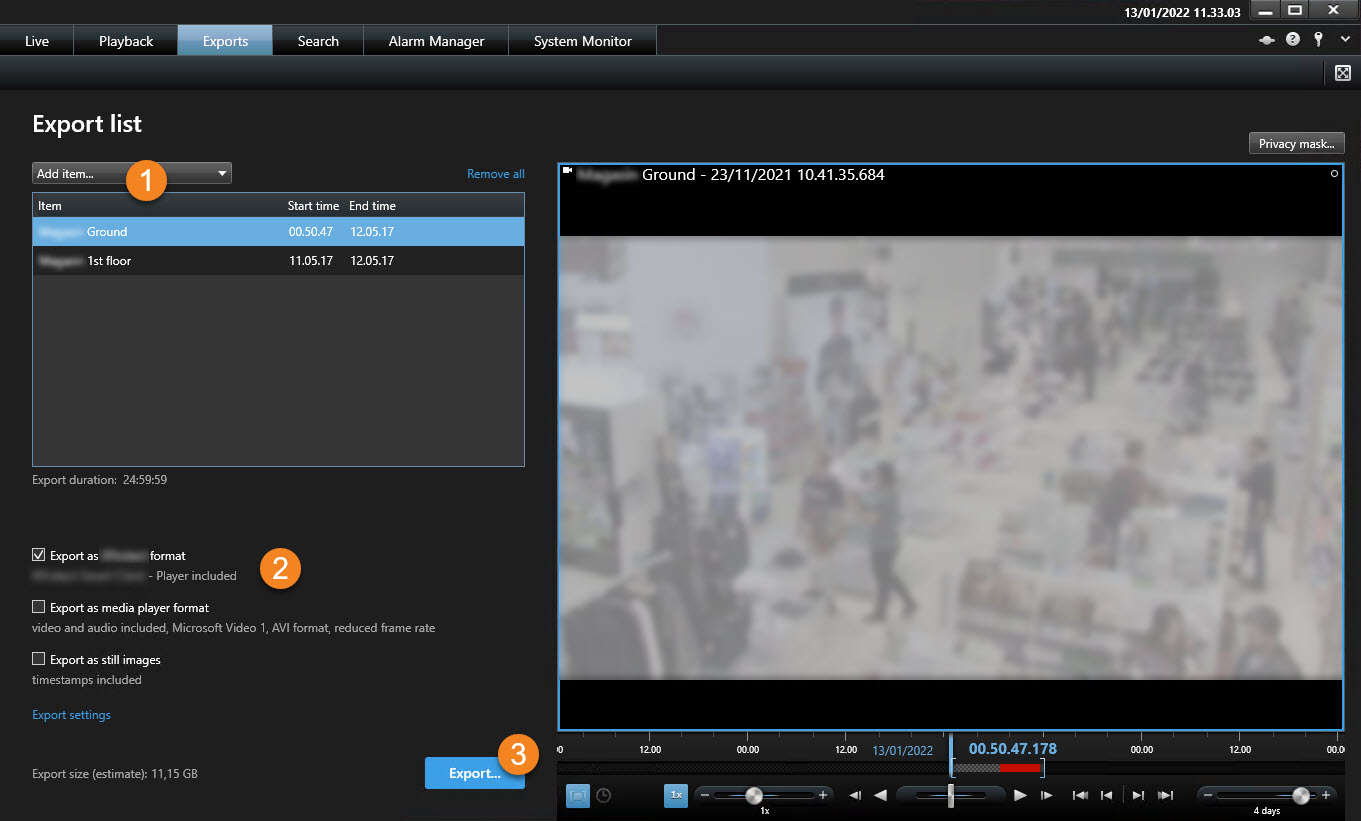
On the Exports tab, you can export video evidence in three steps:
-
Add the video sequences that you want to export to the Exports tab > Export list. See also Add video sequences to the Export list.
-
Select at least one export format and adjust the export settings. See also Adjust export settings.
-
Create the export. See also Create the export.
Add video sequences to the Export list
You can add video sequences to the Export list on the:
In the Export list, select Add item to add the video sequences that you want to export.
-
In the timeline, select the
 button to select the start and end time (see Time navigation controls (overview)) of the sequence that you want to export.
 -
For each item that you want to include in the export, select the associated check box
 .
. -
Select Export > Export to add the selected video sequences to the Export list and to move to the Exports tab.
OR:
Select Export > Add to export list to add the selected video sequences to the Export list and to stay on the Playback tab.
-
In the Evidence lock list, select an existing evidence lock.
-
Select Add to export list to add the selected evidence lock to the Export list and to stay on the Playback tab.
-
For each search result that you want to export, hover over it and select the blue check box
 .
. -
In the blue action bar, select Add to export list
 .
.
Adjust export settings
After you added at least one sequence to the Exports tab > Export list, you must select at least one export format. Optionally, you can adjust export settings.
Steps:
-
Under the Export list, select at least one export format.
- Export as XProtect format - use the XProtect format if you want to include the XProtect Smart Client – Player along with the export. Other media players will not work. If you want the recipient to be able to verify that the exported evidence has not been tampered with, select Export settings > XProtect format > Include digital signature. This will enable the Verify signatures button in the XProtect Smart Client – Player
- Export as media player format - use a format that most media players can play. This requires that a media player is installed on the computer where the export is to be viewed
- Export as still images - export a still image file for each frame for the selected period
-
Optionally, for each video sequence on the Export list, you can change the Start time and the End time.
-
Optionally, you can add privacy masks to video sequences to cover different video areas. See also Mask areas in recordings during export.
-
Optionally, for each format, you can change the Export settings. See also Export settings.
The duration of the export and the number of cameras affect how long it takes to complete the export. To reduce the time spent, you may try changing the export format.
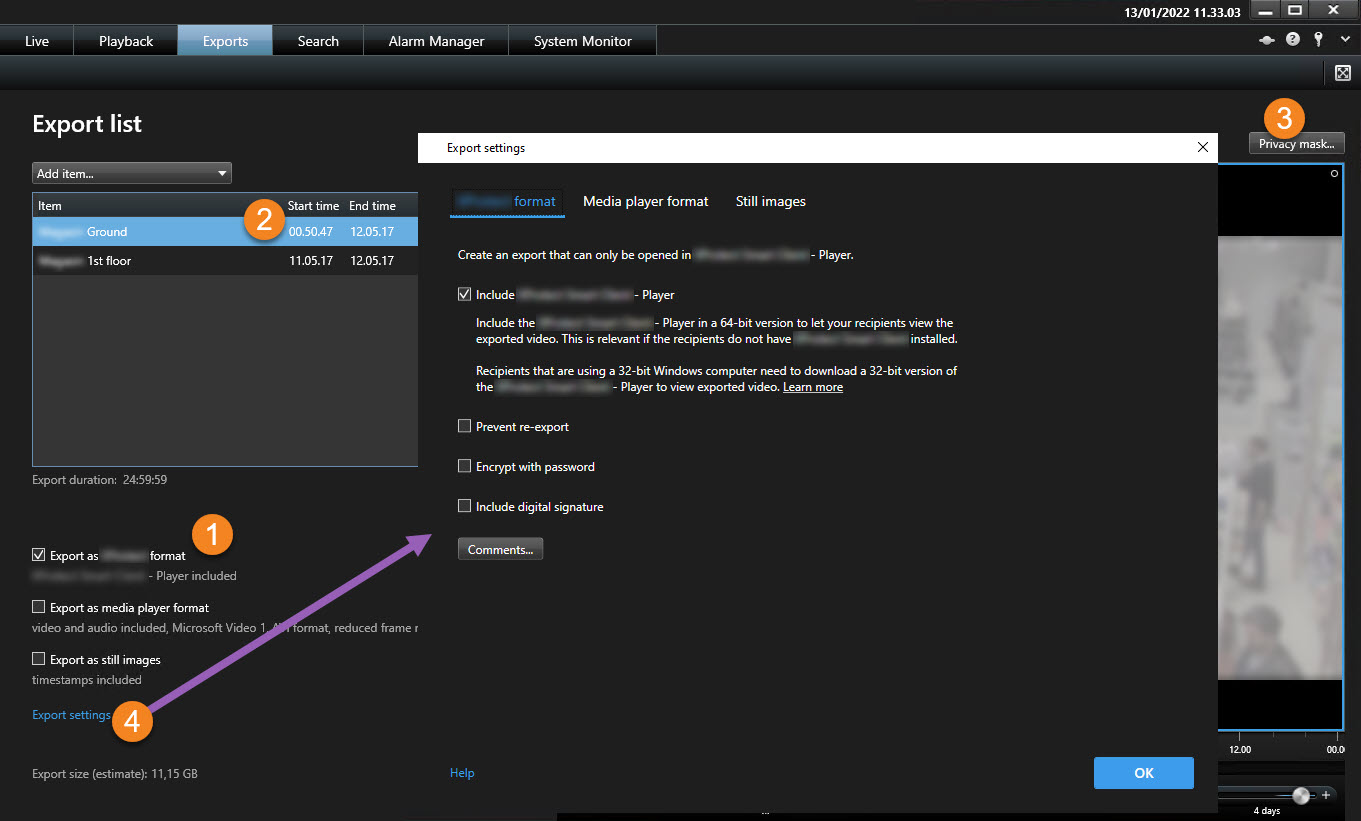
Create the export
After you added at least one sequence to the Exports tab > Export list and selected at least one export format, you can create the export.
Steps:
- Select the Export button. The Create export window opens.
- In the Export name field, an export name is automatically created for you. You can change the name.
- In the Export destination field, specify a path for the export. The export that you create will be stored in the folder that you specify here.
- Select Create export to export the evidence.
- The export is created and stored in the folder that you specified as the Export destination. See also View exported video.
Missing user permissions may prevent you from exporting video data.
Mask areas in recordings during export
When you export video, you can add privacy masks to cover selected areas. When someone watches the exported video, the areas with privacy masks appear as solid blocks.
The privacy masks that you add here only apply to the current export and for the video sequence that you selected in the Export list. The export may already include privacy masks that have been defined by your system administrator for certain cameras. See also Privacy masking (explained).
Steps:
- On the Exports tab > Export list, select the video sequence that you want to add a privacy mask to.
- Above the preview pane, click the Privacy mask button. The Add privacy mask window opens.
- For each area that you want to mask, click the
 button, and then drag the pointer over the area that you want to mask.
 -
To unmask a part of a privacy mask, click the
 button, and then drag the pointer over the area that you want to unmask. Repeat this step for each part to unmask.
To temporarily hide masks, click and hold the Hide mask button.
- Click OK to return to the Exports tab.
The preview image contains an invisible grid with cells. If the area you select includes any portion of a cell, the system masks the entire cell. The result can be that the system masks slightly more of the image than you intended.
Storyboards (explained)
The storyboard function helps you paste together video sequences from one camera or from multiple cameras into one cohesive flow. You can use the sequence of events, the storyboard, as proof of evidence in internal investigations or the court of law.
You can skip all sequences that are not relevant and avoid wasting time looking through long sequences of video that you do not need. Also, you avoid wasting storage space on stored sequences that do not contain relevant video.
Export storyboards
You can create a storyboard by pasting together video sequences into one cohesive flow and then export it.
Steps:
- On the Playback tab, start by opening a view that contains items that you want to add to your storyboard.
- In the timeline, click .
- Select the start time and the end time for the storyboard. See Time navigation controls (overview).
- For each item in the view that you want to add, select the corresponding check box and click Export > Add to export list.
Repeat steps 1-4 until you have added all items that you need for your storyboard.
-
Continue with the export process. See Adjust export settings and Create the export.
Export locked video evidence
When you export evidence locks![]() A video sequence that is protected, so it cannot be deleted., also the data from devices related to the cameras is included in the export.
A video sequence that is protected, so it cannot be deleted., also the data from devices related to the cameras is included in the export.
Steps:
- Click the Playback tab.
- To the right of the timeline, click Evidence lock and select View.
- If you want to stay on the Live tab instead of the Playback tab, click the Status button
 on the application toolbar and select Evidence lock list.
 -
Select an evidence lock and click Add to export list.
-
Continue with the export process. See Adjust export settings and Create the export.
View exported video
The exports that you create are stored in the folder that you specified in the Create export window > Export destination field.
Steps:
- To view the exported video immediately after creating it:
In the upper-right corner of XProtect Smart Client, select Export details.
- Click the link to open the output folder and to access the exported files.
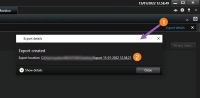
In the Export details window > Export location field, a link shows the location of the output folder.
- If you exported video at a previous point in time:
- Go to the folder where you store exports. The default location is C:\Users\<username>\Documents\Milestone\Video Export. You can check the folder location in the Create export window > Export destination field. This works only if you always use the same export destination.
- Depending on the output format, open the relevant folder and double-click the video file or still image. If the format is XProtect format, double-click the Smart Client – Player file with the .exe extension.

Printing or creating surveillance reports
Depending on your needs, you can either print surveillance reports on the fly based on still images from surveillance cameras, or you can create surveillance reports that you save to your computer.
See also Print alarm reports and Get statistics on alarms.
Print report from single cameras
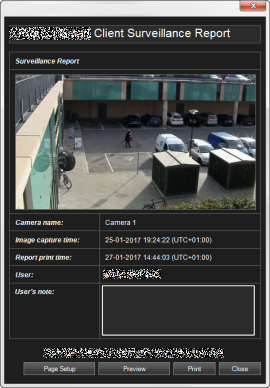
You can print single still images and related information from live cameras or from recorded video. Notes that you add are also printed.
Steps:
- To print a recorded still image, go to the Playback tab.
- To print a live still image, go to the Live tab.
- Open the view that contains the camera you are interested in.
-
Hover over the view item. The camera toolbar appears.

-
Click the
 icon. A window appears.
- Add notes if required.
- Click Print. The Windows Print dialog appears.
- If necessary, change the print settings and print. Otherwise, just click Print.
You can also print information about alarms if your organization uses the alarm handling features. See also Alarms (explained).
Create reports from search results
Based on search results, you can create a surveillance report that contains information about the events or incidents, for example still images, event time, information about the cameras, and notes. The report is saved as a PDF file.
Steps:
- Go to the Search tab and run a search.
- For each search result that you want to include in the report, hover over it and select the blue check box .
- In the blue action bar, click
 . A window appears.
 - Change the default report name into something meaningful. In the report, the name is displayed as the page header.
- To change the folder that the report is saved to, in the Report destination section, click
 and select a different folder.
 - To add a note, enter text in the Note field.
-
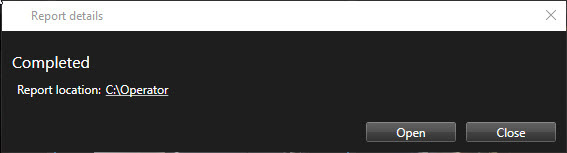
Click Create. A progress bar informs you when the report is generated.

-
To open the report, click Details, and then click Open. To open the destination folder, click the link.
To change the layout of the report, open the Settings dialog, click Advanced, and then select a different value in the PDF report format list.
Copy images to clipboard
You can copy single still images from selected cameras. Copied images can then be pasted (as bitmap images) into other applications, such as word processors, e-mail clients, etc. You can only copy a single image from one camera at a time.
- On the camera toolbar, click the Copy to clipboard icon to copy an image