

Site Navigation: Rules and events
This article describes how to configure events and rules to help you trigger actions and alarms in the system. It also explains how to set up email notifications and time limits on rules.
Rules and events (explained)
Rules are a central element in your system. Rules determine highly important settings, such as when cameras should record, when PTZ cameras should patrol, when notifications should be sent, etc.
Example - a rule specifying that a particular camera should begin recording when it detects motion:
Events are central elements when using the Manage Rule wizard. In the wizard, events are primarily used for triggering actions. For example, you can create a rule which specifies that in the event of detected motion, the surveillance system should take the action of starting recording of video from a particular camera.
The following types of conditions can trigger rules:
|
Name |
Description |
|---|---|
| Events |
When events occur on the surveillance system, for example when motion is detected or the system receives input from external sensors. |
| Time interval |
When you enter specific periods of time, for example:
or |
| Recurring time |
When you set an action to be executed on a detailed, recurring schedule. For example:
The time is based on the local time settings of the server on which Management Client is installed. For more information, see Recurring time. |
You can work with the following under Rules and Events:
- Rules: Rules are a central element in the system. The behavior of your surveillance system is to a very large extent determined by rules. When creating a rule, you can work with all types of events
- Time profiles: Time profiles are periods of time defined in the Management Client. You use them when you create rules in the Management Client, for example to create a rule which specifies that a certain action should take place within a certain time profile
- Notification profiles: You can use notification profiles to set up ready-made email notifications, which can automatically be triggered by a rule, for example when a particular event occurs
- User-defined events: User-defined events are custom-made events that makes it possible for users to manually trigger events in the system or react to inputs from the system
- Analytics events: Analytics events are data received from an external third-party video content analysis (VCA) providers. You can use analytics events as basis for alarms
- Generic events: Generic events allow you to trigger actions in the XProtect event server by sending simple strings via the IP network to your system
See Events overview for a list of events.
Actions and stop actions (explained)
When you add rules (see Add a rule) in the Manage Rule wizard, you can select between different actions:
Some of the actions require a stop action. Example: If you select the action Start recording, recording starts and potentially continues indefinitely. As a result, the action Start recording has a mandatory stop action called Stop recording.
The Manage Rule wizard makes sure you specify stop actions when necessary:
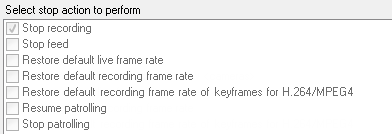
Selecting stop actions. In the example, note the mandatory stop action (selected, dimmed), the non-relevant stop actions (dimmed) and the optional stop actions (selectable).
Each type of action from your XProtect system is described. You may have more actions available if your system installation uses add-on products or vendor-specific plug-ins. For each type of action, stop action information is listed if relevant:
|
Action |
Description |
|---|---|
| Start recording on <devices> |
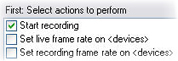
Start recording and saving data in the database from the selected devices. When your select this type of action, the Manage Rule wizard prompts you to specify: When recording should start. This happens either immediately or a number of seconds before the triggering event/beginning of the triggering time interval and on which devices the action should take place. This type of action requires that you have enabled recording on the devices to which the action is linked. You can only save data from before an event or time interval if you have enabled pre-buffering for the relevant devices. You enable recording and specify pre-buffering settings for a device on the Record tab. Stop action required: This type of action requires one or more stop actions. In one of the following steps, the wizard automatically prompts you to specify the stop action: Stop recording. Without this stop action, recording would potentially continue indefinitely. You also have the option of specifying further stop actions. |
| Start feed on <devices> |
Begin data feed from devices to the system. When the feed from a device is started, data is transferred from the device to the system, in which case you may view and record, depending on the data type. When you select this type of action, the Manage Rule wizard prompts you to specify on which devices to start the feeds. Your system includes a default rule which ensures that feeds are always started on all cameras. Stop action required: This type of action requires one or more stop actions. In one of the following steps, the wizard automatically prompts you to specify the stop action: Stop feed. You can also specify further stop actions. Using the mandatory stop action Stop feed to stop the feed from a device means that data is no longer transferred from the device to the system, in which case live viewing and recording of video, for example, is no longer possible. However, a device on which you have stopped the feed can still communicate with the recording server, and you can start the feed again automatically through a rule, as opposed to when you manually have disabled the device. While this type of action enables access to selected devices' data feeds, it does not guarantee that data is recorded, as you must specify recording settings separately. |
| Set <Smart Wall> to <preset> |
Sets the XProtect Smart Wall to a selected preset. Specify the preset on the Smart Wall Presets tab. No mandatory stop action: This type of action does not require a stop action.You can specify optional stop actions to be performed on either an event or after a period of time. |
| Set <Smart Wall> <monitor> to show <cameras> |
Sets a specific XProtect Smart Wall monitor to display live video from the selected cameras on this site or any child site configured in Milestone Federated Architecture. No mandatory stop action: This type of action does not require a stop action.You can specify optional stop actions to be performed on either an event or after a period of time. |
| Set <Smart Wall> <monitor> to show text <messages> |
Sets a specific XProtect Smart Wall monitor to display a user-defined text message of up to 200 characters. No mandatory stop action: This type of action does not require a stop action.You can specify optional stop actions to be performed on either an event or after a period of time. |
| Remove <cameras> from <Smart Wall> monitor <monitor> |
Stop displaying video from a specific camera. No mandatory stop action: This type of action does not require a stop action.You can specify optional stop actions to be performed on either an event or after a period of time. |
| Set live frame rate on <devices> |
Sets a particular frame rate to use when the system displays live video from the selected cameras that substitutes the cameras' default frame rate. Specify this on the Settings tab. When you select this type of action, the Manage Rule wizard prompts you to specify which frame rate to set, and on which devices. Always verify that the frame rate you specify is available on the relevant cameras. Stop action required: This type of action requires one or more stop actions. In one of the following steps, the wizard automatically prompts you to specify the stop action: Restore default live frame rate. Without this stop action, the default frame rate would potentially never be restored. You also have the option of specifying further stop actions. |
| Set recording frame rate on <devices> |
Sets a particular frame rate to use when the system saves recorded video from the selected cameras in the database, instead of the cameras' default recording frame rate. When you select this type of action, the Manage Rule wizard prompts you to specify which recording frame rate to set, and on which cameras. You can only specify a recording frame rate for JPEG, a video codec with which each frame is separately compressed into a JPEG image. This type of action also requires that you have enabled recording on the cameras to which the action is linked. You enable recording for a camera on the Record tab. The maximum frame rate you can specify depends on the relevant camera types, and on their selected image resolution. Stop action required: This type of action requires one or more stop actions. In one of the following steps, the wizard automatically prompts you to specify the stop action: Restore default recording frame rate. Without this stop action, the default recording frame rate would potentially never be restored. You also have the option of specifying further stop actions. |
| Set recording frame rate to all frames for MPEG-4/H.264/H.265 on <devices> |
Sets the frame rate to record all frames when the system saves recorded video from the selected cameras in the database, instead of keyframes only. Enable the recording keyframes only function on the Record tab. When you select this type of action, the Manage Rule wizard prompts you to select which devices the action should apply for. You can only enable keyframe recording for MPEG-4/H.264/H.265. This type of action also requires that you have enabled recording on the cameras to which the action is linked. You enable recording for a camera on the Record tab. Stop action required: This type of action requires one or more stop actions. In one of the following steps, the wizard automatically prompts you to specify the stop action: Restore default recording frame rate of keyframes for MPEG-4/H.264/H.265Without this stop action, the default setting would potentially never be restored. You also have the option of specifying further stop actions. |
| Start patrolling on <device> using <profile> with PTZ priority <priority> |
Begins PTZ patrolling according to a particular patrolling profile for a particular PTZ camera with a particular priority. This is an exact definition of how patrolling should be carried out, including the sequence of preset positions, timing settings, and more. If you have upgraded your system from an older version of the system, the old values (Very Low, Low, Medium, High and Very High) have been translated as follows:
When you select this type of action, the Manage Rule wizard prompts you to select a patrolling profile. You can only select one patrolling profile on one device and you cannot select several patrolling profiles. This type of action requires that the devices to which the action is linked are PTZ devices. You must define at least one patrolling profile for the device(s). You define patrolling profiles for a PTZ camera on the Patrolling tab. Stop action required: This type of action requires one or more stop actions. In one of the following steps, the wizard automatically prompts you to specify the stop action: Stop patrollingWithout this stop action, patrolling would potentially never stop. You can also specify further stop actions. |
| Pause patrolling on <devices> |
Pauses PTZ patrolling. When you select this type of action, the Manage Rule wizard prompts you to specify the devices on which to pause patrolling. This type of action requires that the devices to which the action is linked are PTZ devices. You must define at least one patrolling profile for the device(s). You define patrolling profiles for a PTZ camera on the Patrolling tab. Stop action required: This type of action requires one or more stop actions. In one of the following steps, the wizard automatically prompts you to specify the stop action: Resume patrolling Without this stop action, patrolling would potentially pause indefinitely. You have also the option of specifying further stop actions. |
| Move <device> to <preset> position with PTZ priority <priority> |
Moves a particular camera to a particular preset position - however always according to priority. When selecting this type of action, the Manage Rule wizard prompts you to select a preset position. Only one preset position on one camera can be selected. It is not possible to select several preset positions. This type of action requires that the devices to which the action is linked are PTZ devices. This action requires that you have defined at least one preset position for those devices. You define preset positions for a PTZ camera on the Presets tab. No mandatory stop action: This type of action does not require a stop action.You can specify optional stop actions to be performed on either an event or after a period of time. |
| Move to default preset on <devices> with PTZ priority <priority> |
Moves one or more particular cameras to their respective default preset positions - however always according to priority. When you select this type of action, the Manage Rule wizard prompts you to select which devices the action should apply for. This type of action requires that the devices to which the action is linked are PTZ devices. No mandatory stop action: This type of action does not require a stop action.You can specify optional stop actions to be performed on either an event or after a period of time. |
| Set device output to <state> |
Sets an output on a device to a particular state (activated or deactivated). When you select this type of action, the Manage Rule wizard prompts you to specify which state to set, and on which devices. This type of action requires that the devices to which the action is linked each have at least one external output unit connected to an output port. No mandatory stop action: This type of action does not require a stop action.You can specify optional stop actions to be performed on either an event or after a period of time. |
| Create bookmark on <device> |
Creates a bookmark on live streaming or recordings from a selected device. A bookmark makes it easy to retrace a certain event or period in time. Bookmark settings are controlled from the Options dialog box. When you select this type of action, the Manage Rule wizard prompts you to specify bookmark details and select devices. No mandatory stop action: This type of action does not require a stop action.You can specify optional stop actions to be performed on either an event or after a period of time. |
| Play audio <message> on <devices> with <priority> |
Plays back an audio message on selected devices triggered by an event. Devices are mostly speakers or cameras. This type of action requires that you have uploaded the message to the system on Tools > Options > Audio messages tab. You can create more rules to the same event and send different messages to each device, but always according to priority. The priorities that control the sequence are those set on the rule and on the device for a role on the Speech tab:
|
| Send notification to <profile> |
Sends a notification, using a particular notification profile. When you select this type of action, the Manage Rule wizard prompts you to select a notification profile, and which devices to include pre-alarm images from. You can only select one notification profile and you cannot select several notification profiles. A single notification profile may contain several recipients. You can also create more rules to the same event and send different notifications to each of the notification profiles. You can copy and re-use the content of rules by right-clicking a rule in the Rules list. This type of action requires that you have defined at least one notification profile. Pre-alarm images are only included if you have enabled the Include images option for the relevant notification profile. No mandatory stop action: This type of action does not require a stop action.You can specify optional stop actions to be performed on either an event or after a period of time. |
| Make new <log entry> |
Generates an entry in the rule log. When selecting this type of action, the Manage Rule wizard prompts you to specify a text for the log entry. When you specify the log text, you can insert variables, such as $DeviceName$, $EventName$, into the log message. No mandatory stop action: This type of action does not require a stop action.You can specify optional stop actions to be performed on either an event or after a period of time. |
| Start plug-in on <devices> |
Starts one or more plug-ins. When you select this type of action, the Manage Rule wizard prompts you to select required plug-ins, and on which devices to start the plug-ins. This type of action requires that you have at least one or more plug-ins installed on your system. No mandatory stop action: This type of action does not require a stop action.You can specify optional stop actions to be performed on either an event or after a period of time. |
| Stop plug-in on <devices> |
Stops one or more plug-ins. When you select this type of action, the Manage Rule wizard prompts you to select required plug-ins, and on which devices to stop the plug-ins. This type of action requires that you have at least one or more plug-ins installed on your system. No mandatory stop action: This type of action does not require a stop action.You can specify optional stop actions to be performed on either an event or after a period of time. |
| Apply new settings on <devices> |
Changes device settings on one or more devices. When you select this type of action, the Manage Rule wizard prompts you to select relevant devices, and you can define the relevant settings on the devices you have specified. If you define settings for more than one device, you can only change settings that are available for all of the specified devices. Example: You specify that the action should be linked to Device 1 and Device 2. Device 1 has the settings A, B and C, and Device 2 has the settings B, C and D. In this case, you can only change the settings that are available for both devices, namely settings B and C. No mandatory stop action: This type of action does not require a stop action.You can specify optional stop actions to be performed on either an event or after a period of time. |
| Set Matrix to view <devices> |
Makes video from the selected cameras appear on a computer capable of displaying Matrix-triggered video such as a computer on which you have installed either XProtect Smart Client or the Matrix Monitor application. When you select this type of action, the Manage Rule wizard prompts you to select a Matrix recipient, and one or more devices from which to display video on the selected Matrix recipient. This type of action allows you to select only a single Matrix recipient at a time. If you want to make video from the selected devices appear on more than one Matrix recipient, you should create a rule for each required Matrix recipient or use the XProtect Smart Wall feature. By right-clicking a rule in the Rules list, you can copy and re-use the content of rules. This way, you can avoid having to create near-identical rules from scratch. As part of the configuration on the Matrix recipients themselves, users must specify the port number and password required for the Matrix communication. Make sure that the users have access to this information. The users must typically also define the IP addresses of allowed hosts from which commands regarding display of Matrix-triggered video is accepted. In that case, the users must also know the IP address of the management server, or any router or firewall used. |
| Send SNMP trap |
Generates a small message which logs events on selected devices. The text of SNMP traps is auto-generated and cannot be customized. It can contain the source type and name of the device on which the event occurred. No mandatory stop action: This type of action does not require a stop action.You can specify optional stop actions to be performed on either an event or after a period of time. |
| Retrieve and store remote recordings from <devices> |
Retrieves and stores remote recordings from selected devices (that support edge recording) in a specified period before and after the triggering event. This rule is independent of the Automatically retrieve remote recordings when connection is restored setting. No mandatory stop action: This type of action does not require a stop action.You can specify optional stop actions to be performed on either an event or after a period of time. |
| Retrieve and store remote recordings between <start and end time> from <devices> |
Retrieves and stores remote recordings in a specified period from selected devices (that support edge recording). This rule is independent of the Automatically retrieve remote recordings when connection is restored setting. No mandatory stop action: This type of action does not require a stop action.You can specify optional stop actions to be performed on either an event or after a period of time. |
| Save attached image |
Ensures that when an image is received from the Images Received event (sent via SMTP email from a camera), it is saved for future usage. In future, other events can possibly also trigger this action. No mandatory stop action: This type of action does not require a stop action.You can specify optional stop actions to be performed on either an event or after a period of time. |
| Activate archiving on <archives> |
Starts archiving on one or more archives. When you select this type of action, the Manage Rule wizard prompts you to select relevant archives. No mandatory stop action: This type of action does not require a stop action.You can specify optional stop actions to be performed on either an event or after a period of time. |
| On <site> trigger <user-defined event> |
Relevant mostly within Milestone Federated Architecture, but you can also use this in a single site setup. Use the rule to trigger a user-defined event on a site, normally a remote site within a federated hierarchy. No mandatory stop action: This type of action does not require a stop action.You can specify optional stop actions to be performed on either an event or after a period of time. |
| Show <access request notification> |
Lets you access request notifications pop up on the XProtect Smart Client screen when the criteria for the triggering events are met.Milestone recommends that you use access control events as triggering events for this action, because access request notifications typically are configured for operating on related access control commands and cameras. This type of action requires that you have at least one access control plug-in installed on your system. No mandatory stop action: This type of action does not require a stop action.You can specify optional stop actions to be performed on either an event or after a period of time. |
| Set <camera> to <rule-based DLNA channel> |
Cameras are assigned to the rule-based DLNA channel based on events. This type of action requires that you have a DLNA server installed on your system. No mandatory stop action: This type of action does not require a stop action.You can specify optional stop actions to be performed on either an event or after a period of time. |
| Remove <camera> from <rule-based DLNA channel> |
Cameras are removed from the rule-based DLNA channel based on events. This type of action requires that you have a DLNA server installed on your system. No mandatory stop action: This type of action does not require a stop action.You can specify optional stop actions to be performed on either an event or after a period of time. |
| Remove current camera from <rule-based DLNA channel> |
The camera with the active stream is removed from the rule-based DLNA channel based on events. This type of action requires that you have a DLNA server installed on your system. No mandatory stop action: This type of action does not require a stop action.You can specify optional stop actions to be performed on either an event or after a period of time. |
| Change the password on hardware devices |
Changes the password of selected hardware devices to a randomly-generated password based on the password requirements for that specific hardware device. For a list of supported hardware devices, see https://www.milestonesys.com/community/business-partner-tools/supported-devices/. This action is only available when you set up a rule using the Perform an action on a <recurring time> rule type. The following events are available for the action:
This type of action does not have a stop action. You can view the progress of this action in the Current Tasks node. For more information, see Current tasks (explained). To view the action results - go to the Server Logs node, on the System logs tab. For more information, see Server Logs tab (options). For more information, see System logs (properties). |
Events overview
When you add an event-based rule in the Manage Rule wizard, you can select between a number of different event types. In order for you to get a good overview, events you can select are listed in groups according to whether they are:
Hardware:
Some hardware is capable of creating events themselves, for example to detect motion. You can use these as events but you must configure them on the hardware before you can use them in the system. You may only be able to use the events listed on some hardware as not all types of cameras can detect tampering or temperature changes.
Hardware - Configurable events:
Configurable events from hardware are automatically imported from device drivers. This means that they vary from hardware to hardware and are not documented here. Configurable events are not triggered until you have added them to the system and configured them on the Event tab for hardware. Some of the configurable events also require that you configure the camera (hardware) itself.
Hardware - Predefined events:
|
Event |
Description |
|---|---|
| Communication Error (Hardware) |
Occurs when a connection to the hardware is lost. |
| Communication Started (Hardware) |
Occurs when communication with the hardware is successfully established. |
| Communication Stopped (Hardware) |
Occurs when communication with the hardware is successfully stopped. |
Devices - Configurable events:
Configurable events from devices are automatically imported from device drivers. This means that they vary from device to device and are not documented here. Configurable events are not triggered until you have added them to the system and configured them on the Event tab on a device.
Devices - Predefined events:
|
Event |
Description |
|---|---|
| Bookmark Reference Requested |
Occurs when a bookmark is made in live or playback mode in the clients. Also, a requirement for using the Default record on bookmark rule. |
| Communication Error (Device) |
Occurs when a connection to a device is lost, or when an attempt is made to communicate with a device, and the attempt is unsuccessful. |
| Communication Started (Device) |
Occurs when communication with a device is successfully established. |
| Communication Stopped (Device) |
Occurs when communication with a device is successfully stopped. |
| Evidence Lock Changed |
Occurs when an evidence lock is changed for devices by a client user or via the MIP SDK. |
| Evidence Locked |
Occurs when an evidence lock is created for devices by a client user or via the MIP SDK. |
| Evidence Unlocked |
Occurs when an evidence lock is removed for devices by a client user or via the MIP SDK. |
| Feed Overflow Started |
Feed overflow (media overflow) occurs when a recording server cannot process received data as quickly as specified in the configuration and therefore is forced to discard some recordings. If the server is healthy, feed overflow usually happens because of slow disk writes. You can resolve this either by reducing the amount of data written, or by improving the storage system's performance. Reduce the amount of written data by reducing frame rates, resolution or image quality on your cameras, but this may degrade recording quality. If you are not interested in that, instead improve your storage system's performance by installing extra drives to share the load or by installing faster disks or controllers. You can use this event to trigger actions that helps you avoid the problem, for example, to lower the recording frame rate. |
| Feed Overflow Stopped |
Occurs when feed overflow (see Feed Overflow Started) ends. |
| Live Client Feed Requested |
Occurs when client users request a live stream from a device. The event occurs upon the request even if the client user's request later turns out to be unsuccessful, for example because the client user does not have the rights required for viewing the requested live feed or because the feed is for some reason stopped. |
| Live Client Feed Terminated |
Occurs when client users no longer request a live stream from a device. |
| Manual Recording Started |
Occurs when a client user starts a recording session for a camera. The event is triggered even if the device is already recording via rule actions. |
| Manual Recording Stopped |
Occurs when a client user stops a recording session for a camera. If the rule system also has started a recording session it continues recording even after the manual recording is stopped. |
| Marked Data Reference Requested |
Occurs when an evidence lock is made in playback mode in the clients or via the MIP SDK. An event is created that you can use in your rules. |
| Motion Started |
Occurs when the system detects motion in video received from cameras. This type of event requires that the system's motion detection is enabled for the cameras to which the event is linked. In addition to the system's motion detection, some cameras can detect motion themselves and trigger the Motion Started (HW) event, but it depends on the configuration of the camera hardware and in the system. See also Hardware - Configurable events:. |
| Motion Stopped |
Occurs when motion is no longer detected in received video. See also Motion Started. This type of event requires that the system's motion detection is enabled for the cameras to which the event is linked. In addition to the system's motion detection, some cameras can detect motion themselves and trigger the Motion Stopped (HW) event, but it depends on the configuration of the camera hardware and in the system. See also Hardware - Configurable events:. |
| Output Activated |
Occurs when an external output port on a device is activated. This type of event requires that at least one device on your system supports output ports. |
| Output Changed |
Occurs when the state of an external output port on a device is changed. This type of event requires that at least one device on your system supports output ports. |
| Output Deactivated |
Occurs when an external output port on a device is deactivated. This type of event requires that at least one device on your system supports output ports. |
| PTZ Manual Session Started |
Occurs when a manually operated PTZ session (as opposed to a PTZ session based on scheduled patrolling or automatically triggered by an event) is started on a camera. This type of event requires that the cameras to which the event is linked are PTZ cameras. |
| PTZ Manual Session Stopped |
Occurs when a manually operated PTZ session (as opposed to a PTZ session based on scheduled patrolling or automatically triggered by an event) is stopped on a camera. This type of event requires that the cameras to which the event is linked are PTZ cameras. |
| Recording Started |
Occurs whenever recording is started. There is a separate event for manual recording started. |
| Recording Stopped |
Occurs whenever recording is stopped. There is a separate event for manual recording stopped. |
| Settings Changed |
Occurs when settings on a device are successfully changed. |
| Settings Changed Error |
Occurs when an attempt is made to change settings on a device, and the attempt is unsuccessful. |
External events - Predefined events:
|
Event |
Description |
|---|---|
| Request Play Audio Message |
Activated when play audio messages are requested via the MIP SDK. Through the MIP SDK a third-party vendor can develop custom plug-ins (for example, integration to external access control systems or similar) for your system. |
| Request Start Recording |
Activated when start recordings are requested via the MIP SDK. Through the MIP SDK a third-party vendor can develop custom plug-ins (for example, integration to external access control systems or similar) for your system. |
| Request Stop Recording |
Activated when stop recordings are requested via the MIP SDK. Through the MIP SDK a third party vendor can develop custom plug-ins (for example, integration to external access control systems or similar) for your system. |
External events - Generic events:
Generic events allow you to trigger actions in the system by sending simple strings via the IP network to the system. The purpose of generic events is to allow as many external sources as possible to interact with the system.
External events - User-defined events:
A number of events custom made to suit your system may also be selectable. You can use such user-defined events for:
- Making it possible for client users to manually trigger events while viewing live video in the clients
- Countless other purposes. For example, you may create user-defined events which occur if a particular type of data is received from a device
See also User-defined events (explained)
Recording servers:
|
Event |
Description |
|---|---|
| Archive Available |
Occurs when an archive for a recording server becomes available after having been unavailable. See also Archive Unavailable. |
| Archive Unavailable |
Occurs when an archive for a recording server becomes unavailable, for example if the connection to an archive located on a network drive is lost. In such cases, you cannot archive recordings. You can use the event to, for example, trigger an alarm or a notification profile so that an email notification is automatically sent to relevant people in your organization. |
| Archive Not Finished |
Occurs when an archive for a recording server is not finished with the last archiving round when the next is scheduled to start. |
| Database Deleting Recordings Before Set Retention Size |
Occurs when the retention time limit is reached before the database size limit. |
| Database Deleting Recordings Before Set Retention Time |
Occurs when database size limit is reached before the retention time limit. |
| Database Disk Full - Auto Archiving |
Occurs when a database disk is full. A database disk is considered to be full when there is less than 5GB of space is left on the disk: The oldest data in a database is always auto-archived (or deleted if no next archive is defined) when less than 5GB of space is free. |
| Database Disk Full - Deleting |
Occurs when a database disk is full and less than 1GB space is free. Data is deleted even if a next archive is defined. A database always requires 250MB of free space. If this limit is reached (if data is not deleted fast enough), no more data is written to the database until enough space has been freed. The actual maximum size of your database is the number of gigabytes you specify, minus 5GB. |
| Database Full - Auto Archiving |
Occurs when an archive for a recording server is full and needs to auto-archive to an archive in the storage. |
| Database Repair |
Occurs if a database becomes corrupted, in which case the system automatically attempts two different database repair methods: a fast repair and a thorough repair. |
| Database Storage Available |
Occurs when a storage for a recording server becomes available after having been unavailable. See also Database Storage Unavailable. You can, for example, use the event to start recording if it has been stopped by a Database Storage Unavailable event. |
| Database Storage Unavailable |
Occurs when a storage for a recording server becomes unavailable, for example if the connection to a storage located on a network drive is lost. In such cases, you cannot archive recordings. You can use the event to, for example, stop recording, trigger an alarm or a notification profile so an e-mail notification is automatically sent to relevant people in your organization. |
| Failover encrypted communication error | Occurs when there is an SSL communication error between the failover server and monitored recording servers. |
| Failover Started |
Occurs when a failover recording server takes over from a recording server. See also Failover recording servers (explained). |
| Failover Stopped |
Occurs when a recording server becomes available again, and can take over from a failover recording server. |
System monitor events
System monitor events are triggered by exceeded thresholds values configured in the System Monitor Thresholds node. See also System monitor thresholds (explained).
This functionality requires that the Data Collector service is running.
System Monitor - Server:
|
Event |
Description |
|---|---|
| CPU usage critical |
Occurs when the CPU usage exceeds the critical CPU threshold. |
| CPU usage normal |
Occurs when the CPU usage falls back below the warning CPU threshold. |
| CPU usage warning |
Occurs when the CPU usage exceeds the warning CPU threshold or falls back below the critical CPU threshold. |
| Memory usage critical |
Occurs when the memory usage exceeds the critical memory threshold. |
| Memory usage normal |
Occurs when the memory usage falls back below the warning memory threshold. |
| Memory usage warning |
Occurs when the memory usage exceeds the warning memory threshold or falls back below the critical memory usage threshold. |
| NVIDIA decoding critical |
Occurs when the NVIDIA decoding usage exceeds the critical NVIDIA decoding threshold. |
| NVIDIA decoding normal |
Occurs when the NVIDIA decoding usage falls back below the warning NVIDIA decoding threshold. |
| NVIDIA decoding warning |
Occurs when the NVIDIA decoding usage exceeds the warning NVIDIA decoding threshold or falls back below the critical NVIDIA decoding threshold. |
| NVIDIA memory critical |
Occurs when the NVIDIA memory usage exceeds the critical NVIDIA memory threshold. |
| NVIDIA memory normal |
Occurs when the NVIDIA memory usage falls back below the warning NVIDIA memory threshold. |
| NVIDIA memory warning |
Occurs when the NVIDIA memory usage exceeds the warning NVIDIA memory threshold or falls back below the critical NVIDIA memory threshold. |
| NVIDIA rendering critical |
Occurs when the NVIDIA rendering usage exceeds the critical NVIDIA rendering threshold. |
| NVIDIA rendering normal |
Occurs when the NVIDIA rendering usage falls back below the warning NVIDIA rendering threshold. |
| NVIDIA rendering warning |
Occurs when the NVIDIA rendering usage exceeds the warning NVIDIA rendering threshold or falls back below the critical NVIDIA rendering threshold. |
| Service available critical |
Occurs when a server service stops running. There are no threshold values for this event. |
| Service available normal |
Occurs when a server service status changes to running. There are no threshold values for this event. |
System Monitor - Camera:
|
Event |
Description |
|---|---|
| Live FPS critical |
Occurs when the live FPS rate falls below the critical live FPS threshold. |
| Live FPS normal |
Occurs when the live FPS rate exceeds the warning live FPS threshold. |
| Live FPS warning |
Occurs when the live FPS rate falls below the warning live FPS threshold or exceeds the critical live FPS threshold. |
| Recording FPS critical |
Occurs when the recording FPS rate falls below the critical recording FPS threshold. |
| Recording FPS normal |
Occurs when the recording FPS rate exceeds the warning recording FPS threshold. |
| Recording FPS warning |
Occurs when the recording FPS rate falls below the warning recording FPS threshold or exceeds the critical recording FPS threshold. |
| Used space critical |
Occurs when the storage used for recordings by a specific camera exceeds the critical used space threshold. |
| Used space normal |
Occurs when the storage used for recordings by a specific camera falls back below the warning used space threshold. |
| Used space warning |
Occurs when the storage used for recordings by a specific camera exceeds the warning used space threshold or falls back below the critical used space threshold. |
System Monitor - Disk:
|
Event |
Description |
|---|---|
| Free space critical |
Occurs when the disk space usage exceeds the critical free space threshold. |
| Free space normal |
Occurs when the disk space usage falls below the warning free space threshold. |
| Free space warning |
Occurs when the disk space usage exceeds the warning free space threshold or falls back below the critical free space threshold. |
System Monitor - Storage:
|
Event |
Description |
|---|---|
| Retention time critical |
Occurs when the system predicts that the storage will be filled up faster than the critical retention time threshold value. For example, when data from video streams is filling up the storage faster than expected. |
| Retention time normal |
Occurs when the system predicts that the storage will be filled up slower than the warning retention time threshold value. For example, when data from video streams is filling up the storage at the expected rate. |
| Retention time warning |
Occurs when the system predicts that the storage will be filled up faster than the warning retention time threshold value or slower than the critical retention time threshold value. For example, when data from video streams is filling up the storage faster than expected due to more motion detected by the cameras configured to record on motion. |
Other:
Events from add-on products and integrations:
Events from add-on products and integrations can be used in the rule system, for example:
- Analytics events can also be used in the rule system
Rules
Rules (explained)
Rules specify actions to carry out under particular conditions. Example: When motion is detected (condition), a camera should begin recording (action).
The following are examples of what you can do with rules:
- Start and stop recording
- Set non-default live frame rate
- Set non-default recording frame rate
- Start and stop PTZ patrolling
- Pause and resume PTZ patrolling
- Move PTZ cameras to specific positions
- Set output to activated/deactivated state
- Send notifications via e-mail
- Generate log entries
- Generate events
- Apply new device settings, for example a different resolution on a camera
- Make video appear in Matrix recipients
- Start and stop plug-ins
- Start and stop feeds from devices
Stopping a device means that video is no longer transferred from the device to the system, in which case you cannot view live video nor record video. In contrast, a device on which you have stopped the feed can still communicate with the recording server, and you can start the feed from the device automatically through a rule, as opposed to when the device is manually disabled in the Management Client.
Some rule content may require that certain features are enabled for the relevant devices. For example, a rule specifying that a camera should record does not work as intended if recording is not enabled for the relevant camera. Before creating a rule, Milestone recommends that you verify that the devices involved can perform as intended.
Default rules (explained)
Your system includes a number of default rules that you can use for basic features without setting anything up. You can deactivate or modify the default rules as you need. If you modify or deactivate the default rules, your system may not work as desired nor guarantee that video feeds or audio feeds are automatically fed to the system.
|
Default rule |
Description |
|---|---|
| Go to Preset when PTZ is done |
Ensures that PTZ cameras go to their respective default preset positions after you have operated them manually. This rule is not enabled by default. Even when you have enabled the rule, you must have defined default preset positions for the relevant PTZ cameras in order for the rule to work. You do this on the Presets tab. |
| Play Audio on Request |
Ensures that video is recorded automatically when an external request occurs. The request is always triggered by a system integrating externally with your system, and the rule is primarily used by integrators of external systems or plug-ins. |
| Record on Bookmark |
Ensures that video is recorded automatically when an operator sets a bookmark in XProtect Smart Client. This is provided you have enabled recording for the relevant cameras. Recording is enabled by default. The default recording time for this rule is three seconds before the bookmark is set and 30 seconds after the bookmark is set. You can edit the default recording times in the rule. The pre-buffer which you set on the Record Tab must match or be longer than the pre-recording time. |
| Record on Motion |
Ensures that as long as motion is detected in video from cameras, the video is recorded, provided recording is enabled for the relevant cameras. Recording is by default enabled. While the default rule specifies recording based on detected motion, it does not guarantee that the system records video, as you may have disabled individual cameras' recording for one or more cameras. Even when you have enabled recording, remember that the quality of recordings may be affected by individual camera's recording settings. |
| Record on Request |
Ensures that video is recorded automatically when an external request occurs, provided recording is enabled for the relevant cameras. Recording is enabled by default. The request is always triggered by a system integrating externally with your system, and the rule is primarily used by integrators of external systems or plug-ins. |
| Start Audio Feed |
Ensures that audio feeds from all connected microphones and speakers are automatically fed to the system. While the default rule enables access to connected microphones' and speakers' audio feeds immediately upon installing the system, it does not guarantee that audio is recorded, as you must specify recording settings separately. |
| Start Feed |
Ensures that video feeds from all connected cameras are automatically fed to the system. While the default rule enables access to connected cameras' video feeds immediately upon installing the system, it does not guarantee that video is recorded, as cameras' recording settings must be specified separately. |
| Start Metadata Feed |
Ensures that data feeds from all connected cameras are automatically fed to the system. While the default rule enables access to connected cameras' data feeds immediately upon installing the system, it does not guarantee that data is recorded, as cameras' recording settings must be specified separately. |
|
Show Access Request Notification |
Ensures that all access control events categorized as 'Access Request', will cause an access request notification to pop up in XProtect Smart Client, unless the notification function is disabled in the Smart Client profile. |
Recreate default rules
If you accidentally delete any of the default rules, you can recreate them by entering the following content:
|
Default rule |
Text to enter |
|---|---|
| Goto preset when PTZ is done |
Perform an action on PTZ Manual Session Stopped from All Cameras Move immediately to default preset on the device on which event occurred |
| Play Audio on Request |
Perform an action on Request Play Audio Message from External Play audio message message from metadata on the devices from metadata with priority 1 |
| Record on Bookmark |
Perform an action on Bookmark Reference Requested from All Cameras, All Microphones, All Speakers start recording three seconds before on the device on which event occurred Perform action 30 seconds after stop recording immediately |
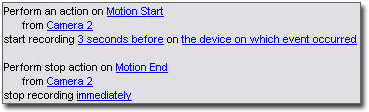
| Record on Motion |
Perform an action on Motion Started from All Cameras start recording three seconds before on the device on which event occurred Perform stop action on Motion Stopped from All Cameras stop recording three seconds after |
| Record on Request |
Perform an action on Request Start Recording from External start recording immediately on the devices from metadata Perform stop action on Request Stop Recording from External stop recording immediately |
| Start Audio Feed |
Perform an action in a time interval always start feed on All Microphones, All Speakers Perform an action when time interval ends stop feed immediately |
| Start Feed |
Perform an action in a time interval always start feed on All Cameras Perform an action when time interval ends stop feed immediately |
| Start Metadata Feed |
Perform an action in a time interval always start feed on All Metadata Perform an action when time interval ends stop feed immediately |
|
Show Access Request Notification |
Perform an action on Access request (Access Control Categories) from Systems [+ units] Show built-in access request notification |
Rule complexity (explained)
Your exact number of options depends on the type of rule you want to create, and on the number of devices available on your system. Rules provide a high degree of flexibility: you can combine event and time conditions, specify several actions in a single rule, and very often create rules covering several or all of the devices on your system.
You can make your rules as simple or complex as required. For example, you can create very simple time-based rules:
|
Example |
Explanation |
|---|---|
| Very Simple Time-Based Rule |
On Mondays between 08.30 and 11.30 (time condition), Camera 1 and Camera 2 should start recording (action) when the time period begins and stop recording (stop action) when the time period ends. |
| Very Simple Event-Based Rule |
When motion is detected (event condition) on Camera 1, Camera 1 should start recording (action) immediately, then stop recording (stop action) after 10 seconds. Even if an event-based rule is activated by an event on one device, you can specify that actions should take place on one or more other devices. |
| Rule Involving Several Devices |
When motion is detected (event condition) on Camera 1, Camera 2 should start recording (action) immediately, and the siren connected to Output 3 should sound (action) immediately. Then, after 60 seconds, Camera 2 should stop recording (stop action), and the siren connected to Output 3 should stop sounding (stop action). |
| Rule Combining Time, Events, and Devices |
When motion is detected (event condition) on Camera 1, and the day of the week is Saturday or Sunday (time condition), Camera 1 and Camera 2 should start recording (action) immediately, and a notification should be sent to the security manager (action). Then, 5 seconds after motion is no longer detected on Camera 1 or Camera 2, the 2 cameras should stop recording (stop action). |
Depending on your organization's needs, it is often a good idea to create many simple rules rather than a few complex rules. Even if it means you have more rules in your system, it provides an easy way to maintain an overview of what your rules do. Keeping your rules simple also means that you have much more flexibility when it comes to deactivating/activating individual rule elements. With simple rules, you can deactivate/activate entire rules when required.
Validating rules (explained)
You can validate the content of an individual rule or all rules in one go. When you create a rule, the Manage Rule wizard ensures that all of the rule's elements make sense. When a rule has existed for some time, one or more of the rule's elements may have been affected by other configuration, and the rule may no longer work. For example, if a rule is triggered by a particular time profile, the rule does not work if you have deleted that time profile or if you no longer have permissions to it. Such unintended effects of configuration may be hard to keep an overview of.
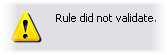
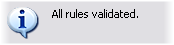
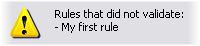
Rule validation helps you keep track of which rules have been affected. Validation takes place on a per-rule basis and each rule is validated by themselves. You cannot validate rules against each other, for example in order to see whether one rule conflicts with another rule, not even if you use the Validate All Rules feature.
You cannot validate whether configuration of requirements outside the rule itself may prevent the rule from working. For example, a rule specifying that recording should take place when motion is detected by a particular camera is validated if the elements in the rule itself are correct, even if motion detection, which is enabled on a camera level, not through rules, has not been enabled for the relevant camera.
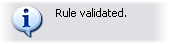
You validate an individual rule or all rules in one go by right-clicking the rule you want to validate and select Validate Rule or Validate All Rules. A dialog box informs you whether the rule(s) validated successfully or not. If you chose to validate more than one rule and one or more rules did not succeed, the dialog box lists the names of the affected rules.
Add a rule
When you create rules, you are guided by the wizard Manage Rule which only lists relevant options.
It ensures that a rule does not contain missing elements. Based on your rule's content, it automatically suggests suitable stop actions, that is what should take place when the rule no longer applies, ensuring that you do not unintentionally create a never-ending rule.
- Right-click the Rules item > Add Rule. This opens the Manage Rule wizard. The wizard guides you through specifying the content of your rule.
- Specifying a name and a description of the new rule in the Name and Description fields respectively.
- Select the relevant type of condition for the rule: either a rule which performs one or more actions when a particular event occurs, or a rule which performs one or more actions when you enter a specific period of time.
- Click Next to go to the wizard's second step. On the wizard's second step, define further conditions for the rule.
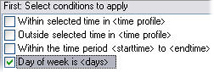
- Select one or more conditions, for example Day of week is <day>:
Depending on your selections, edit the rule description in the lower part of the wizard window:
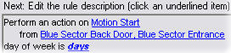
Click the underlined items in bold italics to specify their exact content. For example, clicking the days link in our example lets you select one or more days of the week on which the rule should apply.
- Having specified your exact conditions, click Next to move to the next step of the wizard and select which actions the rule should cover. Depending on the content and complexity of your rule, you may need to define more steps, such as stop events and stop actions. For example, if a rule specifies that a device should perform a particular action during a time interval (for example, Thursday between 08.00 and 10.30), the wizard may ask you to specify what should happen when that time interval ends.
- Your rule is by default active once you have created it if the rule's conditions are met. If you do not want the rule to be active straight away, clear the Active check box.
- Click Finish.
Edit, copy and rename a rule
- In the Overview pane, right-click the relevant rule.
- Select either:
Edit Rule or Copy Rule or Rename Rule. The wizard Manage Rule opens.
- In the wizard, rename and/or change the rule. If you selected Copy Rule, the wizard opens, displaying a copy of the selected rule.
- Click Finish.
Deactivate and activate a rule
Your system applies a rule as soon as the rule's conditions apply which means it is active. If you do not want a rule to be active, you can deactivate the rule. When you deactivate the rule, the system does not apply the rule even if the rule's conditions apply. You can easily activate a deactivated rule later.
Deactivating a rule- In the Overview pane, select the rule.
- Clear the Active check box in the Properties pane.
- Click Save in the toolbar.
- An icon with a red x indicates that the rule is deactivated in the Rules list:
When you want to activate the rule again, select the rule, select the Activate check box, and save the setting.
Recurring time
When you set an action to be executed on a detailed, recurring schedule.
For example:
- Every week on Tuesday every 1 hour(s) between 15:00 and 15:30
- On day 15 every 3 month(s) at 11:45
- Every day every 1 hour(s) between 15:00 and 19:00
The time is based on the local time settings of the server on which Management Client is installed.
Optionally, you can select a time profile to ensure that the rule is executed only inside, or outside of that time profile interval.
For general instructions on how to set up a new rule, see Add a rule.
For information about time profiles, see Time profiles.
Time profiles
Available functionality depends on the system you are using. See https://www.milestonesys.com/solutions/platform/product-index/ for more information.
Time profiles are periods of time defined by the administrator. You can use time profiles when creating rules, for example, a rule specifying that a certain action should take place within a certain time period.
Time profiles are also assigned to roles, along with Smart Client profiles. By default, all roles are assigned the default time profile Always. This means that members of roles with this default time profile attached has no time-based limits to their user rights in the system. You can also assign an alternative time profile to a role.
Time profiles are highly flexible: you can base them on one or more single periods of time, on one or more recurring periods of time, or a combination of single and recurring times. Many users may be familiar with the concepts of single and recurring time periods from calendar applications, such as the one in Microsoft® Outlook.
Time profiles always apply in local time. This means that if your system has recording servers placed in different time zones, any actions, for example recording on cameras, associated with time profiles are carried out in each recording server's local time. Example: If you have a time profile covering the period from 08.30 to 09.30, any associated actions on a recording server placed in New York is carried out when the local time is 08.30 to 09.30 in New York, while the same actions on a recording server placed in Los Angeles is carried out some hours later, when the local time is 08.30 to 09.30 in Los Angeles.
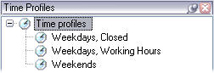
You create and manage time profiles by expanding Rules and Events > Time Profiles. A Time Profiles list opens. Example only:
For an alternative to time profiles, see Day length time profiles (explained).
Specify a time profile
- In the Time Profiles list, right-click Time Profiles > Add Time Profile. This opens the Time Profile window.
- In the Time Profile window, enter a name for the new time profile in the Name field. Optionally, enter a description of the new time profile in the Description field.
- In the Time Profile window's calendar, select either Day View, Week View or Month View, then right-click inside the calendar and select either Add Single Time or Add Recurring Time.
- When you have specified the time periods for your time profile, click OK in the Time Profile window. Your system adds your new time profile to the Time Profiles list. If at a later stage you wish to edit or delete the time profile, you do that from the Time Profiles list as well.
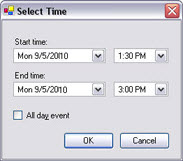
Add a single time
When you select Add Single Time, the Select Time window appears:
Time and date format may be different on your system.
- In the Select Time window, specify Start time and End time. If the time is to cover whole days, select the All day event box.
- Click OK.
Specify a recurring time
When you select Add Recurring Time, the Select Recurring Time window appears:
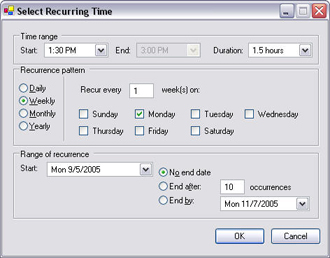
- In the Select Time window, specify time range, recurrence pattern and range of recurrence.
- Click OK.
A time profile can contain several periods of time. If you want your time profile to contain further periods of time, add more single times or recurring times.
Edit a time profile
- In the Overview pane's Time Profiles list, right-click the relevant time profile, and select Edit Time Profile. This opens the Time Profile window.
- Edit the time profile as needed. If you have made changes to the time profile, click OK in the Time Profile window. You return to the Time Profiles list.
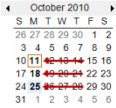
In the Time Profile Information window, you can edit the time profile as needed. Remember that a time profile may contain more than one time period, and that time periods may be recurring. The small month overview in the top right corner can help you get a quick overview of the time periods covered by the time profile, as dates containing specified times are highlighted in bold.
In this example, the bold dates indicate that you have specified time periods on several days, and that you have specified a recurring time on Mondays.
Day length time profiles (explained)
When you place cameras outside, you must often lower the camera resolution, enable black/white or change other settings when it gets dark or when it gets light. The further north or south from the equator the cameras are placed, the more the sunrise and sunset time varies during the year. This makes it impossible to use normal fixed time profiles to adjusts camera settings according to light conditions.
In such situations, you can create day length time profiles instead to define the sunrise and sunset in a specified geographical area. Via geographic coordinates, the system calculates the sunrise and sunset time, even incorporating daylight saving time on a daily basis. As a result, the time profile automatically follows the yearly changes in sunrise/sunset in the selected area, ensuring the profile to be active only when needed. All times and dates are based on the management server's time and date settings. You can also set a positive or negative offset (in minutes) for the start (sunrise) and end time (sunset). The offset for the start and the end time can be identical or different.
You can use day length profiles both when you create rules and roles.
Create a day length time profile
- Expand the Rules and Events folder > Time Profiles.
- In the Time Profiles list, right-click Time Profiles, and select Add Day Length Time Profile.
- In the Day Length Time Profile window, fill in the needed information. To deal with transition periods between lightness and darkness, you can offset activation and deactivation of the profile. The time and the name of months are shown in the language used your computer's language/regional settings.
- To see the location of the entered geographic coordinates in a map, click Show Position in Browser. This opens a browser where you can see the location.
- Click OK.
Day length time profile properties
Set the following properties for day length time profile:
|
Name |
Description |
|---|---|
| Name |
The name of the profile. |
| Description |
A description of the profile (optional). |
| Geo coordinates |
Geographic coordinates indicating the physical location of the camera(s) assigned to the profile. |
| Sunrise offset |
Number of minutes (+/-) by which activation of the profile is offset by sunrise. |
| Sunset offset |
Number of minutes (+/-) by which deactivation of the profile is offset by sunset. |
| Time zone |
Time zone indicating the physical location of the camera(s). |
Notification profiles
Notification profiles (explained)
Notification profiles allow you to set up ready-made email notifications. Notifications can automatically be triggered by a rule, for example when a particular event occurs.
When you create the notification profile, you specify the message text and decides if you want to include still images and AVI video clips in the email notifications.
You may need to disable any email scanners that could prevent the application from sending email notifications.
Requirements for creating notification profiles
Before you can create notification profiles, you must specify mail server settings for email notifications.
You can secure the communication to the mail server, if you install the necessary security certificates on the mail server.
If you want the email notifications to be able to include AVI movie clips, you must first specify the compression settings:
- Go to Tools > Options. This opens the Options window.
- Configure the mail server on the Mail Server tab (Mail Server tab (options)) and the compression settings on the AVI Generation tab AVI Generation tab (options).
Add notification profiles
- Expand Rules and Events, right-click Notification Profiles > Add Notification Profile. This opens the Add Notification Profile wizard.
- Specify name and description. Click Next.
- Specify recipient, subject, message text and time between emails:
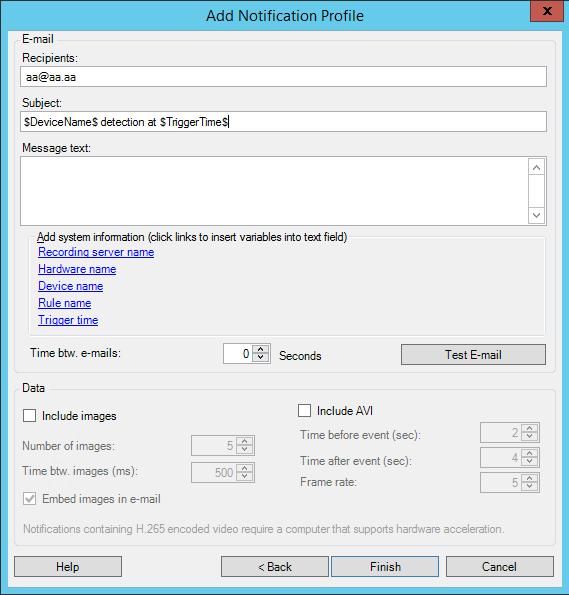
- To send a test email notification to the specified recipients, click Test E-mail.
- To include pre-alarm still images, select Include images, and specify number of images, time between images and whether to embed images in emails or not.
- To include AVI video clips, select Include AVI, and specify the time before and after event and frame rate.
- Click Finish.
Notifications containing H.265 encoded video require a computer that supports hardware acceleration.
Use rules to trigger email notifications
You use the Manage Rule for creating rules. The wizard takes you through all relevant steps. You specify the use of a notification profile during the step on which you specify the rule's actions.
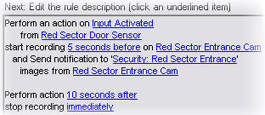
When you select the action Send notification to <profile>, you can select the relevant notification profile and which cameras any recordings to include in the notification profile's email notifications should come from:

In Manage Rule, you click the links to make your selections.
Remember that you cannot include recordings in the notification profile's email notifications unless something is actually being recorded. If you want still images or AVI video clips in the email notifications, verify that the rule specifies that recording should take place. The following example is from a rule which includes both a Start recording action and a Send notification to action:
Notification profile (properties)
Specify the following properties for notification profiles:
|
Component |
Requirement |
|---|---|
| Name |
Enter a descriptive name for the notification profile. The name appears later whenever you select the notification profile during the process of creating a rule. |
| Description (optional) |
Enter a description of the notification profile. The description appears when you pause your mouse pointer over the notification profile in the Overview pane's Notification Profiles list. |
| Recipients |
Enter the e-mail addresses to which the notification profile's e-mail notifications should be sent. To enter more than one e-mail address, separate addresses with a semicolon. Example: aa@aaaa.aa;bb@bbbb.bb;cc@cccc.cc |
| Subject |
Enter the text you want to appear as the subject of the e-mail notification. |
| Message text |
Enter the text you want to appear in the body of the e-mail notifications. In addition to the message text, the body of each e-mail notification automatically contains this information:
|
| Time between e-mails |
Specify required minimum time (in seconds) to pass between the sending of each e-mail notification. Examples:
|
| Number of images |
Specify the maximum number of still images you want to include in each of the notification profile's e-mail notifications. Default is five images. |
| Time between images (ms) |
Specify the number of milliseconds you want between the recordings presented on the included images. Example: With the default value of 500 milliseconds, the included images show recordings with half a second between them. |
| Time before event (sec.) |
This setting is used to specify the start of the AVI file. By default, the AVI file contains recordings from 2 seconds before the notification profile is triggered. You can change this to the number of seconds you require. |
| Time after event (sec.) |
This setting is used to specify the end of the AVI file. By default, the AVI file ends 4 seconds after the notification profile is triggered. You can change this to the number of seconds you require. |
| Frame rate |
Specify the number of frames per second you want the AVI file to contain. Default is five frames per second. The higher the frame rate, the higher the image quality and AVI file size. |
| Embed images in e-mail |
If selected (default), images are inserted in the body of e-mail notifications. If not, images are included in e-mail notifications as attached files. |
User-defined events
User-defined events (explained)
If the event you require is not on the Events Overview list, you can create your own user-defined events. Use such user-defined events to integrate other systems with your surveillance system.
With user-defined events, you can use data received from a third-party access control system as events in the system. The events can later trigger actions. This way, you can, for example, begin recording video from relevant cameras when somebody enters a building.
You can also use user-defined events for manually triggering events while viewing live video in XProtect Smart Client or automatically if you use them in rules. For example, when user-defined event 37 occurs, PTZ camera 224 should stop patrolling and go to preset position 18.
Through roles, you define which of your users are able to trigger the user-defined events. You can use user-defined events in two ways and at the same time if required:
|
Events |
Description |
|---|---|
| For providing the ability to manually trigger events in XProtect Smart Client |
In this case, user-defined events make it possible for end users to manually trigger events while viewing live video in XProtect Smart Client. When a user-defined event occurs because a user of XProtect Smart Client triggers it manually, a rule can trigger that one or more actions should take place on the system. |
| For providing the ability to trigger events through API |
In this case, you can trigger user-defined events outside the surveillance system. Using user-defined events this way requires that a separate API (Application Program Interface. A set of building blocks for creating or customizing software applications) is used when triggering the user-defined event. Authentication through Active Directory is required for using user-defined events this way. This ensures that even if the user-defined events can be triggered from outside the surveillance system, only authorized users are to do it. Also, user-defined events can via API be associated with meta-data, defining certain devices or device groups. This is highly usable when using user-defined events to trigger rules: you avoid having a rule for each device, basically doing the same thing. Example: A company uses access control, having 35 entrances, each with an access control device. When an access control device is activated, a user-defined event is triggered in the system. This user-defined event is used in a rule to start recording on a camera associated with the activated access control device. It is defined in the meta-data which camera is associated with what rule. This way the company does not need to have 35 user-defined events and 35 rules triggered by the user-defined events. A single user-defined event and a single rule are enough. When you use user-defined events this way, you may not always want them to be available for manual triggering in XProtect Smart Client. You can use roles to define which user-defined events should be visible in XProtect Smart Client. |
No matter how you want to use user-defined events, you must add each user-defined event through the Management Client.
If you rename a user-defined event, already connected XProtect Smart Client users must log out and log in again before the name change is visible.
If you delete a user-defined event, this affects any rules in which the user-defined event is in use. Also, a deleted user-defined event only disappears from XProtect Smart Client when the XProtect Smart Client users log out.
Add a user-defined event
- Expand Rules and Events > User-defined Events.
- In the Overview pane, right-click Events > Add User-defined Event.
- Enter a name for the new user-defined event, and click OK. The newly added user-defined event now appears in the list in the Overview pane.
The user can now trigger the user-defined event manually in XProtect Smart Client if the user has rights to do so.
Analytics events
Analytics events (explained)
Analytics events are typically data received from an external third-party video content analysis (VCA) provider.
Using analytics events as basis for alarms is basically a three step process:
- Part one, enabling the analytics events feature and setting up its security. Use a list of allowed addresses to control who can send event data to the system and which port the server listens on
- Part two, creating the analytics event, possibly with a description of the event, and testing it
- Part three, using the analytics event as the source of an alarm definition
You set up analytics events on the Rules and Events list in the Site Navigation pane.
To use VCA-based events, a third-party VCA tool is required for supplying data to the system. Which VCA tool to use is entirely up to you, as long as the data supplied by the tool adheres to the format. This format is explained in the MIP SDK Documentation on analytics events.
Contact your system provider for more details. Third-party VCA tools are developed by independent partners delivering solutions based on a Milestone open platform. These solutions can impact performance on the system.
Add and edit an analytics event
Add an analytics event
- Expand Rules and Events, right-click Analytics Events and select Add New.
- In the Properties window, enter a name for the event in the Name field.
- Enter a description text in the Description field if needed.
- In the toolbar, click Save. You can test the validity of the event by clicking Test Event. You can continually correct errors indicated in the test and run the test as many times as you want and from anywhere in the process.
Edit an analytics event
- Click an existing analytics event to view the Properties window, where you can edit relevant fields.
- You can test the validity of the event by clicking Test Event. You can continually correct errors indicated in the test and run the test as many times as you want and from anywhere in the process.
Test an analytics event
After you create an analytics event, you can test the requirements (see Test Analytics Event (properties)), for example that the analytics events feature has been enabled in Management Client.
- Select an existing analytics event.
- In the properties, click the Test Event button. A window appears that shows all the possible sources of events.
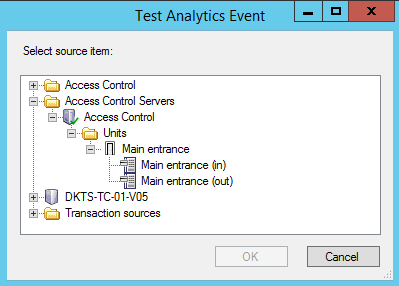
- Select the source of your test event, for example a camera. The window is closed and a new window appears that goes through four conditions that must be fulfilled for the analytics event to work.
As an additional test, in XProtect Smart Client you can verify that the analytics event was sent to the event server. To do this, open XProtect Smart Client and view the event in the Alarm Manager tab.
See also
Test Analytics Event (properties)
When you test the requirements of an analytics event, a window appears that checks four conditions and provides possible error descriptions and solutions.
|
Condition |
Description |
Error messages and solutions |
|---|---|---|
| Changes saved |
If the event is new, is it saved? Or if there are changes to the event name, are these changes saved? |
Save changes before testing analytics event. Solution/Explanation: Save changes. |
| Analytics Events enabled |
Is the Analytics Event feature enabled? |
Analytics events have not been enabled. Solution/Explanation: Enable the Analytics Events feature. To do this, click Tools > Options > Analytics Events and select the Enabled check box. |
| Address allowed |
Is the IP address/host name of the machine sending the event(s) allowed (listed on the analytics events address list)? |
The local host name must be added as allowed address for the Analytics Event service. Solution/Explanation: Add your machine to the analytics events address list of allowed IP addresses or host names. Error resolving the local host name. Solution/Explanation: The IP address or host name of the machine cannot be found or is invalid. |
| Send analytics event |
Did sending a test event to the Event Server succeed? |
See table below. |
Each step is marked by either failed:  or successful:
  .
.
Error messages and solutions for the condition Send analytics event:
|
Error message |
Solution |
|---|---|
| Event server not found |
Unable to find the event server on the list of registered services. |
| Error connecting to event server |
Unable to connect to the event server on the stated port. The error occurs most likely because of network problems, or the Event Server service has stopped. |
| Error sending analytics event |
The connection to the event server is established, but the event cannot be sent. The error most likely occurs because of network problems, for example a time out. |
| Error receiving response from event server |
The event has been sent to the event server, but no reply received. The error most likely occurs because of network problems or a port that is busy. See the event server log, typically located at ProgramData\Milestone\XProtect Event Server\Logs\. |
| Analytics event unknown by event server |
The Event Server service does not know the event. The error most likely occurs because the event or changes to the event have not been saved. |
| Invalid analytics event received by event server |
The event format is incorrect. |
| Sender unauthorized by event server |
Most likely your machine is not on the list of allowed IP addresses or host names. |
| Internal error in event server |
Event server error. See the event server log, typically located at ProgramData\Milestone\XProtect Event Server\Logs\. |
| Invalid response received from Event server |
The response is invalid. Possibly the port is busy or there are network problems. See the event server log, typically located at ProgramData\Milestone\XProtect Event Server\Logs\. |
| Unknown response from event server |
The response is valid, but not understood. The error occurs possibly because of network problems, or the port is busy. See the event server log, typically located at ProgramData\Milestone\XProtect Event Server\Logs\. |
| Unexpected error |
Please contact Milestone support for help. |
Generic events
Generic events (explained)
This feature does not work if you do not have the XProtect event server installed.
Generic events allow you to trigger actions in the XProtect event server by sending simple strings via the IP network to your system.
You can use any hard- or software, which can send strings via TCP or UDP, to trigger generic events. Your system can analyze received TCP or UDP data packages, and automatically trigger generic events when specific criteria are met. This way, you may integrate your system with external sources, for example access control systems and alarm systems. The aim is to allow as many external sources as possible to interact with the system.
With the concept of data sources, you avoid having to adapt third-party tools to meet the standards of your system. With data sources, you can communicate with a particular piece of hard- or software on a specific IP port and fine-tune how bytes arriving on that port are interpreted. Each generic event type pairs up with a data source and makes up a language used for communication with a specific piece of hard- or software.
Working with data sources requires general knowledge of IP networking and specific knowledge of the individual hard- or software you want to interface from. There are many parameters you can use and no ready-made solution on how to do this. Basically, your system provides the tools, but not the solution. Unlike user-defined events, generic events have no authentication. This makes them easier to trigger but, to avoid jeopardizing security, only events from local host are accepted. You can allow other client IP addresses from the Generic Events tab of the Options menu.
Add a generic event
You can define generic events to help the VMS recognize specific strings in TCP or UDP packets from an external system. Based on a generic event, you can configure Management Client to trigger actions, for example to start recording, or alarms.
Requirements
You have enabled generic events and specified the source destinations allowed. For more information, see Generic Events tab (options).
To add a generic event:
- Expand Rules and Events.
- Right-click Generic Events and select Add New.
- Fill in the needed information and properties. For more information, see Generic event (properties).
- (optional) To validate that the search expression is valid, enter a search string in the Check if expression matches event string field that corresponds to the expected packages:
- Match - the string can be validated against the search expression
- No match - the search expression is invalid. Change it and try again
In XProtect Smart Client, you can verify whether your generic events have been received by the event server. You do this in the Alarm List on the Alarm Manager tab by selecting Events.
Generic event (properties)
|
Component |
Requirement |
|---|---|
| Name |
Unique name for the generic event. Name must be unique among all types of events, such as user defined events, analytics events, and so on. |
| Enabled |
Generic events are by default enabled. Clear the check box to disable the event. |
| Expression |
Expression that the system should look out for when analyzing data packages. You can use the following operators:
Example: The search criteria "(User001 OR Door053) AND Sunday" first processes the two terms inside the parenthesis, then combines the result with the last part of the string. So, the system first looks for any packages containing either of the terms User001 or Door053, then takes the results and run through them in order to see which packages also contain the term Sunday.
Example: The search criteria "User001 AND Door053 AND Sunday" returns a result only if the terms User001, Door053 and Sunday are all included in your expression. It is not enough for only one or two of the terms to be present. The more terms you combine with AND, the fewer results you retrieve.
Example: The search criteria "User001 OR Door053 OR Sunday" returns any results containing either User001, Door053 or Sunday. The more terms you combine with OR, the more results you retrieve. |
| Expression type |
Indicates how particular the system should be when analyzing received data packages. The options are the following:
If you switch from Search or Match to Regular expression, the text in the Expression field is automatically translated to a regular expression. |
| Priority |
The priority must be specified as a number between 0 (lowest priority) and 999999 (highest priority). The same data package may be analyzed for different events. The ability to assign a priority to each event lets you manage which event should be triggered if a received package matches the criteria for several events. When the system receives a TCP and/or UDP package, analysis of the packet starts with analysis for the event with the highest priority. This way, when a package matches the criteria for several events, only the event with the highest priority is triggered. If a package matches the criteria for several events with an identical priority, for example two events with a priority of 999, all events with this priority is triggered. |
| Check if expression matches event string |
An event string to be tested against the expression entered in the Expression field. |
Generic event data source (properties)
|
Component |
Requirement |
|---|---|
| Data source |
You can choose between two default data sources and define a custom data source. What to choose depends on your third party program and/or the hard- or software you want to interface from: Compatible: Factory default settings are enabled, echoes all bytes, TCP and UDP, IPv4 only, port 1234, no separator, local host only, current code page encoding (ANSI). International: Factory default settings are enabled, echoes statistics only, TCP only, IPv4+6, port 1235, <CR><LF> as separator, local host only, UTF-8 encoding. (<CR><LF> = 13,10). [Data source A] [Data source B] and so on. |
| New |
Click to create a new data source. |
| Name |
Name of the data source. |
| Enabled |
Data sources are by default enabled. Clear the check box to disable the data source. |
| Reset |
Click to reset all settings for the selected data source. The entered name in the Name field remains. |
| Port |
The port number of the data source. |
| Protocol type selector |
Protocols which the system should listen for, and analyze, in order to detect generic events: Any: TCP as well as UDP. TCP: TCP only. UDP: UDP only. TCP and UDP packages used for generic events may contain special characters, such as @, #, +, ~, and more. |
| IP type selector |
Selectable IP address types: IPv4, IPv6 or both. |
| Separator bytes |
Select the separator bytes used to separate individual generic event records. Default for data source type International (see Data source) is 13,10. (13,10 = <CR><IF>). |
| Echo type selector |
Available echo return formats:
|
| Encoding type selector |
By default, the list only shows the most relevant options. Select the Show all check box to display all available encoding options. |
| Show all |
See previous bullet. |
| Allowed external IPv4 addresses |
Specify the IP addresses, that the management server must be able to communicate with in order to manage external events. You can also use this to exclude IP addresses that you do not want data from. |
| Allowed external IPv6 addresses |
Specify the IP addresses, that the management server must be able to communicate with in order to manage external events. You can also use this to exclude IP addresses that you do not want data from. |
Ranges can be specified in each of the four positions, like 100,105,110-120. As an example, all addresses on the 10.10 network can be allowed by 10.10.[0-254].[0-254] or by 10.10.255.255.