

Setting options for the system
In the Options dialog box, you can specify a number of settings related to the general appearance and functionality of the system.
Available functionality depends on the system you are using. See https://www.milestonesys.com/solutions/platform/product-index/ for more information.
To access the dialog box, select Tools > Options.
General tab (options)
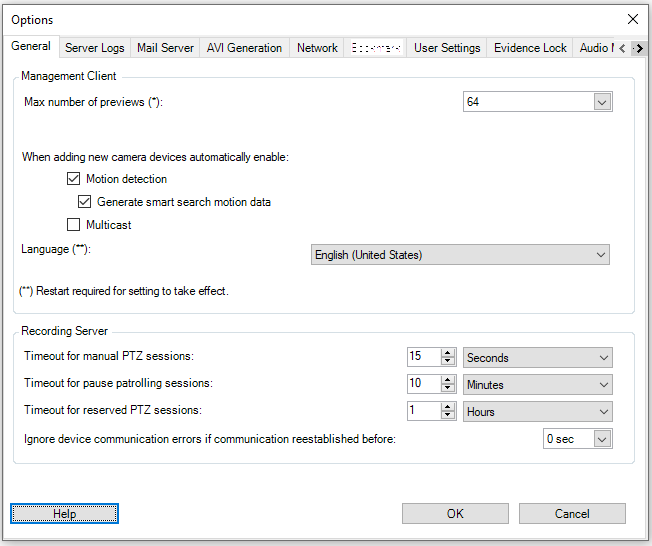
On the General tab, you can specify general settings for the Management Client and the recording server.
Management Client
|
Name |
Description |
|---|---|
| Max number of previews |
Select the maximum number of thumbnail images displayed in the Preview pane. Default is 64 thumbnail images. Select Action > Refresh from the menu for the change to take effect. A large number of thumbnail images in combination with a high frame rate may slow the system down. |
| When adding new camera devices automatically enable: Motion detection |
Select the check box to enable motion detection on new cameras, when you add them to the system with the Add Hardware wizard. This setting does not affect motion detection settings on existing cameras. You enable and disable motion detection for a camera on the Motion tab for the camera device. |
| When adding new camera devices automatically enable: Generate motion data for smart search |
Generation of motion data for smart search requires that motion detection is enabled for the camera. Select the check box to enable generation of smart search motion data on new cameras, when you add them to the system with the Add Hardware wizard. This setting does not affect motion detection settings on existing cameras. You enable and disable the generation of smart search motion data for a camera on the Motion tab for the camera device. |
| When adding new camera devices automatically enable: Multicast |
Select the check box to enable multicast on new cameras when you add them with the Add Hardware wizard. This setting does not affect multicast settings on existing cameras. You enable and disable live multicasting for a camera on the Client tab for the camera device. |
| Language |
Select the language of the Management Client. Restart the Management Client to use the new language. |
Recording server
|
Name |
Description |
|---|---|
| Timeout for manual PTZ sessions |
Client users with the necessary user rights can manually interrupt the patrolling of PTZ cameras. Select how much time should pass before regular patrolling is resumed after a manual interruption. The setting applies for all PTZ cameras on your system. Default setting is 15 seconds. If you want individual timeouts on the cameras, you specify this on the Presets tab for the camera. |
| Timeout for pause patrolling sessions |
Client users with a sufficient PTZ priority can pause patrolling on PTZ cameras. Select how much time should pass before regular patrolling is resumed after a pause. The setting applies for all PTZ cameras on your system. Default setting is 10 minutes. If you want individual timeouts on the cameras, you specify this on the Presets tab for the camera. |
| Timeout for reserved PTZ sessions |
Set the default timeout period for reserved PTZ sessions. When a user runs a reserved PTZ session, the PTZ camera cannot be used by others before it is released either manually or when the period has timed out. Default setting is 1 hour. If you want individual timeouts on the cameras, you specify this on the Presets tab for the camera. |
| Ignore device communication errors if communication reestablished before |
The system logs all communication errors on hardware and devices, but here you select for how long a communication error must exist before the rule engine triggers the Communication Error event. |
Server Logs tab (options)
On the Server Logs tab, you can specify settings for the system’s management server logs.
For more information, see Logs (explained).
|
Name |
Description |
|---|---|
| Logs |
Select the log type that you want to configure:
|
| Settings |
Disable or enable the logs and specify the retention period. Allow 2018 R2 and earlier components to write logs. For more information, see Allow 2018 R2 and earlier components to write logs For System logs, specify the level of messages that you want to log:
For Audit logs, enable user access logging if you want the system to log all user actions in XProtect Smart Client. These are, for example, exports, activating outputs, and viewing cameras live or in playback. Specify:
|
Mail Server tab (options)
On the Mail Server tab, you can specify the settings for your system's mail server.
For more information, see Notification profiles.
|
Name |
Description |
|---|---|
| Sender e-mail address |
Enter the email address that you want to appear as the sender of email notifications for all notification profiles. Example: sender@organization.org. |
| Mail server address | Enter the address of the SMTP mail server that sends e-mail notifications. Example: mailserver.organization.org. |
| Mail server port | The TCP port used for connecting to the mail server. Default port is 25 for unencrypted connections, Encrypted connections typically use port 465 or 587. |
| Encrypt the connection to the server |
If you want to secure the communication between the management server and the SMTP mail server, select this check box. The connection is secured using the STARTTLS email protocol command. In this mode, the session begins on an unencrypted connection, then a STARTTLS command is issued by the SMTP mail server to the management server to switch to secure communication using SSL. |
| Server requires login |
If enabled, you must specify a user name and password for the users to log in to the mail server. |
AVI Generation tab (options)
On the AVI Generation tab, you can specify compression settings for the generation of AVI video clip files. The settings are required if you want to include AVI files in e-mail notifications sent by rule-triggered notification profiles.
See also Notification profiles.
|
Name |
Description |
|---|---|
| Compressor |
Select the codec (compression/decompression technology) that you want to apply. To have more codecs available in the list, install them on the management server. |
| Compression quality |
(Not available for all codecs). Use the slider to select the degree of compression (0-100) to be performed by the codec. 0 means no compression, generally resulting in high image quality and large file size. 100 means maximum compression, generally resulting in low image quality and small file size. If the slider is not available, the compression quality is determined entirely by the selected codec. |
| Keyframe every |
(Not available for all codecs). If you want to use keyframes, select the check box and specify the required number of frames between keyframes. A keyframe is a single frame stored at specified intervals. The keyframe contains the entire view of the camera, whereas the following frames contain only the pixels that change. This helps greatly reduce the size of files. If the check box is not available, or not selected, every frame contains the entire view of the camera. |
| Data rate |
(Not available for all codecs). If you want to use a particular data rate, select the check box and specify the number of kilobytes per second. The data rate specifies the size of the attached AVI file. If the check box is not available, or not selected, the data rate is determined by the selected codec. |
Network tab (options)
On the Network tab, you can specify the IP addresses of the local clients, if the clients are to connect to the recording server via the Internet. The surveillance system then recognizes them as coming from the local network.
You can also specify the IP version of the system: IPv4 or IPv6. Default value is IPv4.
Bookmark tab (options)
Available functionality depends on the system you are using. See https://www.milestonesys.com/solutions/platform/product-index/ for more information.
On the Bookmarks tab, you can specify settings for bookmarks, their IDs and function in XProtect Smart Client.
|
Name |
Description |
|---|---|
| Bookmark ID prefix |
Specify a prefix for all the bookmarks that is made by the users of XProtect Smart Client. |
| Default bookmark time |
Specify the default start and end time of a bookmark is set in XProtect Smart Client. This setting needs to be aligned with:
|
To specify the bookmark rights of a role, see Device tab (roles).
User Settings tab (options)
On the User Settings tab, you can specify user preference settings, for example, if a message should be shown when remote recording is enabled.
Customer Dashboard tab (options)
On the Customer Dashboard tab, you can enable or disable Milestone Customer Dashboard.
Customer Dashboard is an online monitoring service that provides a graphical overview of the current status of your system, including possible technical issues such as camera failures, to system administrators or other people that have been given access to information about your system installation.
You can select or clear the check box to change your Customer Dashboard settings at any time.
Evidence Lock tab (options)
Available functionality depends on the system you are using. See https://www.milestonesys.com/solutions/platform/product-index/ for more information.
On the Evidence Lock tab, you define and edit evidence lock profiles and the duration your client users can select to keep the data protected.
|
Name |
Description |
|---|---|
| Evidence lock profiles |
A list with defined evidence lock profiles. You can add and remove existing evidence lock profiles. You cannot remove the default evidence lock profile but you can change its time options and its name. |
| Lock time options |
The duration the client users can select to lock evidence. Available time options are hour(s), day(s), week(s), month(s), year(s), indefinite or user-defined. |
To specify the evidence lock access rights of a role, see the Device tab (roles) for role settings.
Audio messages tab (options)
On the Audio messages tab, you can upload files with audio messages that are used for broadcasting messages, triggered by rules.
The maximum number of uploaded files is 50 and the maximum size allowed for each file is 1 MB.
|
Name |
Description |
|---|---|
| Name |
Provides the name of a message. You enter the name when you add a message. To upload a message to the system, click Add. |
| Description |
Provides a description of the message. You enter the description when you add a message. You can use the description field to describe the purpose or the actual message. |
| Add |
Lets you upload audio messages to the system. Supported formats are standard Windows audio file formats:
|
| Edit |
Lets you modify the name and description, or you can replace the actual file. |
| Remove |
Delete the audio message from the list. |
| Play |
Click this button to listen to the audio message from the computer that runs the Management Client. |
To create a rule that triggers playback of audio messages, see Rules.
To learn more about actions in general that you can use in rules, see Actions and stop actions (explained).
Access Control Settings tab (options)
The use of XProtect Access requires that you have purchased a base license that allows you to access this feature.
|
Name |
Description |
|---|---|
| Show development property panel |
If selected, additional developer information appears for Access Control > General Settings. This setting is only meant to be used by developers of access control system integrations. |
Analytics Events tab (options)
On the Analytics Events tab, you can enable and specify the analytics events feature.
|
Name |
Description |
|---|---|
| Enable |
Specify if you want to use analytics events. As default, the feature is disabled. |
| Port |
Specify the port used by this feature. The default port is 9090. |
| All network addresses or Specified network addresses |
Specify if events from all IP addresses/hostnames are allowed, or only events from IP addresses/hostnames that are specified in the Address list (see below). |
| Address list |
Specify a list of trusted IP addresses/hostnames. The list filters incoming data so that only events from certain IP addresses/hostnames are allowed. You can use both Domain Name System (DNS), IPv4 and IPv6 address formats. You can add addresses to your list by manually entering each IP address or host name, or by importing an external list of addresses.
|
Alarms and Events tab (options)
On the Alarms and Events tab, you can specify settings for alarms, events and logs. Related to these settings, see also Limit size of database.
|
Name |
Description |
|
|---|---|---|
| Keep closed alarms for |
Specify the number of days for storing alarms with the state Closed in the database. If you set the value to 0, the alarm is deleted after it has been closed. Alarms always have timestamps. If the alarm is triggered by a camera, the timestamp has an image from the time of the alarm. The alarm information itself is stored on the event server, while the video recordings corresponding to the attached image are stored on the relevant surveillance system server. |
|
| Keep all other alarms for |
Specify the number of days for storing alarms with the state New, In progress, or On hold. If you set the value to 0, the alarm appears in the system, but will not be stored. Alarms always have timestamps. If the alarm is triggered by a camera, the timestamp has an image from the time of the alarm. The alarm information itself is stored on the event server, while the video recordings corresponding to the attached image are stored on the relevant surveillance system server. |
|
| Keep logs for |
Specify the number of days for keeping the event server logs. If you keep the logs for longer periods of time, ensure that the machine where the event server is installed has enough disk space. |
|
| Enable verbose logging |
To keep a more detailed log for event server communication, select the check box. It will be stored for the number of days specified in the Keep logs for field. |
|
| Event types |
Specify the number of days for storing events in the database. There are two ways of doing this:
If the value is 0, the events will not be stored in the database. The external events (user-defined events, generic events, and input events) are set to 0 by default, and you cannot change that value. The reason is that these types of events occur so frequently that storing them in the database may cause performance issues. |
|
Generic Events tab (options)
On the Generic Events tab, you can specify generic events and data source related settings.
For more information about how to configure actual generic events, see Generic events.
|
Name |
Description |
|---|---|
| Data source |
You can choose between two default data sources and define a custom data source. What to choose depends on your third party program and/or the hard- or software you want to interface from: Compatible: Factory default settings are enabled, echoes all bytes, TCP and UDP, IPv4 only, port 1234, no separator, local host only, current code page encoding (ANSI). International: Factory default settings are enabled, echoes statistics only, TCP only, IPv4+6, port 1235, <CR><LF> as separator, local host only, UTF-8 encoding. (<CR><LF> = 13,10). [Data source A] [Data source B] and so on. |
| New |
Click to define a new data source. |
| Name |
Name of the data source. |
| Enabled |
Data sources are by default enabled. Clear the check box to disable the data source. |
| Reset |
Click to reset all settings for the selected data source. The entered name in the Name field remains. |
| Port |
The port number of the data source. |
| Protocol type selector |
Protocols which the system should listen for, and analyze, in order to detect generic events: Any: TCP as well as UDP. TCP: TCP only. UDP: UDP only. TCP and UDP packages used for generic events may contain special characters, such as @, #, +, ~, and more. |
| IP type selector |
Selectable IP address types: IPv4, IPv6 or both. |
| Separator bytes |
Select the separator bytes used to separate individual generic event records. Default for data source type International (see Data sources earlier) is 13,10. (13,10 = <CR><IF>). |
| Echo type selector |
Available echo return formats:
|
| Encoding type selector |
By default, the list only shows the most relevant options. Select the Show all check box to display all available encodings. |
| Allowed external IPv4 addresses |
Specify the IP addresses, that the management server must be able to communicate with in order to manage external events. You can also use this to exclude IP addresses that you do not want data from. |
| Allowed external IPv6 addresses |
Specify the IP addresses, that the management server must be able to communicate with in order to manage external events. You can also use this to exclude IP addresses that you do not want data from. |