

Site Navigation: Alarms
This article describes how to set up alarms to appear in the system, triggered by events.
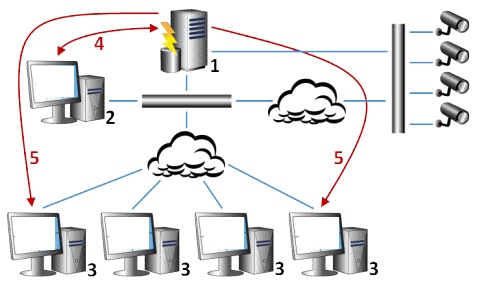
Alarms (explained)
This feature only works if you have XProtect Event Server installed.
Based on functionality handled in the event server, the alarms feature provides central overview, control and scalability of alarms in any number of installations (including any other XProtect systems) throughout your organization. You can configure it to generate alarms based on either:
- Internal system related events
For example, motion, server responding/not responding, archiving problems, lack of disk space and more.
- External integrated events
This group can consist of several types of external events:
- Analytics events
Typically data received from an external third-party video content analysis (VCA) providers.
- MIP plug-in events
Through the MIP SDK a third-party vendor can develop custom plug-ins (for example, integration to external access control systems or similar) to your system.
- Analytics events
Legend:
- Surveillance system
- Management Client
- XProtect Smart Client
- Alarm configuration
- Alarm data flow
You handle and delegate alarms in the alarm list in XProtect Smart Client. You can also integrate alarms with the XProtect Smart Client's smart map and map functionality.
Alarm configuration (explained)
Alarm configuration includes:
- Dynamic role-based setup of alarm handling
- Central technical overview of all components: servers, cameras, and external units
- Setup of central logging of all incoming alarms and system information
- Handling of plug-ins, allowing customized integration of other systems, for example external access control or VCA-based systems
In general, alarms are controlled by the visibility of the object causing the alarm. This means that four possible aspects can play a role with regards to alarms and who can control/manage them and to what degree:
|
Name |
Description |
|---|---|
| Source/device visibility |
If the device causing the alarm is not set to be visible to the user's role, the user cannot see the alarm in the alarm list in XProtect Smart Client. |
| The right to trigger user-defined events |
This right determines if the user's role can trigger selected user-defined events in XProtect Smart Client. |
| External plug-ins |
If any external plug-ins are set up in your system, these might control users' rights to handle alarms. |
| General role rights |
Determine whether the user is allowed to only view or also to manage alarms. What a user of Alarms can do with alarms depends on the user's role and on settings configured for that particular role. |
On the Alarms and Events tab in Options, you can specify settings for alarms, events and logs.
Alarm Definitions
When your system registers an event on your system, you can configure the system to generate an alarm in XProtect Smart Client. You must define alarms before you can use them, and alarms are defined based on events registered in your system servers. You can also use user-defined events for triggering alarms and use the same event to trigger several different alarms.
Add an alarm
To define an alarm, you need to create an alarm definition, where you specify, for example, what triggers the alarm, instructions on what the operator needs to do, and what or when the alarm stops. For detailed information about the settings, see Alarm Definitions (properties).
- In the Site Navigation pane, expand Alarms, and right-click Alarm Definitions.
- Select Add New.
- Fill in these properties:
- Name: Enter a name for the alarm definition. The name of the alarm definition appears whenever the alarm definition is listed.
- Instructions: You can write instructions for the operator who receives the alarm.
- Triggering event: Use the drop-down menus to select an event type and an event message to be used when the alarm is triggered.

A list of selectable triggering events. The one highlighted is created and customized using analytics events.
- Sources: Select the cameras or other devices that the event should originate from to trigger the alarm. Your options depend on the type of event you have selected.
- Time profile: If you want the alarm to be activated during a specific time interval, select the radio button and then a time profile in the drop-down menu.
- Event based: If you want the alarm to be activated by an event, select the radio button and specify which event will start the alarm. You also need to specify the event that will stop the alarm.
- In the Time limit drop-down menu, specify a time limit for when action is required by the operator.
- In the Events triggered drop-down menu, specify which event to trigger when the time limit has passed.
- Specify additional settings, for example related cameras and initial alarm owner.
Alarm Definitions (properties)
Alarm definition settings:
|
Name |
Description |
|---|---|
| Enable |
By default, the alarm definition is enabled. To disable it, clear the check box. |
| Name |
Alarm names do not have to be unique, but using unique and descriptive alarm names are advantageous in many situations. |
| Instructions |
Enter a descriptive text about the alarm and how to resolve the issue that caused the alarm. The text appears in XProtect Smart Client when the user handles the alarm. |
| Triggering event |
Select the event message to use when the alarm is triggered. Choose from two drop-downs:
|
| Sources |
Specify the sources that the events originate from. Aside from cameras or other devices, sources may also be plug-in defined sources, for example VCA and MIP. The options depend on the type of event you have selected. |
Alarm trigger:
|
Name |
Description |
|---|---|
| Time profile |
Select the Time profile radio button to specify the time interval during which the alarm definition is active. Only the time profile you have defined under the Rules and Events node are displayed in the list. If none are defined, only the Always option is available. |
| Event based |
If you want the alarm to be based on an event, select this radio button. Once selected, specify the start and stop event. You can select hardware events defined on cameras, video servers and input. See also Events overview. Also global/manual event definitions can be used. See also User-defined events. |
Operator action required:
|
Name |
Description |
|---|---|
| Time limit |
Select a time limit for when operator action is required. The default value is 1 minute. The time limit is not active before you have attached an event in the Events triggered drop-down menu. |
| Events triggered |
Select which event to trigger when the time limit has passed. |
Maps:
|
Name |
Description |
|---|---|
| Alarm Manager view |
Assign either a smart map or a map to the alarm when the alarm is listed in XProtect Smart Client > Alarm Manager. Smart map displays alarms if they are triggered by a camera and if the camera is added to the smart map. For more information about adding cameras to the smart map, see Adding, deleting, or editing cameras on smart map. |
Other:
|
Name |
Description |
|---|---|
| Related cameras |
Select up to 15 cameras to include in the alarm definition, even if these cameras themselves do not trigger the alarm. This can be relevant, for example, if you have selected an external event message (such as a door being opened) as the source of your alarm. By defining one or more cameras near the door, you can attach the cameras' recordings of the incident to the alarm. |
| Initial alarm owner |
Select a default user responsible for the alarm. |
| Initial alarm priority |
Select a priority for the alarm. Use these priorities in XProtect Smart Client to determine the importance of an alarm. |
| Alarm category |
Select an alarm category for the alarm, for example False alarm or Need investigation. |
| Events triggered by alarm |
Define an event that the alarm can trigger in XProtect Smart Client. |
| Auto-close alarm |
If you want a particular event to automatically stop the alarm, select this check box. Not all events can trigger alarms. Clear the check box to disable the new alarm from the beginning. |
| Alarm assignable to Administrators |
Select the check box to include users with an administrator role in the Assigned to list. The Assigned to list is in the alarm details on the Alarm Manager tab in XProtect Smart Client. Clear the check box to filter out users with an administrator role from the Assigned to list to shorten the list. |
Alarm Data Settings
When you configure alarm data settings, specify the following:
Alarm Data Levels tab
Priorities|
Name |
Description |
|---|---|
| Level |
Add new priorities with level numbers of your choosing or use/edit the default priority levels (numbers 1, 2 or 3). These priority levels are used to configure the Initial alarm priority setting. |
| Name |
Enter a name for the entity. You can create as many as you like. |
| Sound |
Select the sound to be associated with the alarm. Use one of the default sounds or add more in Sound Settings. |
| Repeat sound | Decide whether the sound should play only once or repeatedly until in XProtect Smart Client, the operator clicks the alarm in the alarm list. |
| Enable desktop notifications |
For each alarm priority, you can enable or disable desktop notifications. If you are using an XProtect VMS that supports Smart Client profiles, you must also enable notifications on the required Smart Client profiles. See Alarm Manager tab (Smart Client profiles). |
States
|
Name |
Description |
|---|---|
| Level |
In addition to the default state levels (numbers 1, 4, 9 and 11, which cannot be edited or reused), add new states with level numbers of your choosing. These state levels are only visible in the XProtect Smart Client's Alarm List. |
|
Name |
Description |
|---|---|
| Level |
Add new categories with level numbers of your choosing. These category levels are used to configure the Initial alarm category setting. |
| Name |
Enter a name for the entity. You can create as many as you like. |
Alarm List Configuration tab
|
Name |
Description |
|---|---|
| Available columns |
Use > to select which columns should be available in the XProtect Smart Client's Alarm List. Use < to clear selection. When done, Selected columns should contain the items to be included. |
Reasons for Closing tab
|
Name |
Description |
|---|---|
| Enable |
Select to enable that all alarms must be assigned a reason for closing before they can be closed. |
| Reason |
Add reasons for closing that the user can choose between when closing alarms. Examples could be Solved-Trespasser or False Alarm. You can create as many as you like. |
Sound Settings
When you configure sound settings, specify the following:
|
Name |
Description |
|---|---|
| Sounds |
Select the sound to be associated with the alarm. The list of sounds contains a number of default Windows sounds. You can also add new sounds (.wav or .mp3). |
| Add |
Add sounds. Browse the sound file and upload one or several .wav or .mp3 files. |
| Remove |
Remove a selected sound from the list of manually added sounds. Default sounds cannot be removed. |
| Test |
Test the sound. In the list, select the sound. The sound plays once. |