

Site Navigation: Clients: Smart Client profiles
Available functionality depends on the system you are using. See https://www.milestonesys.com/solutions/platform/product-index/ for more information.
Smart Client profiles allows system administrators to control how XProtect Smart Client should look and behave and what features and panes XProtect Smart Client users have access to. You can set up user rights for: panes and options, minimize/maximize options, inactivity time-control, remember password or not, view shown after log in, layout of print reports, export path, and more.
To manage Smart Client profiles in the system, expand Client and select Smart Client Profiles. You can also learn about the relationship between Smart Client profiles, roles and time profiles and how to use these together (see Create and set up Smart Client profiles, roles and time profiles).
Add and configure a Smart Client profile
You must create a Smart Client profile before you can configure it.
- Right-click Smart Client Profiles.
- Select Add Smart Client Profile.
- In the Add Smart Client Profile dialog box, enter a name and description of the new profile and click OK.
- In the Overview pane, click the profile you created to configure it.
- Adjust settings on one, more or all of the available tabs and click OK.
Copy a Smart Client profile
If you have a Smart Client profile with complicated settings or rights and need a similar profile, it might be easier to copy an already existing profile and make minor adjustments to the copy than to creating a new profile from scratch.
- Click Smart Client Profiles, right-click the profile in the Overview pane, select Copy Smart Client Profile.
- In the dialog box that appears, give the copied profile a new unique name and description. Click OK.
- In the Overview pane, click the profile you just created to configure it. This is done by adjusting settings on one, more or all of the available tabs. Click OK.
Create and set up Smart Client profiles, roles and time profiles
When you work with Smart Client profiles, it is important to understand the interaction between Smart Client profiles, roles and time profiles:
- Smart Client profiles deal with user right settings in XProtect Smart Client
- Roles deal with security settings in clients, MIP SDK and more
- Time profiles deal with time aspects of the two profiles-types
Together these three features provide unique control and customizing possibilities with regards to XProtect Smart Client user rights.
Example: You need a user in your XProtect Smart Client setup who should only be allowed to view live video (no playback) from selected cameras, and only during normal working hours (8.00 to 16.00). One way of setting this up could be as follows:
- Create a Smart Client profile, and name it, for example, Live only.
- Specify the needed live/playback settings on Live only.
- Create a time profile, and name it, for example, Daytime only.
- Specify the needed time period on Daytime only.
- Create a new role and name it, for example, Guard (Selected cameras).
- Specify which cameras Guard (Selected cameras) can use.
- Assign the Live onlySmart Client profile and the Daytime only time profile to the Guard (Selected cameras) role to connect the three elements.
You now have a mix of the three features creating the wanted result and allowing you room for easy fine-tuning and adjustments. You can do the setup in a different order, for example, creating the role first and then the Smart Client profile and the time profile, or any other order you prefer.
Set simplified mode as the default mode
Through the Smart Client profiles, you can configure your system to automatically open XProtect Smart Client in simplified mode with a limited set of features and tabs. By default, XProtect Smart Client opens in advanced mode with the complete set of features and tabs.
If the XProtect Smart Client operator at some point decides to switch to a different mode than the default mode, XProtect Smart Client remembers this setting the next time the operator opens the program.
- In Management Client, expand the Client node.
- Select the relevant Smart Client profile.
- Click the General tab.
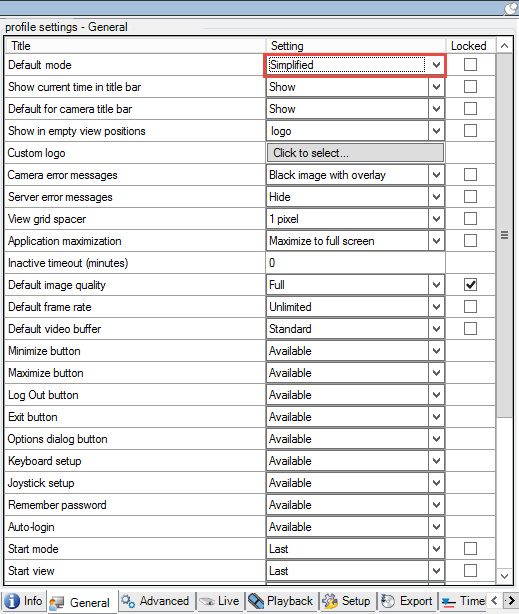
- In the Default Smart Client mode list, select Simplified. XProtect Smart Client now opens in simplified mode for those users associated with the current Smart Client profile.
Prevent operators from switching between simple and advanced mode
In XProtect Smart Client, operators can switch between simple and advanced mode. However, you can prevent the XProtect Smart Client operators from switching between modes. Technically, you must lock the setting that determines whether XProtect Smart Client opens in simple mode or advanced mode.
- In Management Client, expand the Client node.
- Select the relevant Smart Client profile.
- Click the General tab.
- Verify that the Default Smart Client mode list has the proper value. If Enabled, XProtect Smart Client opens in simple mode.
- Select the Locked check box. The mode toggling button in XProtect Smart Client is hidden.
See also, Set simplified mode as the default mode.
Smart Client profile properties
The following tabs allow you to specify the properties of each Smart Client profile. You can lock the settings in the Management Client if required, so the users of XProtect Smart Client cannot change them.
Info tab (Smart Client profiles)
This tab allows you to specify the following properties:
|
Tab |
Description |
|---|---|
| Info |
Name and description, priority of existing profiles and an overview of which roles use the profile. If a user is a member of more than one role, each with their individual Smart Client profile, the user gets the Smart Client profile with the highest priority. |
General tab (Smart Client profiles)
This tab allows you to specify the following properties:
|
Tab |
Description |
|---|---|
| General |
Settings such as show/hide and mini- and maximize menu settings, login/-out, startup, timeout, info and messaging options, and enabling or disabling of certain tabs in XProtect Smart Client. If you Hide the camera error messages, there is a risk that the operator overlooks that the connection to a camera has been lost. The Online help setting lets you to disable the help system in XProtect Smart Client. The Video tutorials setting lets you disable the Video tutorials button in XProtect Smart Client. The button redirects operators to the video tutorials page: https://www.milestonesys.com/support/help-yourself/video-tutorials/ |
Advanced tab (Smart Client profiles)
This tab allows you to specify the following properties:
|
Tab |
Description |
|---|---|
| Advanced |
Advanced settings such as maximum decoding threads, deinterlacing and time zone settings. Maximum decoding threads controls how many decoding threads are used to decode video streams. It can help improve performance on multi-core computers in live as well as playback mode. The exact performance improvement depends on the video stream. It is mainly relevant if using heavily coded high-resolution video streams like H.264/H.265, for which the performance improvement potential can be significant, and less relevant if using, for example, JPEG or MPEG-4. With deinterlacing, you convert video into a non-interlaced format. Interlacing determines how an image is refreshed on a screen. The image is refreshed by first scanning the odd lines in the image, then scanning the even lines. This allows a faster refresh rate because less information is processed during each scan. However, interlacing may cause flickering, or the changes in half of the image's lines may be noticeable. Adaptive streaming enables XProtect Smart Client to automatically select the live video streams with the best match in resolution to the streams requested by the view item. This decreases the load on the CPU and the GPU and thereby improves the decoding capability and performance of the computer. This requires multi-streaming of live video streams with different resolutions to be configured, see Streams tab (devices). |
Live tab (Smart Client profiles)
This tab allows you to specify the following properties:
|
Tab |
Description |
|---|---|
| Live |
Availability of live tabs/panes, camera playback and overlay buttons, bounding boxes, and live-related MIP plug-ins. |
Playback tab (Smart Client profiles)
This tab allows you to specify the following properties:
|
Tab |
Description |
|---|---|
| Playback |
Availability of playback tabs/panes, layout of print reports, independent playback, bookmarks, bounding boxes, and playback-related MIP plug-ins. |
Setup tab (Smart Client profiles)
This tab allows you to specify the following properties:
|
Tab |
Description |
|---|---|
| Setup |
Availability of general setup/panes/buttons, setup-related MIP plug-in and rights to edit a map and to edit live video buffering. |
Exports tab (Smart Client profiles)
This tab allows you to specify the following properties:
|
Tab |
Description |
|---|---|
| Exports |
Paths, privacy masks, video and still image formats and what to include when exporting these, export formats for XProtect Smart Client – Player and much more. |
Timeline tab (Smart Client profiles)
This tab allows you to specify the following properties:
|
Tab |
Description |
|---|---|
| Timeline |
Whether to include audio or not, visibility of indication of time and motion, and finally how to handle playback gaps. You can also select whether to show additional data or additional markers from other sources. |
Access Control tab (Smart Client profiles)
This tab allows you to specify the following properties:
|
Tab |
Description |
|---|---|
| Access Control |
Select if access request notifications should pop up on the XProtect Smart Client screen when triggered by events. |
Alarm Manager tab (Smart Client profiles)
This tab allows you to specify the following properties:
|
Tab |
Description |
|---|---|
| Alarm Manager |
Specify whether desktop notifications for alarms should be displayed on the computers where XProtect Smart Client is installed. The notifications appear only if XProtect Smart Client is running - even if minimized. Desktop notifications for alarms appear only when the alarms have certain priorities, for example Medium or High. To configure which alarm priorities that trigger notifications, go to Alarms > Alarm Data Settings > Alarm Data Levels. For each required alarm priority, select the Enable desktop notifications check box. See Alarm Data Settings. |
Smart map tab (Smart Client profiles)
This tab allows you to specify the following properties:
|
Tab |
Description |
|---|---|
| Smart map |
Specify settings for the smart map feature. You can specify whether OpenStreetMaps is available for use as a geographic background, and whether XProtect Smart Client will automatically create locations when a user adds a custom overlay to the smart map. You can also specify how often you want the system to delete data related to smart maps from your computer. To help XProtect Smart Client display smart map faster, the client saves map data in the cache on your computer. Over time this might slow down your computer. Caching does not apply for Google Maps. If you want to use Bing Maps or Google Maps as geographic backgrounds, enter a Bing Maps API key, or a Maps Static API key from Google. |