Troubleshooting
To troubleshoot issues with the installation, see the Installation Troubleshooting section.
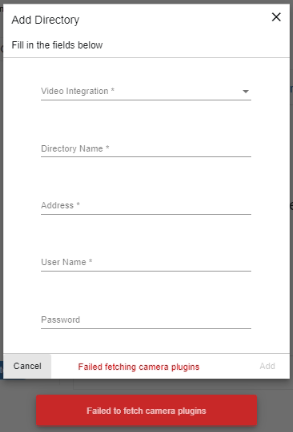
Failed fetching camera plugins error
Symptom
In the Camera management section of the BriefCam Administrator Console when trying to add a directory, the Milestone Integration option is not available and the Failed fetching camera plugins error appears at the bottom of the screen.
Possible root causes
-
A shadow AKKA service is running in the background.
-
Ports are blocked in the firewall.
-
An antivirus/anti-spam ware is preventing reading/writing to BriefCam folders.
-
The BriefCam shared folder is missing sufficient read/write permissions.
-
The permissions issue is possibly because of one of the following (but not limited to):
-
GPO applied on the server
-
Current logged in user lacking admin privileges
-
Antivirus/antimalware restriction
-
Target drive out of space
-
Solution
-
In the Services pane of the BriefCam Administrator Console, check that the PID is not constantly changing for one or more of the AKKA services:
-
Lighthouse
-
LPR Matching
-
BI Face Recognition
-
Face Recognition Matching
-
Filtering
-
-
If one or more of the AKKA service’s PID is constantly changing, this may be because a shadow AKKA service is running in the background. In this case:
-
From the BriefCam Administrator Console, stop the BriefCam AKKA services.
-
From the Task Manager, stop the relevant service.
-
From the BriefCam Administrator Console, restart the services.
-
-
Check that the relevant port is opened in the firewall. You can do this using the Telnet command:
-
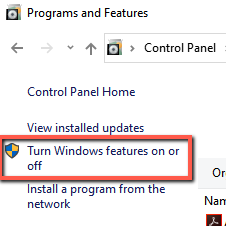
In the Control Panel, go to Programs and Features (or Programs).
-
Click Turn Windows Features on or off.
-
Select the box for Telnet Client.
-
Click OK.
-
In the command prompt (type CMD in the Windows search box), type: telnet <IP address of server and press Enter.
-
If you see a blank cursor, the connection is fine
-
-
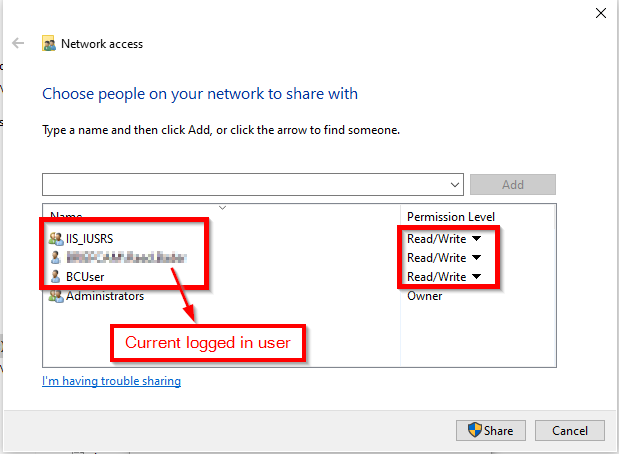
Check the Data folder for sufficient permissions. The current logged in user should have read/write permissions.
-
Check the relevant log for errors. The logs can be found at: C:\Program Files\BriefCam\BriefCam Server\logs. You may find, for example, information that the AKKA service failed to start.
White screen displayed
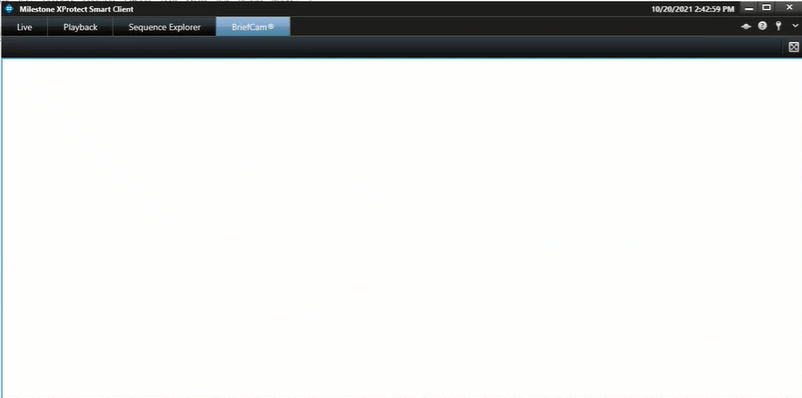
Symptom
XProtect Rapid REVIEW was installed without any errors. However, the embedded client shows a white/blank screen.
Possible root causes
The root cause is often a networking issue (that can be caused by, but is not limited to, an incorrect configuration).
Before you proceed with the drill-down and the different troubleshooting procedures described below, perform the most basic checks of networking. Use Powershell TNC (TestNetConnection) to verify that port 80 is listening where the BOA is installed and that port 8030 is listening where the SSO provider is installed. The majority of instances where a white screen issue is encountered, will be resolved by a network/firewall modification, or by a BOA/SSO config file modification (BOA/SSO address correction in the relevant config file as detailed in the Environment settings not configured properly section).
Other items to check include:
-
Milestone user permissions
-
Server-side/client-side cache issues
-
The BriefCam server or Milestone smart client computers have two NICs (Network interfaces)
-
Missing XProtect Rapid REVIEW license
-
Environment settings not configured properly
Solution
Milestone user permissions
In order to view the BriefCam tab embedded in the Milestone XProtect Smart Client, the user who accesses the client has to have at least 'Read' permissions defined on the Milestone Management Client.
-
In the Milestone XProtect Smart Client, check that the user accessing the XProtect Smart Client has Read permissions.
-
If the user exists but does not have Read permissions – assign the user the necessary permissions.
-
If the user does not exist:
-
Create the user by accessing XProtect Management Client. The user will be created automatically in BriefCam when the user accesses XProtect.
Do not manually create the user in the BriefCam Administrator Console. If the user is created manually and has the same user name in Milestone XProtect, you will see a white screen in XProtect Smart Client.
-
You can log into the BriefCam Administrator Console’s Users section and verify that the Milestone user is there with the type set to SAML.
-
-
Try to access the smart client using this user and check the BriefCam tab.
Note that by default the user who runs the BriefCam services is the BCUser. You may still see the white screen issue if the user configured as BCUser was disabled, for example, after moving to a domain. To solve this issue:
-
From the Windows Services, try restarting the BriefCam VSService.
-
If the service fails to start, then check the BCUser settings in the Computer Management console.

-
If the issue still is not solved, check the Milestone client-side logs at C: \Users\[current user]\AppData\Roaming\BriefCam\Client\logs.
Sometimes on a system where not all the components were installed correctly and the embedded client previously showed a white screen, clearing the Milestone client cache can solve the issue.
To clear the cache on the BriefCam server-side:
-
Go to: C:\Users\CurrentLogedInUser\AppData\Roaming\Milestone.
Note that the AppData folder is a hidden folder. If you do not have hidden folders enabled on your machine, you can open the AppData folder by going to the search bar on your Windows Toolbar, typing %appdata% and pressing Enter.
-
Delete all the contents of this folder.
The next time you start a Milestone XProtect client, the contents of this folder will be recreated.
To clear the cache on the XProtect Smart Client side:
-
Go to: C:\Users\CurrentLogedInUser \AppData\Roaming\BriefCam\MilestoneEmbedded.
-
Delete all the contents of this folder.
The next time you start a Milestone XProtect client, the contents of this folder will be recreated.
Two NICs
The white screen might display if either the BriefCam server of Milestone smart client computer has two NICs (network interfaces) are attached to it and the SSO communication looks for the local host.
As a result, there are issues loading BriefCam’s iFrame in the Milestone embedded client.
To solve this issue:
-
Check how many activated NICs exist, by going to Control Panel > Network and Sharing Center > Change adapter settings.

-
If there is more than one NIC activated, if possible, inactivate one of the NICs.
If the above did not resolve the issue, you need to change the value in several locations so that it does not point to localhost but rather to the BriefCam server’s IP address (the IP address of the NIC configured to communicate between the BriefCam server and the Milestone server):
-
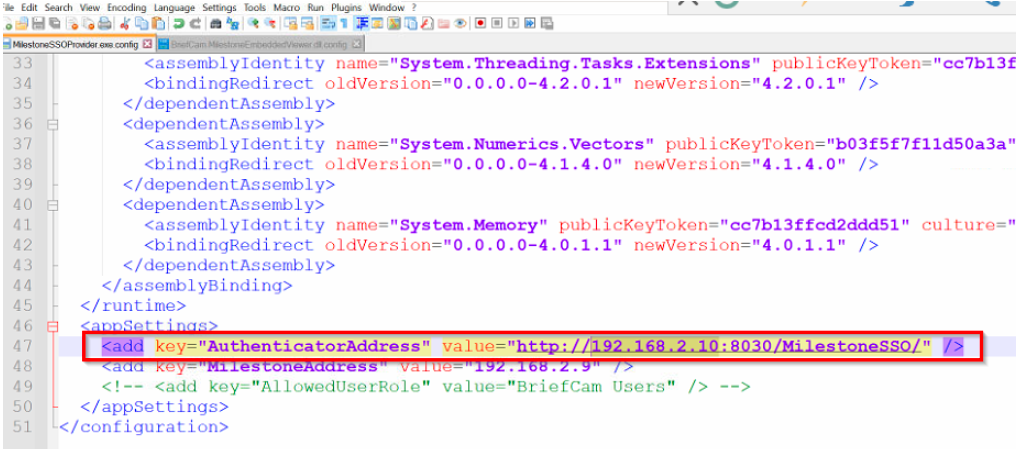
On the BriefCam server, open the Milestone SSOProvider.exe.config file (located by default at: C:\Program Files\BriefCam\BriefCam Server) and find the AuthenticatorAddress value.
-
If the value is set to localhost, change the value to point to the Milestone server’s IP address.
By default the MilestoneSSOProvider.log file is located at C:\Program Files\BriefCam\BriefCam Server\logs\MilestoneSSOProvider-0.
-
On the Milestone XProtect Smart Client computer, open the BriefCam.MilestoneEmbeddedViewer.dll.config file (located at: C:\Program Files\Milestone\XProtect Smart Client\MIPPlugins\BriefCam).
-
If the value of the serverAddress or boaServerAddress key is set to localhost, change the values to point to the BriefCam server’s IP address.

-
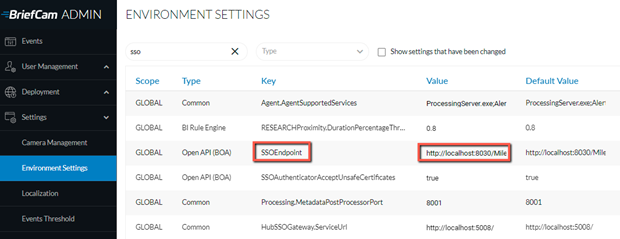
In the BriefCam Administrator Console, go to Settings > Environment settings and search for the SSOEndpoint setting. If the value is set to localhost, change it to the BriefCam server’s IP address, that is: http://[ BriefCam server IP address ]:8030/Milestone.
-
Restart the following:
-
In the BriefCam Administrator: the Milestone SSO Provider service and the VS Server service.
-
The BOA application pool of the IIS.
-
Milestone XProtect Smart Client.
-
-
Clear the cache as described in the Clearing Server/Client Cache section.
Missing license
The BriefCam Open API (BOA) is the communication between BriefCam and the Milestone SSO.
-
Check the BOA log at C:\Logs\Milestone\BOA – It could, for example, point to a missing license.
-
Check that the BOA license product exists at localhost:1947.
Environment settings not configured properly
In rare scenarios, you’ll need to manually configure SSO-related settings making sure that each of the config file's settings are pointing to the proper server hostname.
-
In the BriefCam Administrator Console, go to Settings > Environment settings and search for the SSOEndpoint setting. If the value is set to localhost, change it to the BriefCam server’s IP address, that is: http://[ BriefCam server IP address ]:8030/Milestone.
-
Open the MilestoneSSOProvider.exe.config file (located at: C:\Program Files\BriefCam\BriefCam Server) and find the AuthenticatorAddress value.
-
If the value is set to localhost, change the value to the BriefCam server. If there are multiple NICs, this should point to the Milestone server.
-
In the BriefCam.MilestoneEmbeddedViewer.dll.config file (located at: C:\Program Files\Milestone\XProtect Smart Client\MIPPlugins\BriefCam), both the serverAddress and the boaServer address need to point to the BriefCam server. If there is more than one NIC, use the IP address of the BriefCam server. Below are detailed instructions of how to do this:
-
Scroll to the bottom of the file and look for the following lines: <add key=”serverAddress” value=”http://computer’s_hostname/synopsis/” />
-
Change the values to match your BriefCam server (the XPRR Computer). For example, if the BriefCam XPRR computer is called RapRev, the value will look as follows: http://RapRev/synopsis/
-
Find this row: <add key=”boaServerAddress” value=”http://cmputer’s_hostname/BOA/” />
-
Change the value point to your Milestone server. For example: http://RapRev/BOA/
-
-
Restart the following:
-
In the BriefCam Administrator: the Milestone SSO Provider service and the VS Server service.
-
The BOA application pool of the IIS.
-
Milestone XProtect Smart Client.
-
-
Clear the cache as described in the Clearing Server/Client Cache section.
Server unavailable error
Symptom
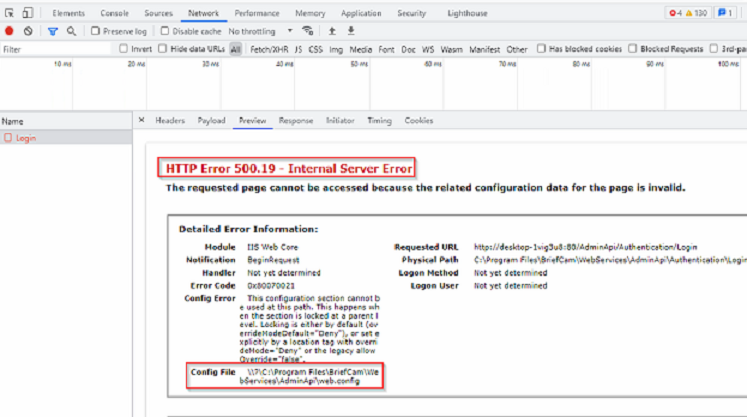
After installing BriefCam and trying to open the BriefCam Administrator Console, a Server Unavailable error appears. When opening F12 (debug mode), the following is seen:
Possible root causes
-
BriefCam and Milestone are installed on the same computer, which causes the IIS services to conflict since the same ports are in use. As detailed in the prerequisites, a dedicated machine for BriefCam is required.
-
The IIS components are not configured on the current server. This may be because of a custom operating system image that includes certain restrictions, such as the IIS is not installed, only a restricted list of components was installed, or the Sysadmin restricted those components to be installed/configured by external installers.
Solution
-
From the Windows Control Panel, open Programs and Features.
-
Click Turn Windows features on or off.
-
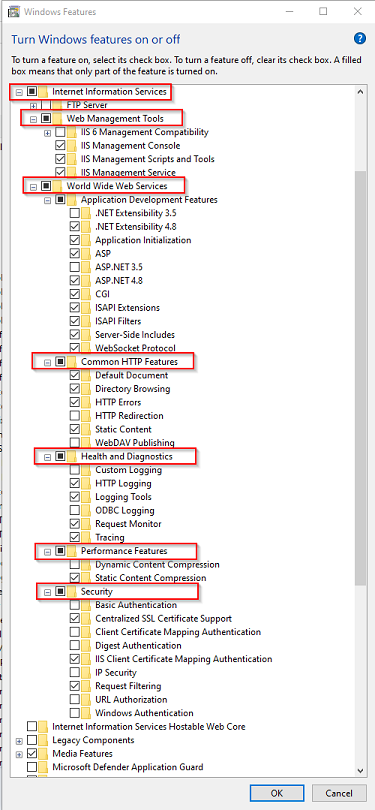
From the list, make sure that all the Internet Information Services that appear in the illustration below are available.
-
If any of the below is missing, add it.
-
Restart the computer.
-
Server returned 401 Unauthorized error
When trying to get a live stream from the Milestone VMS, the “Server returned 401 Unauthorized (authorization failed)” error may occur when you have, for example, more than one WWW-Authenticate header. This can occur in XProtect 2021 R1 and above.
To solve this issue:
-
Make sure you are using the following Milestone ONVIF Bridge component: VideoOS.ONVIF.InstallerForExpressAndProfessional.exe Version 21.1b build 7008. For a detailed step-by-step guide, see http://download.milestonesys.com/MTSKB/KB000003403/ONVIF-Bridge-detailed-guide.pdf.
-
Open the Windows Registry (click Windows + R, type regedit, and press Enter).
-
Open the following registry:
Computer\HKEY_LOCAL_MACHINE\SOFTWARE\Milestone\Milestone Open Network Bridge\ -
Add the following DWORD value: SHA256Auth.
-
Set the value to 0.
-
In the ONB Tray Manger, restart the ONB services.
This registry, introduced with XProtect 2021 R1, switches off SHA256 support, when FIPS is disabled.
For additional information, see: https://developer.milestonesys.com/s/article/changes-digest-authentication-RTSP-service-in-2021-R1-troubleshooting.
Rapid REVIEW tab is missing
Symptom
The Rapid REVIEW tab is missing from the Milestone XProtect embedded client.
Possible root causes
-
Visual Studio X64 redistributable package is not installed. This can be caused by a GPO or other restrictions applied by the System Administrator.
-
Windows is not up to date (even though this is one of the prerequisites).
Solution
-
On the XProtect Smart Client computer, download the vc_redist.x64.exe runtime component for Visual C++: Microsoft Download Center.
-
Run the executable file as Admin.
-
Clear the cache on the Milestone XProtect Smart Client side:
-
Go to: C:\Users\CurrentLogedInUser\AppData\Roaming\Milestone\BriefCam\Milestone Embedded.
Note that the AppData folder is a hidden folder. If you do not have hidden folders enabled on your machine, you can open the AppData folder by going to the search bar on your Windows toolbar, typing %appdata% and pressing Enter.
-
Delete all the contents of this folder. The next time you start a Milestone XProtect client, the contents of this folder will be re-created.
-
Access the Milestone XProtect embedded client.
-
-
If this does not work, install the latest Windows update.
Rapid REVIEW tab is not appearing correctly
If you are upgrading from v6.1, the tab name will not show Rapid REVIEW. To change the tab name:
1. Open the BriefCam.MilestoneEmbeddedViewer.dll.config file, which is located at: C:\Program Files\Milestone\XProtect Smart Client\MIPPlugins\BriefCam\.
2. Add the following text under the <appSettings> node:
<add key="InstallationType" value="SMB" />
3. Save the file.