Installation and deployment steps
-
Run the installer
-
Set up the deployment
-
Define and activate the cameras
-
Disable face recognition and license plate recognition (optional)
-
Install BriefCam Embedded Client for Milestone XProtect plug-in
-
Using an HTTPS host (optional)
Prerequisites
Before you install, please check the following list of prerequisites.
| Server | At least one dedicated server for XProtect Rapid REVIEW (it cannot be installed on the same server with the VMS). |
| Memory | At least 128GB of RAM |
| Storage |
Refer to the APPENDIX: XProtect Rapid REVIEW 2024 M1 hardware recommendations for recommended storage size. |
| GPUs |
At least one supported GPU. For additional information, see the list of recommended GPUs which is available on the specification sheet that you can download from the Milestone Content Portal: Collections / Rapid REVIEW. The GPU should not be used for any system task such as connecting a monitor to the GPU or running applications, such as Chrome, using the GPU. |
| CPU | For each GPU, at least 8 cores at base (non-turbo) frequency of 2.5GHz and above. |
| Drivers |
For the server with the GPU, make sure to download a supported version of the NVIDIA driver (470.94 or higher). Make sure to restart the computer after installing the NVIDIA driver. |
| Network connectivity between BriefCam and the VMS | Ensure a minimum of 1 Gbps of throughput is available. This is relevant for deployments with less than 300 cameras on site. For larger deployments, consult with your BriefCam Account Manager. |
| Operating System |
Windows 11, Windows 10 Pro version 1803 or higher, Windows Server 2022, Windows Server 2019 or Windows Server 2016 (you can check the Windows versions by running winver.exe.) Windows 11 and Windows 10 Pro (version 1803 or higher) can be used for development environments or all-in-one production environments with a single GPU without the RESEARCH component. They are not supported for other production environments and are not supported for any RESEARCH environment. Windows OS must be in English (Get-WinSystemLocale command in Powershell) |
| Windows Updates | Make sure that the latest Windows updates are installed. |
| .NET Framework |
If the computer is running Windows 10 or Windows Server 2016, download and install .NET Framework 4.7.2 Runtime or higher. Make sure to restart the computer after installing .NET Framework. |
| Permissions | Current logged in user has full local admin rights and full Registry Read/Write permissions. |
| Browsers |
Mozilla Firefox version 69.* and above Google Chrome version 77.* and above Microsoft Edge version 80 and above
|
| Ports | See the Firewall Consideration and Ports Availability section below. |
| UAC (User Account Control) | The Windows User Account Control must be disabled. |
| VSServer service | The user that will run the BriefCam VSServer service must be a local administrators and also a member of the IIS_IUSRS service group in Active Directory. |
STEP 1 - Run the Installer
XProtect Rapid REVIEW will not work if the minimum requirements are not met. For additional information, see the APPENDIX: XProtect Rapid REVIEW 2024 M1 hardware recommendations.
-
Extract the XProtect Rapid REVIEW package (RapidREVIEW <version>.zip).
-
Right-click the MilestoneXProtectRapidReview2023R2M1Installer_7.0.37096.exe file and select Run as administrator.
-
Read and accept the License Agreement terms and click NEXT.
When running on a laptop, you may also see a duplicated smaller screen on top of the regular installation screen. To continue, check the check box on the smaller screen and the NEXT button on the larger screen. This is a known issue
-
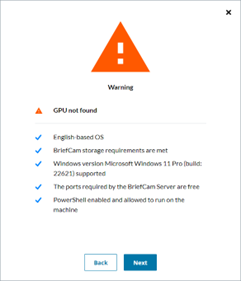
The installer will check to see if your computer meets the minimum prerequisites..
-
If all the prerequisites are met, you’ll see a “Your system is fine” message.
-
If any of the prerequisites are not met, you will see a screen describing the warnings. Try resolving the warnings (for more information see the Prerequisites section) and then click RETRY or run the installer again. To resolve the warnings, you can also see the logs and run the standalone Check Prerequisites tool.
If there are still errors and you click NEXT, the installation will continue. However, may not run properly on your computer since it does not meet the minimum requirements.
-
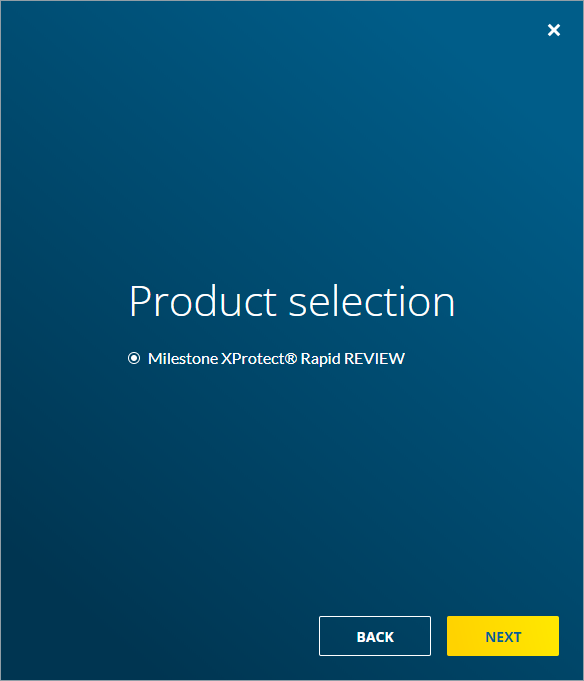
Select whether you want to install, upgrade, or uninstall XProtect Rapid REVIEW.
-
Click NEXT.
-
Fill in the following fields. (You can click the Simple mode option if you only want to show required fields.)
-
The password does not meet the password policy of the operating system and/or organization.
-
Domain accounts cannot be created using this dialog. Contact the relevant IT person if a new domain account is required.
-
If the user is disabled, locked, or otherwise limited.
-
It’s recommended to select the drive with the most available space.
-
The path to the PostgreSQL data cannot contain special characters, such as space, ~, and &.
-
If you select an existing shared network folder, make sure that the user has permissions to the shared network folder.
-
If you want to select a mapped drive, make sure to first map the drive before installing BriefCam.
-
Click NEXT and a summary screen will appear.
-
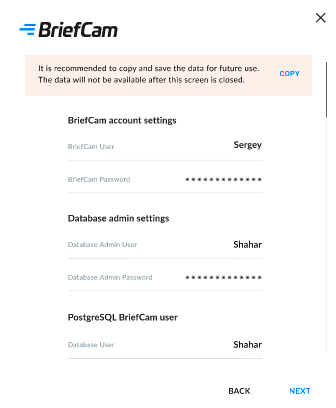
Review the settings and save the settings for future use by clicking the COPY button.
-
Click NEXT to complete the installation.
The extracted folder includes the XProtect Rapid REVIEW installer, multiple BriefCam installer files and an installation and configuration guide. You do not need to run any of the BriefCam installers (except for the NGINX, embedded client, and management client installers at a later stage).
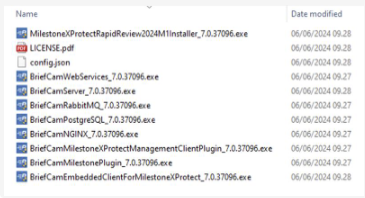
BriefCam uses port 80 for its application. If you want to use a different port, change it in the config.json file before running the installer. The config.json file is one of the files in the installation package.
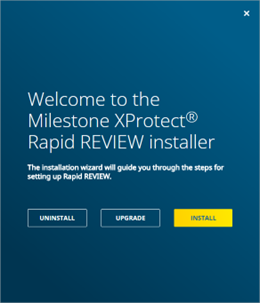
If you select INSTALL or UPGRADE, the following screen appears.
The following screen opens where you’ll enter the necessary credentials and settings.

| Field | Description |
|---|---|
| BriefCam account settings (required) | |
| BriefCam User |
The Windows user that runs the services. If this user does not yet exist, the installer will create it for you. |
| Password |
The password of the user above (BriefCam User). Note that apostrophes and double quotes are not supported in the Password field. Use a password that is compliant with your organization’s password policy. A password may fail for a variety of reasons: |
| Database admin settings | |
| Database Admin User | The admin user for the PostgreSQL database. This cannot be the same as the Database User in the table above. |
| Database Admin Password | The password of the user above (Database Admin User). A database admin password is automatically generated. Note that apostrophes and double quotes are not supported in the Database Admin Password field. |
| PostgreSQL BriefCam User (required) | |
| Database User |
The PostgreSQL user that accesses the application database. Note that the user name is case sensitive. |
| Database Password | The password of the user above (Database User). Note that apostrophes and double quotes are not supported in the Database Password field. |
| Authentication key | |
| Passphrase | This passphrase will be used to generate an encryption key to secure connection strings and other sensitive data. |
| Domain Name | |
| Domain Name | If the user is a domain user, enter the domain name and make sure that the domain user has full admin privileges on the server. If the user is a local user, enter a period (.) Note that the domain name is case sensitive. |
| License activation key | |
| Software activation key |
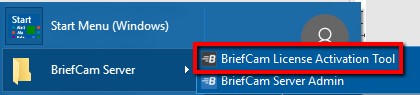
The license activation key provided by Milestone. The license will be activated if the computer is online. If it is not online, you can activate the license using the BriefCam License Activation tool, which you can access by clicking the following icon after the installation completes.
|
| Paths | |
| Root path | The path where you want to install BriefCam. |
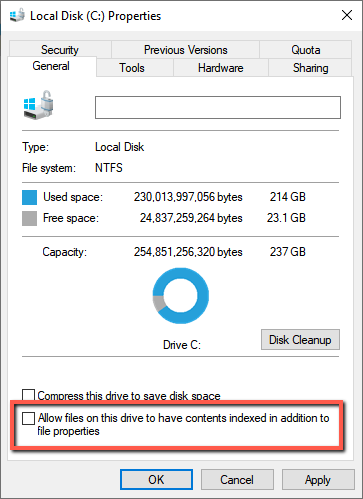
| Shared directory |
The drive that will be the shared data folder. This folder will store longer blobs, database backups, rendered synopsis files, and more. In the properties of the drive you select, make sure that you unchecked the Allow files on this drive to have contents indexed in addition to file properties check box (as shown in the image below).
|
| Postgres data directory | The path where you want to store PostgreSQL data. This path must be set to an SSD drive. This field cannot contain special characters, such as space, ~, and %. |
| Milestone | |
| MilestoneSSO Provider | Leave as-is. The endpoint of the Rapid REVIEW-Milestone integration service. |
| Milestone VMS Address | If you already want to configure the connection to the MilestoneVMS, enter the host or IP address of the Milestone VMS in this field. It is recommended to fill it in. |

The installation may take 10-25 minutes. Note that after the installation is complete, the services will be automatically restarted.
If you did not fill in the VMS address after the installation completed, open the MilestoneSSOProvider.exe.config file and update the MilestoneAddress value to the VMS address.
By default, this file is located in C:\Program Files\BriefCam\BriefCam Server.
Firewall Consideration and Ports Availability
Internal (Local) Ports
On each server, the following ports should be opened for internal communication:
-
On each server, all outbound ports should be opened, to allow communicating with other servers as needed.
-
On each server, the following inbound ports should be opened according to the installed services. The BriefCam application listens for incoming traffic from these ports. The installer will create the relevant Windows firewall rules for these ports.
| Component | Port # |
|---|---|
| BI Face Recognition Service | TCP 13004 |
| Face Recognition Matching Service | TCP 13002 |
| Filtering Service | TCP 13001 |
| License Service | TCP 1947 |
| Lighthouse Service | TCP 2553, TCP 2554, TCP 2555, TCP 2556, TCP 2557 |
| LPR Matching Service | TCP 13003 |
| Milestone | TCP 554, TCP 8080 |
| MilestoneSSOProvider | TCP 8030 |
| Notification Service | TCP 7080 |
| PostgreSQL Redis | TCP 5432 |
| Redis | TCP 6379 |
| Storage | TCP 139, TCP 445 |
| Video Streaming Gateway Service | TCP 5010 |
| VSServer Service | TCP 1112, TCP 1113 |
| Web Services (BOA, ProWebApi, AdminWebApi) | HTTP (80) |
External Ports
The following ports should be opened to traffic coming from the end users’ browsers.
| Component | Port # | Comment |
|---|---|---|
| Web Services | HTTP (80) | |
| Video Streaming Gateway Service | TCP 5010 | Not needed when using a load balancer |
| Notification Service | TCP 7080 |
Additionally recommended prerequisites
-
Set the default system language to English during the installation. If the language is a language other than English, the installation may end with an error. The system language can be set to any preferred language after the installation.
-
Disable antivirus scans from all BriefCam folders. For more information, see the Antivirus guidelines from BriefCam.
Installation Troubleshooting
If the installation failed:
-
Investigate the log files (deploy.log and the MilestoneXProtectRapidReview2023R2Installer_<version>.log) to see which component of the installation has failed. The log files are in the folder where you extracted the installation files.
-
Investigate the relevant component’s log file and fix the issue according to the error in the log.
-
Uninstall Rapid REVIEW using the UNINSTALL option in the installer.
-
Restart the computer.
-
Reinstall Rapid REVIEW.
Activate licenses
This information assists you in activating an XProtect Rapid REVIEW license. You can complete activation in both online and offline modes.
It also assists you in modifying and re-activating an existing license for system expansion if, for example, you want to add additional device licenses.
All steps listed below should be performed on the server where you installed XProtect Rapid REVIEW.
Licensing warning
Be aware that licensing with BriefCam is sensitive. A product key can be activated only once. If you try to activate it again, it will fail with error code 831. Furthermore, if certain components are missing on your BriefCam installation, there is a chance that the license is activated on the BriefCam licensing server without being applied on your system. If this happens, you must open a support case with BriefCam requesting an extra activation for the license.
To prevent problems with license activation:
-
Make sure that the Sentinel LDK License Manager service is available in Windows Services.
-
Verify that you can access the URL http://localhost:1947 to get to the GEMALTO application site.
-
All IIS AppPools must be in place: AdminApiPool, AdminClientPool, BoaPool, ProWebApiPool, ProWebApiStoragePool, ProWebClientPool, VideProcessingGateway
-
All BriefCam components must be available in Control Panel – Programs: BriefCam PostgreSQL, BriefCam Web Services, BriefCam Server, BriefCam Milestone Plugin.
If any of the preconditions mentioned above are not accomplished, please open a case with Milestone Technical Support providing your license product key and tag ID.
Once the license is activated successfully, you can uninstall and re-install as many times as you wish. The license will remain on the server so you don't need to re-activate it. A request for an extra activation for the license will only be required in the case of a re-installation of the Windows OS or if the license is deleted by a disk formatting .
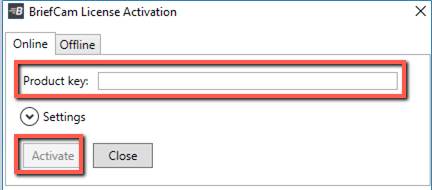
Online activation
Online activation requires an active Internet connection.
-
From the desktop, do one of the following
- Click the BriefCam License Activation application.
-
From the Start menu, type BriefCam License Activation and launch the application.
-
Enter your product key and click Activate.
-
Click OK to close the dialog box and then click Close in the main application window to close the License Activation application.
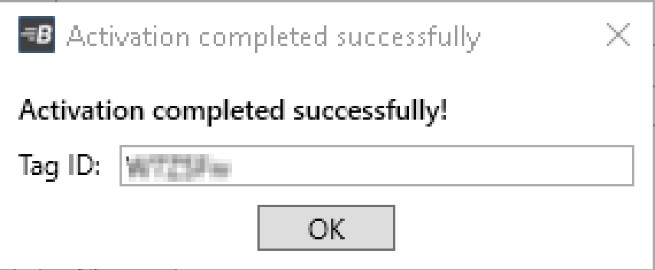
When the activation is successful, the following dialog box will appear. Here you’ll find your Tag ID, which you’ll need when you open a support ticket.
Offline activation
Offline activation is useful in cases where internet connectivity is not available on the computer where you are installing BriefCam.
To perform offline activation:
-
From the desktop, do one of the following:
- Click the BriefCam License Activation application.
- From the Start menu, type BriefCam License Activation and launch the application.
-
Click the Offline tab to access offline activation.
-
Click 1. Collect Information to generate a C2V (client to vendor) file, select or approve the destination in which it is to be stored, and click Save.
-
Send the C2V file to the Support team by logging into Milestone Support to open a ticket and attaching the C2V file. The product key number you received from Milestone needs to be mentioned in the ticket. This will help the support team generate the relevant V2C file (vendor to client), which is required to activate the product offline.
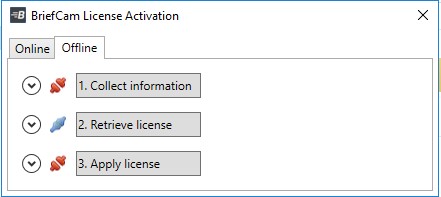

After receiving the V2C, there are two ways to activate the product offline:
You can activate via the BriefCam License Activation application or you can use the Gemalto application.
Activate via the BriefCam License Activation application
-
Open the BriefCam License Activation application.
-
Click the Offline tab.
-
Click 3. Apply license.
-
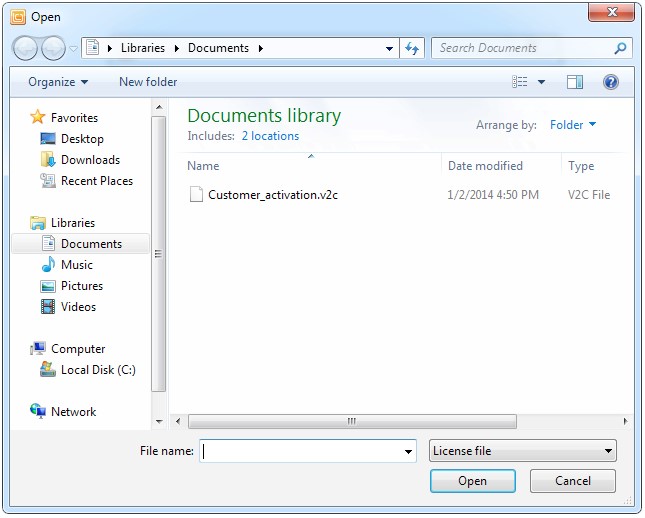
Select the V2C file provided by the support team, and click Open.
-
When you see a message that the product was activated successfully, click OK and close the License Activation application. BriefCam will now be activated.
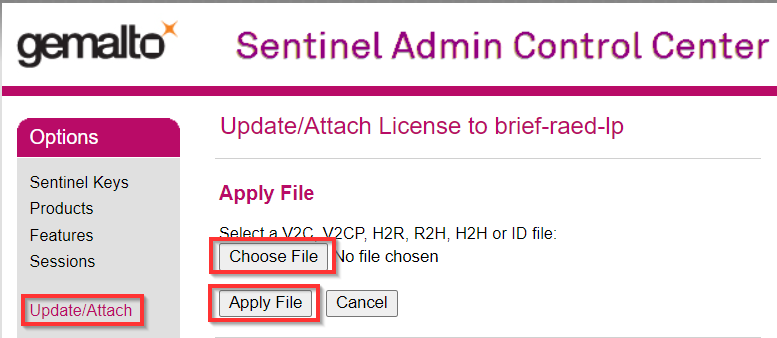
Activate via the Gemalto application.
-
Open a web browser.
-
Select the Update/Attach option.
-
Click Choose File.
-
Select the V2C file provided by the support team.
-
Click Apply File.
System expansion (adding additional device licenses)
To make any modifications to the license, such as adding cameras to the license, you need to:
-
Activate the license.
-
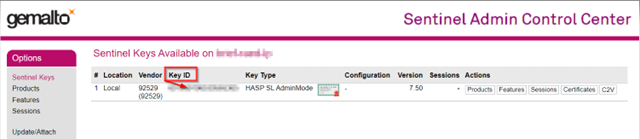
Place an order and mention the system Tag ID and the Key ID, which can be found in the Gemalto application:
-
Open your browser.
-
Go to the Sentinel Admin Control Center
-
Copy the Key ID.
-
Activate the V2C on the server:
-
Open a web browser.
-
Go to the Sentinel Admin Control Centerl.
-
Select the Update/Attach option.
-
Click Choose File.
-
Select the V2C file provided by the Milestone support team.
-
Click Apply File.
The Milestone team will then generate the relevant V2C with the requested modification(s).
STEP 2 – Set up the deployment
-
In a browser, enter the hostname of the computer where XProtect Rapid REVIEW was installed followed by slash (/) and the word admin, that is: http://[computer name]/admin. The BriefCam Administrator Console will open.
-
Log into the console. The initial administrator is Administrator and the password is changeit.
-
Change the password.
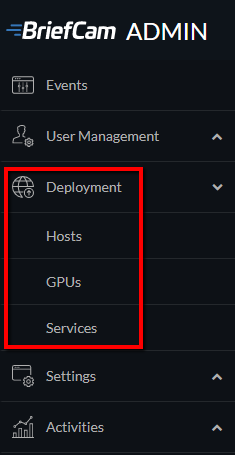
You’ll now set up the deployment from the Deployment section.
-
From the Deployment section, click Hosts.
-
Next to the host name, click on the settings icon
 .
. -
From the Templates menu, select All In One.
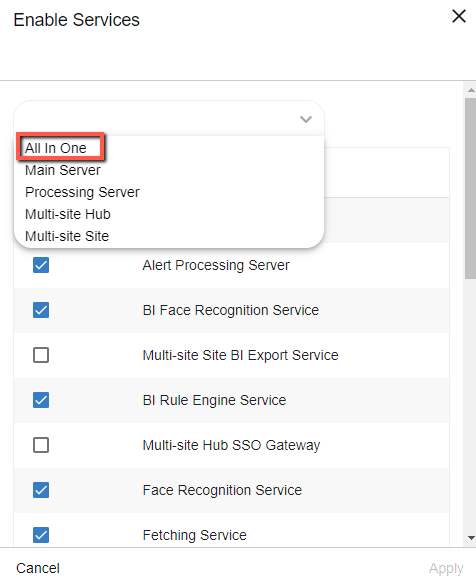
-
Clear the Alert Processing Server, BI Face Recognition Service, and BI Rule Engine Service check boxes (these options will not be needed).
-
Click Apply.
-
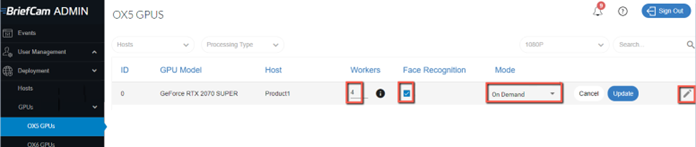
From the Deployment section, click GPUs and then select GPU OX5.
-
Click on the edit icon (
 ).
). -
If face recognition will be used, select the Face Recognition check box.
-
In the Mode column, select On Demand.
-
Verify that the number of workers under Workers is set to 4.
-
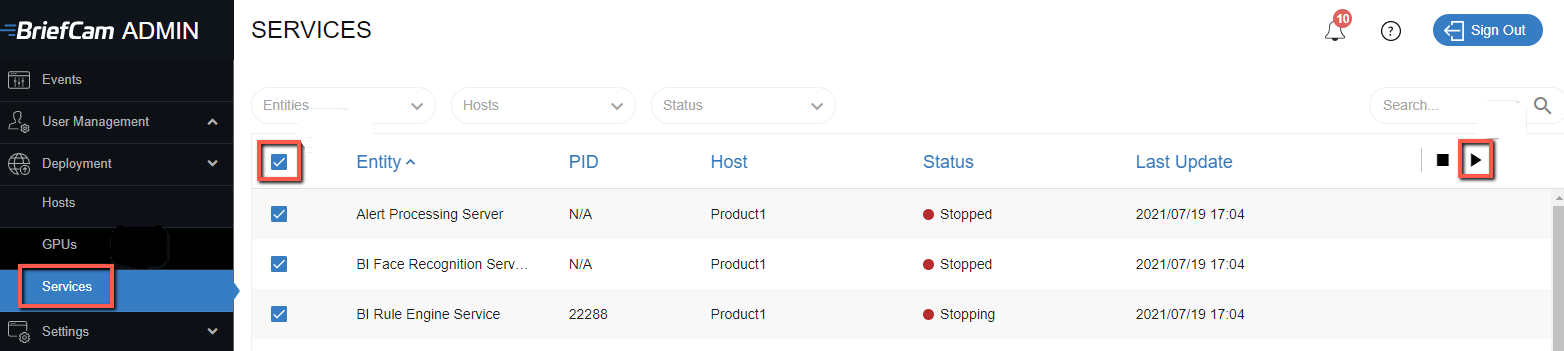
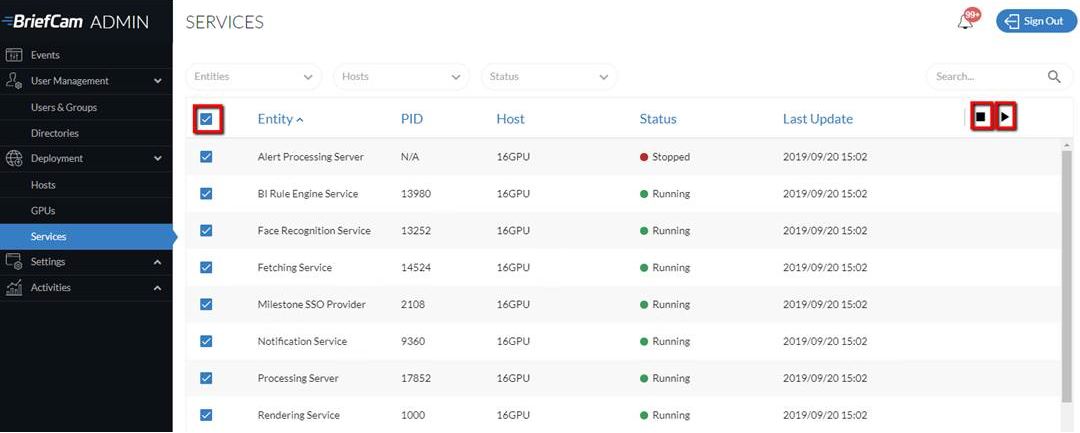
From the Deployment section, click Services.
-
Select the check box at the top left of the table.
-
Click the start button.
STEP 3 – Define and activate the cameras
-
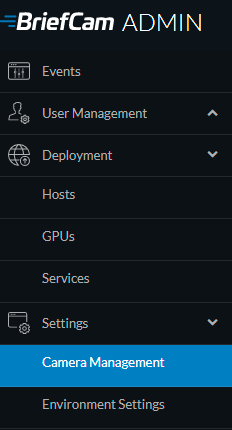
Open the Settings section and click Camera Management (as shown in the image below).
-
Click Add directory. The Add Directory dialog box opens.

-
From the Video Integration field, select Milestone Integration.
-
In the Directory Name field, enter a display name for the user directory.
-
In the Address field, enter the IP address of the Milestone VMS server.
-
In the User Name and Password fields, enter an administrator user name and password of the VMS server. With an admin user you can make sure that all the cameras can be accessed.
-
Click Add to add the directory.
-
Click the zoom (
 ) icon to the right of the new directory and select the Add / Edit Cameras option.
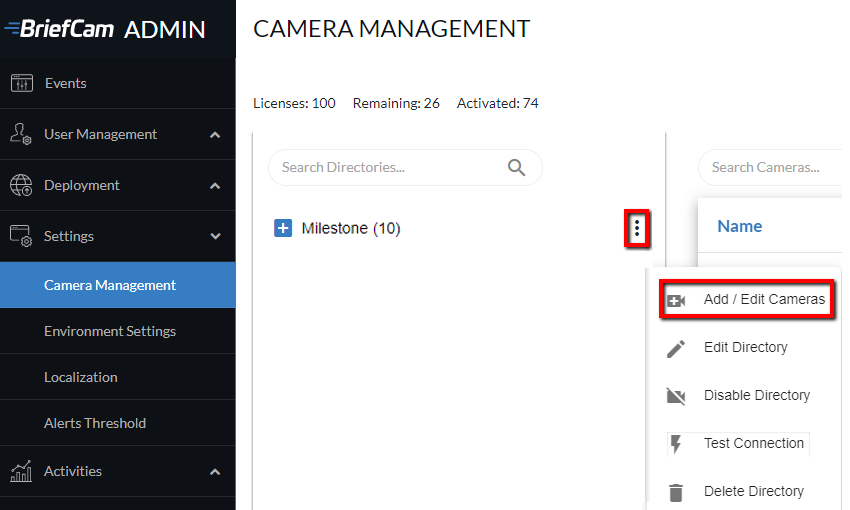
-
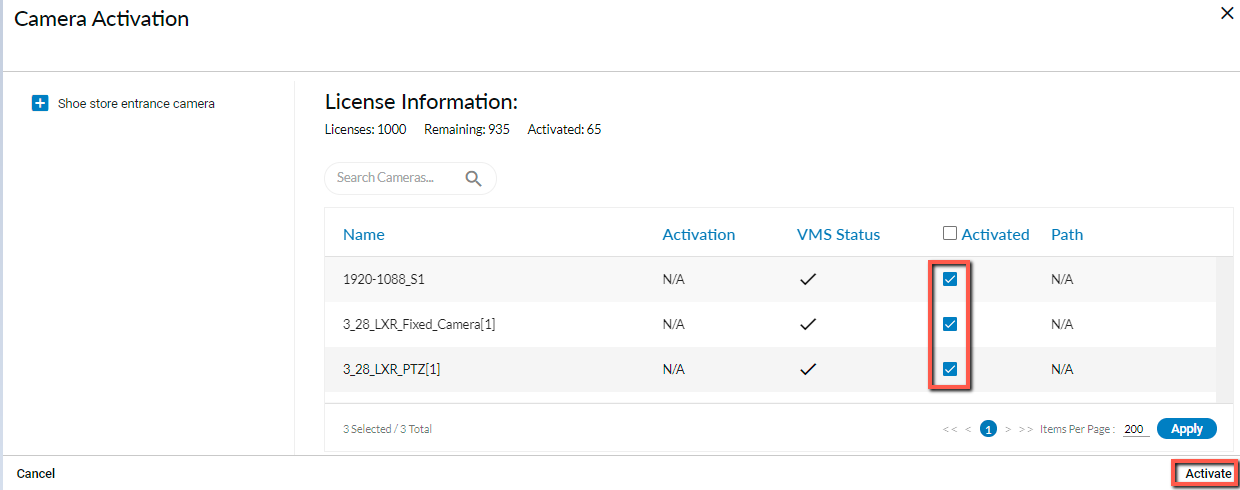
For all of the cameras, select the check box in the camera’s Activated column and click the Activate button (located in the bottom right corner), as shown in the image below.
-
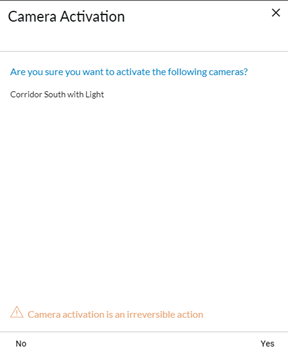
The Camera Activation pane shown below will appear. If you are sure you want to activate the cameras, click Yes. Note that Camera activation is irreversible. It cannot be reset unless a special approved request is opened with BriefCam support.
STEP 4 – Disable face recognition and license plate recognition (optional)
If you want to disable face recognition and/or license plate recognition:
-
In the BriefCam Administrator Console, open the Settings section and click Environment Settings
- Set the clientEnableFaceRecognition environment setting to false. This removes the Face Recognition functionality from the UI.
-
Set the MetaData.EnableFaceRecognition environment setting to false. This disables the Face Recognition engine.
-
Set the EnableLPR environment setting to false. This removers the License Plate Recognition functionality from the UI.
STEP 5 – Install BriefCam Embedded Client for Milestone XProtect plug-in
When using the embedded client, BriefCam can only work with a single Milestone VMS.
On each XProtect Rapid REVIEW client computer, install BriefCam’s embedded client for Milestone XProtect plugin.
-
Click the BriefCam Embedded Client for Milestone XProtect plug-in file to download it and then run it. You’ll find the plugin in the XProtect Rapid REVIEW zip file.
-
The installation checks for prerequisites, such as Microsoft .NET Framework 4.7.2 Full and Microsoft Visual C++ 2015 2017 2019 Redistributable Package (x64).
-
If anything is missing, you will be prompted to install the missing prerequisites and click Install.
-
In the Welcome screen, click Get Started.
-
Read the license, accept the License Agreement terms, and click Next.
-
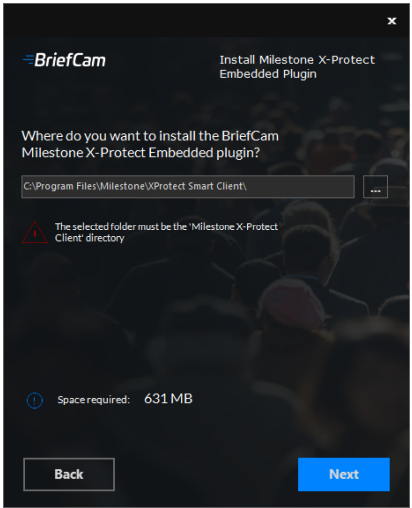
Select the installation destination path and click Next.
Note that the installation path must be the same directory where Milestone XProtect Smart Client is installed. (This may vary slightly between client computers and between Milestone versions.) -
Select XProtect Rapid REVIEW and click Next
-
Enter the BriefCam Web Application URL (which is the hostname or IP address of the BriefCam computer followed by /synopsis and verify that the provided URL is correct by clicking the Verify URL button (as shown below).
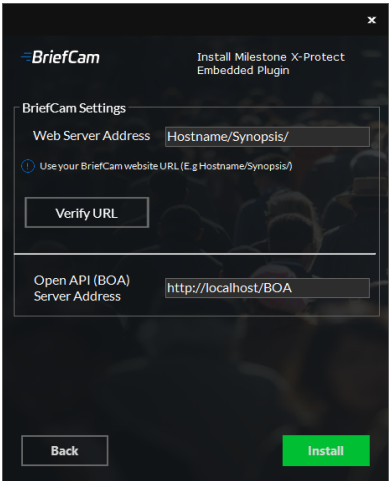
-
In the BriefCam Open API (BOA) Server Address field, enter the hostname or IP address of the BriefCam computer followed by /BOA.
-
Click Next.
-
Click Install and then click Finish.
-
In the BriefCam Administrator Console, restart the services by selecting all of the services, clicking the stop button (
 ) and then the start button (
 ), as shown in the image below.
-
Restart IIS on the Rapid REVIEW server by opening the Windows services and right-click the World Wide Web Publishing Service. Then click Restart.
Note: An admin user is automatically created by the SSO when logging into the Milestone client using the Basic authentication or Windows authentication method.
If you want to log into the Milestone client using the Windows authentication (current user) option, add the BriefCam user that you used to install BriefCam services to the Administrators group in Milestone XProtect Management Client.

When you have completed the steps, a BriefCam tab will appear in the Milestone XProtect Smart Client.
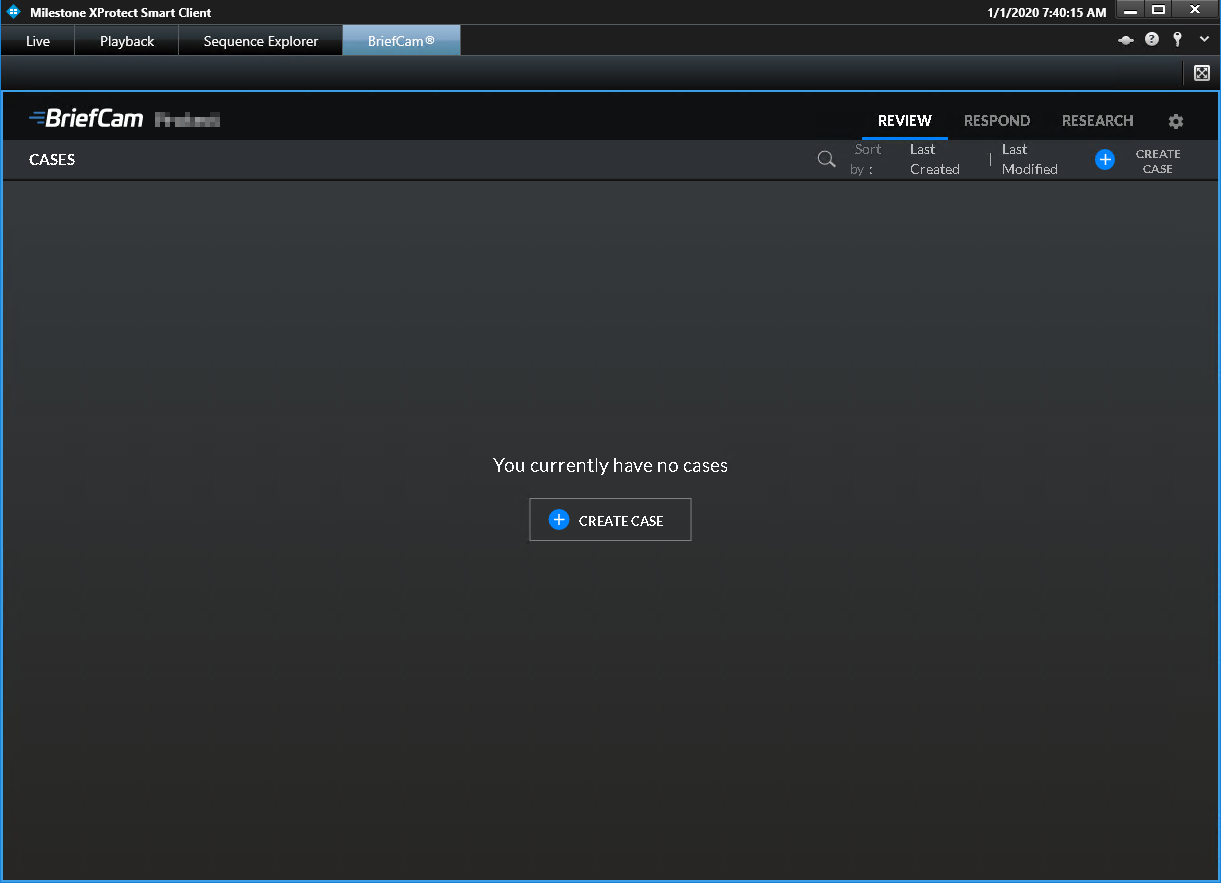
In BriefCam, for security reasons, users are automatically logged out if no activity is detected for 20 minutes. Therefore, a user may be automatically logged off the BriefCam functionality while the Milestone VMS is still running.
STEP 6 - Install BriefCam’s mananagement client plug-in (optional)
If you want non-administrator users to be able log into the Milestone systeand see BriefCam, install BriefCam’s management client for the Milestone plug-in on the computer where Milestone’s XProtect management client is installed.
Note, that once the management plug-in is installed and configured, reverting to a configuration without this plug-in is not possible.
-
Click on theBriefCam Milestone XProtect management client plug-in file to download it and then run it. You’ll find the plug-in in theXProtect Rapid REVIEW zip file.
-
In the Welcome screen, click Get Started.
-
Read the license, accept the License Agreement terms, and click Next.
-
Select the installation destination path and click Install.
-
Log into the Milestone XProtect management client .
-
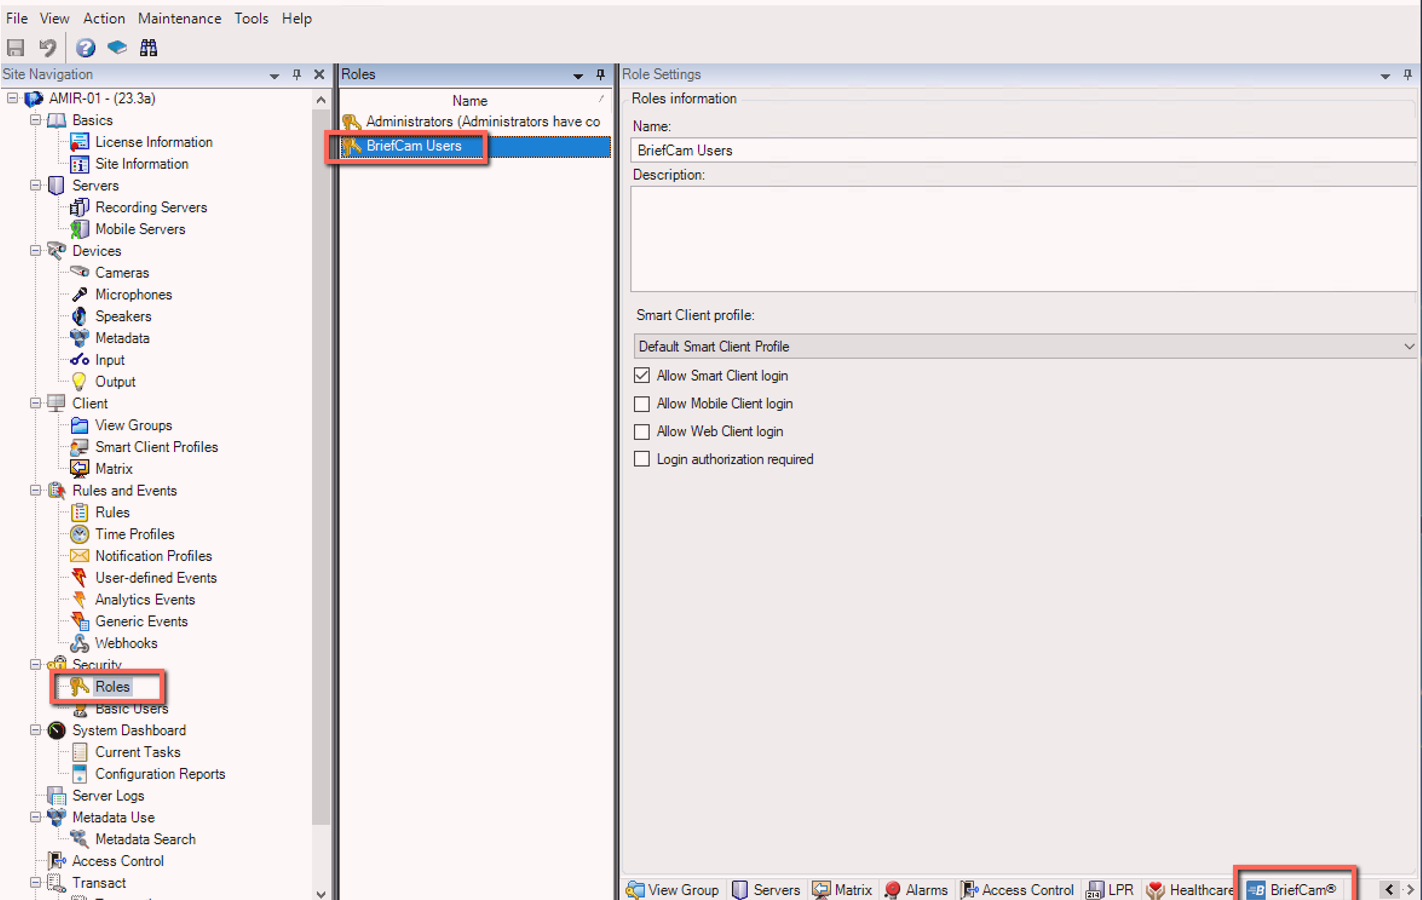
Right-click on the Roles section and add a new role, for example: BriefCam users as shown in the image below.
-
Make sure that the new role is selected and click the BriefCam tab at the bottom of the screen. In the management client in Milestone XProtect 2023 R1, the tab is named MIP.
-
From the Role Settings section, select the BriefCam role, as shown in the image below.
-
Give these users access to BriefCam by selecting the Allow access to video analytics platform checkbox.
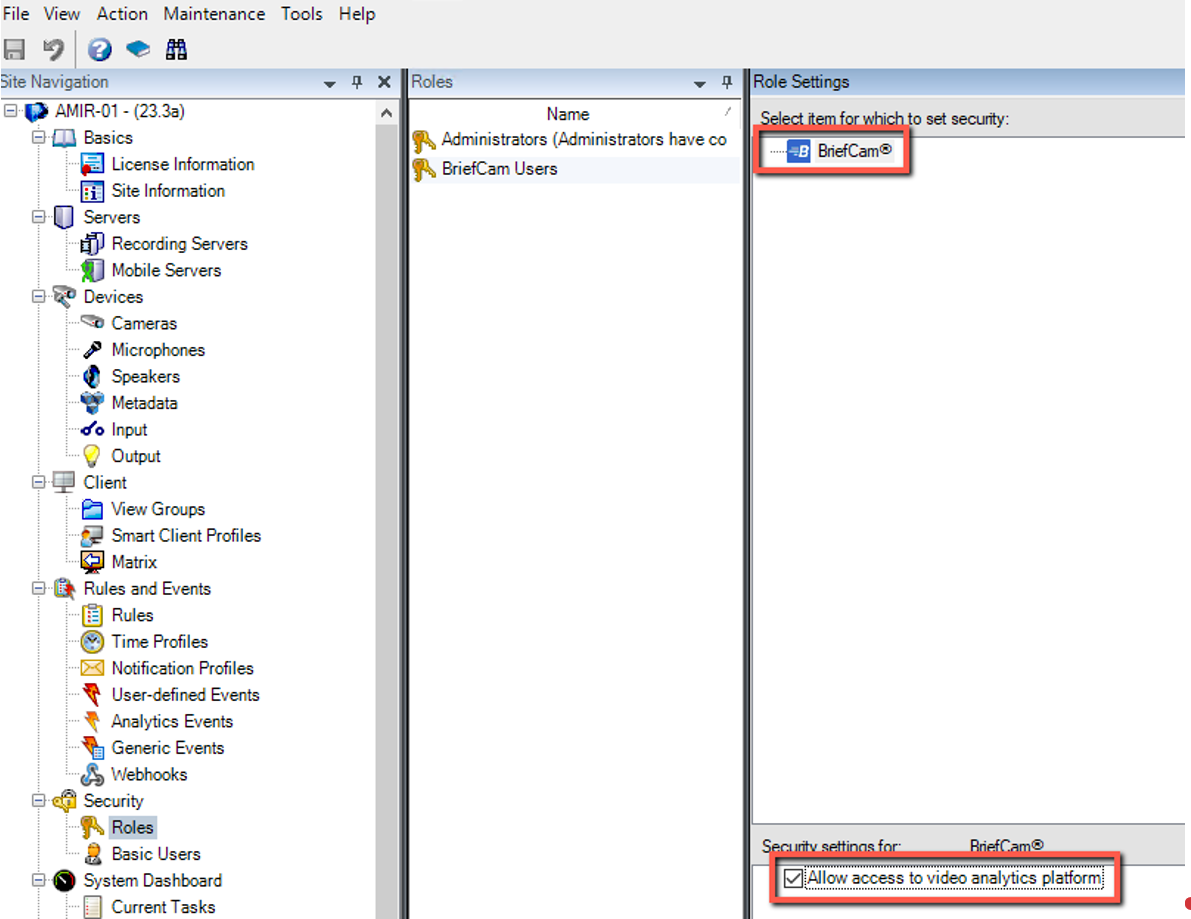
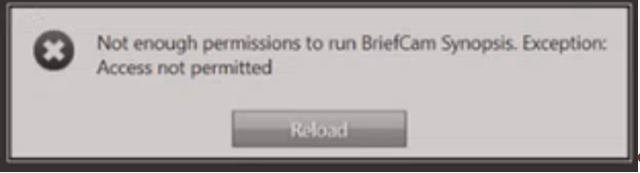
If the check box is not selected, the user will see the following message when clicking the Rapid REVIEW tab. If the check box is not checked, the user will see the following message when clicking the Rapid REVIEW tab.
STEP 7 – Using an HTTPS host (optional)
To work with SSL and BriefCam, using a load balancer is required.
This section describes the steps to take to use the NGINX load balancer as an https host for BriefCam services.
Recommendations
-
BriefCam recommends using NGINX.
-
It is recommended to use NGINX. You’ll find BriefCam’s NGINX plugin in theXProtect Rapid REVIEW zip file.
-
It is recommended to use NGINX. You’ll findBriefCams NGINX plug-in in theXProtect Rapid REVIEW zip file.
-
If you are working in a virtualized environment, the load balancer must be on a separate machine.
-
If you are working in a non-virtualized (physical servers) environment, you can have the load balancer on the same machine as the Web Services (although it is not recommended). However, if you install the load balancer on the same machine as the Web Services, IIS has to work on a different port than 80, since 80 is for NGINX.
Prerequisites
-
Make sure that port 80 is not in use by another application.
-
If IIS is installed, make sure to stop it or change its default port.
Steps
-
To run BriefCam's NGINX Installation wizard, right-click on the BriefCamNGINX_<Version number>.exe file and select Run as administrator.
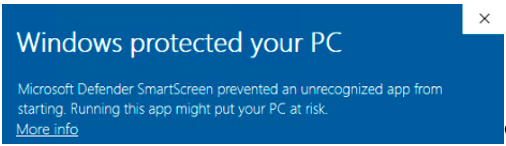
If you are using the latest Windows Update and a Windows Defender alert appears, click the More info link and click Run anyway.
-
In the Welcome screen, click Get Started.
-
Accept the terms of the BriefCam license agreement and click Next.
-
Read the license agreement and click Next.
-
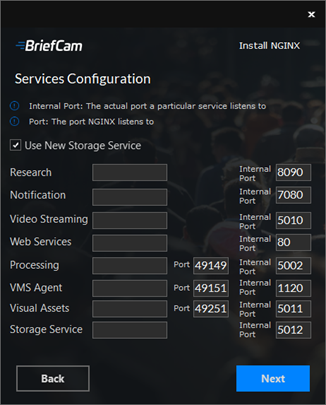
Enter the IP address or the hostname (if there is a DNS resolution) for each of the relevant services below, and click Next.
-
Decide whether to run with a secure communication.
-
If you select the check box, enter the paths to the certificate and private key.
You need to create or use an existing self-signed certificate separated into two files: .crt and .key.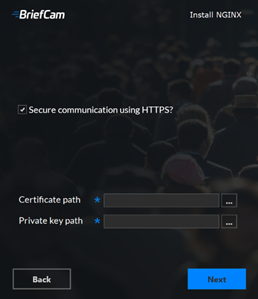
-
If your SSL certificate is protected by a password, you need to configure NGINX to read a list of passwords that are stored in a separate file. If the private key is not in this file, NGINX will not start. You do this as follows:
-
Create a new text file named ssl_passwords.txt and save it to a separate folder than where the SSL certificate is located.
-
Set the file to be readable only to the user running NGINX.
-
Enter the certificate password into the first line of the ssl_passwords.txt file.
-
d. In the nginx config file, add the following line above the existing certificate lines:
ssl_password_file /var/lib/nginx/ssl_passwords.txt;
-
Distribute this file separately from the configuration file.
For additional security measures for SSL private keys, see the NGINX documentation.
-
-
Click Next.
-
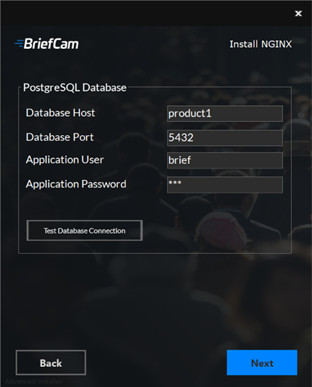
In the Database Host and Database Port fields, enter the name and port of the machine where you installed PostgreSQL.
-
In the Application User and Application Password fields, enter the username and password that you entered when installing PostgreSQL.
-
Click the Test Database Connection button.
-
Click Next.
-
Confirm or select the drive where you want to install NGINX and click Install.
-
If you have more than one web service hostname, after installing NGINX, open the nginx.conf file (located by default at: C:/nginx/conf) and in the http section, copy and paste the existing rows and update the new rows with the additional hostnames.
-
On any host that is running the application (browser) make sure the domains (or host name) can be resolved by the DNS. If no DNS is available, you can edit the hosts file and add the IP address of the load balancer using the following syntax:
- 10.x.x.x www.example.com example.com
For example: 10.0.0.143 www.example.com
- 10.x.x.x www.example.com example.com
-
Open the following three web config .js files on the BriefCam server (by default these three files are at C:\Program Files\BriefCam\WebServices):
-
\app\webConfig.js
-
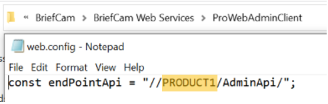
\ProWebAdminClient\web.config.js
-
\ProWebClient\webConfig.js

-
-
In each of the three web config .js files, set the endpoints (endPointApi) to point to the load balancer. In the example below, you would change PRODUCT1 to the address to the load balancer. Make sure that “http:” does not appear in the path.
-
Open the QLIK QMC with the user that was used to install the RESEARCH module (https://<hostname>/qmc).
-
Browse to virtual proxies and add two new parameters using the hostname of each of the machines (for example, the QLIK machine and the NGINX machine host names as shown in the image below) to both proxies:
-
Virtual Proxies->bc->advanced->Host white list
-
Virtual Proxies->Central Proxy (Default)->advanced->Host white list
On some systems, you might be required to add the host name, FQDN and IP address of the load balancer and all the web services instances into the virtual proxies white list in QMC.
-
-
Check that the follow environment settings are set to the NGINX IP address or hostname and if you selected to use a secured connection (https), make sure the URLs begin with https:
-
BaseVideoUrl.
-
clientNotificationEndPoint
-
DB.LocalStorageAddress
-
LoadBalancerAddress – This setting should be set to: <NGINX-IP>
-
ProWebApiAddress
-
ProWebClientAddress
-
QlikServer
-
Site.Url
-
StorageGatewayUrl
-
SSOEndpoint – If you want to use an embedded client, this value should be set to: https://<NGINX-host>:8030/MilestoneSSO/
-
VideoProcessingGateWayUrl – This is only needed if you are using the Storage Gateway service.
-
-
Restart the BriefCam services.
-
If you selected to use a secured connection (https), browse to the application and check that it works with https requests. For example:
-
https://www.example.com/app
-
https://www.example.com/admin
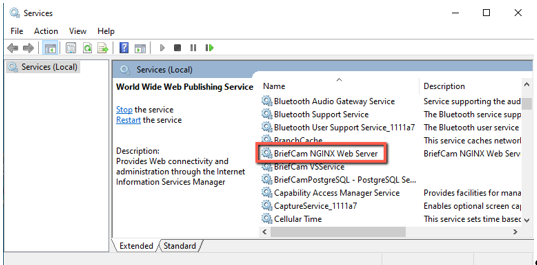
NGINX Windows Service
The BriefCam NGINX installer creates a BriefCamNGINX Web Server service in the Windows Services screen. This service is responsible for making sure the NGINX process is constantly running and the load balancer is ready to accept requests.
Generic configurations
For any other type of load balancer, you need to configure the following redirect rules based on the URL:
-
Notification Service
Search for: /signalr
Redirect to: notification-server:7080
-
Video Streaming Gateway
Search for: /vsg
Use rewrite rule to remove /vsg from the url
Redirect to: videostreaming-server:5010
-
Web Services>
Search for: /
Redirect to: briefcam-webserver
Logging
To handle the log rotation:
-
Download the log rotation text from here: Log rotation script and create a bat file:
-
Copy the text from the link to a .txt file and name it LogRotation.
-
Change the file extension from .txt to .bat.
-
-
Save the script (.bat file) to C:\NGINX.
-
Create an OS user (such as bcuser), a user on the OS level, or create a Windows user account. The user does not need admin rights.
-
Edit the C:\NGINX folder’s security options and assign full control to the user that you created in step 3.
-
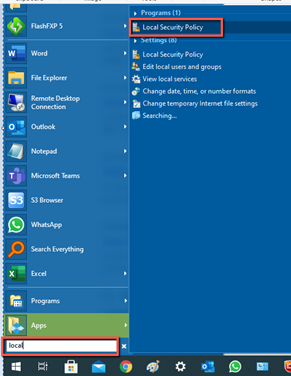
Click Start (Windows key) and type secpol.msc to open the Local Security Policy utility.
-
Go to Security settings > Local Policies > User Rights Assignment.
-
Right-click Log on as a batch job and add the user.
-
Add a daily scheduled task to run the C:\NGINX\LogRotation.bat file. Make sure to select Run whether user is logged on or not. By default, the last 10 days will be retained (retention period in days). If you want a different number of days, when running the batch file, enter the required number of days as a command line argument. For example, for 20 days, use: C:\NGINX\LogRotation.bat 20.
Network security considerations
-
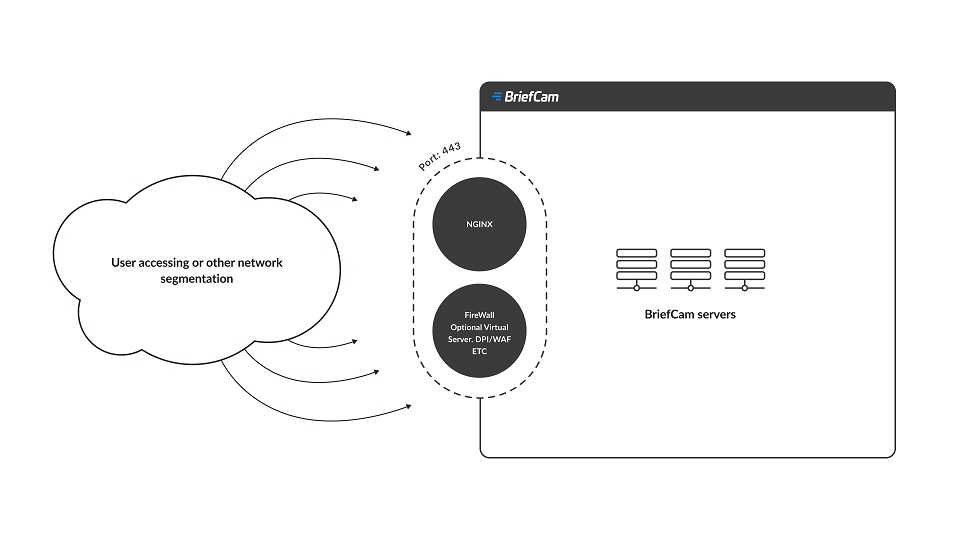
The network segment hosting the BriefCam servers / virtual computers should be separated from other networks by a firewall and access should be granted only via ports configured in NGINX. For additional information, see the Using an HTTPS Host.
-
Administrative access to the servers, such as RDP, should be allowed either over VPN or from administration bastion hosts. A bastion host is a server that allows access to a private network from a public network, such as the internet. Bastion hosts are vulnerable to potential attacks and should be kept as secure as possible.
-
If DPI / WAF/ URL protection are required – they should be implemented on the firewall when pointing to the operational BriefCam NGINX host.
Upgrade Steps
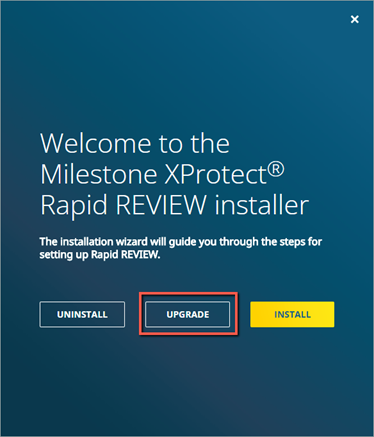
To upgrade XProtect Rapid REVIEW, select the UPGRADE option on the installer screen as shown below.
Note that using this installer to upgrade XProtect Rapid REVIEW, you can only upgrade from version 6.4 and above:
-
Stop all BriefCam services and close all open applications before starting the upgrade process.
-
Select the UPGRADE option on the installer screen.
-
If you are upgrading, the tab name will not show Rapid REVIEW. To change the tab name, open the BriefCam.MilestoneEmbeddedViewer.dll.config file, on the computer with the Milestone XProtect Smart ClientThe file is located at: C:\Program Files\Milestone\XProtect Smart Client\MIPPlugins\BriefCam.
-
Add the following text under the <appSettings> node:
<add key="InstallationType" value="SMB" /> -
Save the file.
-
Log into XProtect Smart Client.