Storage and archiving (explained)
Le funzionalità disponibili dipendono dal sistema in uso. Consultare l'elenco completo delle funzioni, disponibile nella pagina di panoramica sul prodotto sul sito web Milestone (https://www.milestonesys.com/products/software/xprotect-comparison/).
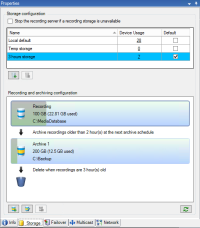
On the Storage tab, you can set up, manage and view storages for a selected recording server.
For recording storages and archives, the horizontal bar shows the current amount of free space. You can specify the behavior of the recording server in case recording storages become unavailable. This is mostly relevant if your system includes failover servers.
If you are using Evidence lock, there will be a vertical red line showing the space used for evidence locked footage.
When a camera records video or audio, all specified recordings are by default stored in the storage defined for the device. Each storage consists of a recording storage that saves recordings in the recording database Recording. A storage has no default archive(s), but you can create these.
To avoid that the recording database runs full, you can create additional storages (see Add a new storage). You can also create archives (see Create an archive within a storage) within each storage and start an archiving process to store data.
Archiving is the automatic transfer of recordings from, for example, a camera's recording database to another location. In this way, the amount of recordings that you can store is not limited to the size of the recording database. With archiving you can also back up your recordings to another media.
You configure storage and archiving on each recording server.
As long as you store archived recordings locally or on accessible network drives, you can use XProtect Smart Client to view them.
If a disk drive breaks and the recording storage becomes unavailable, the horizontal bar turns red. It is still possible to view live video in XProtect Smart Client, but recording and archiving stops until the disk drive is restored. If your system is configured with failover recording servers, you can specify the recording server to stop running, to let the failover servers take over (see Specify behavior when recording storage is unavailable).
The following mostly mentions cameras and video, but speakers, microphones, audio and sound also apply.
Milestone recommends that you use a dedicated hard disk drive for recording storages and archives to prevent low disk performance. When you format the hard disk, it is important to change its Allocation unit size setting from 4 to 64 kilobytes. This is to significantly improve recording performance of the hard disk. You can read more about allocating unit sizes and find help on the Microsoft website (https://learn.microsoft.com/en-us/windows-server/storage/file-server/ntfs-overview).
The oldest data in a database is always auto-archived (or deleted if no next archive is defined) when less than 5GB of space is free. If less than 1GB space is free, data is deleted. A database always requires 250MB of free space. If you reach this limit because data is not deleted fast enough, attempts to write to the database might fail and in that case no more data is written to the database until you free up enough space. The actual maximum size of your database becomes the amount of gigabytes that you specify, minus 5GB.
For FIPS 140-2 compliant systems, with exports and archived media databases from XProtect VMS versions prior to 2017 R1 that are encrypted with non FIPS-compliant cyphers, it is required to archive the data in a location where it can still be accessed after enabling FIPS. For detailed information on how to configure your XProtect VMS to run in FIPS 140-2 compliant mode, see the FIPS 140-2 compliance section in the hardening guide.
Attaching devices to a storage
Once you have configured the storage and archiving settings for a recording server, you can enable storage and archiving for individual cameras or a group of cameras. You do this from the individual devices or from the device group. See Attach a device or group of devices to a storage.
Effective archivingWhen you enable archiving for a camera or a group of cameras, the content of the recording storage is automatically moved to the first archive at intervals that you define.
Depending on your requirements, you can configure one or more archives for each of your storages. Archives can be located either on the recording server computer itself, or at another location which can be reached by the system, for example on a network drive.
By setting up your archiving in an effective way, you can optimize storage needs. Often, you want to make archived recordings take up as little space as possible, especially on a long-term basis, where it is perhaps even possible to slacken image quality a bit. You handle effective archiving from the Storage tab of a recording server by adjusting several interdependent settings:
- Recording storage retention
- Recording storage size
- Archive retention
- Archive size
- Archive schedule
- Encryption
- Frames Per Second (FPS).
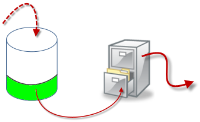
The size fields define the size of the recording storage, exemplified by the cylinder, and its archive(s) respectively:
By means of retention time and size setting for the recording storage, exemplified by the white area in the cylinder, you define how old recordings must be before they are archived. In our illustrated example, you archive the recordings when they are old enough to be archived.
The retention time and size setting for archives define how long the recordings remain in the archive. Recordings remain in the archive for the time specified, or until the archive has reached the specified size limit. When these settings are met, the system begins to overwrite old recordings in the archive.
The archiving schedule defines how often and at what times archiving takes place.
FPS determines the size of the data in the databases.
To archive your recordings, you must set all these parameters up in accordance with each other. This means that the retention period of the next archive must always be longer than the retention period of a current archive or recording database. This is because the number of retention days stated for an archive includes all retention stated earlier in the process. Archiving must also always take place more frequently than the retention period, otherwise you risk losing data. If you have a retention time of 24 hours, any data older than 24 hours is deleted. Therefore, to get your data safely moved to the next archive, it is important to run archiving more often than every 24 hours.
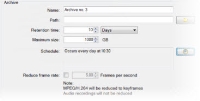
Example: These storages (image to the left) have a retention time of 4 days and the following archive (image to the right) a retention time of 10 days. Archiving is set to occur every day at 10:30, ensuring a much more frequent archiving than retention time.
You can also control archiving by use of rules and events.


