Creating and distributing certificates manually
Important to know:
Creating and distributing certificates manually is not recommended as a secure way of distributing certificates. If you choose manual distribution, you are responsible for keeping the private certificates secure at all times. When you keep the private certificates secure, the client computers that trust the certificates are less vulnerable to attacks.
In some situations, Windows Update may periodically remove certificates that are not from a "trusted third-party certificate authority."
To make sure that your certificates are not removed by Windows Update, you must enable the Turn off Automatic Root Certificates Update. Before making this change, you should make sure that the change is following your company security policy.
- Enable this by opening the Local Group Policy Editor on the computer (click on the Windows start bar and type gpedit.msc).
- In the Windows Local Group Policy Editor, navigate to Computer Configuration > Administrative Templates > System > Internet Communication Management > Internet Communication Settings.
- Double-click Turn off Automatic Root Certificate Update and select Enabled.
- Click OK.
Note that this setting might be controlled by a domain policy. In which case, it must be disabled at that level.
Your certificate will now stay on the computer despite it is not from a "trusted third-party certificate authority," because Windows Update will not contact the Windows Update website to see if Microsoft has added the CA to its list of trusted authorities.
Create CA certificate
On a computer with restricted access and not connected to your XProtect system, run this script once to create a CA certificate.
The computer that you use for creating certificates must run Window 10 or Windows Server OS 2016 or newer.
Be aware that when you create certificates in this way, the certificates are related to the computer they are installed on. If the computer name changes, then the VMS will not be able to start until the certificates are created again and re-installed on the computer.
This script creates two certificates:
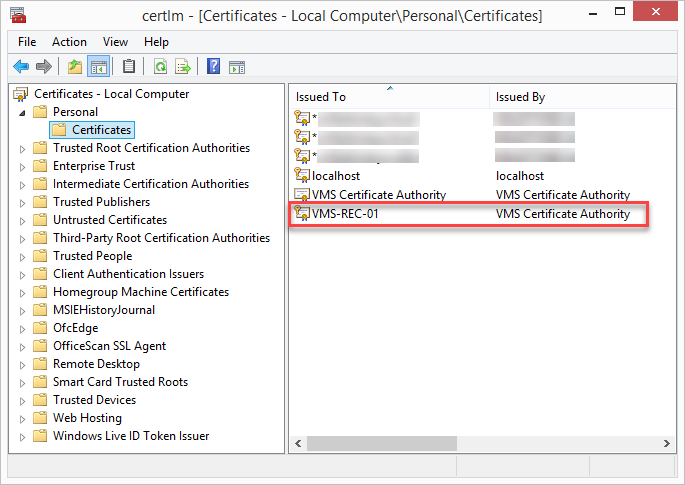
- A private certificate - only exists in the Personal Certificates store for the current user after the script is run. It is recommended that you create a backup kept on a medium (USB) in a safe place, and preferably two backups kept in physically different locations. With the exception of the backups, this certificate should never leave the computer that you created the certificate on
- A public certificate - to be imported as trusted certificate on all client computers
- In Appendix A, in the back of this guide, you find a script for creating the CA certificate. Copy the content.
- Open Notepad and paste the content.
- In Notepad, click File -> Save as, name the file CreateCACertificate.ps1 and save it locally, like this:
C:\Certificates\CreateCACertificate.ps1. - In File Explorer, go to C:\Certificates and select the CreateCACertificate.ps1 file.
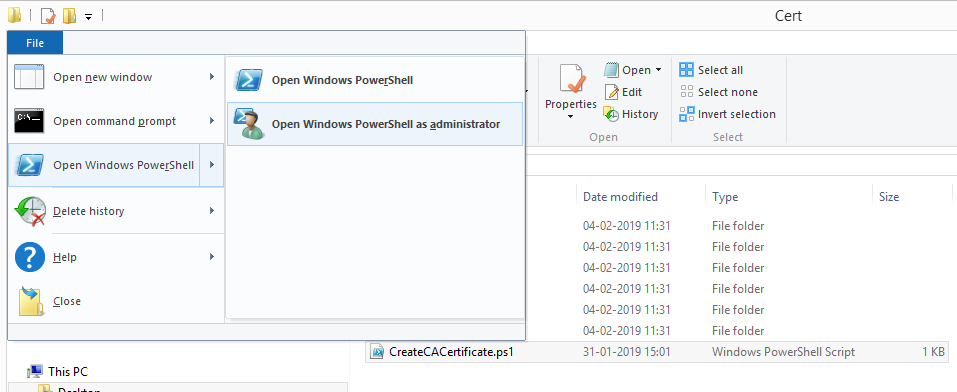
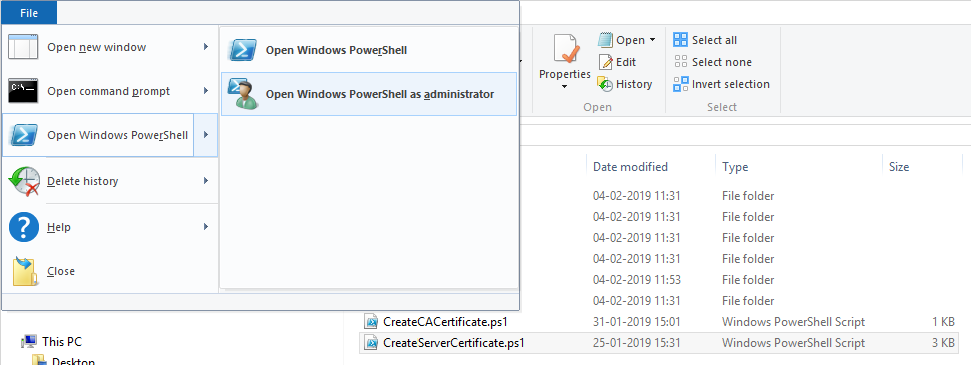
- In the File menu, select Open Windows PowerShell and then Open Windows PowerShell as administrator.
- In PowerShell at the prompt, enter .\CreateCACertificate.ps1 and press Enter.
- Check that the root-authority-public.cer file appears in the folder where you ran the script.
It is very important that the lines break in the same places as in Appendix A. You can add the line breaks in Notepad or alternatively, reopen this PDF with Google Chrome, copy the content again and paste it into Notepad.


Your computer may require that you change the PowerShell execution policy. If yes, enter Set-ExecutionPolicy RemoteSigned. Press Enter and select A.
Install certificates on the clients
After you created the CA certificate, you trust the public CA certificate by installing it on all the computers that act as clients to the service according to the descriptions in Introduction to certificates.
See Import client certificates for an alternative procedure to manually installing certificates on clients.
- Copy the root-authority-public.cer file from the computer where you created the CA certificate (C:\Certificates\root-authority-public.cer) to the computer where the XProtect client is installed.
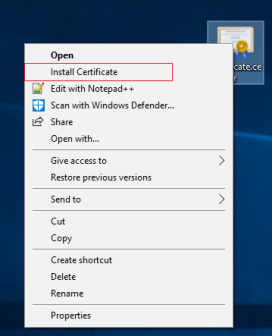
- Right-click on the certificate and select Install Certificate.
- In the Certificate Import Wizard, select to install the certificate in the store of the Local Machine and click Next.

- Select to manually locate the store in which the certificate will be installed.
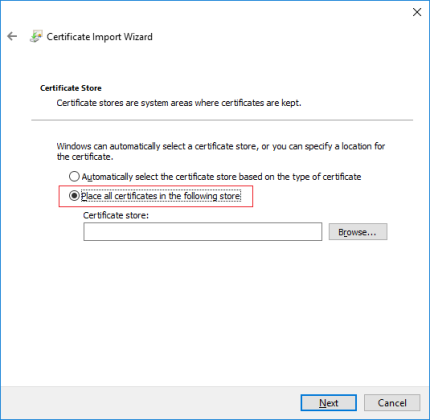
- Click Browse, select Trusted Root Certification Authorities and click OK. Then click Next.

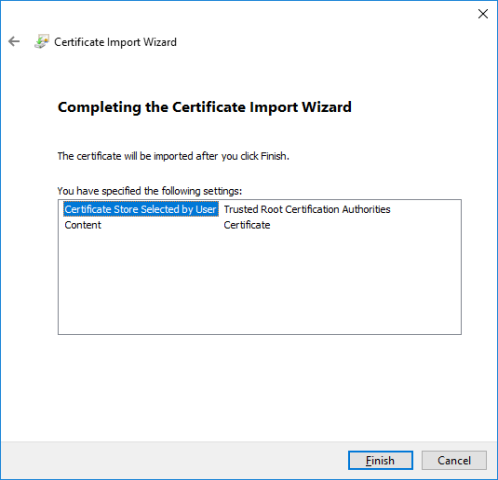
- On the Completing the Certificate Import Wizard dialog, click Finish.
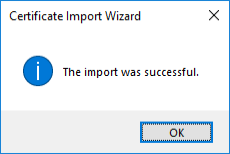
- You will receive a confirmation dialog of successful import.
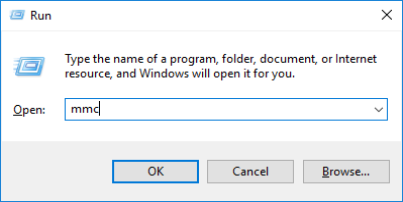
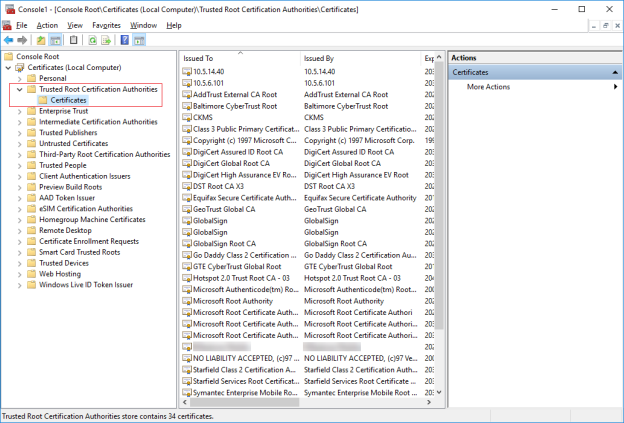
- To verify that the certificate is imported, start the Microsoft Management Console.
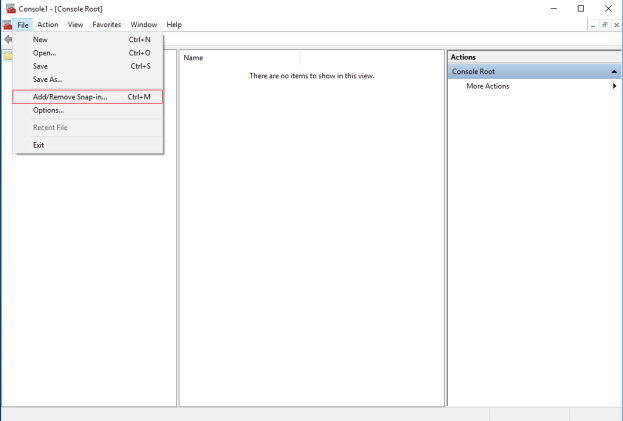
- In the Microsoft Management Console, from the File menu select Add/Remove Snap-in….
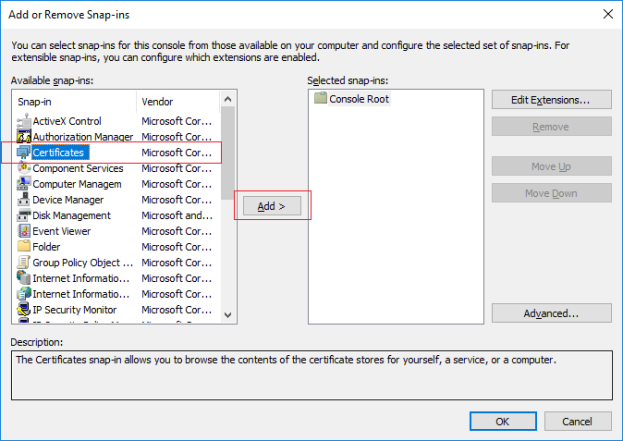
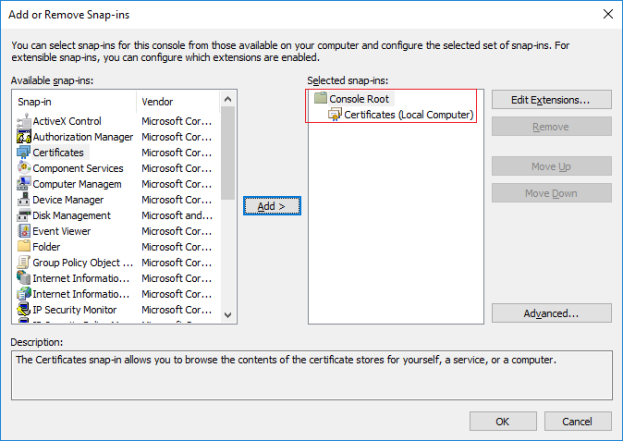
- Select the Certificates snap-in and click Add.
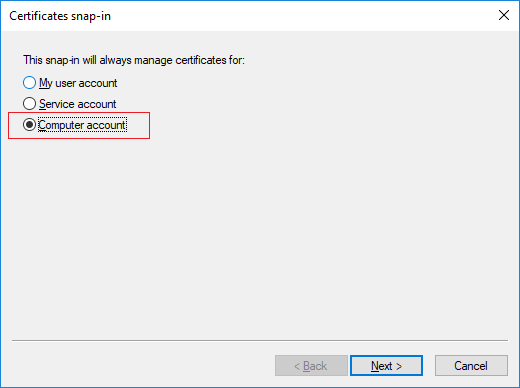
- Select that the snap-in must manage certificates for the Computer account.
- Select Local computer as the computer that you want the snap-in to manage and click Finish.
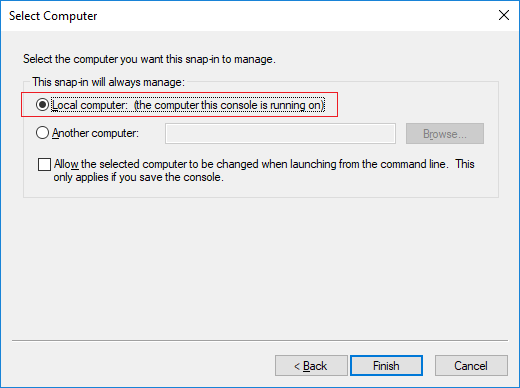
- Click OK after the snap-in has been added.
- Verify that the certificate is listed in the center view of the Trusted Root Certification Authorities subtree.
- Repeat the steps on the next computer that runs as a client to the service where encryption is being enabled, until you have installed the certificate on all relevant computers.
For information about which client and server services, and integrations that require the certificate, see Introduction to certificates.
If you receive a security warning that you are about to install a root certificate, click Yes to continue.
Create SSL certificate
After you have installed the CA certificate on all the clients, you are ready to create certificates to be installed on all computers that run servers (recording servers, management servers, mobile servers or failover servers).
If you want to configure a failover management server, you need to create a different SSL certificate. For more information, see Create SSL certificate for the failover management server.
On the computer where you created the CA certificate, from the folder where you placed the CA certificate, run the Server certificate script to create SSL certificates for all servers.
The computer that you use for creating certificates must run Window 10 or Windows Server 2016 or newer.
- In Appendix B in the back of this guide, you find a script for creating server certificates.
- Open Notepad and paste the contents.
- In Notepad, click File -> Save as, name the file CreateServerCertificate.ps1 and save it locally in the same folder as the CA certificate, like this:
C:\Certificates\CreateServerCertificate.ps1. - In File Explorer, go to C:\Certificates and select the CreateServerCertificate.ps1 file.
- In the File menu, select Open Windows PowerShell and then Open Windows PowerShell as administrator.
- In PowerShell at the prompt, enter .\CreateServerCertificate.ps1 and press Enter.
- Enter the DNS name for the server. If the server has multiple names, for example for internal and external use, add them here, separated by a space. Press Enter.
- Enter the IP address of the server. If the server has multiple IP addresses, for example for internal and external use, add them here, separated by a space. Press Enter.
- Specify a password for the certificate and press Enter to finish the creation.
- Run the script until you have certificates for all of your servers.
It is very important that the lines break in the same places as in Appendix B. You can add the line breaks in Notepad or alternatively, reopen this PDF with Google Chrome, copy the contents again and paste it into Notepad.
To find the DNS name, open File explorer on the computer running the Recording Server service. Right-click This PC and select Properties. Use the Full computer name.

To find the IP address, you can open Command Prompt on the computer running the Recording Server service. Enter ipconfig /all. If you have installed the XProtect system, you can open the Management Client, navigate to the server and find the IP address on the Info tab.
You use this password when you import the certificate on the server.
A Subjectname.pfx file appears in the folder where you ran the script.
Import SSL certificate
After you created the SSL certificates, install them on the computers that run the server service.
- Copy the relevant Subjectname.pfx file from the computer where you created the certificate to the corresponding server service computer.
- On the server service computer, start Manage computer certificates.
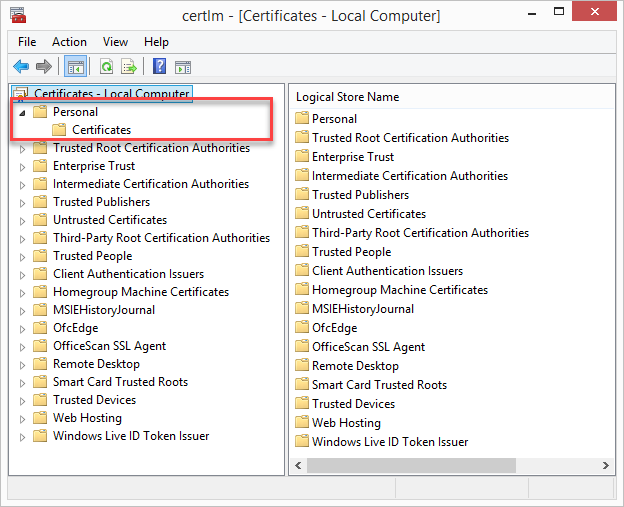
- Click on Personal, right-click Certificates and select All Tasks > Import.
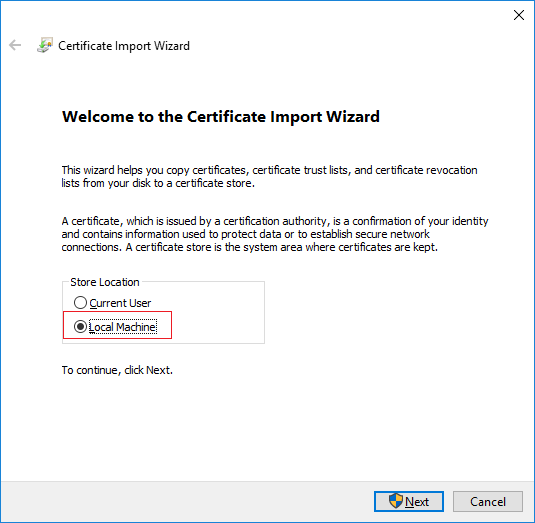
- Select to import the certificate in the store of the Local Machine and click Next.
- Browse to the certificate file and click Next.
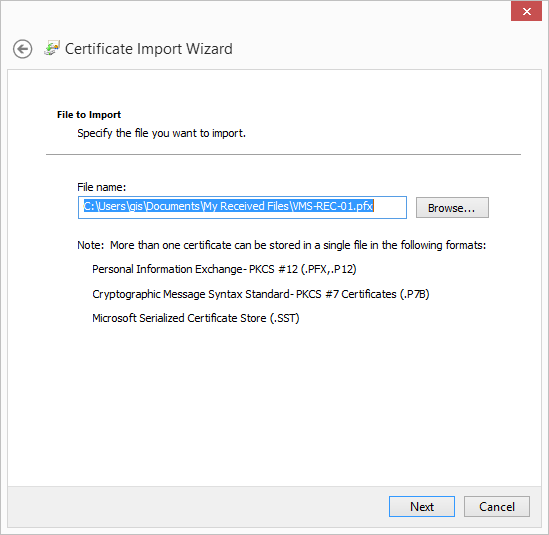
- Enter the password for the private key that you specified when you created the server certificate, and click Next.
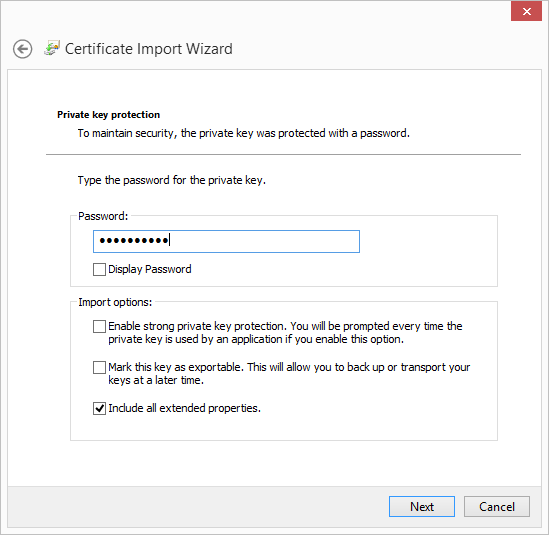
- Place the file in the Certificate Store: Personal and click Next.
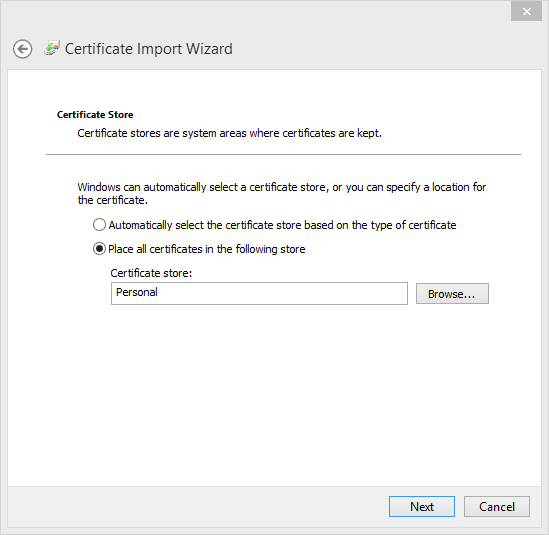
- Verify the information and click Finish to import the certificate.
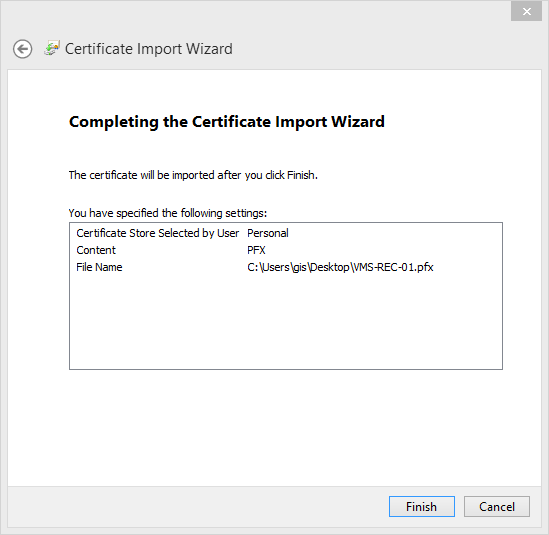
- The imported certificate appears in the list.
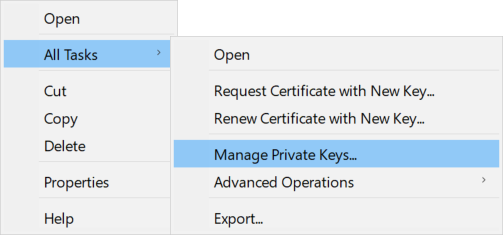
- To allow a service to use the private key of the certificate, right click the certificate and select All Tasks > Manage Private Keys.
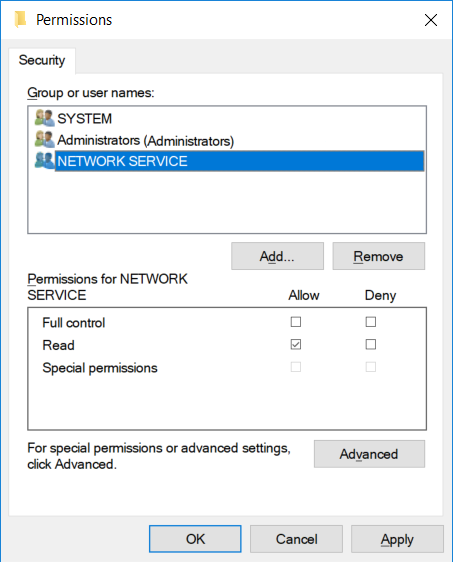
- Add read permission for the user running the XProtect VMS services that need to use the server certificate.
- Continue to the next computer, until you have installed all server certificates.
Remember that each certificate is created to a specific server.
