

Edit thresholds for when hardware states should change
You can edit the thresholds for when your hardware change between the three states on the System monitor dashboard. For more information, see System monitor thresholds (explained).
You can change thresholds for different types of hardware. For more information, see System Monitor Thresholds (System Dashboard node).
As a default, the system is set up to show threshold values for all units of the same hardware type, for example, all cameras or servers. You can change these default threshold values.
You can also set up threshold values for individual servers or cameras or a subset of these to allow, for example, that some cameras use a higher Live FPS or Recording FPS than other cameras.
- In the Site Navigation pane, select System Dashboard > System Monitor Thresholds.
-
Select the Enabled check box for the relevant hardware if you have not already enabled it. The figure below shows an example.
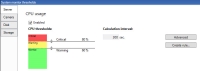
- Drag the threshold control slider up or down to increase or decrease the threshold value. There are two sliders available for each hardware piece shown in the threshold control, separating the Normal, Warning, and Critical states.
- Enter a value for the calculation interval or keep the default value.
- If you want to set values on individual pieces of hardware, select Advanced.
- If you want to specify rules for certain events or within specific time intervals, select Create rule.
- Once you have set the thresholds levels and calculation intervals, select File > Save from the menu.
