Storage technologies
Knowing that live media data is of a real-time nature, and that data is written to many files in parallel when recorded, it is important to choose disks and storage system technologies that best support this kind of usage.
This section will cover how standard storage technologies work, the advantages and disadvantages they have, as well as how they can be used in an XProtect VMS environment in the best way.
This section will not cover hybrid storage solutions, which often consist of a mix of flash memory and/or SSD disks combined with traditional hard disks and/or tape robots. There are simply too many variants with specific benefits and/or pitfalls to be generically covered in this whitepaper.
With that said, hybrid storage solutions may work and provide certain benefits for some XProtect VMS installations. Should such a storage system be considered for a project, it is recommended to contact Milestone Systems Sales for assistance regarding the specific hybrid storage solution.
This section will also not cover object and cloud storage as it is not natively supported in the XProtect VMS. The reason these storage technologies are not natively supported is that the benefits they normally offer cannot be utilized by the XProtect VMS.
Object storage is well suited for large amounts of unstructured data where the metadata tags attached to the data are used to identify and find the data again. This makes the storage system and the use of it simple because data can be stored in a flat structure and found again by searching for the data’s identifier or metadata tags.
In an XProtect VMS, data is highly structured with the media database keeping a detailed index over the data and controlling where data is stored so this makes a hierarchical file-based storage system more ideal. Furthermore, to ensure that only users with the right permissions can view data, the data are accessed through APIs on the recording server and not directly on the storage system. This means that the additional benefits that object storage may offer cannot be used, making standard storage solutions better suited for XProtect VMS use.
Cloud storage is not supported either for several reasons. First, data is recorded at a constant high bitrate, hence, it would require a lot of upstream bandwidth to store XProtect VMS data in the cloud. Second, the traditional benefit of providing direct access to the data stored in the cloud from anywhere in the world does not apply to XProtect VMS data. Again, this is because data can only be accessed through APIs on the recording server which is to ensure that only users with the right permissions can view the data. Therefore, because the XProtect VMS permanently sends data to the storage at a high bitrate, and because users cannot access the data directly from the cloud but would have to stream it back through the recording server instead, standard storage solutions are better suited when using the XProtect VMS.
Standard disk technologies and key characteristics
There are primarily two types of disk drives – spinning platters hard disk drives (HDD) and solid-state drives (SSD).
Hard Disk Drive
HDDs very much resemble an old-style turntable with a pickup reading data (music) from a rotating platter (a record). Instead of using a pickup and a vinyl platter, HDDs have a stack of rotating platters coated with a magnetic media and an actuator arm with multiple electronic heads, one for each side of the platters, for reading and writing data as magnetic information on the platters.
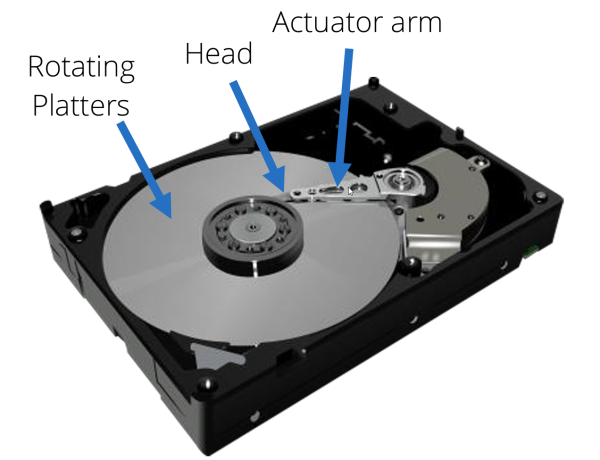
As with the turntable analogy, when data should be read or written, the arm must move to the right track and wait for the platter to rotate to the right spot in the track where data is then either read or written.
While the head moves and the platters rotate to the right place, data cannot be read or written. This time is known as “access time”. The access time varies depending on the distance from the current location of the head and platters to the new location that should be accessed. Access time is thus specified for HDDs as an average access time.
HDDs come with various rotation speeds, typically ranging from 4,200 to 15,000 RPM and have variations in how fast they can move the head. Because of this, the average access time varies a lot across different HDDs – typically the average access time is between 3-20 ms.
Furthermore, HDDs vary in performance depending on where data is read or written on the platters. Performance is highest when data is stored close to the platter’s outer edge, and lowest when data is stored close to the platters center. The reason for this is that tracks are longer closer to the edge of the platters and thus can hold more data per rotation.
HDD benefits:
-
They can be very large. Currently the largest are up to 22 Terabytes
-
They have a relatively low per Terabyte cost
-
They have a good read and write performance when the data is accessed sequentially, like reading or writing a single file at a time
HDD disadvantages:
-
Due to having moving parts, they have a relatively lower durability when used extensively
-
They have a relatively long average access time which has a huge impact when writing is
-
non-sequential as it is when recording streamed data from multiple devices
-
Disk performance varies depending on where on the platters the data is stored
So, in short, HDDs are slower (with non-sequential access), but larger and cheaper. This makes them best suited for storing the archive databases in an XProtect VMS.
With that said, HDDs can of course be used for recording the live data. However, much attention should be paid when choosing the disks to ensure they match the needs of the specific installation.
The test results below show an example of the performance of an HDD. Notice that the write performance drops to ~8% of the maximum write performance when using non-sequential disk access.
Tests done:
-
Sequential – 64 Queues of data & 1 thread
-
Non-sequential - 4 Queues of data & 4 threads
-
Non-sequential - 16 Queues of data & 16 threads
-
Non-sequential - 32 Queues of data & 32 threads
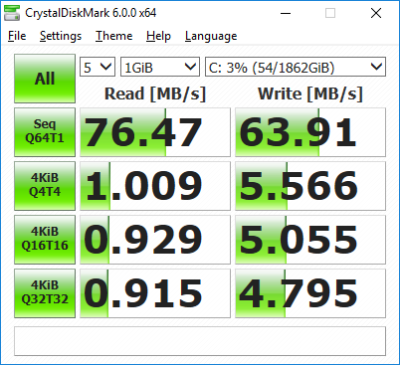
Disclaimer: The test results do not illustrate absolute performance numbers of all HDDs. The results are included to illustrate the relatively large difference in performance between sequential (one file) and non-sequential (multiple files) disk access, and furthermore included to compare the performance with SSDs, which is covered below.
Solid-State Drive
SSDs have no moving parts, as they are completely made of memory chips mounted to a PCB.
Because they do not have any moving parts, the access time is much shorter - typically in the 0.01–0.1ms range.
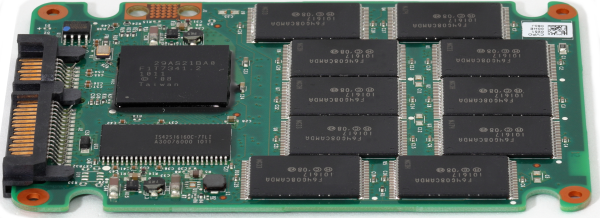
SSD disks primarily come in two grades; Consumer-grade and Enterprise-grade;
-
Consumer-grade SSDs are well suited for standard PC usage. However, due to having a lower write limit, it is not recommended to use these drives with an XProtect VMS as the permanent writing and deleting of data will wear out the drive up to ~25 times faster than Enterprise-grade SSDs
-
Enterprise-grade SSDs are more expensive and can cost 2~10 times more compared to consumer-grade SSDs. Enterprise-grade SSDs are thus not relevant for standard PC usage. However, because of the various wear-leveling-techniques and increased write limit, these drives have a much better durability and are thus better suited for usage in an XProtect VMS
Enterprise-grade SSD disk benefits:
-
They have a very short average access time
-
Due to not having moving parts and having wear-leveling-techniques, Enterprise-grade SSDs have very high durability
Enterprise-grade SSD disk disadvantages:
-
They have a relatively higher per Terabyte cost
So, in short SSD disks are very fast (with non-sequential access), but smaller and more expensive. This makes them best suited for storing the recording databases in an XProtect VMS.
The test results below show the performance of an SSD disk. Notice that the write performance is still ~36% of the maximum write performance when using non-sequential disk access
Tests done:
-
Sequential – 64 Queues of data & 1 thread
-
Non-sequential - 4 Queues of data & 4 threads
-
Non-sequential - 16 Queues of data & 16 threads
-
Non-sequential - 32 Queues of data & 32 threads
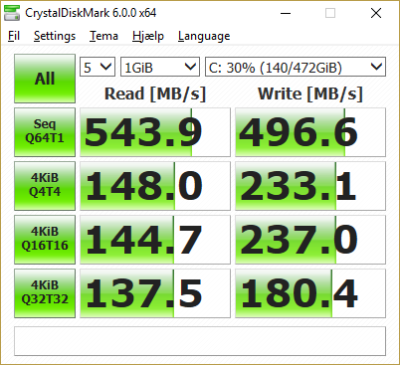
Disclaimer: The test results do not illustrate absolute performance numbers of all SSD disks. The results are included to illustrate the relatively low difference in performance between sequential (one file) and non-sequential (multiple files) disk access, and furthermore to compare with HDDs.
One thing to remember, though, if wanting to use SSD disks, is to calculate the expected lifespan of the selected drives with the specific XProtect VMS usage. Typically, the disks’ lifespan is described as the amount of data written per day to allow the drives to work for the entire warranty period. Calculating how much data is written per day allows an estimation of how long the SSDs can be expected to last.
RAID - Redundant Array of Independent Disks
In an XProtect VMS, as in most IT systems, having just a single disk to store the data is typically not enough as it doesn’t provide the performance and size needed.
One option is to use JBOD and manually ensure that the load on the disks and data to be stored are distributed across the individual disks. However, while JBOD is a cheap solution that will work in any PC or server without extra controllers or software, it is not the most optimal solution as the storage size and performance across the disks cannot be combined and utilized in the most optimal way.
For more information about JBOD see the following Wikipedia page:
https://en.wikipedia.org/wiki/Non-RAID_drive_architectures#JBOD
An alternative to using JBOD is to use RAID technology, which can make the individual disks act as one large disk with higher performance and larger size. The most common RAID configurations are covered below.
RAID 0
The simplest form of RAID is called RAID 0 or ‘striping’. With RAID 0 the disks (4 in below example) are combined in an array to form a single large drive. When data is written to this array, it is split into equally sized parts and each part is then written to the disks.
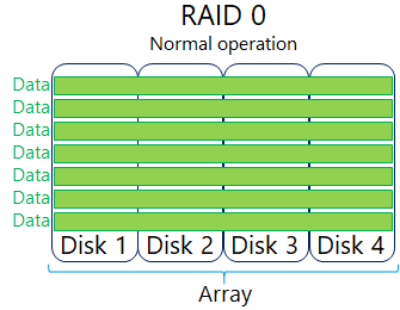
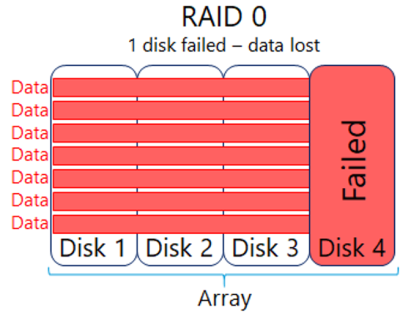
This gives excellent performance since the process of splitting the file in the RAID controller is simple, and since all drives write a part of the file in parallel. It effectively gives a write performance that is the sum of the individual disks.
However, RAID 0 have one significant drawback – if one disk fails all data across all disks in the array is lost and cannot be recovered. This shortcoming can be addressed by using other RAID configurations.
For more information about RAID 0 see the following Wikipedia page:
https://en.wikipedia.org/wiki/Standard_RAID_levels#RAID_0
RAID 1
RAID 1, which is also known as ‘mirroring’, works by having a secondary drive act as a backup to the primary drive. Data is then written to both the primary and secondary drives effectively ensuring a 1:1 copy of the data.
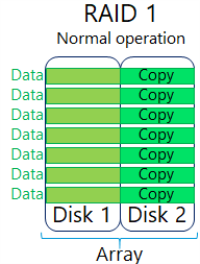
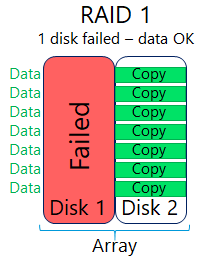
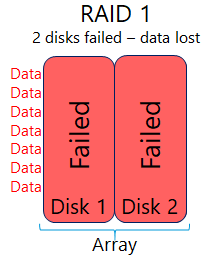
While RAID 1 protects the data and doesn’t impact performance of the disk, it however requires twice the number of disks. Furthermore, it is not possible to make the array larger than the size of a single disk.
For more information about RAID 1 see the following Wikipedia page:
https://en.wikipedia.org/wiki/Standard_RAID_levels#RAID_1
RAID 5
RAID 5, which is also known as ‘striping with parity’, requires at least 3 disks. The disks are joined together in an array to form a single drive, much like with RAID 0. However, to protect against disk failures the data is stored across the disks in the array with some extra information called parity.
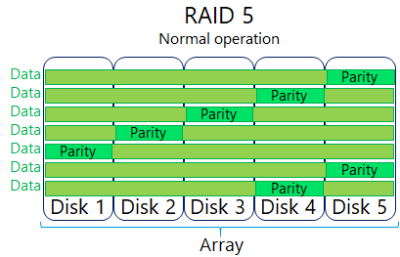
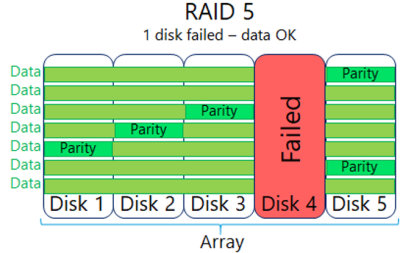
Should a disk fail this parity information can be used to reconstruct the missing data and thus allow the files to be accessed even if a disk has failed or is completely missing.
However, compared to RAID 0, the data protection comes at a cost of needing one more disk to achieve the same storage size. Furthermore, because parity needs to be calculated/recalculated for data being written/edited, RAID 5 is not as fast as RAID 0 using the same number of disks (plus 1 for parity).
With standard IT usage, a cache function in the RAID controller can alleviate a lot of the performance degradation. However, with XProtect VMS usage the media data is permanently received in real-time and in a non-sequential way appended to files already written to disk - triggering constant recalculations of the parity information.
This makes the cache function much less effective compared to standard IT data usage, and it is something that is often overlooked or not fully understood. If not considered, it can cause trouble in the VMS installation with missing recordings and slow playback experience in the VMS clients. Because of this, when considering using RAID 5 on the storage system for the VMS’s recording database, it is important to take RAID 5’s performance degradation with real-time non-sequential VMS data into account.
When considering RAID 5 on the storage system for the XProtect VMS’s archive database, the performance of RAID 5 with VMS archive data compared to standard IT system data is the same. This means that standard guidelines for storage performance known from IT usage can be used to calculate the needed performance when used for VMS archive databases.
One more thing to consider with RAID 5 is the additional performance degradation of the array while a disk is in the failed state or being ‘rebuild’ - once the failed drive has been replaced.
When a disk is in the failed state, the RAID controller must work harder as data cannot be read directly from the disks since data from the failed disk is missing. Instead, the data is reconstructed on-the-fly in the RAID controller by reading the data from the working disks and the extra parity information. This, however, slows down performance and could impact XProtect VMS operation.
Once a failed drive is replaced, the RAID controller will rebuild the missing information on the replaced disk. This rebuild function puts an even greater load on the disks as all data from the remaining disks needs to be read and missing data recalculated and written to the new disk. This degradation in performance must be considered to ensure it does not impact the XProtect VMS performance.
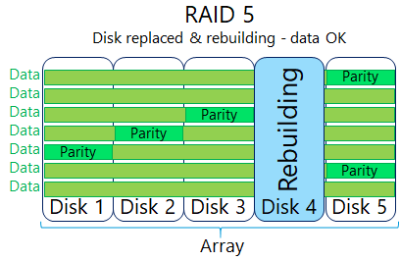
Finally, just to cover this scenario as well, if two disks fail at the same time, all data on the array is lost and cannot be recovered. So, it is important that the disk array is monitored and that disks are replaced immediately if they fail.
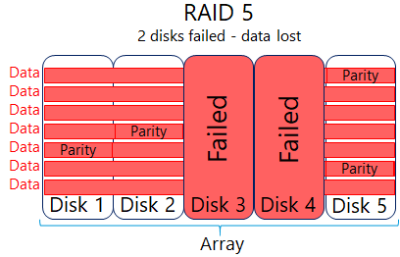
For more information about RAID 5 see the following Wikipedia page:
https://en.wikipedia.org/wiki/Standard_RAID_levels#RAID_5
RAID 6
RAID 6 is basically an extension of RAID 5 where a second set of parity information is added. This allows the disk array to continue to work even if two disks have failed.
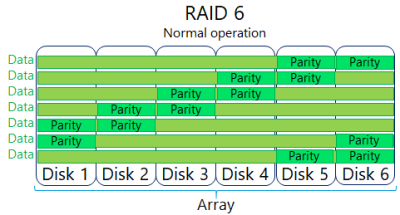
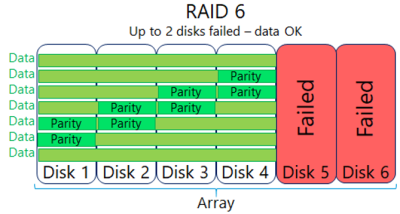
As with RAID 5 the performance of a RAID 6 array degrades if there are failed disks, and it degrades furthermore when replaced disks are being rebuild.
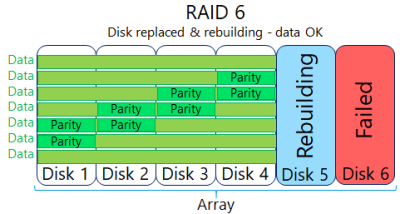
Finally, to also cover this scenario, if a third disk fails, data is lost and can’t be recovered.
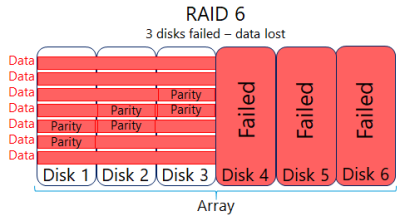
Recommendation for using RAID 6 with the XProtect VMS is the same as for RAID 5.
For more information about RAID 6 see the following Wikipedia page:
https://en.wikipedia.org/wiki/Standard_RAID_levels#RAID_6
RAID 10 (also called RAID 1+0 or RAID 1&0)
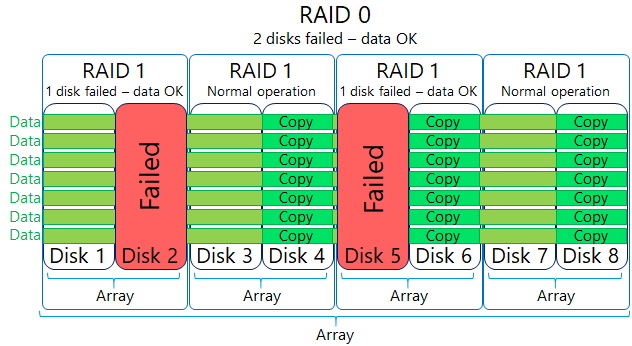
RAID 10 is a so-called nested RAID configuration as it utilizes two RAID levels at the same time. Sets of two (or more) disks are joined in several RAID 1 arrays. These RAID 1 arrays are then joined in a RAID 0 array.
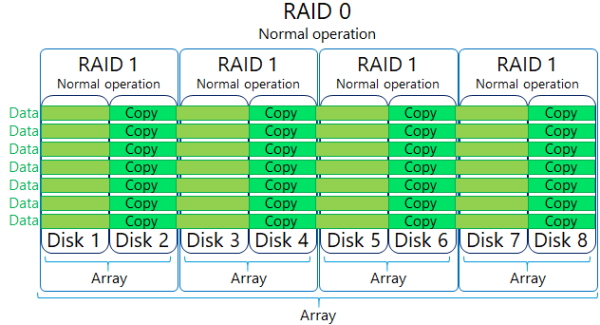
RAID 10 provides the best performance and redundancy and is often called ‘the best RAID configuration for mission critical applications and databases. In an XProtect VMS RAID 10 is especially good for the recording database – whether or not archiving is used.
However, the benefits of RAID 10 though come at the cost of needing a lot of hard disks making this configuration quite costly - especially when needing a lot of disk space as the XProtect VMS often requires.
This means that, for larger XProtect VMS systems with many cameras per recording server storing recordings for a longer period, RAID 10 may become too expensive. In this case a combination of a smaller RAID 10 array for the recording database, and a larger RAID 5 or 6 array for an archive database could be a more cost-efficient solution.
Should a disk fail, the data from the failed disk is simply read from the other disk in the RAID 1 pair. When a disk is failed the performance does not degrade.
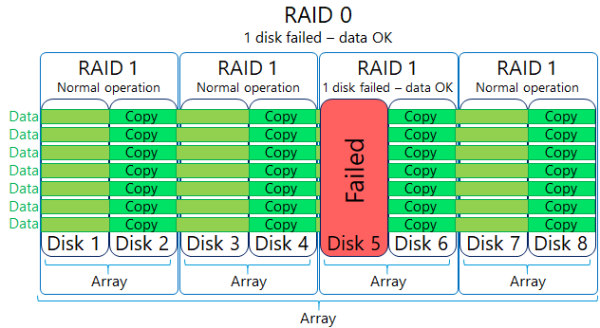
Once a failed disk is replaced, the information on it is rebuild by copying the data from the other working disk in the RAID 1 pair. During a rebuild, only the load of the disks in the rebuilding RAID 1 pair are impacted. Furthermore, depending on the RAID controller, the rebuild does not necessarily decrease the overall performance – the rebuild may just take a longer time.
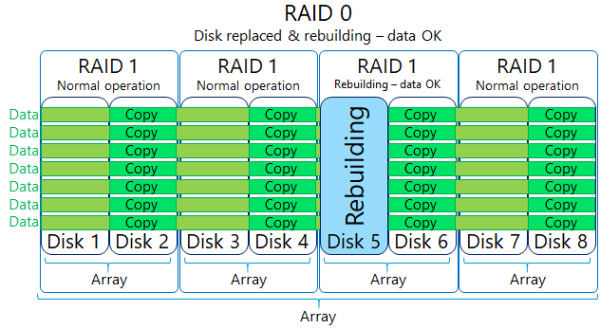
Should a second disk in one of the other RAID 1 pairs fail it still does not compromise either the data or the performance.
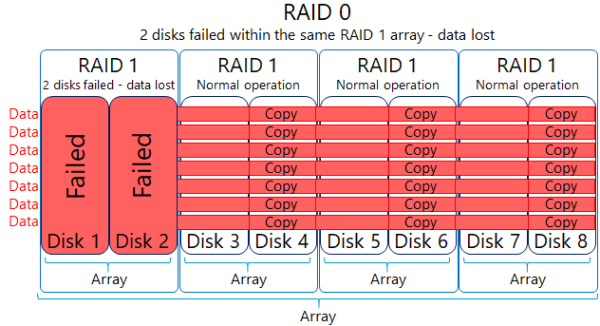
However, if the second disk in the same RAID 1 pair fails, all data in the entire RAID is lost. So, it is still important to monitor the disk system for failures and replace any broken disks immediately.
For more information about RAID 10 see the following Wikipedia page: https://en.wikipedia.org/wiki/Nested_RAID_levels#RAID_10_(RAID_1+0)
Other RAID configurations
Apart from the most used RAID configurations covered here, there are some additional RAID configurations called RAID 50, RAID 60 and RAID 100, which can offer some specific benefits.
For more information on these RAID configurations see the following Wikipedia page:
https://en.wikipedia.org/wiki/Nested_RAID_levels
RAID – hot spare
Hot spare is one or more extra disks attached to a RAID array in a storage system. With one or more hot spares available in the storage system, it can be configured to automatically replace a broken disk in the RAID array with one of the working hot spare disks.
This ensures that a disk is replaced immediately without manual intervention should a disk fail in the RAID array, allowing the RAID array to be rebuilt as fast as possible and minimize the time the RAID array is impacted by the failed disk.
Even though the storage system automatically replaces broken disks with hot spare disks, it is still important to monitor the storage system and replace the broken disks in a timely manner to ensure working hot spares are available continuously.
For optimal performance and availability of the storage system used in an XProtect VMS, it is recommended that the RAID array is configured with one or more hot spare disks.
RAID controllers
In addition to choosing disk type/model, number of disks and RAID level to obtain the performance and disk space needed, it is also very important to choose a RAID controller that can utilize the full potential of the selected RAID level and disks to deliver maximum performance. Often the RAID controller is the bottleneck in the storage solution – especially if using software RAID defined in Windows, or if using cheap “no-brand” RAID controllers.
Because of this, it is very important to check the performance specification of the RAID controller to ensure that it can deliver what is needed at the desired RAID level. This also applies during periods where a disk is in the failed state, or the RAID array is being rebuilt after a disk has been replaced.
Storage enclosure technologies
The disks used for the RAID can of course be installed in the PC or server running the XProtect VMS recording server if it has space for it, but for larger installations needing a lot of storage and thus many disks, the disks are typically installed in an external storage enclosure. Such an external storage enclosure is typically either a DAS, NAS, or SAN.
DAS
A DAS is an external enclosure with its own power supply and disks. A DAS can only be connected to a single server and the controller for the DAS is typically installed inside the server. Furthermore, the RAID array configuration is defined and stored in the server/controller.
A DAS is well suited for both recording and archive database usage with the XProtect VMS, and because it provides the performance and storage that a single recording server needs, and typically is less expensive, it is most often the ideal choice for recording server storage.
For more information on DAS see the following Wikipedia page:
https://en.wikipedia.org/wiki/Direct-attached_storage
NAS
Like with a DAS, a NAS is an external enclosure with its own power supply and disks. However, unlike a DAS, a NAS is not directly connected or attached to the servers. Instead, a NAS is connected to the standard IT network and provides access via one or more file shares, which servers and users can access simultaneously - if they have access permissions for the file shares.
In the past, a NAS was primarily a storage solution for home users and smaller businesses that needed a small, cheap, and simple file share to store their files. However, over the last years, large professional NASs with high performance, high capacity and redundancy functionality have become available.
With the XProtect VMS, a NAS may only be used for the archive databases. The reason for this is that the recording database needs uninterrupted block-level access to the storage system to ensure high performance and continuous recording of live media data. Because a NAS is connected to a standard IT network and uses file-level access, direct uninterrupted disk access cannot be guaranteed as needed, which means that even small delays or gaps in the communication will cause performance issues and loss of recordings.
When a NAS is used for the archive database, the data has already been recorded to the recording database. This means that when moving the recordings to the archive database having uninterrupted block-level disk access is no longer needed. File-level access is enough as data is not lost in case of an interruption. The archive job simply pauses and resumes once the connection has been restored.
One thing to remember when using a NAS for the archive database is to secure access to the NAS’s file share that stores the media files so only the XProtect VMS recording server can access the file share.
This is needed because no one else other than the XProtect VMS recording server should be able to access the media database files. All other systems or users that should access the media data stored in the database files, must access it through the VMS recording server, which then ensures that only systems or users with the correct VMS permissions get access to the media data.
For more information on NAS see the following Wikipedia pages:
https://en.wikipedia.org/wiki/Network-attached_storage
SAN
A SAN, as the two previous types, is an external storage enclosure with its own power supply, storage controller and room for multiple disks. The SAN provides access to the defined disk arrays to one or more servers. A single server is typically connected to the SAN via a direct optical connection called a Fiber Channel. If more servers share the SAN, the optical cables are connected to a Fiber Channel switch, which then is connected to the SAN. Alternatively, iSCSI can be used to provide the connection to the SAN over the standard IP network. If iSCSI is used, a dedicated network is typically recommended for performance reasons.
Each defined array in the SAN is assigned to a specific server. This means that even though two servers may share the SAN, the data on the individual disk arrays in the SAN is not shared between the servers but belongs to a single specific server and can only be accessed through that server.
A SAN is typically a more advanced and expensive storage solution compared to DAS and NAS, and it is mostly used in installations where more servers share the storage infrastructure and the flexibility that the SAN offers.
A SAN is well suited for both recording and archive database usage with the XProtect VMS. However, because a single XProtect VMS recording server can/will utilize the entire performance and storage space on a SAN, some of the benefits like sharing the SAN across multiple servers cannot be utilized just as well in a XProtect VMS installation as in standard IT installations, potentially making the solution more expensive.
For more information on SAN see the following Wikipedia pages:

