Storage configuration
This section provides an overview of how to configure the XProtect VMS storage with optional archives.
For detailed information on how to configure all storage and recording parameters, please refer to the ‘XProtect VMS – Administrator manual’ which can be found here:
https://doc.milestonesys.com/latest/en-US/portal/htm/chapter-page-mc-administrator-manual.htm
Basic configuration
Configuration of the storage path, retention time and optional archiving is done per recording server by using the XProtect Management Client. Once the XProtect Management Client has been logged in to the XProtect VMS, select the ‘Recording Server‘ node in the navigation tree. Then select the recording server to manage in the recording server tree, and finally select the ‘Storage‘ tab.
Once the ‘Storage’ tab has been selected, the default storage configuration is displayed.
This default storage configuration (path and retention time) was set in the installer when the recording server was initially installed.
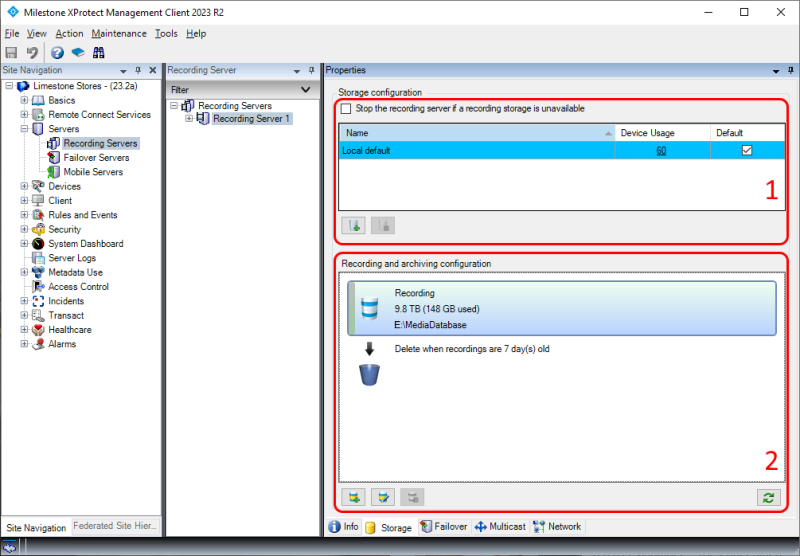
The storage configuration consists of two areas.
-
Area 1: Lists the defined storage configurations for the selected recording server. Furthermore, it shows how many devices currently use each storage configuration and which storage configuration is the default for new devices added to the recording server
-
Area 2: Shows the storage path, retention time and currently used space for the recording database and any defined archives for the storage configuration selected in Area 1
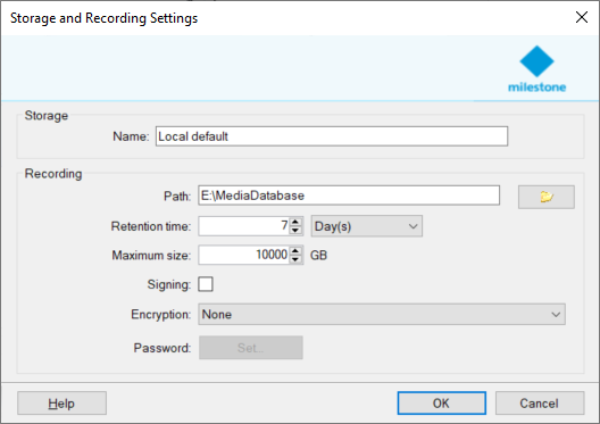
To edit the settings
for the selected storage configuration, click the storage graphics or the ‘Edit Recording
Storage‘ button  in area 2.
One thing to notice is the ‘Retention time‘ and ‘Maximum size’ settings. These settings specify how old recordings need to be, or how much space they may use (whichever comes first) before they are deleted or alternatively moved to an archive at the next archive time.
Archiving
If recordings should be archived to another location, click the ‘Add Archive‘ button
 in area 2 to add an
archive.
The retention and maximum size settings work in the same way as in the recording settings dialog where they control when recordings are deleted or moved to yet another archive.
One option to pay attention to when configuring an archive is the ‘Schedule:‘ definition, which controls when recordings are moved from the previous recording location and into the archive.
Although the archive schedule can be set freely, from once an hour up to once a month, it is important to consider that recordings will remain in the previous storage location until the archive schedule triggers the recordings to be moved to the archive.
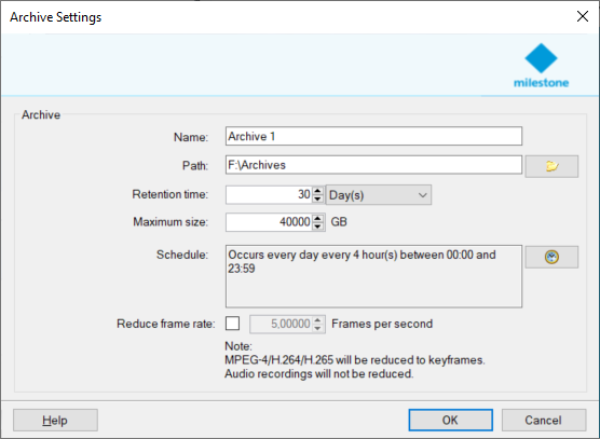
Example: if the retention setting on the initial recording location is set to 7 days and the schedule in the archive is set to archive once every day, there will be 8 days of recordings in the initial recording location when the archive process starts.
Recommendation: To ensure the best performance, it is recommended to archive every 4 hours.
The same applies if subsequent archives are defined. Recordings will stay in the previous storage location until the next archive is scheduled.
Note: The functions to archive the recordings more than one time are only available in XProtect Expert and XProtect Corporate.
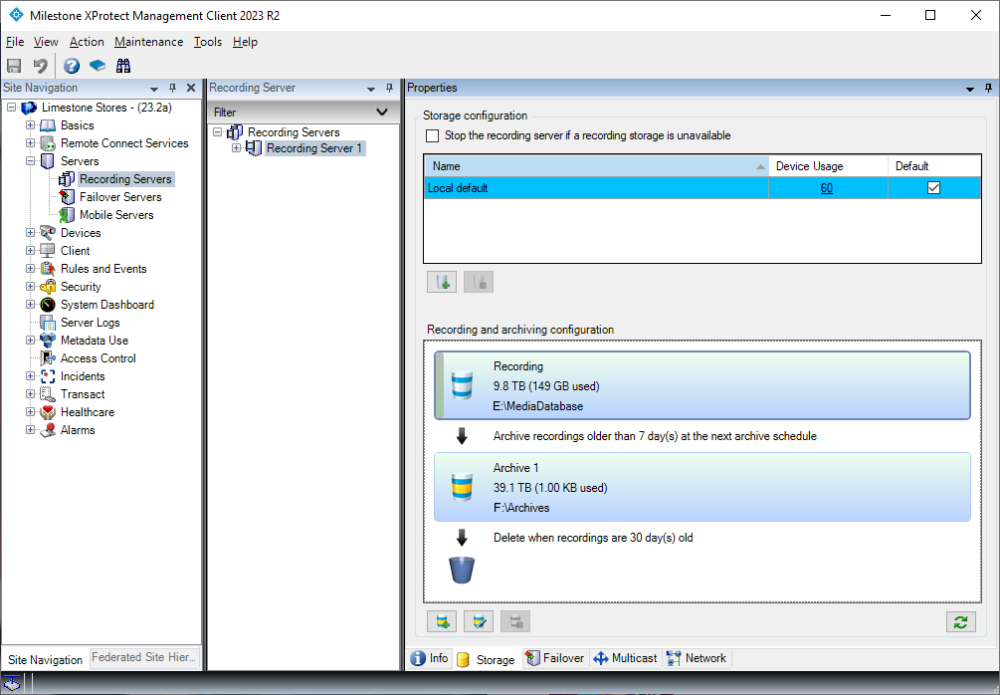
Below screenshot shows a single storage configuration containing the initial recording location and one archive with a total retention time of 30 days.
Reduce framerate
If an XProtect VMS installation is required to record video at a high framerate, and store it for a long time, a storage system with a lot of space is needed - which can be expensive to purchase and maintain. However, as the recorded video gets older, it typically becomes less important and thus a lower recording framerate can sometimes be acceptable.
Reducing the framerate of older recordings when they are archived can reduce the space needed to store the video recordings. However, the amount of reduction that can be achieved depends on the video format used. Furthermore, the process of archiving itself creates an extra load on the recording server and storage system, which must be considered.
MJPEG video
When recording video in MJPEG format - which is basically a series of independent JPEG images - the saving in space is proportional to the number of images the recordings are reduced by. Furthermore, because the MJPEG stream is just a series of JPEG images that can be decoded independently from one another, the framerate can be reduced to any framerate lower than the original framerate the video was recorded in.
Example: Recording video as MJPEG with 30 FPS and each image using 100KB.
-
One second of the initial 30 FPS recordings will use 100KB * 30 = 3,000KB
-
When reducing the framerate to 5 FPS, one second of video will now use 100KB * 5 = 500KB – a saving in needed diskspace of 83.33%
This means that when recording video in the MJPEG format there is a lot of space that can be saved by reducing the framerate of the recordings over time.
MPEG video
When video is recorded in the MPEG formats (MPEG-4, H.264 & H.265), the benefits of reducing the framerate of the recordings is not as big as with MJPEG. The reason for this lies in how these codecs compresses the video.
In MPEG formats, the images are grouped into units called GOP’s. Each GOP consists of an initial image called a ‘keyframe’ or ‘I-frame’ and a series of “partial frames”, called ‘B-frames’ and/or ‘P-frames’, which only contain information about changes in the image compared to the previous/next images in the GOP.
The keyframe is like a JPEG and can be decoded independently. The subsequent images in the GOP only contain information about changes compared to the previous/next image in the GOP. The ‘B-frames’ and ‘P-frames’ can thus not stand alone and be decoded independently. They can only be decoded as part of a complete sequence starting with the keyframe.
Furthermore, because the keyframe is the reference image for decoding the rest of the images in the GOP, and the subsequent images only consist of updates to the keyframe or previous images, the keyframe takes up a lot of the space in the GOP – especially if there is not much movement in the video. If there isn’t much movement in the video, which is often the case in a video surveillance system, the keyframe can use 50-80% of the entire GOP. Additionally, because the ‘B frames’ and ‘P frames’ cannot be decoded independently, MPEG video can only be reduced to the keyframe interval (default in the XProtect VMS is 1 FPS) or less (e.g. every second keyframe). Moreover, because the keyframe uses most of the data in the GOP, reducing the FPS from 30 to 1 may result in saving only 20-50% of the storage used.
It is possible to configure a shorter GOP length, of, for example, 0.5 seconds making a reduced framerate of 2 FPS possible. However, doing so is not recommended as having two GOPs per second – and thus also two large keyframes per second - will increase the network and storage load and increase the disk space needed until the recordings are archived and reduced in framerate.
For more information about MPEG-4, H.264 & H.265 video encoding and GOP’s see:
https://en.wikipedia.org/wiki/H.264/MPEG-4_AVC
https://en.wikipedia.org/wiki/High_Efficiency_Video_Coding
https://en.wikipedia.org/wiki/Group_of_pictures
Configuration
The function to reduce the framerate is configured as part of the archive configuration. When enabled, only the set subset of the video frames is read from the previous media database and transferred to the archive.
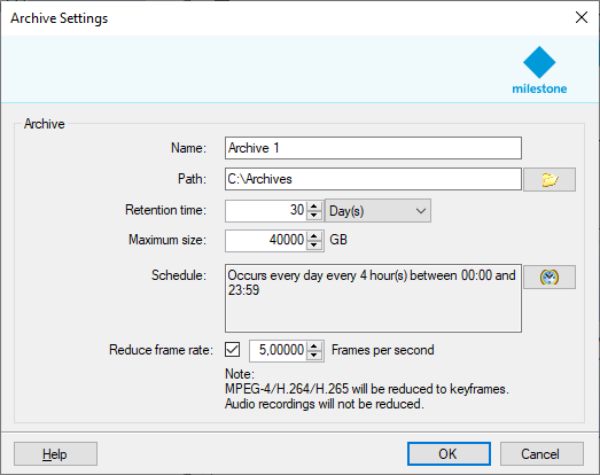
Note: The function to reduce the framerate during archiving is only available in XProtect Expert and XProtect Corporate.
Differentiated retention time
Should devices on the same recording server use different retention times, further storage configurations can
be added by clicking the ‘Add Recording Storage‘ button  in area 1 of the dialog.
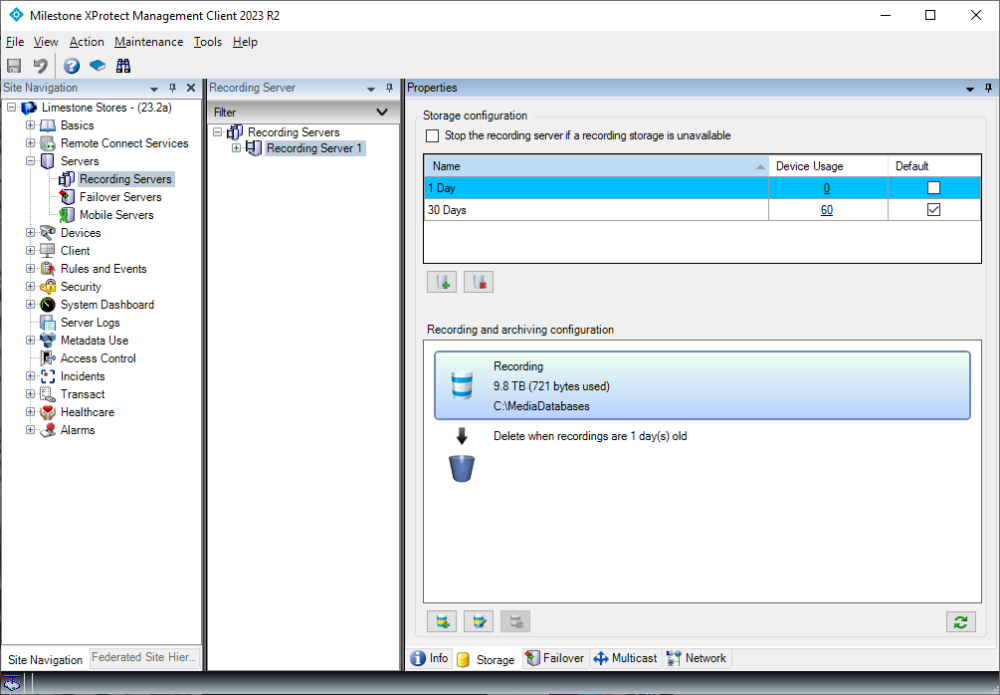
Once multiple storage configurations have been defined, the one to use for a specific device can be selected in the device’s ‘Storage‘ tab.
Low disk space handling
The recording server supports a last resort fallback function to handle unexpected low disk space situations. If triggered, the recording server tries to make space for new recordings or archives by either moving or deleting exiting recordings depending on the configuration and the drive that runs low on space:
-
If a next archive location relative to the drive that runs low is defined, the oldest recordings/archives are automatically archived to this archive location regardless of the defined archive schedule
-
If no archives are defined, or if it is the drive storing the final archive location that runs low on space, the oldest recordings are deleted
However, the success of the function to archive the recordings to the next location depends on whether the drives can move the recordings from the drive with low disk space to the next archive drive faster than new recordings are being stored on the disk with low disk space. If this cannot be done fast enough, the disk will eventually become completely full which will trigger recordings to be deleted.
Because there is a small risk that recordings will end up being deleted, it is not recommended to design the recording server and storage around utilizing this last resort fallback function as part of the regular operation. This function should only be used as a last resort to handle a situation where the system is running out of disk space.
System Monitor events
To catch low disk space situations before they happen and trigger above functionality, it is recommended to configure the low disk space thresholds to appropriate levels. The thresholds can be set in the ‘System Monitor Thresholds’ pane under the ‘Disk’ tab.

When defined, events will be triggered when the free disk space becomes lower than the set warning and
critical levels. These events can then be used to trigger alarms or send email notifications via the rule system.

