Advanced steps – XProtect Smart Client
Restrict physical access to any computer running XProtect Smart Client
Milestone recommends that you restrict physical access to computers running XProtect Smart Client. Allow only authorized personnel to access the computers. For example, keep the door locked, and use access controls and surveillance.
Learn more
The following control(s) provide additional guidance:
- NIST SP 800-53 PE-1 Physical and Environmental Protection Policy and Procedures
- NIST SP 800-53 PE-2 Physical Access Authorizations
- NIST SP 800-53 PE-3 Physical Access Control
- NIST SP 800-53 PE-6 Monitoring Physical Access
Always use a secure connection by default, particularly over public networks
If you need to access the VMS with XProtect Smart Client over a public or untrusted network, Milestone recommends that you use a secure connection through VPN. This helps ensure that communication between XProtect Smart Client and the VMS server is protected.
Learn more
The following control(s) provide additional guidance:
- NIST SP 800-53 AC-2 Account Management
- NIST SP 800-53 AC-17 Remote Access
- NIST SP 800-53 CM-6 Configuration Settings
Activate login authorization
Login authorization requires a user to log in on XProtect Smart Client or Management Client, and another user who has an elevated status, such as a supervisor, to provide approval.
You set up login authorization on the roles. Users associated with the role are prompted for a second user (a supervisor) to authorize their access to the system.
Login authorization is currently not supported by mobile client, and XProtect Web Client
To turn on login authorization for a role, follow these steps:
- Open Management Client.
- Expand the Security node, select Roles, and then select the relevant role.
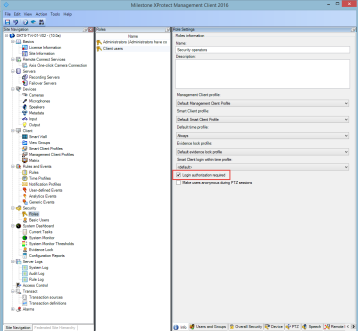
Select the Login authorization required check box.

To configure the roles that authorize and grant access, follow these steps:
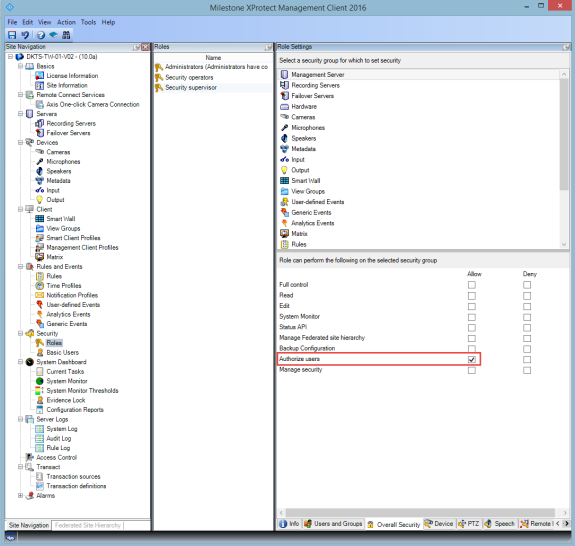
- To create a new role, for example "Security supervisor", expand the Security node, right-click Roles and create a new role.
- Click the Overall Security tab, and select the Management Server node.
Select the Allow check box next to the Authorize users check box.

Learn more
The following control(s) provide additional guidance:
- NIST SP 800-53 AC-2 Account Management
- NIST SP 800-53 AC-6 Least Privilege
- NIST SP 800-53 AC-17 Remote Access
- NIST SP 800-53 CM-6 Configuration Settings
Do not store passwords
XProtect Smart Client provides the option to remember passwords for users. To reduce the risk of unauthorized access, Milestone recommends that you do not use this feature.
To turn off the remember password feature, follow these steps:
- Open Management Client.
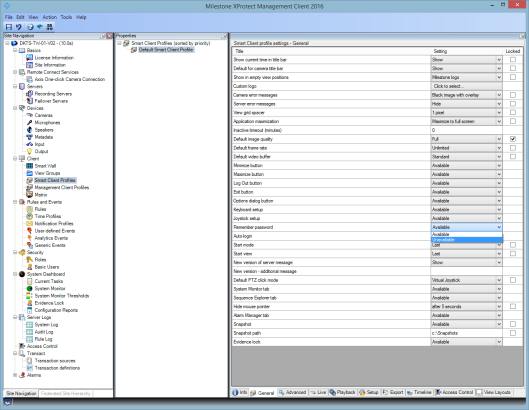
- Expand the Client node, select Smart Client Profiles, and then select the relevant Smart Client profile.
- In the Remember password list, select Unavailable.
The Remember password option is not available the next time a user with this profile logs into XProtect Smart Client.

Learn more
The following control(s) provide additional guidance:
- NIST SP 800-53 AC-2 Account Management
- NIST SP 800-53 CM-6 Configuration Settings
- NIST SP 800-53 IA-1 Identification and Authentication Policy and Procedures
Turn on only required client features
Turn on only required features, and turn off features that a surveillance operator does not need. The point is to limit opportunities for misuse or mistakes.
You can turn on and turn off features in XProtect Smart Client and in XProtect Management Client.
In Management Client, configure Smart Client profiles to specify sets of permissions for users who are assigned to the profile.Smart Client profiles are similar to Management Client profiles, and the same user can be assigned to each type of profile.
To configure a Smart Client profile, follow these steps:
- Open Management Client.
- Expand the Client node, select Smart Client Profiles, and then select the relevant Smart Client profile.
- Use the tabs to specify settings for features in Smart Client. For example, use the settings on the Playback tab to control features used to investigate recorded video.
Before you assign a user to a Smart Client profile, ensure that the permissions for the user’s role are appropriate for the profile. For example, if you want a user to be able to investigate video, make sure that the role allows the user to play back video from cameras, and that Sequence Explorer tab is available on the Smart Client profile.
Learn more
The following control(s) provide additional guidance:
- NIST SP 800-53 AC-2 Account Management
- NIST SP 800-53 AC-6 Least Privilege
- NIST SP 800-53 CM-6 Configuration Settings
Use separate names for user accounts
Milestone recommends that you create a user account for each user, and use a naming convention that makes it easy to identify the user personally, such as their name or initials. This is a best practice for limiting access to only what is necessary, and it also reduces confusion when auditing.
Learn more
The following control(s) provide additional guidance:
- NIST 800-53 AC-4 Least Privilege
- NIST 800-53 CM-1 Configuration Management Policy and Procedures
- NIST 800-53 CM-2 Baseline Configuration
- NIST 800-53 CM-6 Configuration Settings
- NIST 800-53 CM-7 Least Functionality
Prohibit the use of removable media
For video exports, establish a chain of procedures that are specific to evidence. Milestone recommends that the security policy allows only authorized XProtect Smart Client operators to connect removable storage devices such as USB flash drives, SD cards, and smartphones to the computer where XProtect Smart Client is installed.
Removable media can transfer malware to the network, and subject video to unauthorized distribution.
Alternatively, the security policy can specify that users can export evidence only to a specific location on the network, or to a media burner only. You can control this through the Smart Client profile.
Learn more
The following control(s) provide additional guidance:
- NIST SO 800-53 MP-7 Media Use
- NIST SP 800-53 SI-3 Malicious Code Protection

