

Specify time for video playback

|
"I need to go back to an exact time and see footage around that time." |
In XProtect Web Client, the time information displayed in the app inherits the time zone set on your computer. This includes the time shown in live and playback mode, alarms, bookmarks, and so on.
To play back the video from a specific point in time, you can use the timeline controls (see Using the timeline in playback mode (explained) or Using the timeline in investigations (explained)).
To go to a specific point in time in the recording, you can also click and hold the timeline track and drag it to the left or right.
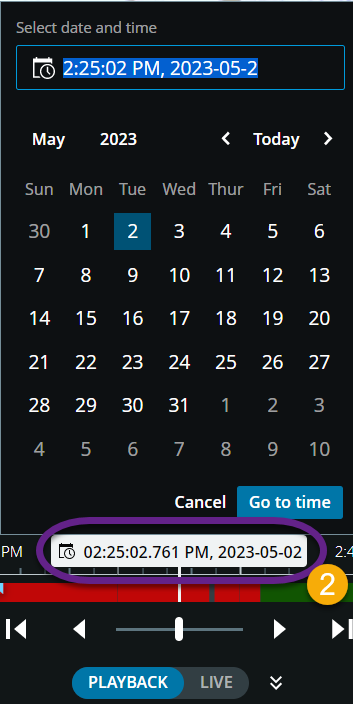
On the Views tab, you can specify time for video playback by using the time picker.
- In the left pane, find and click a camera or a view with multiple cameras.
- To open the time picker:
- In live mode, in the bottom-left corner of the view pane, click the current time indicator
 .
.
- In live mode, in the bottom-left corner of the view pane, click the current time indicator
- In playback mode, in the center of the timeline, click the selected time indicator
 .
. - In the input field, manually specify the new values for the date and time of the recording. You can also select the new date from the calendar.
- Click Go to time.

On the Investigations tab:
- You can specify the date and time for video playback from the time picker on the timeline. To do that, follow the procedure for using the time picker in playback mode.
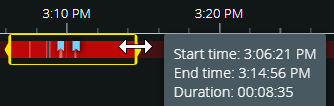
- You can specify the start and end time for video playback by using the time selection mode on the timeline.
| Item | What can I do with it? |
|---|---|
|
|

|
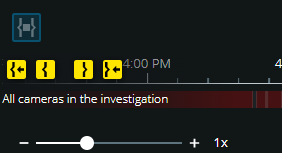
Indicates that time selection mode is on. |
|
If you have dragged the time selection brackets beyond the left or right end of the timeline, then to adjust the brackets, select one of the navigation buttons to do the following actions:
The video stream is temporarily paused while you're using the navigation buttons. |

 -
- 
 -
-  -
-  -
-