Managing server logs
The following are the types of server logs:
- System log
- Audit log
- Rule-triggered logs
These are used to log the usage of the system. These logs are available in the Management Client under Server logs.
For information about logs used for troubleshooting and investigating software errors, see Debug logs (explained).
Identify user activity, events, actions and errors
Use logs to get a detailed record of user activity, events, actions, and errors in the system.
To see logs in the Management Client, go to the Site Navigation pane and select Server Logs.
|
Log type |
What is logged? |
|---|---|
| System logs |
System-related information |
| Audit logs |
User activity |
| Rule-triggered logs |
Rules in which users have specified the Make new <log entry> action. For more information about the <log entry> action, see Actions and stop actions. |
To see logs in a different language, see General tab (options) under Options.
To export logs as comma-separated values (.csv) files, see Export logs.
To change log settings, see Server Logs tab (options).
Filter Logs
In each log window, you can apply filters to see log entries from, for example, a specific time span, a device, or a user.
Filters are generated from the log entries that are currently visible in the user interface.
-
In the Site Navigation pane, select Server Logs. By default, the System logs tab appears.
To navigate between log types, select a different tab.
-
Under the tabs, select a filter group, for example, Category, Source type, or User.

A list of filters appears. A list of filters shows maximum 1000 filters.
-
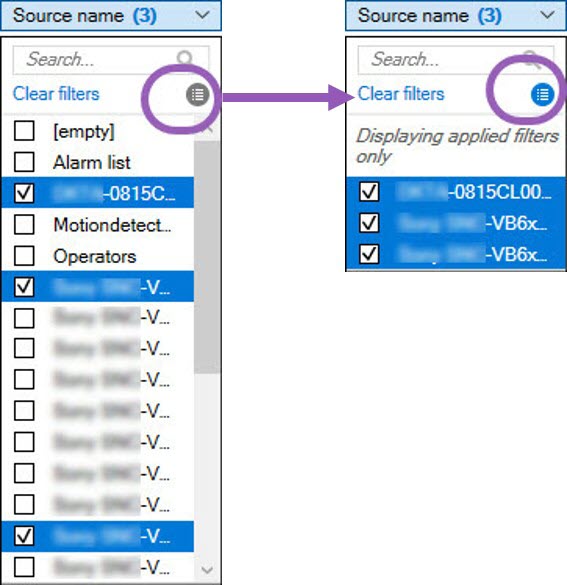
Select a filter to apply it. Select the filter again to remove it.
Optional: In a list of filters, select Display applied filters only to see only the filters that you applied.

When you export logs, the contents of your export change depending on the filters that you apply. For information about your export, see Export logs.
Export logs
Exporting logs helps you to, for example, save log entries beyond the log retention period. You can export logs as comma-separated values (.csv) files.
To export a log:
-
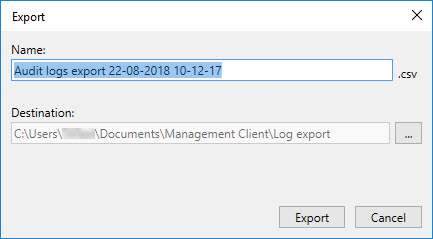
Select Export in the upper-right corner. The Export window appears.

-
In the Export window, in the Name field, specify a name for the log file.
-
By default, exported log files are saved in your Log export folder. To specify a different location, select
 to the right of the Destination field.
 -
Select Export to export the log.
The contents of your export change depending on the filters that you apply. For information about your export, see Filter logs.
Search logs
To search a log, use Search criteria in the top part of the log pane:
- Specify your search criteria from the lists.
- Click Refresh to make the log page reflect your search criteria. To clear your search criteria, and return to viewing all of the log's content, click Clear.
You can double-click any row to have all details presented in a Log Details window. In this way you can also read the log entries that contain more text than can be displayed in a single line.
Change log language
- At the bottom part of the log pane, in the Show log in list, select the wanted language.

- The log is displayed in the selected language. Next time your open the log, it is reset to the default language.
Allow 2018 R2 and earlier components to write logs
The 2018 R3 version of the log server introduces authentication for added security. This prevents 2018 R2 and earlier components from writing logs to the log server.
Affected components:
- XProtect Smart Client
- XProtect LPR Plug-in
- LPR Server
- Access Control Plug-in
- Event Server
- Alarm Plug-in
If you're using the 2018 R2 or earlier version of any of the components listed above, you must decide whether or not to allow the component to write logs to the new log server:
-
Select Tools > Options.
-
In the Options dialog box, at the bottom of the Server Logs tab, find the Allow 2018 R2 and earlier components to write logs check box.
- Select the check box to allow 2018 R2 and earlier components to write logs
- Clear the check box to not allow 2018 R2 and earlier components to write logs

