Configuring transaction events and alarms
Define transaction events
To track and investigate transaction events in XProtect Smart Client, first you need to define what the events are, for example the acquisition of a smartphone. You define transaction events on a transaction definition, so that the events defined apply to all transaction sources, for example cash registers, that use the transaction definition.
Steps:
- In the Site Navigation pane, expand Transact.
- Go to the Overview pane. Select the transaction definition, where you want to define an event.
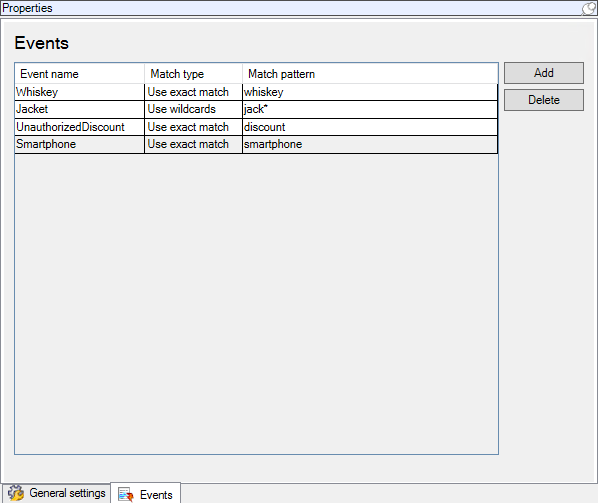
- Click the Events tab.
- In the Properties pane, click Add. A new line is added.
- Enter a name for the event.
- Select the match type to use to identify a specific string in the transaction data as an event. You can choose between exact match, wildcard symbols, and regular expressions. For more information, see the description of match type in Transaction definitions (properties).
- In the Match pattern column, specify what you want the system to identify as an event, for example "smartphone".
- For each event, repeat the steps above.
Create alarms based on transaction events
To notify the XProtect Smart Client operator whenever a specific transaction event occurs, first you need to create a transaction alarm in Management Client. The alarm will appear on the Alarm Manager tab in XProtect Smart Client allowing the operator to investigate the event and, if required, take action.
Steps:
- In the Site Navigation pane, expand Alarms.
- Go to the Overview pane. Right-click the Alarm Definitions node and select Add New. . The settings in the Properties pane become active.
- Enter a name for the alarm and, in the Description field, possibly also instructions for XProtect Smart Client operator on what action to take.
- In the Triggering event drop-down menu, select Transaction events.
- In the drop-down menu below Transaction events, select the specific event.
- In the Sources field, click the Select. button. A pop-up window appears.
- Click the Servers tab and select the transaction source.
- Specify additional settings. For more information, see Alarm Definitions (Alarms node).
Set up rules on an event
To trigger an action when a specific transaction event occurs, you need to configure a rule, where you select an event and specifies what needs to happen, for example that a camera starts recording or an e-mail is sent.
Steps:
- In the Site Navigation pane, expand Rules and Events.
- Go to the Overview pane.Right-click Rules and select Add Rule. A wizard appears.
- Follow the steps in the wizard.
- Make sure that the Perform an action on <event> radio button is selected.
- Select the transaction event under Transact > Transaction events.
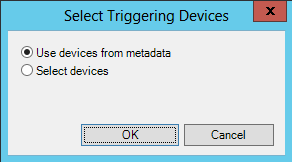
- If an action involves recording, and you want to use the cameras associated with the transaction sources, for example the cash registers, select the Use devices from metadata radio button in the dialog box that appears during the wizard.
Enable filtering of transaction events or alarms
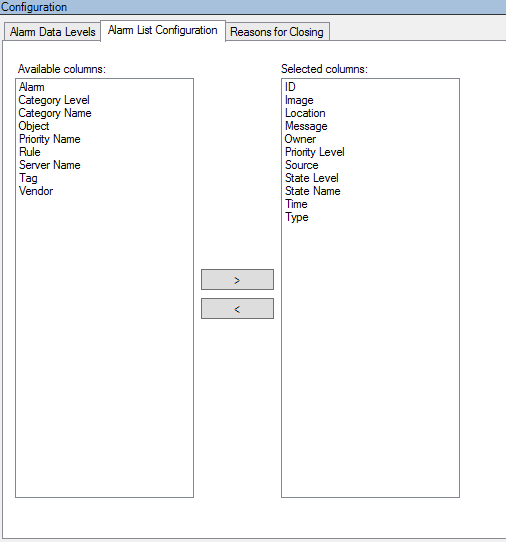
If you want the XProtect Smart Client operator to be able to filter events or alarms by transactions, first you need to enable the Type field in Management Client. Once enabled, the field is available in the filter section on the Alarm Manager tab in XProtect Smart Client.
Steps:
- In the Site Navigation pane, expand Alarms
- Select Alarm Data Settings and click the Alarm List Configuration tab.
- In the Available columns section, select the Type field.
- Add the field to Selected columns.
- Save the changes. Now, the field is available in XProtect Smart Client.