Using XProtect Transact
If XProtect Transact![]() Product available as an add-on to surveillance systems. With XProtect Transact, you can combine video with time-linked Point of Sale (PoS) or ATM transaction data. has been configured in your system, you can observe live transactions, investigate transactions in several ways, and print transactions.
Product available as an add-on to surveillance systems. With XProtect Transact, you can combine video with time-linked Point of Sale (PoS) or ATM transaction data. has been configured in your system, you can observe live transactions, investigate transactions in several ways, and print transactions.
Tabs with XProtect Transact functionality
This topic gives you an overview of what you can do with XProtect Transact![]() Product available as an add-on to surveillance systems. With XProtect Transact, you can combine video with time-linked Point of Sale (PoS) or ATM transaction data. in XProtect Smart Client. The features are described according to the tabs.
Product available as an add-on to surveillance systems. With XProtect Transact, you can combine video with time-linked Point of Sale (PoS) or ATM transaction data. in XProtect Smart Client. The features are described according to the tabs.
|
Tab |
Description |
|---|---|
| Views tabs |
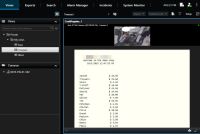
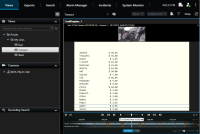
On the views tabs, you can view live and recorded video with transactions. In live mode, you can observe live transactions and surveillance video from the cameras monitoring the transactions. The view can contain several transaction view items, where transactions are displayed as receipts that roll over the screen in sync with the video stream from up to two cameras. In playback mode, you can browse recorded transactions and surveillance video from the cameras monitoring the transactions. The view can contain several transaction view items, where transactions are displayed as receipts that roll over the screen in sync with the video stream from up to two cameras. You create and modify the transaction views in setup mode. |
| Alarm Manager |
On the Alarm Manager tab, you can view and investigate events and alarms related to transactions. The events are displayed in the event list. To group transaction events, you need to filter for events of the type transaction. When you click a line in the event list, the video associated with the event is displayed in a preview. |
| Transact |
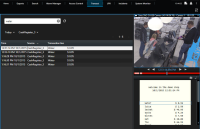
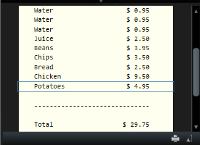
On the Transact tab, you can investigate transactions by performing free text searches and applying filters. The transaction lines appear in a list that you can sort by time, transaction source, and line name. When clicking a line, the associated video still frames from the associated cameras are displayed. Below the preview area, the receipt is displayed. |
Observe live transactions
You can observe real time transactions in combination with live video surveillance from the cameras recording the transactions. For example, you may want to observe a cash register, the sales clerk, and the ongoing transactions.
You have set up a view to display transactions. For more information, see Set up views for transactions.
Steps:
- In live mode, expand the Views pane.
-
Select a view set up for transactions. Receipts roll over the screen if there are ongoing transactions, and the live video from the associated cameras are displayed.
If the transaction view item is narrower than the receipt, a horizontal scroll bar allows you to view the part of the receipt that is hidden. If you try to access the scroll bar, the view item toolbar appears covering the scroll bar. To access the scroll bar, press and hold down Ctrl while moving the cursor into the view item area.
Select  to change the font size of receipts.
Investigating transactions
Investigate transactions in a view
The simplest method of investigating transactions is to view transactions in a view, where the receipts roll over the screen in sync with the video recordings.
You have set up a view to display transactions. For more information, see Set up views for transactions.
Steps:
- Select the relevant view and switch to playback mode.
-
In the Views pane, select the transaction view. Depending on how the view has been configured, one or more receipts appear together with the cameras associated with the transaction source.
- To browse the video sequences in backward mode, drag the time line to the right.
- To browse the video sequences in forward mode, drag the time line to the left.
- Use the
 or
or  button to play the video backwards or forwards.
If the transaction view item is narrower than the receipt, a horizontal scroll bar allows you to view the part of the receipt that is hidden. If you try to access the scroll bar, the view item toolbar appears covering the scroll bar. To access the scroll bar, press and hold down Ctrl while moving the cursor into the view item area.
Select  to change the font size of receipts.
Investigate transactions using search and filters
You can investigate transactions and the associated video recordings by using filters and search words. The filters help you narrow down your search, for example transactions from the last seven days, or a specific cash register. Search words help you identify specific data from the transactions, for example the name of the sales clerk or unauthorized discounts.
- Click the Transact tab.
- In the Today drop-down list, select a time interval.
-
In the Source drop-down list, select the transaction sources you want to investigate. Disabled sources are marked with "()", for example "(CashRegister_3)".
- Enter your search words. The search results are displayed as transaction lines below the filters, and in the receipt, the search item is highlighted.
- To update the list, click
 .
. - Click a transaction line to view the associated video still frame. Use the
 or
or  button to start the video in backward play or forward play mode.
By default, transaction data is stored for 30 days, but depending on the configuration, data can be stored up to 1000 days.
Investigate transactions from a disabled source
Even if a transaction source has been disabled by your system administrator, you can still view past transactions from that source in combination with the associated video recordings.
Steps:
- Click the Transact tab.
-
In the All sources drop-down list, select a disabled transaction source. Parentheses indicate that the source is disabled, for example "(CashRegister_1)".
- Select a time interval, for example Last 7 days, or set a custom interval.
- Click
 to view the transaction lines for the specified time interval.
 - Select a transaction line to view the associated video still frame from that exact point in time.
- Use the
 or
or  button to play the video backwards or forwards.
By default, stored transaction data is deleted after 30 days. However, your system administrator may have changed the retention period to anything between 1 and 1000 days.
Investigate transaction events
You can investigate transaction events, for example by identifying transactions where a specific item has been purchased. Investigating a transaction event involves viewing the details about the event in the alarm list and the associated video recordings.
To filter by transaction events, the Type field must be added to XProtect Smart Client. This can only be done by your system administrator.
Steps:
- Click the Alarm Manager tab.
- Click Setup in the upper right corner to enter the setup mode.
- Expand the Properties pane.
- In the Data Source list, select Event and click Setup again to exit the setup mode. All events are displayed in a list with the most recent at the top.
-
To view only the transaction events, expand the Filter section and enter transaction event in the Type field. Automatically the filter is applied, and only transaction events appear in the list.
- If you want to view a specific event defined by your system administrator, open the Message list and select the event.
- To view the video recordings associated with an event, click the event in the list. The video starts playing in the preview area.
Investigate transaction alarms
You can investigate alarms that have been triggered by transaction events. The alarms appear in the alarm list, where you can view the details about the alarm and the associated video recordings.
To filter by transaction events, the Type field must be added to XProtect Smart Client. This can only be done by your system administrator.
Steps:
- Click the Alarm Manager tab.
- Click the Setup button in the upper right corner to enter the setup mode.
- Expand the Properties pane.
- In the Data Source list, select Alarm and click Setup again to exit the setup mode. The most recent alarms are displayed at the top.
- To view only the alarms triggered by transaction events, expand the Filter section and enter transaction event in the Type field. Automatically the filter is applied to the list.
- To view alarms triggered by a specific event, open the Message list and select the event.
- To view the video recordings associated with an alarm, click the alarm in the list. The video starts playing in the preview area.
Print transactions
When you are viewing transactions in the Transact workspace, you can print the transactions, one at a time. The printout displays the receipt and still images from the associated cameras at the time matching the transaction line.
Steps:
- Click the Transact tab.
-
Find the transaction you want to print as described in Investigating transactions.
- Click Print below the transaction to print it. A Windows dialog box appears.
- Select the required printer and click OK.


