Adding LPR content to your views
Add LPR cameras to views
- In Setup mode, select the view you want to add an LPR camera to.
- In the System overview pane, click LPR and drag it to the relevant view item.
- In the Select LPR camera dialog box, expand the required server to view a list of available LPR cameras from that server.
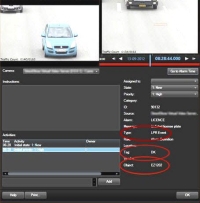
You can specify how you want to display LPR camera events in live mode in the Properties pane (see Adjust LPR view settings).
Adjust LPR view settings
- In live mode, click Setup.
- In Properties, next to LPR camera, click the Browse button to open the Select LPR camera dialog box and select another LPR camera.
- Choose the order of LPR events in your lists on the right-hand side of the preview:
- Newest on top: Display the newest LPR events at the top of the list
- Newest on bottom: Display the newest LPR events at the bottom of the list
- If you want to display the list of license plates from one camera but want to view video from another, select a different camera in the Camera name field.
Enable LPR server status on maps
It is possible to visualize LPR servers on maps and have their current status shown on the maps. To enable the LPR server status on maps:
- In live mode, click Setup.
- In Views, select the relevant map.
- Right-click the map and select Toolbox.
- In the toolbox, click the
 Add plug-in element icon to open the Element selector window.
 - Select the relevant LPR server and drag it onto the map.
- On the map, right-click the LPR server icon and select Status details to get live status on the LPR server and the LPR cameras related to the server.
You can associate the LPR specific map with your Alarm list by adding the map on the Alarm Manager tab.
Enable LPR-specific elements
To be able to see all relevant information regarding LPR recognitions in your XProtect Smart Client, on the Alarm Manager tab, do the following:
- On the Alarm Manager tab, in the Alarms list, right-click the Image icon
 next to the Quick Filters column. From the menu, select: Object, Tag, and Type.
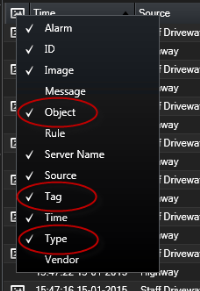
- Now Type displays all events related to LPR, Tag displays their country codes, and Object displays license plate numbers of the registered vehicles.