

Troubleshooting XProtect Hospital Assist
You haven't activated your license file. When your XProtect VMS and its devices are running in a grace period, you can't access any of the XProtect Hospital Assist features. Activate your license, then try again.
To see the loads on CPU and GPU, you must log in to your host machine and run commands from Command Prompt in Windows.:
-
The current CPU load:
ssh abcd@IP address "top -b -n 1 -o %CPU | head -n 20"
-
The current GPU load:
ssh abcd@IP Address "nvidia-smi -q -d UTILIZATION"
Where abcd is the user name and IP address is the IP address of the Processing Server.
Both commands prompt you for a password when you run them.
You have connected the Processing server to your XProtect VMS and you have installed the XProtect Processing Server Admin Plugin, but there is still no Processing Server node and tab in XProtect Management Client.
The Processing Server and your computer with XProtect Management Client are likely not on the same network or domain.
To fix it, add the IP address and the host name of the Processing Server to the hosts file on the computer with XProtect Management Client.
During the installation, upgrade, or uninstallation of the XProtect Processing Server Admin Plugin for XProtect Management Client (VideoOS.ProcessingServer.Plugin.Admin.Installer.exe), log entries are written to the XProtect Processing Server PluginI.log file that you can find in the C:\ProgramData\Milestone\Installer folder.
To see the loads on CPU and GPU, you must log in to your host machine and run commands from Command Prompt in Windows.:
-
The current CPU load:
ssh abcd@IP address "top -b -n 1 -o %CPU | head -n 20"
-
The current GPU load:
ssh abcd@IP Address "nvidia-smi -q -d UTILIZATION"
Where abcd represents the user name and IP address is the IP address of the Processing Server.
Both commands prompt you for a password when you run them.
Sometimes, the installation of the AI Bridge, Fall Detection, and supporting services may fail due to a timeout. You can review the logs for any timeout errors to see if this is the issue you're having.
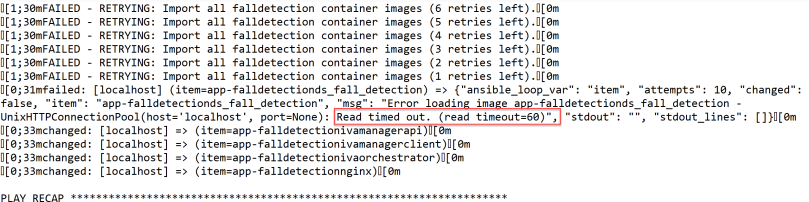
Workaround:
To fix the installation, you can increase the timeout. Follow these steps:
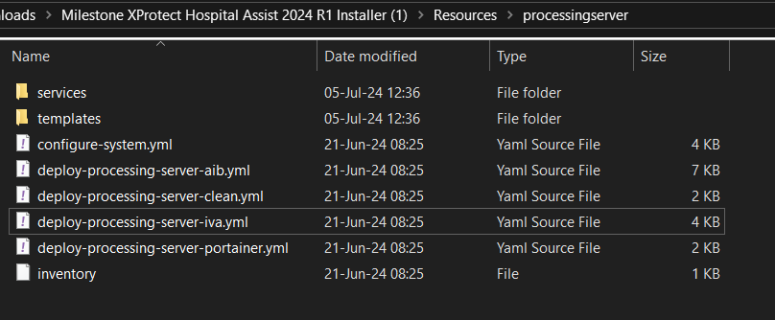
- On your installer directory, go to Resources, processingserver folder.
- Open deploy-processing-server-iva.yml using a text editor.
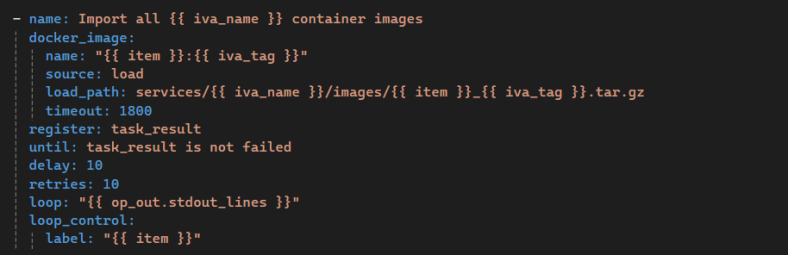
- Find the text “Import all {{ iva_name }} container images”
- Add
timeout: 1800below theload_path: services/{{ iva_name }}/images/{{ item }}_{{ iva_tag }}.tar.gz. - The parameters in the file should look like the image below.
- When you've save and updated the file, you can now use the installer to start the installation.

Note: You can also use this file to replace the original file.
Overview
Normally, the Hospital Assist Deployment Tool can reassign GPUs in Hyper-V Virtual Machines back to the Windows Server host. However, in cases where it fails to do so, you can manually reassign the GPU using the following steps.
Prerequisites
Ensure that Nvidia drivers are installed on the Windows Server. Without these drivers, the script may not correctly identify the GPU devices.
PowerShell script
Run PowerShell ISE as an Administrator.
Run the following script:
# Get the list of all VMs
$vms = Get-VM
foreach ($vm in $vms) {
if ($null -ne (Get-VM -VMName $vm.Name -ErrorAction SilentlyContinue)) {
Write-Host "Removing GPUs in VM: $($vm.Name)"
Remove-VMAssignableDevice -VMName $vm.Name -Confirm:$false
}
}
# Reassign GPUs to host
@(Get-PnpDevice | Where-Object { $_.Manufacturer -eq "NVIDIA" -and $_.Class -eq "Display" }) | ForEach-Object {
$InstanceId = $_.InstanceId
$LocationPath = (Get-PnpDeviceProperty -KeyName DEVPKEY_Device_LocationPaths -InstanceId $InstanceId).Data[0]
Write-Host "Reassigning GPU to host. Location path: $LocationPath"
Mount-VmHostAssignableDevice -LocationPath $LocationPath
Enable-PnpDevice -InstanceId $InstanceId -Confirm:$false
}
Write-Output "All GPUs have been reassigned back to the Windows Server host."
-
In some cases, running the script may produce errors when reassigning GPUs to the host. As long as the GPU appears in Device Manager, the reassignment is successful.
Sample:

On Step 5 of 6 of the Hospital Assist Deployment Tool, you need to connect through the target Ubuntu Server.
If you receive an error saying Cannot connect to the Ubuntu Server, you can check the following options:
- Ensure the credentials you've entered on the page are correct.
- Ensure the machine name/IP address of the Ubuntu server is correct.
- If options 1 and 2 don’t fix the issue, check the installer logs for the message: The file was skipped because of the following validation exception: AuthorizationManager check failed.
- To fix this issue, unblock all the files to enable the installer to be run. Use the following script:
$directory = [Location of installer, for example "C:\Milestone XProtect Hospital Assist 2024 R1 Installer"]
$files = Get-ChildItem -Path $directory -Recurse
foreach ($file in $files ) {
Unblock-File -Path $file.FullName
}