Bosch Integration
Integration Summary
VMS Partner | Product | Version | Last Tested BriefCam Version | Integration Level | H.265 Support |
Bosch | BVMS Bosch Video Security | 13.0 | 2025 R1 SP1 | Real time alerts integration (L2a) | Yes |
Bosch | BVMS Bosch Video Security | 12.2 | 2025 R1 SP1 | Real time alerts integration (L2a) | Yes |
Bosch | BVMS Bosch Video Security | 11 | 6.3 | Integration for on-demand and real-time (L2) | Yes |
Bosch 13.0 and Bosch 12.2
Prerequisites
Prior to installing the Bosch SDK and BriefCam plugins, ensure the following:
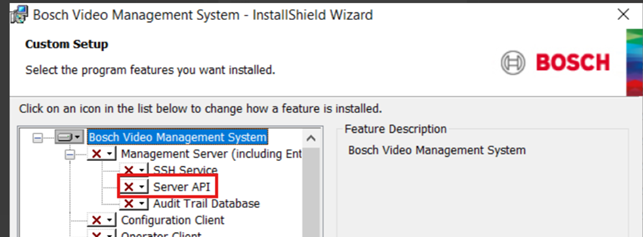
The Bosch Server API is installed on every Bosch Management server.
The Server API is listening on port 5399.
BriefCam has access to the machine/s and port 5399 where the Server API is installed.
VMS SDK
Prior to the plugin installation, install theVideoSDK.07.00.0046.x64 Bosch SDK on all machines where the BriefCam BVMS plugin will be installed.
Bosch Credentials
To set up the Bosch integration you will need the following credentials:
Bosch VMS administrator user credentials
Bosch VRM service account credentials
Bosch VRM device service account credentials
Bosch VSG service credentials
All the credentials can be retrieved from the BVMS Configuration Client.
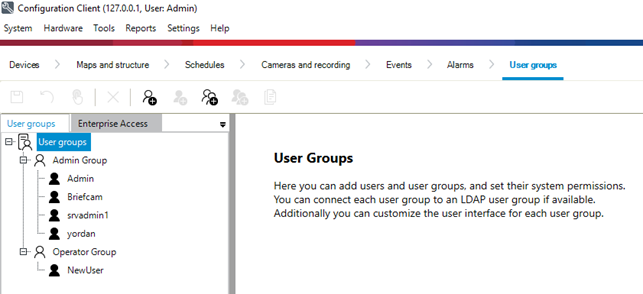
Bosch VMS administrator user credentials
These credentials are available at: User Groups > Admin Groups.
Bosch VRM service account credentials
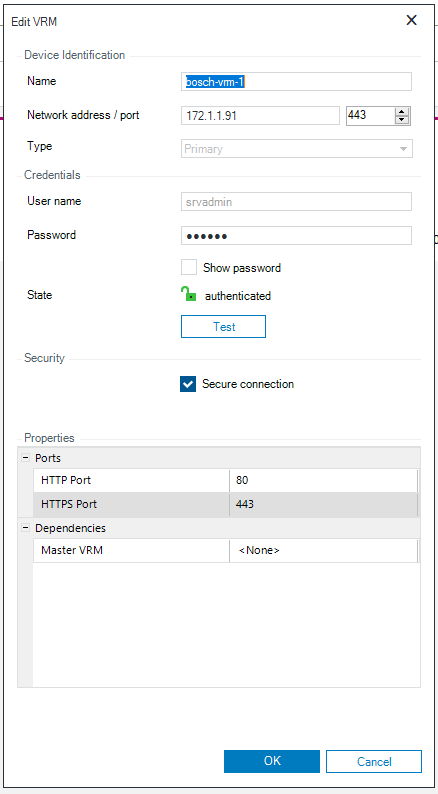
These credentials are available at: Devices > Device Tree > VRM Devices > Specific VRM.
Right-click on the required VRM.
Select Edit VRM Device.
To see the password, click the Show Passwords check box.
Bosch VRM device service account credentials
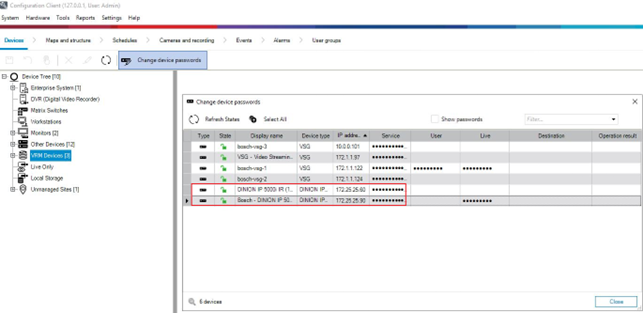
These credentials are available at: Devices > Device Tree > VRM Devices > Specific VRM Device (Bosch Cameras).
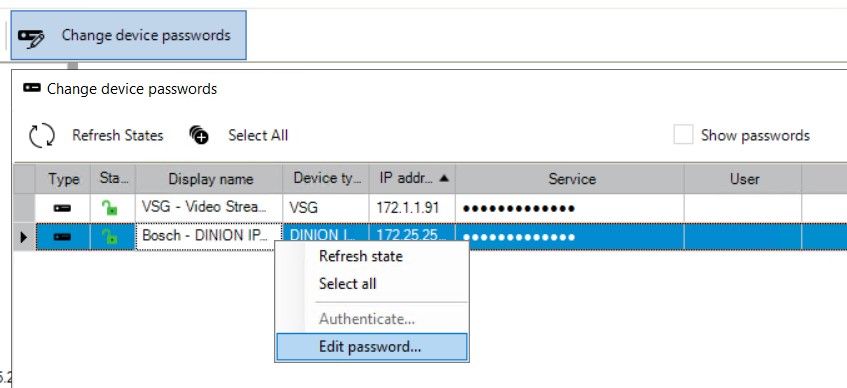
Select a VRM device and click the Change Device Passwords tab.
To see the password, click the Show Passwords check box.
Bosch VSG service account credentials
These credentials are available at: Devices > Device Tree > VRM Devices > Specific VSG (VSG ONVIF Service).
Select a VSG and click on Change Device Passwords.
To see the password, click the Show Passwords check box.
Installing and Configuring the Bosch Integration
Install BriefCam’s Bosch plugin.
Go to
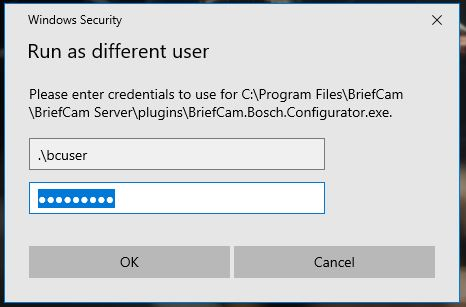
{BriefCamServerDirectory}/plugins, right-click onBriefCam.Bosch.Configurator.exeand select Run as a Different User.To enable live streams, you will run the BriefCam Bosch Configurator on each VSServer and Alert Processing Server machine.Enter the credentials for the Windows user running BriefCam services. This is usually the default bcuser user.
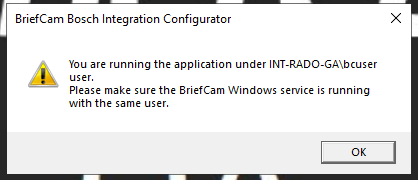
When the application is started successfully you should see a prompt confirming that the selected user is used.
The application initial screen is shown.
Click the Load button to load existing configuration data, or if no data is present create a new configuration data file.
If there is no data, fill in the multiple tabs in the BriefCam Bosch Integration Configurator.
The JSON data must be copied and distributed to all machines that will run the BriefCam services and Bosch plugin.
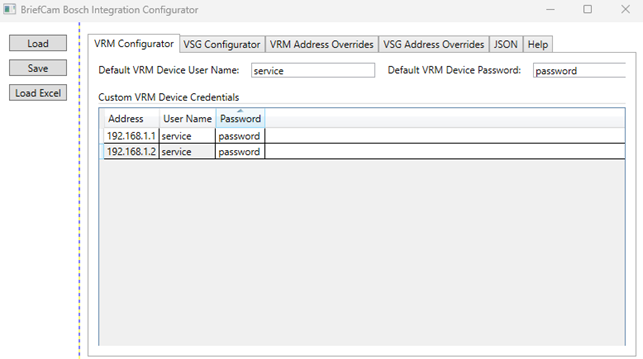
VRM Configurator – This tab is used to set up default and custom credentials for all cameras added as VRM devices (Bosch cameras). To find these credentials, see the Bosch VRM device service account credentials section in the Bosch Integration topic.
VRM Configurator – This tab is used to set up default and custom credentials for all cameras added as VRM devices (Bosch cameras). To find these credentials, see the Bosch VRM device service account credentials section in the Bosch Integration topic.
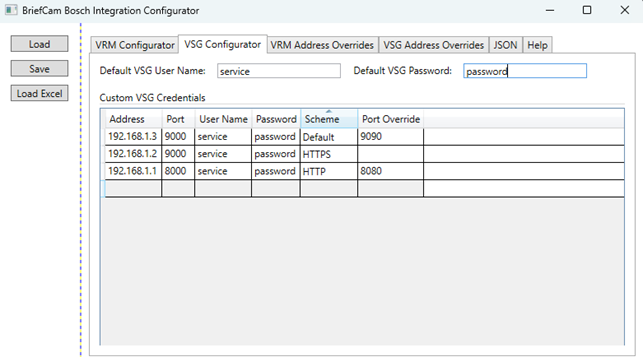
VSG Configurator – This tab is used to set up default and custom credentials for all VSG Server instances. To find these credentials, see the Bosch VSG service account credentials section in the Bosch Integration topic. When clicking Save configurations are committed to the configuration.data file and encrypted.
Note
Address overrides are needed for supporting multi-sensor cameras.
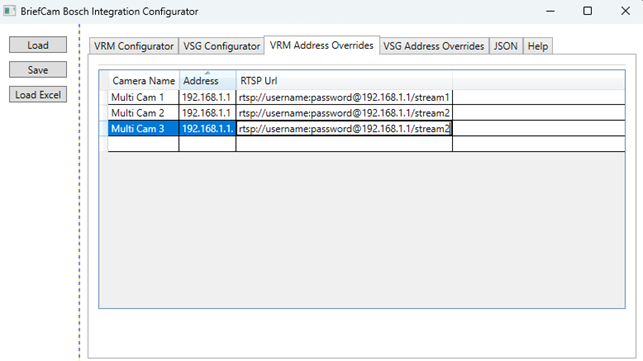
VRM Address Overrides – This tab is used to set up an explicit override RTSP address for a given VRM camera name.
For each stream, from a multi-sensor camera, a row needs to be defined with the Camera Name, Camera Address, and a valid RTSP URL.
The camera names need to be exactly as they are shown in the VMS. Any trailing or beginning spaces, for example, will not match the camera name.
RTSP URLs should have credentials included in the URL, if the RTSP is secured.
The overridden URLs will be used when BriefCam is requesting live stream URLs for specified cameras.
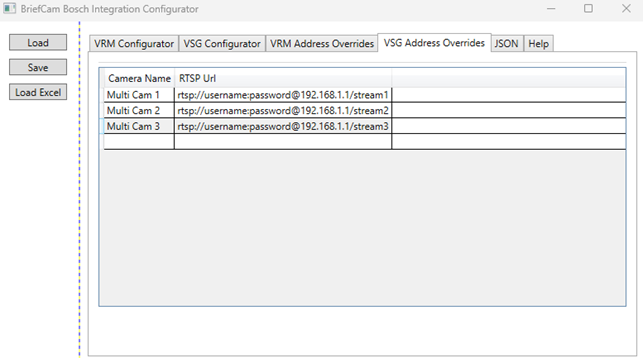
VSG Address Overrides – This tab is used to set up an explicit override RTSP address for a given VRM camera name.
For each stream, from a multi-sensor camera, a row needs to be defined with the Camera Name, Camera Address, and a valid RTSP URL.
The camera names need to be exactly as they are shown in the VMS. Any trailing or beginning spaces, for example, will not match the camera name.
RTSP URLs should have credentials included in the URL, if the RTSP is secured.
The overridden URLs will be used when BriefCam is requesting live stream URLs for specified cameras.
JSON – This is the plain JSON config created from the previous four tabs. From the main machine you need to copy and distribute this JSON data machines that will run the BriefCam services and Bosch plugin.
Help - Help information for tabs 1-5.
Click Save. The configurations will be saved to the
configuration.datafile and encrypted. The contents of theconfiguration.datafile can be found in the JSON tab in the application.Copy the data from the JSON tab.
Run the configurator on every other machine and in the JSON tab on the other machines, copy the data from the first machine's JSON tab exactly as-is.
Important
The JSON data must be copied and distributed to all machines that will run the BriefCam services and Bosch plugin.
Settings can be edited both in the JSON file and in the Input Files and Configurator tabs.
Alternatively, the credentials can be loaded in the Configurator application using Excel files as described below.
Loading credentials using an Excel file
All VRM and VSG credentials can be loaded in the Configurator application using Excel files (xlsx or xls format) in the following structure:

Each row should start with the type of credentials either VRM or VSG.
The VRM rows should have four values – Type {VRM}, VRM Device Address, VRM Device Username, VRM Device Password
The VSG rows should have five values – Type {VSG}, VSG Server Address, VSG Instance Port, VSG Username, VSG Password
Values from the Excel file will be loaded row by row into respective configurator tabs, and can be viewed/modified after loading.
Once this configuration is done, you can proceed with adding the directories in the BriefCam Administrator Console.
Connecting to the Bosch VMS
In the BriefCam Administrator Console, open the Camera Management section.
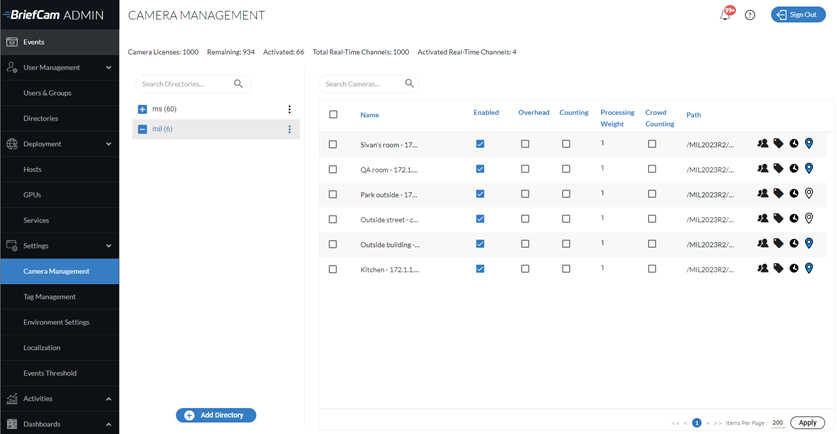
Click the Add directory button.
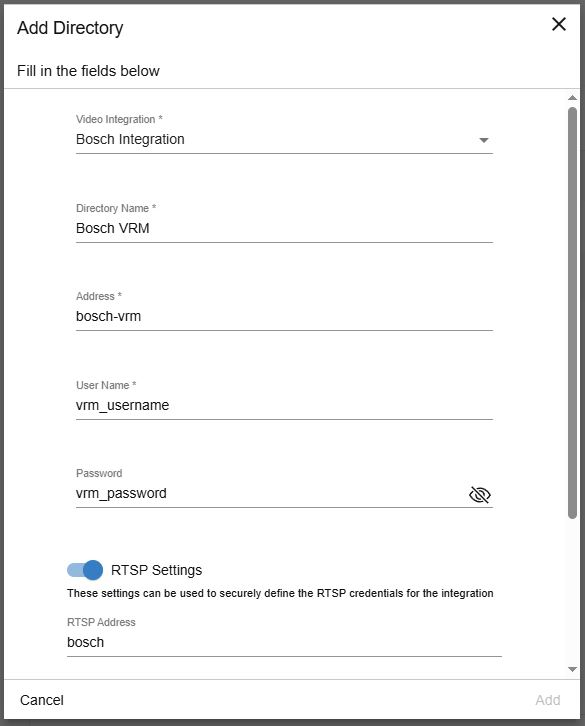
From the Video Integration field, select Bosch Integration
In the Directory Name field, enter a name.
In the Address, User Name, and Password fields, enter the Bosch VRM service account credentials.
Enable the RTSP settings toggle.
In the RTSP Settings section, enter the Bosch VMS administrator user credentials.
Click Add.
Enabling sending of alerts (L2a) on Bosch VMS
The instructions below are for sending alerts in Bosch 13.0. For sending alerts in Bosch 12.2, see the Bosch 12.2 section.
Open the Bosch Configuration Client and do the following:
Navigate to Maps and Structure.
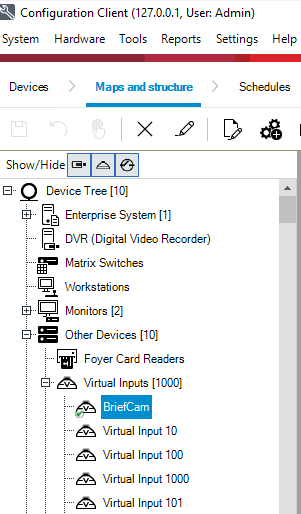
From the Device Tree, navigate to Other Devices -> Virtual Inputs.
Rename one of the available default Virtual Inputs or add a new one, such as Virtual Input to
BriefCam. All RESPOND alerts will be received in this Virtual Input namedBriefCam.Drag and drop the renamed Virtual Input to the logical tree.
Save the changes.
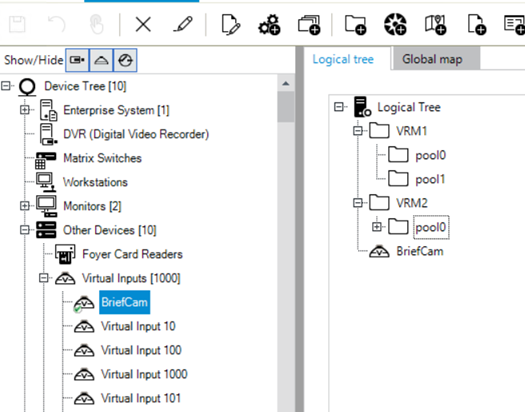
If there are no available default Virtual Inputs, do the following:
Navigate to the Device Tree.
Navigate to Other Devices -> Virtual Inputs.
Click the button and add a new Virtual Input with the name
BriefCam. All RESPOND alerts will be received in this Virtual Input namedBriefCam.Navigate to Maps and Structure.
From the Device Tree, navigate to Other Devices -> Virtual Inputs.
Drag and drop the renamed Virtual Input to the logical tree.
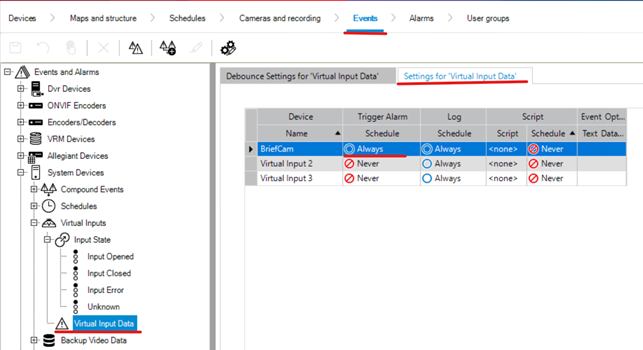
Navigate to Events.
From the Device Tree, navigate to Other Devices -> Virtual Inputs -> Input State -> Virtual Input Data.
Select Settings for the Virtual Input Data tab.
Set the Trigger Alarm's Schedule to Always for the newly added Virtual Input named
BriefCam.Save the changes.
In the Operator Client, the alarms will look similar to the image below.
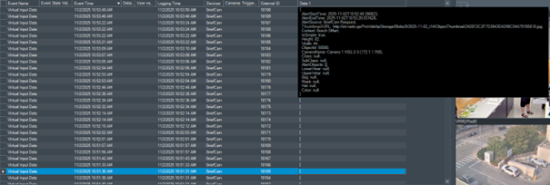
When an operator hovers over the Data field, the text of the alarm will be shown.
Or, if an operator selects an alarm and clicks on the Text Data button, a pop-up will be displayed with the text of the alarm.
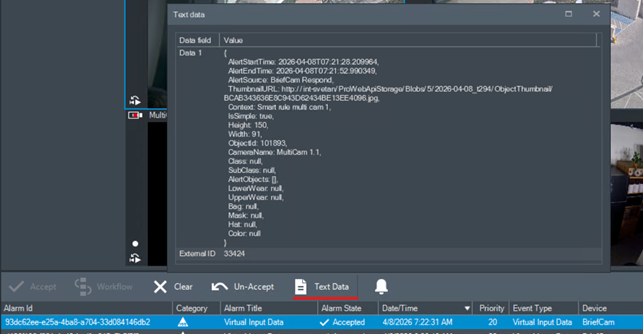
The External ID column is the ID of the alarm in BriefCam.
The Devices column is the Virtual Input Device that was set up in the previous steps.
Open the Bosch Configuration Client and do the following:
Navigate to Maps and Structure.
From the Device tree, navigate to Other Devices -> Virtual Inputs.
Rename one of the available default Virtual Inputs, such as Virtual Input 1 to
BriefCam. All RESPOND alerts will be received in this Virtual Input named BriefCam.Save the changes.
In the Operator Client the alarms will look similar to the image below.
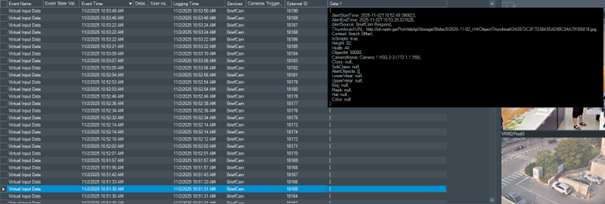
When an opreator hovers over the Data field, the text of the alarm will be shown.
The External ID column is the ID of the alarm in BriefCam.
The Devices column is the Virutal Input Device that was set up in the previous steps.
Troubleshooting with Custom Version Video Integration Tester
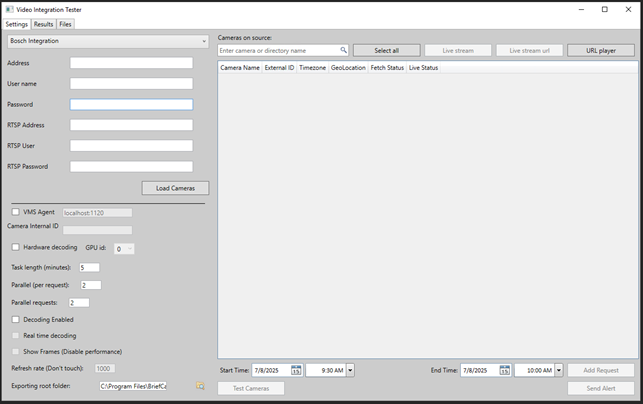
There is a custom version of the Video Integration Tester (VIT) that supports the Bosch plugin. This will provide the ability to troubleshoot recorder video, live streams and general functionality of the Bosch plugin.
It can provide RTSP credentials and work with the implementation of the Bosch plugin.
Run the VIT as the BriefCam Service User to enable decryption of the configuration.data file.
Use the same VRM and VMS credentials that are configured in the BriefCam Administrator Console to ensure consistent access and authentication.
Bosch 11
VMS SDK
Prior to the plugin installation, install the relevant Bosch SDK (
6 videosdk06120078x64) on the BriefCam server.If the OX6.OnDemand Service and/or OX6.RealTime Service is installed on a dedicated machine, also install the Bosch SDK on that machine.
Connecting to the Bosch VMS
Note
If the Bosch VRM is installed on a separate machine and not on the VMS, in the BriefCam Administrator Console’s Add Directory screen’s Address field, specify the VRM’s IP address and not the VMS’s IP address.
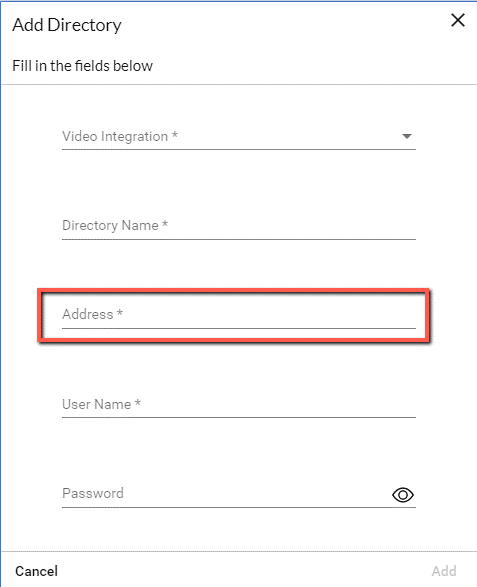
Log in to the Bosch 11 VMS using the Bosch VRM’s default user called srvadmin (this is the only user that you can use).
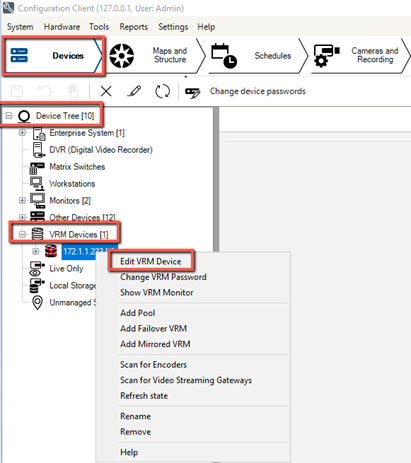
In the Bosch Configuration Client, go to Devices.
In the Device Tree, navigate to VRM Devices and right-click on the main device.
Select Edit VRM device.
In the Edit VRM screen, check the Show password checkbox. The username (
srvadmin) and the password that you set here must be used to connect to Bosch VMS, retrieve cameras and export video.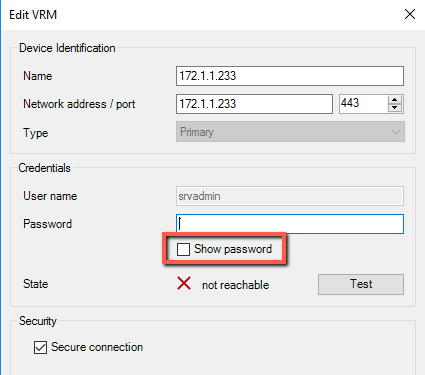
Navigate to VRM Devices, the main VRM, and Pool 0.
Right-click on the video streaming gateway (
vsg2in the image below) and select Edit Video Streaming Gateway.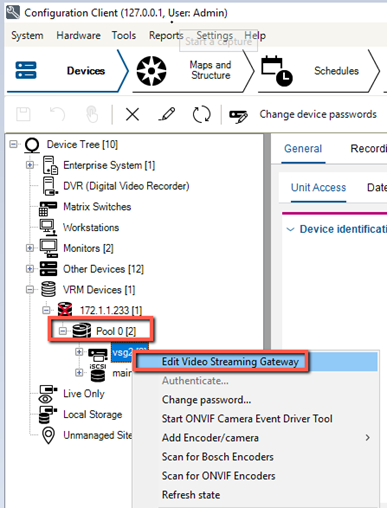
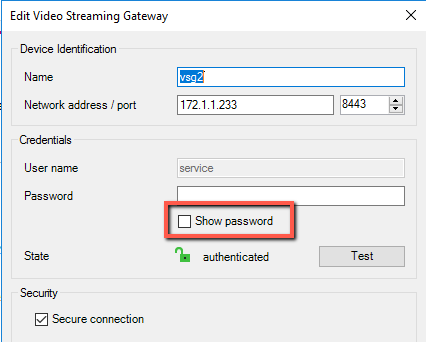
In Edit Video Streaming Gateway screen, check the Show password checkbox.
Note
To support both VRM and VSG cameras, you need to use same password for VSG and all VRM devices.
Enabling Live Video Streaming for Bosch 11
To enable live video streaming for Bosch 11, make the following changes in the BriefCam.Bosch6Fetcher.ini file:
Make sure the
Usersetting is set toservice. For earlier Bosch versions, do not change this setting.In the
User NameandPasswordsettings, enter the password from the Edit Video Streaming Gateway screen (as shown in the image below).Note
All cameras that are configured in the VMS with this user name and password will work with the live video stream.
In the
Portsetting, enter the port from the Network port field from the Edit Video Streaming Gateway screen (as shown in the image below).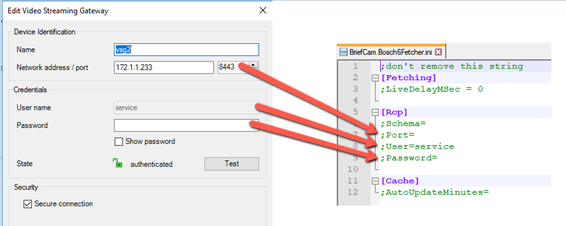
If the Secure connection checkbox is unchecked in the screen above, set the
Schemasetting tohttp.Enter the following section to the .ini file and fill in the credentials:
[Live] OnvifUser=service OnvifPassword=xxxxxxxxxxxxxxxRemove the semicolon before any setting that you changed.
Restart the BriefCam services.
Bosch Settings in BriefCam
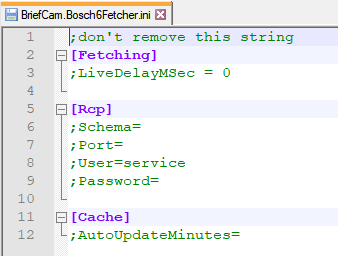
The BriefCam.Bosch6Fetcher.ini file (located by default at C:\Program Files\BriefCam\BriefCam Server\plugins) includes the following settings:
Setting | Description |
| When configuring the RESPOND module to use Bosch cameras, the timestamp is not delivered as part of the RTSP stream. As a result, BriefCam uses the local system time as the stream time minus a configurable time lag to represent network and systems latency. This time lag can be configured in the |
| Set which schema to use: |
| The port of the video streaming gateway. The default is |
| The username for the video streaming gateway. For Bosch 11 and above, set this to |
| The video streaming gateway password for the user. For Bosch 11 and above, set a password and remove the semicolon. Remember that you need to use same password for VSG and all VRM devices. This setting is only relevant for Bosch 11. |
| How often in minutes to check if a change was made to the ONVIF camera configuration and update the cache. |
Known Limitations
In Bosch 11, only one pool installed on the same machine as the VMS is supported.
Bounding boxes when playing the original video are not supported.
When configuring the RESPOND module to use Bosch cameras, the timestamp is not delivered as part of the RTSP stream. As a result, BriefCam uses the local system time as the stream time minus a configurable time lag to represent network and systems latency. This time lag can be configured in
BriefCam.Bosch6Fetcher.ini->LiveDelayMSecproperty (default is0, meaning no delay).