Next-Gen Engine Deployment
Prerequisites
A minimum of two servers (virtual or physical) are required to use the Next-Gen engine:
One server that runs Windows. Note that a GPU is not needed on the Windows server unless on-demand processing is required.
One server with a GPU that runs RedHat 8.9 or Linux Ubuntu 22.04.2 Server edition (for 2025 R1) or Linux Ubuntu 24.04.2 Server edition (for 2025 R1 SP1). This server will run the OX6 engine. The Linux GPU is for real-time (RESPOND and Continuous RESEARCH) processing only. Note that the Linux version can be upgraded after the installation.
The time between the Windows and Linux servers must match exactly.
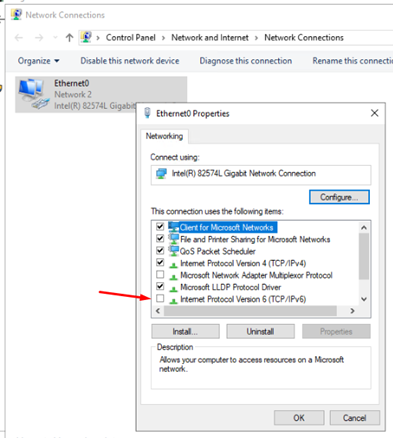
On the Windows server, disable IPv6 on the Network interfaces.
All servers must have a supported GPU. For a list of supported GPUs, see the BriefCam installation Guide.
On the Linux server:
All hostnames used in the OX6 deployment must be externally resolvable, rather than being locally resolvable through the local hosts file. Alternatively, IP addresses can be used.
The openssh-server feature should be enabled.
A sudo-enabled account is required for installation. The account can be disabled after the installation.
At least 150+ GB free disk space. Average disk use for a single 1080p channel is 2.2GB and for a 4k channel is 4.7GB.
Configured static IP address with a default gateway (even in an offline environment without internet access). The default gateway can be a fictive address.
Full and non-restricted connectivity to BriefCam Servers is required.
Secure boot on the Linux machine has to be disabled.
The Linux Host address must not overlap with 172.17.0.0/16.
The installation of Linux should be done on an environment that is not connected to the internet. This is to prevent newer packages from being installed, which may prevent a successful installation. The necessary dependencies are installed by the installer. Alternatively, make sure that no OS updates are applied to the base Ubuntu or RedHat installation.
The Linux server should not be updated or installed with Nvidia drivers – This will be done by the BriefCam installer.
For best performance, 10 GB of network bandwidth and SSD disks are recommended.
Usage of the ext4 file system is encouraged, as its size can be enlarged and reduced if required (xfs does not support size reduction).
Windows Server
You first must configure the Windows Server.
Note
If you are upgrading, make sure to stop all the services in the BriefCam Administrator Console before upgrading.
On the Windows server, carry out the following steps in this order:
Download the
BriefCamOX6Installer_<build>_encrypted.shpackage from BriefCam’s Installation Downloads page.Open the following ports manually in the firewall:
Port
Service
Comment
5672
RabbitMQ
Message broker
1120
OX6.VMSAdapterService
RTSP Port
8554
OX6.VMSAdapterService
GRPC port
5002
OX6.EngineGatwayService
GRPC Port
5011
OX6.VisualAssetsService
HTTP
You can open the ports manually by running the following PowerShell command:
New-NetFirewallRule -DisplayName "RabbitMQ Port" -Direction Inbound -Protocol TCP -LocalPort 5672 -Action Allow; New-NetFirewallRule -DisplayName "OX6 VmsAdapter Grpc Port" -Direction Inbound -Protocol TCP -LocalPort 1120 -Action Allow; New-NetFirewallRule -DisplayName "OX6 VmsAdapter RTSP Port" -Direction Inbound -Protocol TCP -LocalPort 8554 -Action Allow; New-NetFirewallRule -DisplayName "OX6 EngineGatewayService Grpc Port" -Direction Inbound -Protocol TCP -LocalPort 5002 -Action Allow; New-NetFirewallRule -DisplayName "OX6 VisualAssetsService HTTP Port" -Direction Inbound -Protocol TCP -LocalPort 5011 -Action Allow;Install BriefCam (PostgreSQL, RabbitMQ, Server, and Web Services) and any relevant VMS plugin. For additional information about required prerequisites and installation, see Prerequisites.
(Optional). Install the RESEARCH component.
Activate the BriefCam license.
Run the NGINX installer on the Windows server. When installing a small site, you will usually install NGINX on the same server where the web services are installed. For larger sites, NGINX should be installed on a dedicated server. For additional information, see Installing and Configuring NGINX.
Log into the BriefCam Administrator Console (
http://xxx.xxx.xxx.xxx/adminorhttp://[computer name]/admin).If this is a clean installation:
Log in with the following initial credentials:
Username: Administrator
Password: changeit
Change the password.
Linux Server
After you’ve installed the Windows server, you’ll install the Linux server components by carrying out the following steps in this order:
Install the Linux Server Components and Configure the Cluster
STEP 1: Transferring and Preparing the Package
Use one of the standard file management utilities, such as SCP, to transfer the file from the Windows machine to the Linux machine. You downloaded this file in step 1 of the Windows Server section above.
Unzip the installation file by running the following command:
unzip BriefCamOX6Installer_<build>_encrypted.zip.
This package will check the prerequisites, install the NVIDIA driver and install the Linux components. The script also makes sure that updates to the Linux operating system cannot be downloaded and installed from the internet. Since the script includes everything that you need to verify and install the missing prerequisites, this means that once it is downloaded, it can be installed while offline.
STEP 2: Run the Installer
Note that:
The installer needs to be executed by a sudo-enabled account, which can be disabled after the installation.
All hostnames used in the OX6 deployment must be externally resolvable, rather than being locally resolvable through the local hosts file. Alternatively, IP addresses can be used.
The installer creates a system user: BCUser, which is used for containers operation. This user is not privileged/root level.
The password for the user used to install the OX6 engine can be set/changed at any time without adverse effects on OX6 operation.
Make the script executable by running the following command:
sudo chmod +x BriefCamOX6Installer_<build>_encrypted.sh.You’ll now run the following command (the password should be surrounded by single quotes as in the example below):
sudo ./BriefCamOX6Installer_<build>_encrypted.sh –-windows-server-node {hostname or IP address of the host where BOA, Admin applications and RabbitMQ are located surrounded by single quotes} –rabbitmq-password {'RABBITMQ PASSWORD'}For example:
sudo ./BriefCamOX6Installer_21402_encrypted.sh –-windows-server-node '172.1.1.200' --rabbitmq-password 'GFRS234'
Note that the RabbitMQ password can be found in the RabbitMQ.ConnectionString environment setting.
To view the readme file, use the following command:
sudo ./install_k8s_NNNNNN_encrypted.sh –helpThere are additional flags that you can add to the command above:
--license-node– This points to the host where the license server is located. This is mandatory when the package is encrypted and the license node is different than thewindows-server-node. Set here either a hostname or IP address.--rabbitmq-server-node– This points to the host where the RabbitMQ server is located. This is mandatory only if the RabbitMQ node is different than thewindows-server-node. Set here either a hostname or IP address.--rabbitmq-username– This points to the RabbitMQ username. During the RabbitMQ installation, there is a way to modify the user. If the user is modified, this flag is mandatory. Note that the RabbitMQ username can be found in the RabbitMQ.ConnectionString environment setting.--Just-extract– This flag can be used to extract the content of the archive without actually running the installation.--no-extract– This flag can be used to skip the extraction and just run the installation.--allow-self-signed– Use this if you are using SSL and a self-signed certificate.--skip-disk-space-check– Skips the disk space checks performed by the installer.
Note
To skip the BOA check, input "localhost" under the --windows-server-node parameter. In this case, you must provide the relevant RabbitMQ and license node values.
The yellow texts are warnings and the red texts are errors that you must correct before continuing. If you receive the following warning, rerun the script.
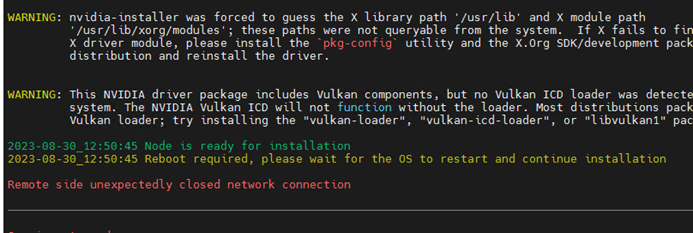
If the script fails with this error: Local time in <TIME> and BOA server time do not match, verify that the NTP servers are reachable, run the following command: systemctl restart systemd-timesyncd.service to restart the time sync service, and rerun the script.
If you see any other red error, do not proceed with the following steps and contact BriefCam Support.
When the prerequisites check is successful, you’ll see the following message (in green):
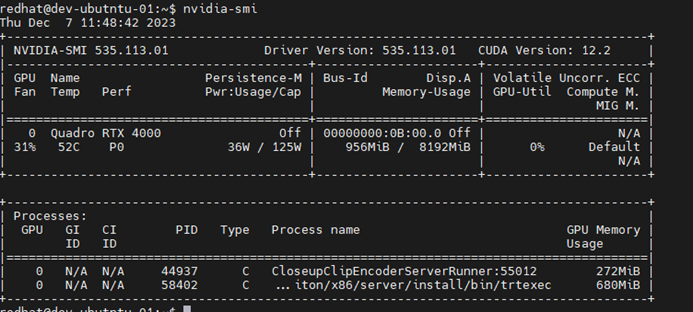
Node is ready for installation.The server will reboot during the process. Once the server has been rebooted, you can use the nvidia-smi command to verify that the NVIDIA driver is properly installed and the GPU is accessible to the operating system (as seen in the image below).
Carry out the following steps to optimize the handling of the log files:
a. Open the daemon.json file (located at: /etc/docker/) and after the “log-driver”: “json-file”, row, add the following lines:
"log-opts": {
"max-size": "100m",
"max-file": "3"
}
b. Run the following commands:
sudo systemctl restart docker
sudo service docker restart
Note:
Logs are saved on the Linux host server at /var/log/briefcam/.
Downloading logs requires hostname resolution from the client running the admin application to the Linux machine.
Adding Additional Nodes (optional)
After the deployment finishes, you can add additional nodes to the OX cluster using the same method as you used for adding the first node.
Engine Warmup
Note that once the installer finishes successfully, the warmup will take, on average, 60-90 minutes. During the warmup, the OX6.Engine Service will appear as Start Pending in the BriefCam Administrator Console, but it cannot be used or restarted until the warmup has finished successfully. When the status of the services changes to Running, the warmup has finished.
Deployment Locations
The docker image is located in the default docker storage directory:
/var/lib/docker.The host controller is deployed to:
/opt/briefcam, with configuration files located at:/etc/briefcam.The log files are located at:
/var/log/briefcam. For additional information, see the Logs section.
Configuration
Log into the BriefCam Administrator Console. From the Deployment section, open the Hosts screen.
Note
If you do not see the Linux host in the table, log out, clear the browser cache, and log in again.
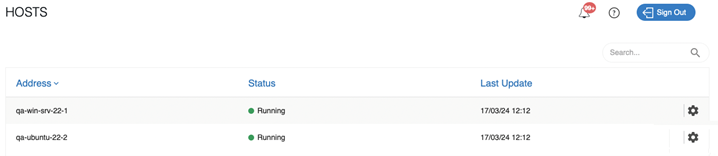
For the Windows host, click on the settings icon and select the OX6 Main Server template.
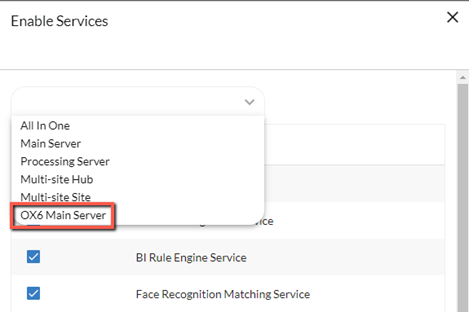
This will select all the relevant services, including the five OX6 services:
Common Platform API
OX6.Engine Gateway Service
OX6.Visual Assets Service
OX6.VMS Adapter
Task Management Service
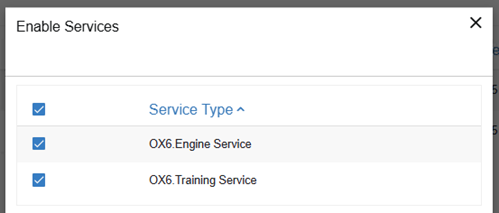
For the Linux host, click on the settings icon and select the OX6.Engine Service and the OX6.Training Service.
Open the GPUs section.
Click the edit button.
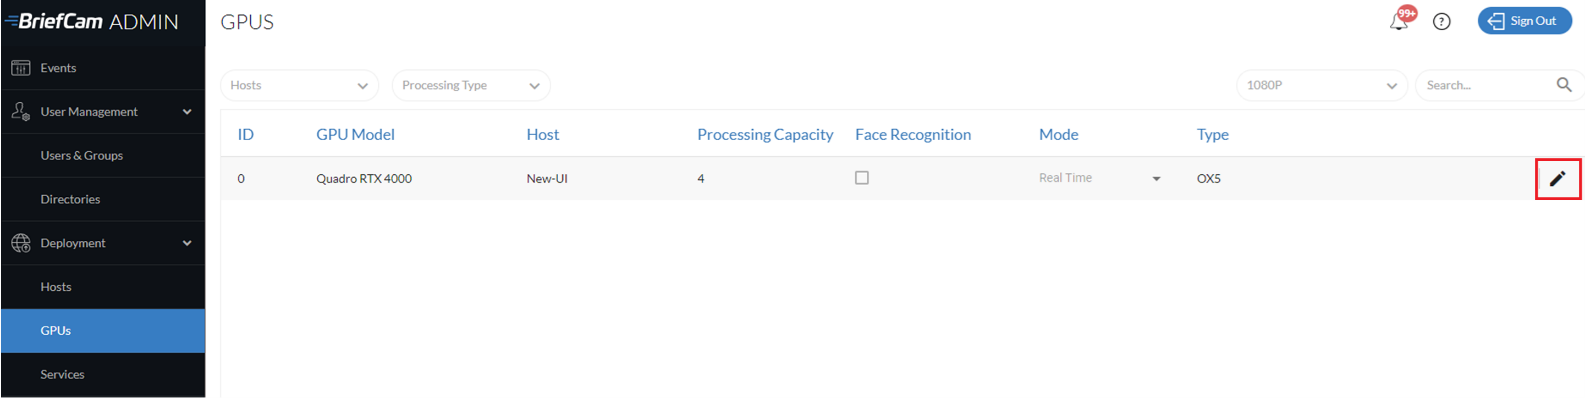
Configure the Processing Capacity using the table below (for 1080p cameras, 15 FPS, and medium activity). Find the GPU that best describes your environment and copy the value from the Real-time channels column into the GPUs screen’s Processing Capacity column.
Engine
GPU
Real-time channels*
Windows-based OX5
Ampere A10
30
Ampere RTX A2000
23
Ampere RTX A4000
30
Ada RTX4080 (for laptops only)
28
Ada L4
30
Set the Mode column to Real Time.
If you edit the GPU entry, click the Update button. When you click this button, the updated settings are pushed to the Next-Gen server.

Make sure that the EnableOX6Realtime environment setting is set to
true.
Set the Rendering.SynopsisObjectClipValidation environment setting to
true.Set and/or verify the following additional environment settings:
CommonPlatfromAPI.ServiceURL
LoadBalancerAddress – The IP address of NGINX or the IP address of the BriefCam instance in an all-in-one environment (that does not use NGINX). This is the hostname or FQDN that the engine will receive to communicate with the VMS Agent and Processing Gateway endpoints.
OX6.CloseupClipMaxDurationSec – The maximum duration for a close-up clip in seconds. The default value is 60 seconds (in 2024 M1 HF1 and above; in 2024 M1, the default was 20 seconds). A value of 0 disables the limit (but may significantly affect performance).
OX6.VMSAdapterGRPCInternalPort – The OX6.VMS Adapter service’s listener port.
OX6.VmsAdapterGrpcPort – The OX6.VMS Adapter's GRPC port. The value will be sent to the OX6.Engine Service. For all-in-one environments that are not using NGINX, make sure that the value in this setting is identical to the OX6.VMSAdapterGRPCInternalPort value. For installations using NGINX, this setting should be set to the NGINX port and NGINX should be configured to point to the OX6.VMS Adapter.
OX6.EngineOutputGatewayGrpcPortInternal – The OX6.Engine Gateway Service’s listener port.
OX6.EngineOutputGatewayGrpcPort – The OX6.Engine Gateway Service’s GRPC port. This setting will be sent to the OX6.Engine Service. For all-in-one environments that are not using NGINX, make sure that the value in this setting is identical to the EngineOutputGatewayGrpcPortInternal value. For installations using NGINX, this setting should be set to the NGINX port with the OX6.Engine Gateway Service’s upstream configured.
OX6.VisualAssetsService.InternalPort – The OX6.Visual Asset Service’s listener port.
OX6.VisualAssetsService.ExternalPort – The Visual Assets Service’s HTTP port. The value will be sent to the OX6.Engine Service. For all-in-one environments that are not using NGINX, make sure that the value in this setting is identical to the OX6.VisualAssetsService.InternalPort value. For installations using NGINX, this setting should be set to the NGINX port and NGINX should be configured to point to the Visual Assets Service.
If you change any of the OX6 environment settings after the initial configuration, you need to:
From the BriefCam Administrator Console, restart the following OX6 services: OX6.Engine Gateway Service, OX6.VMS Adapter, and Task Management Service.
In the OX6 GPUs tab, click the edit button for each active server and click the Update button. (This will restart the OX6.Engine Service.)
If you change the internal or external ports you need to update the NGINX configuration file and restart NGINX.
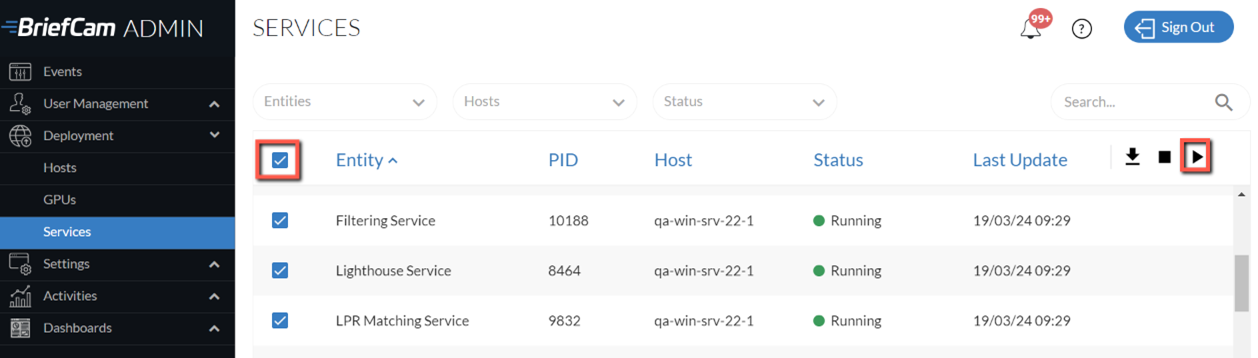
In the Services section, start all the services.
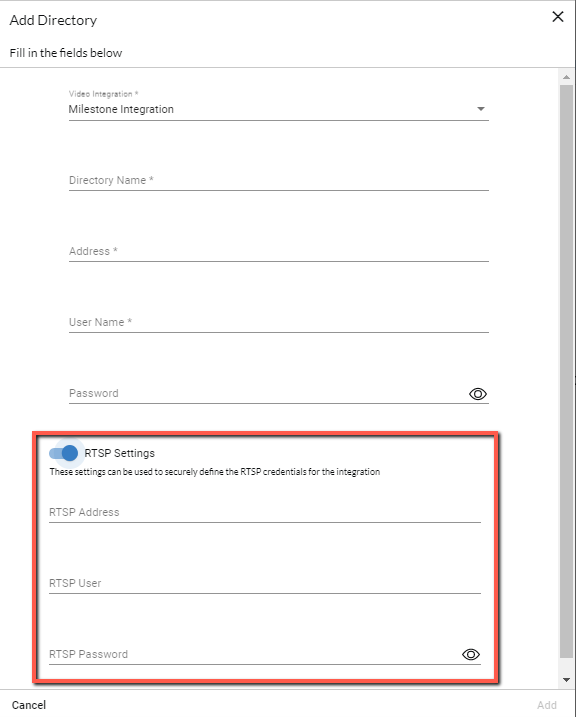
Add the VMS directory as follows:
Open the Camera Management section.
Click the Add Directory button.
From the Video Integration field, select the appropriate VMS integration option. Different integrations can be added by installing additional VMS-specific plugins.
In the Directory Name field, enter a display name for the user directory.
In the Address field, enter the VMS server’s IP address. If you are not using the default port (80), add the communication port (the port number may be specified as a suffix to the address, preceded by a colon).
In the User Name and Password fields, enter the VMS server user name and password. This user must have permissions in the VMS to the cameras exposed for BriefCam.
Click Add to add the directory.
For Milestone and Genetec integrations, scroll down and enable the RTSP Settings option.
Set the RTSP IP address, user name, and password. The RTSP user name and password can be different than the user name and password of the VMS.
Note
If you installed Milestone’s Open Network Bridge, use the username and password that were created when installing the Open Network Bridge.
To test the connection to the newly added directory, click the vertical ellipsis (
 ) icon to the right of a directory (VMS server) name and select the Test Connection option.
Add cameras and users. For additional information, see Camera and VMS Configuration and User and Group Management.
From the BriefCam Administrator Console, restart the VS Server service.
Restart IIS.