Replicating the BriefCam PostgreSQL Database
This section details how to streamline the replication of the PostgreSQL database.
Prerequisites, Notes, and Conventions
Note
Use Windows PowerShell and not Command Prompt (cmd) while pasting commands from the samples in this document.
If the primary server space is sufficient, perform a full backup of the database (using the pg_dump tool) before attempting to create the replica.
Make a note of the primary server’s IP address. Later in this document it will be referred to as <primaryIP>.
Make a note of the secondary server’s IP address. Later in this document it will be referred to as <secondaryIP>.
In the PGSQL server, the following three BriefCam installation components need to all be set to either the hostname or the IP address. Make sure that they are all using the same method (to ensure consistency). You do this by looking for the PostgreSQL
connectionStringin the following files or settings:VS Server:
C:\Program Files\BriefCam\BriefCam Server\VSServer.exe.configWeb Services:
C:\Program Files\BriefCam\WebServices\ProWebApi\Web.configQlik (RESEARCH): ODBC 64-bit entries (Server field)
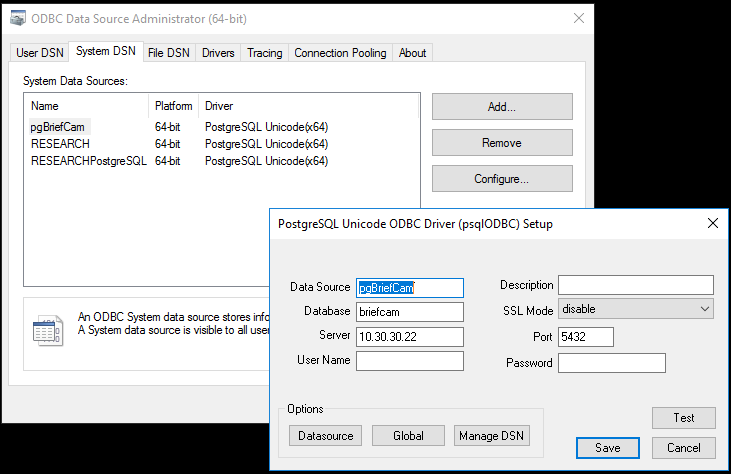
It is recommended to test the full functionality of the systems before creating the secondary server. Make sure to take note of all of the original values of the parameters you change.
On all of the servers where the BriefCam Server components are deployed, set the hosts file to point to the primary PostgreSQL database server – this will override the DNS.
In the BriefCam Administrator Console, open the Environment Settings section and set the DB.LocalStorageAddress and VideoProductsPath settings to use hostnames and not IP addresses.
The speed of PostgreSQL base_backup significantly varies depending on the environment setup (SSD/HDD/NIC speed). As a rule of thumb, on ISCSI storage (10 Gbps links HDD array) and 1 Gbps network NIC (vmxnet3) in a virtual environment, it takes about 40 minutes to perform a base backup of the PostgreSQL database that contains 90 GB of BriefCam data.
Consider testing the speed on the actual environment to be able to estimate how much time the base backup will take to be able to properly set the time slot for the replica creation process.
Use the actual path of the
PostgreSQL_Datadirectory. The BriefCam default isC:\PostgreSQL_Data. However, this may vary in different setups (later in this document the default BriefCam path will be used).Use the actual
pgsql.exepath. The BriefCam default isC:\PostgreSQL\bin\psql.exe(later in this topic, the default BriefCam path will be used).
Steps on the Primary Server
Connect to the primary PostgreSQL server sql shell and verify the location of the config and hba files by executing the following commands:
C:\PostgreSQL\bin\psql.exe -U dbadmin postgres SHOW config_file; SHOW hba_file;Here is an example of the expected output (based on the location of the
PostgreSQL_Datafolder):C:/PostgreSQL_Data/postgresql.conf C:/PostgreSQL_Data/pg_hba.confBack up the original
configandhbafiles by executing the following commands in PowerShell:copy C:/PostgreSQL_Data/postgresql.conf C:/PostgreSQL_Data/postgresql.conf.$(((get-date).ToUniversalTime()).ToString("yyyyMMddTHHmmssZ"))copy C:/PostgreSQL_Data/pg_hba.conf C:/PostgreSQL_Data/pg_hba.conf.$(((get-date).ToUniversalTime()).ToString("yyyyMMddTHHmmssZ"))Verify that the backup files were created by executing the following command:
dir C:/PostgreSQL_Data/*.conf.*The expected output is:
PS C:\Users\Administrator> dir C:/PostgreSQL_Data/*.conf.*
Directory: C:\PostgreSQL_Data
Mode LastWriteTime Length Name
---- ------------- ------ ----
-a---- 11/10/2021 11:22 AM 4374 pg_hba.conf.20211117T100109Z
-a---- 11/10/2021 11:25 AM 23798 postgresql.conf.20211117T100344Z
Add parameters to the
postgres.conffile. You do this by opening the file in a text editor and adding the following lines to the end of the file (just below theCustomized Optionssection):wal_level = replica hot_standby = on hot_standby_feedback = on full_page_writes = on max_wal_senders = 6 max_replication_slots = 6Create a role/user for replication and set its password (do not use the password specified in the sample commands).
Connect to the primary PostgreSQL server’s SQL shell via PowerShell console using the command:
C:\PostgreSQL\bin\psql.exe -U dbadmin postgresExecute the following command (in the SQL shell opened in the previous step):
CREATE ROLE repl_user LOGIN REPLICATION PASSWORD 'replQwerty123';
Add parameters to the
pg_hba.conffile. You do this by opening the file in a text editor and adding the following lines to the file (under the#replication privilegeline):# replication privilege. host replication repl_user <secondaryIP>/32 md5Restart the BriefCamPostgreSQL service on the primary PostgreSQL server by opening PowerShell as an administrator and running the following commands:
net stop "BriefCamPostgreSQL - PostgreSQL Server 10" net start "BriefCamPostgreSQL - PostgreSQL Server 10"Verify that the config files contain the changes that you made to the
postgres.conffile as follows:Connect to the primary PostgreSQL server’s SQL shell via PowerShell console using the command:
C:\PostgreSQL\bin\psql.exe -U dbadmin postgresPrint out the custom configs added to the PostgreSQL conf file using the commands below via SQL shell:
\pset pager off SELECT pg_read_file('postgresql.conf');Verify that you can now see the lines added to the
postgresql.conffile at the bottom of the output.
Verify that the config files contain the changes that you made to the
pg_hba.conffile as follows:Connect to the primary PostgreSQL server’s SQL Shell by executing the following commands:
C:\PostgreSQL\bin\psql.exe -U dbadmin postgres
\pset pager off
SELECT pg_read_file('pg_hba.conf');
Verify that you can now see the lines added to the
pg_hba.conffile at the bottom of the output.
Steps on the Secondary Server
Install BriefCamPostgreSQL.
On the secondary PostgreSQL server, stop the BriefCamPostgreSQL service by running the following in PowerShell as an administrator:
net stop "BriefCamPostgreSQL - PostgreSQL Server 10"Clean the data directory as follows:
Rename the
PostgreSQL_Datafolder.Create a new folder named
PostgreSQL_Dataand in the folder’s Permissions tab, add Full control to Everyone.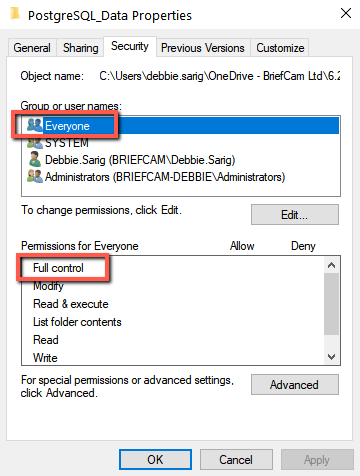
Perform a PostgreSQL basebackup from the primary to the secondary server as follows:
Execute the following command in PowerShell as an administrator:
c:\PostgreSQL\bin\pg_basebackup -h <primaryIP> -U repl_user --checkpoint=fast -D C:\PostgreSQL_Data -R TBD #--slot=standby1It is recommended to stop all the BriefCam services on all the servers during the potentially long database backup. It’s possible to perform this step without stopping all services, depending on the dataset size.
On the secondary PostgreSQL server, start the BriefCamPostgreSQL service by executing the following commands in PowerShell as an administrator:
net start "BriefCamPostgreSQL - PostgreSQL Server 10"
Verify the Replication Operation
Connect to the primary PostgreSQL server’s SQL shell via PowerShell console using the command:
C:\PostgreSQL\bin\psql.exe -U dbadmin postgresCheck the lag value by running the following command in SQL shell (the
write_lagvalue must begin with 00:00:00):SELECT write_lag,client_addr FROM pg_stat_replication ;This is an example of the expected output:
postgres=# SELECT write_lag,client_addr FROM pg_stat_replication ;
write_lag | client_addr
-----------------+-------------
00:00:00.003972 | 10.30.30.30
(1 row)
postgres=#
Note
This check needs to be performed at least once per day.
Activate the Secondary Server to Act as Primary Server
This section describes the procedure of activating the secondary server as the primary instance of the PostgreSQL database, in cases where the primary is at fault and recovery/migration is needed.
Change the hosts file in all BC servers to reflect the <secondaryIP> instead of <primaryIP>.
Check the status and promote the secondary server PGSQL to become the primary server by running the following commands in PowerShell console (make sure to run PowerShell in administrator, and to edit the paths to the pg_ctl.exe file and the PostgreSQL_Data folder accordingly):
c:\PostgreSQL\bin\pg_ctl.exe status -D ”C:\PostgreSQL_Data”
Sample output:
pg_ctl: server is running (PID: 5672) C:\PostgreSQL\bin\postgres.exe "-D" "C:\PostgreSQL_Data"c:\PostgreSQL\bin\pg_ctl.exe promote -D ”C:\PostgreSQL_Data”
Sample output:
waiting for server to promote.... done server promoted
Create Periodic Backup on the Secondary Server
PG_DUMP Scripts in Windows Task Scheduler
Create the
%APPDATA%\postgresql\pgpass.conffile containing the db credentials (that is:*:5432:*:dbadmin:Qwerty123). For details, refer to: https://www.postgresql.org/docs/10/libpq-pgpass.html and https://www.postgresql.org/docs/10/libpq-envars.html (external links).If the above does not work, the password of the scripts can be specified on the execution line:
$env:PGPASSWORD='Qwerty123' ;& c:\PostgreSQL\bin\pg_dump.exe -F t -U dbadmin -d briefcam -f e:\PostgresBackups\db_briefcam-$(((get-date).ToUniversalTime()).ToString("yyyyMMddTHHmmssZ")).tarCreate a folder for backup files, for example:
E:\PostgresBackups\.Create a folder for the backup script files, for example:
E:\PostgresBackupScripts\.Create the backup script at:
E:\PostgresBackupScripts\backup.ps1with the three commands as shown below:c:\PostgreSQL\bin\pg_dump.exe -F t -U dbadmin -d postgres -f e:\PostgresBackups\db_postgres-$(((get-date).ToUniversalTime()).ToString("yyyyMMddTHHmmssZ")).tar
c:\PostgreSQL\bin\pg_dump.exe -F t -U dbadmin -d briefcam -f e:\PostgresBackups\db_briefcam-$(((get-date).ToUniversalTime()).ToString("yyyyMMddTHHmmssZ")).tar
#ls -file E:\PostgresBackups\db*.tar | where {(get-date) - $_.creationtime -gt 15.} | Remove-Item –Verbose
*The 3rd command above should be adjusted according to the required backup retention period by removing the ”#” sign at the start of the line and modifying the number 15 as it represents the number of days backwards. For example, if you wish to configure the script to delete all files older than 7 days, you would have to change the number 15 to 7.
Test the backup creation and the removal of the old files by setting the -gt to 0 and run the following command in Windows cmd:
powershell.exe e:\PostgresBackupScripts\backup.ps1
This will remove all the files created.
Adjust the retention period of the backups as mentioned at the bottom of step 4 above.
Add the backup script to the Windows task scheduler as follows:
Set the Program/script field to the following path:
C:\Windows\System32\WindowsPowerShell\v1.0\powershell.exe
In the Add arguments field set the following:
E:\PostgresBackupScripts\backup.ps1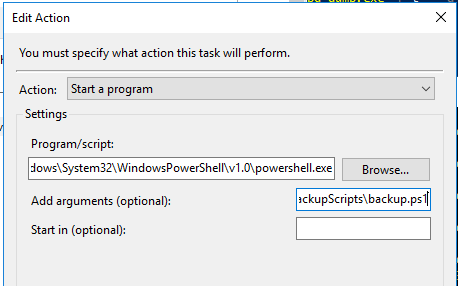
Set the triggers and timing accordingly.
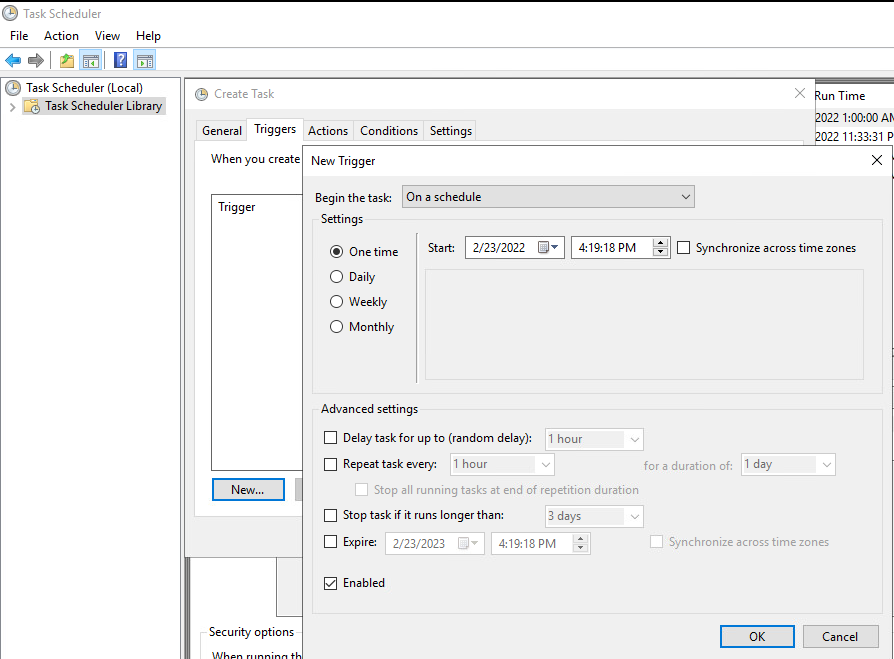
Set the task to run regardless if the user is logged in and save the password.
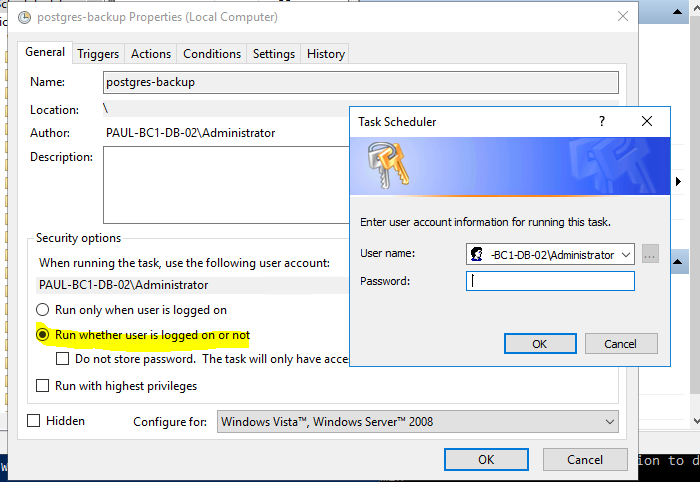
On a test server, check if the files are restorable. This test should be part of your ongoing routine.
Here is an example of the restore command:
C:\PostgreSQL\bin\pg_restore.exe -c -v -U dbadmin -d briefcam -F t e:\PostgresBackups\db_briefcam-20211122T122052Z.tar
The parameter -c performs drop and create. For additional options see:
“C:\PostgreSQL\bin\pg_restore.exe --help”
Revert to Primary Server After It Is Fixed
If you were using a secondary server because there was an issue with the primary server, this section describes how to revert to the primary server once the issue is fixed.
Note
The details of the process below may vary depending on what kind of failure the primary server suffered. To consider the most severe case (an absolute crash of the primary server), the steps below include a fresh installation.
Install the operating system from scratch.
Perform the steps from the Steps on the Primary Server section on the current primary server.
Perform all the actions described in the sections below on the servers, considering that the server that was reinstalled is now technically the “secondary” instance:
Stop the PostgreSQL service on the server that was used as the primary server.
Verify that the BriefCam system works properly.
Perform steps for creating a replica on the server that was used as the primary server.