Configuring a RESEARCH and Web Services Distributed Environment
If you are working with a distributed environment where the Web Services component and the RESEARCH component are on separate machines, you either need to do one of the following:
Use a load balancer (see: Installing and Configuring NGINX)
Use an FQDN (preferred) or an alias/CNAME – If you already use a domain, use a fully qualified name (FQDN). If the servers are not part of a domain (no FQDN), use an alias/CNAME. Details about how to do this are provided below.
You need to make these configurations because BriefCam’s web application consumes the RESEARCH component from an IFrame (an HTML element that is used to insert content from another source – a third-party). The newest browsers improved their security and now prevent sending cookies along with cross-site requests.
The solution is to set up the cookies to be first-party (same-site) cookies (when the domain in the browser’s URL bar matches your cookie domain).
To achieve this, you need to use the FQDN so the domain suffix will be the same for all the servers as highlighted in yellow in the examples below. If you only use the host name, such as “synopsis” or “research” in the examples below, there is no domain suffix and cookies are not shared between the sites.
For example:
synopsis.your-domain.com
research.your-domain.com
If you have a load balancer set up, you will not have this issue. For more information about this, see Installing and Configuring NGINX.
If you are using the FQDN or alias/CNAME option, you need to do the following:
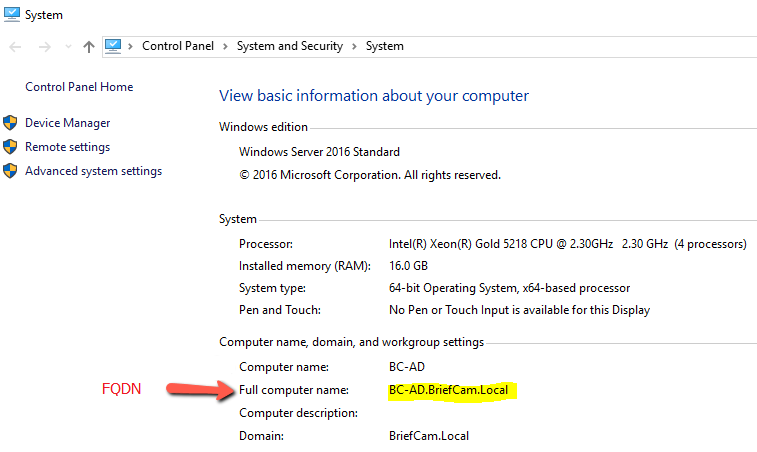
If you are using a fully qualified name (FQDN), find the FQDN of your server, by clicking on the System menu in the Control Panel. You’ll see the FQDN of your machine (if one exists).
From the BriefCam Administrator Console’s Environment Settings section, edit the QlikServer setting and change it to the FQDN or alias/CNAME. For example, if your domain name is: www.test.com, use: research.test.com.
On the Web Services machine, edit the ProWebClient’s
webConfig.jsfile (located at:C:\Program Files\BriefCam\WebServices\ProWebClient\webConfig.js) and replace the hostname with the FQDN or alias/CNAME. For example:const endPointApi = "//www.test.com/prowebapi"; const matomoSiteID = 10; const reCaptchaKey = "";On the Web Services machine, edit the ProWebAdminClient’s
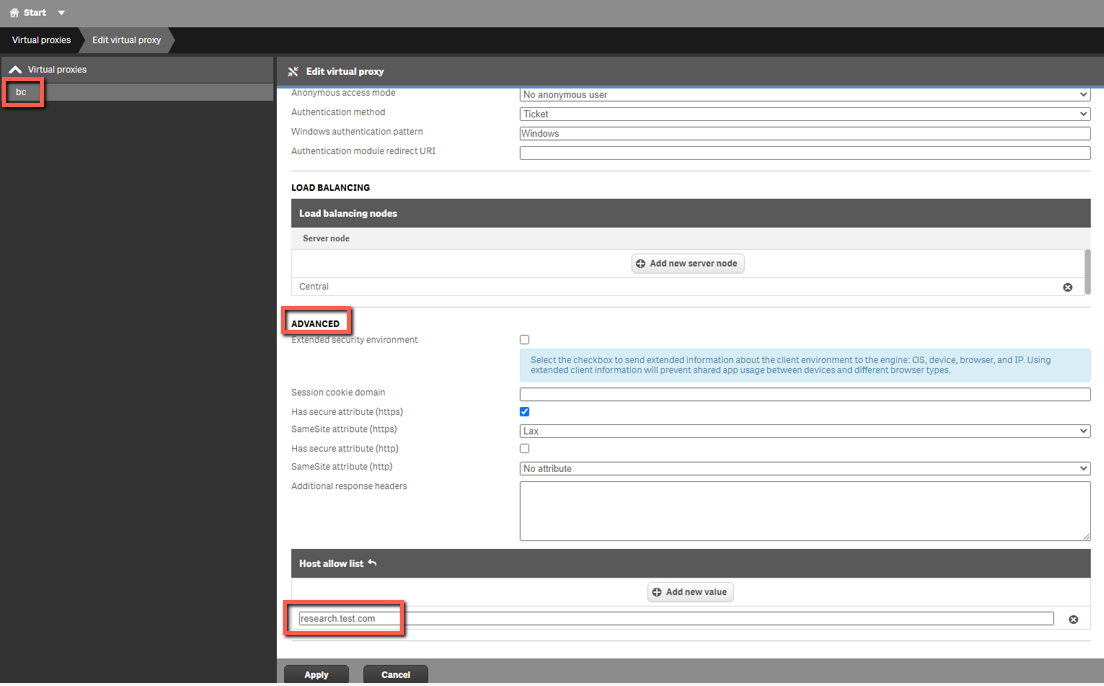
web.config.jsfile (located at:C:\Program Files\BriefCam\WebServices\ProWebAdminClient\web.config.jsand replace the hostname with the FQDN or alias/CNAME. For example:const endPointApi = "//www.test.com/AdminApi/";Enter Qlik QMC > Virtual proxies (https://localhost/qmc/virtualproxies) and edit the
bcproxy.Open the Advanced tab and add the new hostname of the RESEARCH machine (the FQDN or alias/CNAME) into the Host allow list. For example:
Click Apply.
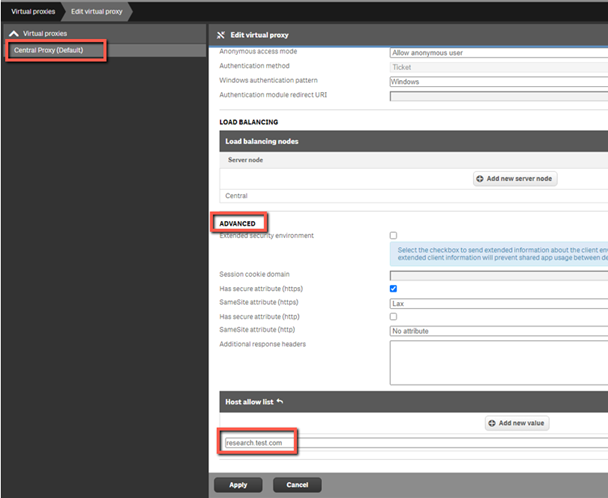
Navigate back to Virtual proxies and edit the Central Proxy (Default).
Open the Advanced tab and add the new hostname of the RESEARCH machine (the FQDN or alias/CNAME) into the Host allow list. For example:
Click Apply.
When opening the Web Client or the BriefCam Administrator Console, make sure to use the new host name in the URL. For example:
http://www.test.com/app
http://www.test.com/admin