

Install certificates in a domain for communication with the Management Server or Recording Server
When client and server endpoints are all operating within a domain environment there is no requirement to distribute CA certificates to client workstations. Group Policy within the domain handles the automatic distribution of all trusted CA certificates to all users and computers in the domain.
This is because, when you install an enterprise root CA, it uses Group Policy to propagate its certificate to the Trusted Root Certification Authorities certificate store for all users and computers in the domain.
You must be a Domain Administrator or be an administrator with write access to Active Directory to install an enterprise root CA.
Microsoft provides extensive documentation for Windows Server operating systems, which includes templates for server certificates, installation of the CA, and certificate deployment can be found in Microsoft's Server Certificate Deployment Overview.
Add a CA certificate to the server
Add the CA certificate to the server by doing the following.
-
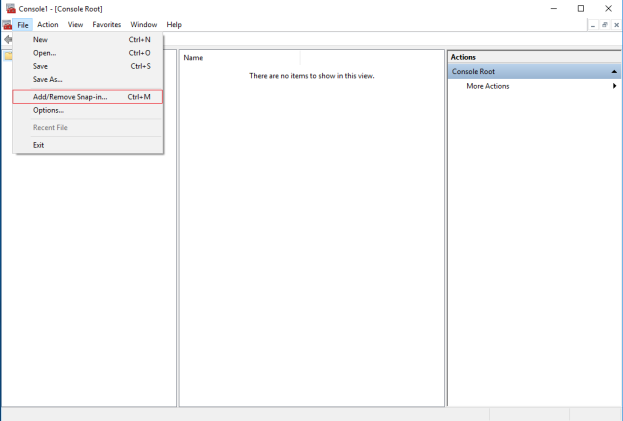
On the computer that hosts the XProtect server, open the Microsoft Management Console.

- In the Microsoft Management Console, from the File menu select Add/Remove Snap-in….
-
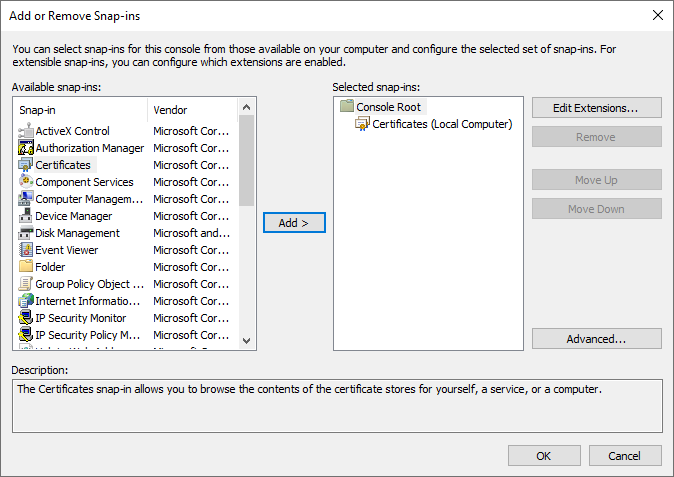
Select the Certificates snap-in and click Add.
-
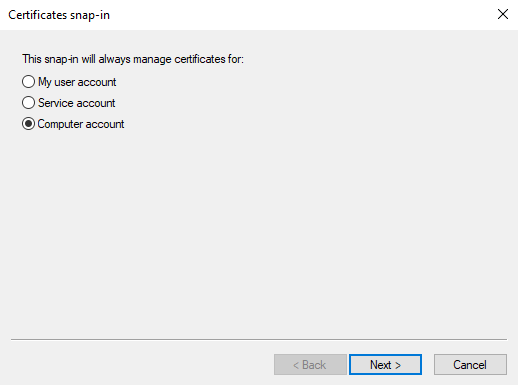
In Certificates snap-in, select Computer account.
-
In Select Computer, select Local computer.
Select Finish, then OK.

-
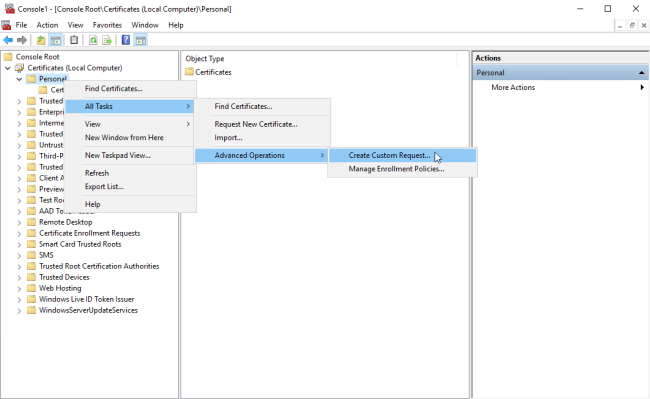
Expand the Certificates object. Right-click on the Personal folder and select All Tasks > Advanced Operations > Create Custom Request.
-
Click Next in the Certificate Enrollment wizard and select Proceed without enrollment policy.
If your Group Policy already contains a Certificate Enrollment Policy, you will want to confirm the rest of this process with your Domain Administration team before proceeding.
Click Next.

-
Select the (No template) CNG Key template and the CMC request format, and click Next.

-
Expand to view the Details of the custom request, and click Properties.

-
On the General tab, fill in the Friendly name and Description fields with the domain name, computer name, or organization.

-
On the Subject tab, enter the required parameters for the subject name.
In the subject name Type, enter in Common Name the host name of the computer where the certificate will be installed.

-
On the Extensions tab and expand the Extended Key Usage (application policies) menu. Add Server Authentication from the list of available options.

-
On the Private Key tab, expand the Key options menu.
Set the key size to 2048 and select the option to make the private key exportable.
Click OK.

-
When all of the certificate properties have been defined, click Next on the Certificate Enrollment wizard.
-
Select a location to save the certificate request and a format. Browse to that location and specify a name for the .req file. The default format is base 64.
-
Click Finish.

A .req file is generated, which you must use to request a signed certificate.
Upload the .req file to receive a signed certificate in return
You must copy the entire text of the .req file, including the begin and end lines, and paste the text to the internal Active Directory Certificate Services certificate authority in the network. See Install Active Directory Certificate Services.
Unless your domain has only recently installed Active Directory Certificate Services, or it has been installed just for this purpose, you will need to submit this request following a separate procedure configured by your Domain Administration team. Please confirm this process with them before proceeding.
-
Browse to the location of the .req file and open it in Notepad.

-
Copy the entire contents of the file. This includes the dashed lines marking the beginning and the end of the Certificate Request.
-
Open a web browser and enter the address of the Domain CA.

-
Click the Request a certificate link.
-
Click the advanced certificate request link.

-
Paste the contents of the .req file into the form. If it is required to select a Certificate Template, select Web Server from the Certificate Template list.

-
Click Submit.
The site shows a message that the certificate will be issued in a few days.
Your Domain Administration team will likely distribute and install the certificate for you. However, if the certificate is delivered to you, you can install it manually.
Install the certificate manually
If the certificate is delivered to you, you can install it manually.
-
Locate the certificate file on the computer that hosts the Management Server or Recording Server .
-
Right-click the certificate and select Install Certificate.
-
Accept the security warning if it appears.
Select to install the certificate for the current user and click Next.

-
Choose a storage location, and browse to the Personal certificate store, and click Next.

-
Finish the Install Certificate wizard.
-
Go to the Microsoft Management Console (MMC) certificates snap-in.
-
In the console, browse to the personal store where the certificate is installed. Right-click on the certificate and select All Tasks > Manage Private Keys.

-
Verify that the account that is running the Milestone XProtect Management Server, Recording Server, or Mobile Server software is in the list of users with permission to use the certificate.
Make sure that the user has both Full Control and Read permissions enabled.
By default, XProtect software uses the NETWORK SERVICE account. In a domain environment, service accounts are commonly used to install and run XProtect services. You will need to discuss this with your Domain Administration team, and have the proper permissions added to the service accounts if it hasn't been configured properly already. Confirm this before proceeding.
Enable server encryption for Management Servers and Recording Servers
Once the certificate is installed with the correct properties and permissions, do the following.
-
Management Server 또는 Recording Server이(가) 설치된 컴퓨터에서 다음으로부터 Server Configurator을(를) 엽니다.
- Windows 시작 메뉴
또는
- 컴퓨터 작업 표시줄에서 서버 관리자 아이콘을 오른쪽 마우스 클릭하여 서버 관리자
-
Server Configurator의 서버 인증서 아래에서 암호화를 켭니다.
-
개인 키를 가졌으며 Windows Certificate Store의 로컬 컴퓨터에 설치된 인증서의 고유한 주체 이름 목록을 열려면 인증서 선택을 클릭합니다.
- 레코딩 서버, 관리 서버, 장애 조치 서버 및 데이터 수집기 서버 간의 통신을 암호화하는 데 사용할 인증서를 선택합니다.
- 적용하기 를 클릭합니다.
선택된 인증서에 관한 Windows Certificate Store 정보를 보려면 세부 정보 를 선택합니다.
Recording Server 서비스 사용자는 개인 키에 대한 액세스를 부여받았습니다. 이 인증은 모든 클라이언트에 대해 신뢰될 필요가 있습니다.

인증서를 적용할 경우, 레코딩 서버가 중단되고 재시작합니다. Recording Server 서비스를 중지하면 레코딩 서버의 기본 구성을 확인 또는 변경하는 동안 라이브 비디오를 레코딩하거나 볼 수 없습니다.