

Using ONVIF clients to view video streams
ONVIF clients can be many different things, ranging from advanced custom surveillance systems to basic media players.
If your have applied a permanent privacy mask on your video, you won't be able to stream the video from an ONVIF client.
This section provides examples of how to connect to the Milestone Open Network Bridge.
Use a Network Video Client to view a live stream
This example describes how to install the ONVIF Device Manager, and configure it to stream live video from an XProtect installation.
The ONVIF Device Manager is a free, open source Network Video Client from iDeviceDesign that complies with ONVIF standards. The tool makes it easy to discover and view video from ONVIF compliant cameras on a network. However, the ONVIF Device Manager only streams live video. Additionally, you cannot capture and save the video data in the stream.
The ONVIF Device Manager does not support FIPS 140-2 or H.265 codec.
Before you start, you must have the following information:
- The login credentials for the user that was created for the Milestone Open Network Bridge
- The IP address or computer name of the computer where the Milestone Open Network Bridge is installed
To install the ONVIF Device Manager, follow these steps:
- Go to the Sourceforge ONVIF Device Manager site (https://sourceforge.net/projects/onvifdm/) and then download and run the installer. You can install the ONVIF Device Manager on any computer.
- When the installation completes, an icon is available on your desktop. Double-click the icon to start the ONVIF Device Manager.
- When you start the ONVIF Device Manager, it automatically discovers ONVIF compliant devices on the network. However, it might not discover the Milestone Open Network Bridge.
- If it does, go to step 6
- If it does not, add the bridge manually. Continue with step 4
- To add a Milestone Open Network Bridge, click ADD.
- In the Add device dialog box, in the URI field, provide the name or IP address of the computer where the Milestone Open Network Bridge is installed, and the ONVIF port number. For example, the string should look like this: http://[IP address]:580/onvif/device_service.
- After you add the bridge, it is available at the bottom of the Device list. Select it.
- Enter the login credentials for the user that was created for the ONVIF client above the list. If this is a Windows user, you must enter the domain\user name.
Use a media player to view a video stream
This example describes how to use the VLC media player to retrieve and view a live video feed or recorded video from a camera in an XProtect installation.
VLC media player is a free, open source multimedia player from VideoLan that supports various streaming protocols, including RTSP. For example, using VLC media player is useful when you want a very fast way to connect to a camera, or just to test the connection to a camera.
When you connect to a camera to view recorded video, the Milestone Open Network Bridge streams the video sequences, starting with the first sequence.
Before you start, get the following information from the person who administrates the XProtect installation:
- The login credentials for the user account that is assigned to the Milestone Open Network Bridge
- The IP address or computer name of the computer where the Milestone Open Network Bridge is installed
In addition, depending on the schema that you use, you need the following information:
-
If you use rtsp://[rtsp_server]:554/live/[camera_id]
Then you need the GUID of the device that you want to stream video from
The camera GUID is available in Management Client. To find the GUID, select the recording server where the camera has been added, and then select the camera. Click the Info tab, press and hold CTRL on your keyboard, and then click the camera’s video preview.
-
If you use rtsp://[rtsp_server]:554/live/[camera_id]/[stream_number]
Then you need the stream number. This is a numeric value between 0 and 15.
-
If you use rtsp://[rtsp_server]:554/live/[camera_id]/[stream_id]
Then you need the stream ID. This is the GUID that identifies the stream in XProtect VMS.
The current XProtect VMS multi-streaming implementation GUIDs that identify the steams are fixed to:
-
28dc44c3-079e-4c94-8ec9-60363451eb40 - for stream 0
-
28dc44c3-079e-4c94-8ec9-60363451eb41 - for stream 1
-
...
-
28dc44c3-079e-4c94-8ec9-60363451eb4f - for stream 15
-
This description is based on VLC 2.2.4 for Windows.
To install the VLC media player, and connect it to an XProtect system, follow these steps:
- Go to https://www.videolan.org/vlc/, and then download the installer for the VLC media player.
- Run the installer, and follow the instructions for each step.
- On the toolbar, click Media, and select Open Network Stream.
- In the Open media dialog box, enter the following RTSP string. Replace the variables in the square brackets [Milestone Open Network Bridge IP Address] and [Camera GUID] with the correct information:
- To view a live video stream, enter rtsp://[Milestone Open Network Bridge IP Address]:554/live/[Camera GUID]
- To view recorded video, enter rtsp://[Milestone Open Network Bridge IP Address]:554/vod/[Camera GUID]
- Click Play, and then enter the user name and password of the user account that was added to the Milestone Open Network Bridge.
Manage video playback
Playback controls comply with RTSP standards and the ONVIF Streaming Specification (https://www.onvif.org/profiles/specifications/).
Recording summary
You can get an overview of all recorded video available on the device by using the GetRecordingSummary command. This is not required, but it provides useful information prior to conducting a search.
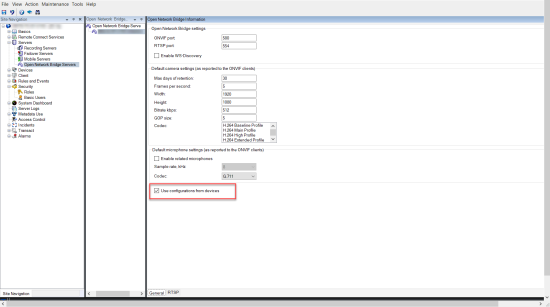
You can use GetRecordingSummary and/or GetMediaAttributes to get the timestamp of the first and the last recording, but you must first enable the Use configurations from cameras setting on the Milestone Open Network Bridge plug-in in the XProtect Management Client.
Create a proxy for the RecordingSearch service using the service endpoint returned by GetServices. Create request and response objects, then call GetRecordingSummary.
SearchBindingProxy searchProxy( &soapSearch );
std::string searchEndpoint = "http://" + host + "/onvif/recording_search_service";
_tse__GetRecordingSummary tse__GetRecordingSummary;
_tse__GetRecordingSummaryResponse tse__GetRecordingSummaryResponse;
result = searchProxy.GetRecordingSummary( searchEndpoint.c_str(), NULL,
&tse__GetRecordingSummary, &tse__GetRecordingSummaryResponse );
Search for recordings
The Search service method FindRecordings starts an asynchronous search on the camera. FindRecordings returns a token that references the search results. Even though there is only one recording available, a search is the proper way to obtain a reference for that recording.
Send a FindRecordings request with the following mandatory parameters:
SearchScope>IncludedSources>Token– you must provide the camera GUID tokenSearchScope>RecordingInformationFilter– string with the following parameters:timestamp(in UTC format)maxTimeBefore(the time before the requested timestamp, in milliseconds)maxCountBefore(the maximum number of tracks before requested timestamp)maxTimeAfter(the time after the requested timestamp, in milliseconds)maxCountAfter(the maximum number of tracks after requested timestamp)
For example:
boolean(//Track[TrackType = “Video”]),2016-12-06T08:07:43Z,99999999,20,99999999,20
You will get a response with a SearchToken, which is unique for the search criteria.
Pass the SearchToken to GetRecordingSearchResults and you will get a list with all the tracks corresponding to the search criteria.
Initiating playback
When viewing video playback, the default speed is 1 (normal playback in the forward direction).
Playback is initiated by means of the RTSP PLAY method. A range can be specified. If no range is specified, the stream is played from the beginning and plays to the end, or, if the stream is paused, it is resumed at the point it was paused. In this example, “Range: npt=3-20” instructs the RTSP server to start playback from the third second until 20th second.
For example:
PLAY rtsp://user:1234@test01:554/vod/943ffaad-42be-4584-bc2c-c8238ed96373 RTSP/1.0
CSeq: 123
Session: 12345678
Require: onvif-replay
Range: npt=3-20
Rate-Control: no
Reverse playback
ONVIF devices MAY support reverse playback. Reverse playback is indicated using the Scale header field with a negative value. For example to play in reverse without data loss, a value of –1.0 would be used.
The Milestone Open Network Bridge supports values [-32 : 32].
PLAY rtsp://user:1234@test01:554/vod/943ffaad-42be-4584-bc2c-c8238ed96373 RTSP/1.0
CSeq: 123
Session: 12345678
Require: onvif-replay
Range: clock=20090615T114900.440Z
Rate-Control: no
Scale: -1.0
Change speed
Speed is controlled by the RTSP Rate-Control header. If "Rate-Control=yes", then the server is in control of the playback speed. The stream is delivered in real time using standard RTP timing mechanisms. If "Rate-Control=no", then the client is in control of the playback speed. Rate-controlled replay will typically only be used by non-ONVIF specific clients because they will not specify “Rate-Control=no”.
To control playback speed in a client, use the provided controllers. For example, with the VLC media player, select Playback > Speed > Faster or Slower. This increases or decreases the speed by 0.5.
Faster Fine and Slower Fine change the speed by 0.25.
Manage VLC media player playback with command line entries
You can manage video playback in the VLC media player by using command lines. Refer to the VLC command line help (https://wiki.videolan.org/VLC_command-line_help/) for details.
Such commands allow you to, for example, reverse playback and change the start time of the playback.
An example of a typical command line:
>vlc.exe --rate=-1.0 --start-time=3600 "rtsp://user:1234@test01:554/vod/943ffaad-42be-4584-bc2c-c8238ed96373"
Where:
- Rate is the scale and speed parameter
- Start-time is seconds after the database start
Following are the playback controls for VLC media player:
|
Code |
What can I achieve with the code? |
|---|---|
| input-repeat= |
<integer [-2147483648 .. 2147483647]> Input repetitions Number of times the same input will be repeated |
|
start-time= |
<float> Start time The stream will start at this position (in seconds) |
|
stop-time= |
<float> Stop time The stream will stop at this position (in seconds) |
|
run-time= |
<float> Run time The stream will run this duration (in seconds) |
|
input-fast-seek no-input-fast-seek |
Fast seek (default disabled) Favor speed over precision while seeking |
|
rate= |
<float> Playback speed This defines the playback speed (nominal speed is 1.0) |
|
input-list= |
<string> Input list You can give a comma-separated list of inputs that will be concatenated together after the normal one |
|
input-slave= |
<string> Input slave (experimental) This allows you to play from several inputs at the same time. This feature is experimental, not all formats are supported. Use a '#' separated list of inputs |