

Install in a cluster
Before you install in a cluster, see Multiple management servers (clustering) (explained) and Requirements for clustering.
Descriptions and illustrations might differ from what you see on your screen.
Install the management server:
- Install the management server and all its sub-components on the first server in the cluster.
The management server must be installed with a specific user and not as a network service. This requires that you use the Custom install option. Also, the specific user must have access to the shared network drive and preferably a non-expiry password.
Configure the Management Server service as a generic service in the failover cluster:
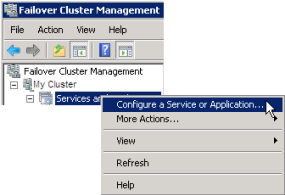
- On the last server on which you have installed the management server, go to Start > Administrative Tools, open Windows' Failover Cluster Management. In the Failover Cluster Management window, expand your cluster, right-click Roles, and select Configure Role.
- In the High Availability Wizard > Before You Begin page, click Next.
- On the Select Role page, select Generic Service and click Next.
- On the Select Service page, select the Milestone XProtect Management Server service and click Next.
- On the Client Access Point page, specify the name (host name of the cluster) that clients will use when accessing the service. The host name must be different from the name of the cluster. Click Next.
- On the Select Storage page, click Next as no storage is required for the service.
- On the Replicate Registry Settings page, click Next as no registry settings are to be replicated.
- On the Confirmation page, click Next after you have verified that the cluster service is configured according to your requirements.
- On the Configure High Availability page, click Next.
- On the Summary page, click Finish to complete configuration of the management server as a generic service in the failover cluster.
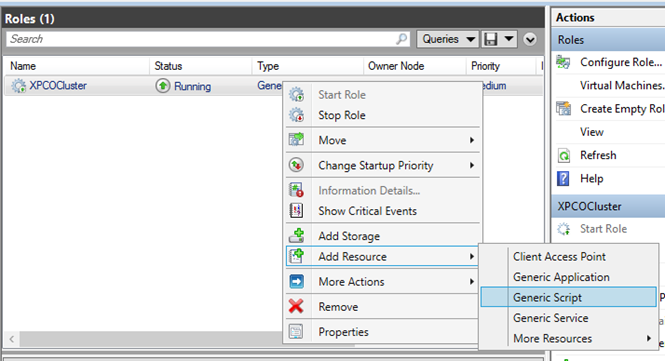
- Right-click the role you just created and click Add resource > Generic Script. Select Milestone XProtect Event Server to add the Milestone XProtect Event Server service as a resource to the Milestone XProtect Management Server Cluster service.
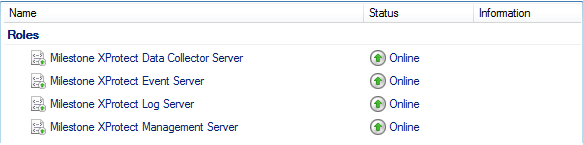
- Repeat step 11 and add all required services in the cluster, for example the Log Server. The Milestone XProtect Event Server and the Data Collector server should both be added as services to achieve an optimal deployment. Additionally, the Milestone XProtect Event Server should be set as a dependent service of the management server to ensure the event server also will stop when the management server is stopped.
- All added services are displayed in the bottom pane of the window.
Update the cluster URL:
When doing configuration changes, on the Microsoft Failover Cluster Manager, pause the control and monitoring of the service so the Server Configurator can make the changes and start and/or stop the Management Server service. If you change the failover cluster service startup type to manual, it should not result in any conflicts with the Server Configurator.
On the Management Server computers:
- Start the Server Configurator on each of the computers that have a management server installed.
- Go to the Registration page.
- Click the pencil (
 ) symbol to make management server address editable.
 - Change the management server address to the URL of the cluster, for example http://MyCluster.
- Click Register.
On computers that have components that use the Management Server (for example, Recording Server, Mobile Server, Event Server
- Start the Server Configurator on each of the computers.
- Go to the Registration page.
- Change the management server address to the URL of the cluster, for example http://MyCluster.
- Click Register.
Use a certificate for an external IDP in a cluster environment
When you install XProtect in a single-server environment, the external IDP configuration data is protected using Data Protection API (DPAPI). If you set up the management server in a cluster, the external IDP configuration data must be protected with a certificate to ensure fluent node failover.
For more information about how to generate a certificate, see The Milestone guide about certificates.
You must import the certificate to the personal certificate store and make the certificate trusted on the computer.
To set up the data protection you must add the thumbprint of the certificate to the Identity Provider configuration.
-
Import the certificate to the personal certificate store and ensure that:
-
the certificate is valid
-
the Identity Provider app pool (IDP) account has permissions to the certificate private key.
For more information about how to verify if the account has permissions to the certificate private key, see The Milestone guide about certificates.
-
-
Locate the appsettings.json file in the installation path of the Identity Provider (“[Install path]\Milestone\XProtect Management Server\IIS\Identity Provider”).
-
Set the certificate thumbprint in the section:
-
"DataProtectionSettings": {
"ProtectKeysWithCertificate": {
"Thumbprint": ""
}
},
-
Repeat step 3 on all management server nodes.
-
Enforce a node failover to ensure that the certificate setup is correct.
-
Log in again using the management client and apply the external provider configuration. If the configuration is already applied, you must re-enter the client secret from the external IDP in the management client.
Troubleshooting errors when an external IDP configuration is protected with a certificate
Invalid certificate/expired certificate
If the configured thumbprint certificate represents a certificate that is not trusted or has expired, the Identity Provider cannot start. The Identity Provider log (C:\ProgramData\Milestone\Identity Provider\Logs\Idp.log) will clearly state if the certificate is invalid.
Solution:
Make sure that the certificate is valid and trusted on the computer.
Missing permissions to certificate private keys
The Identity Provider cannot protect data without permissions to the private keys. If the Identity Provider does not have the permission, the following error message is written to the log file of the Identity Provider (C:\ProgramData\Milestone\Identity Provider\Logs\Idp.log):
ERROR- An exception occurred while processing the key element ‘<key id=”[installation specific]” version=”1” />’. Internal.Cryptography.CryptoThrowHelper+WindowsCryptographicException: Keyset does not exist
Solution:
Make sure the Identity Provider app pool (IDP) account has permissions to the certificate private keys.
Check permissions to a certificate private key:
-
Select Start on the Windows task bar and open the Manage computer certificates tool (certlm.msc).
-
Navigate to the personal certificate store and find the certificate that is used for the encryption.
-
Right-click on the certificate, and select All Tasks > Manage Private Keys.
-
Under Permissions for, ensure that the Identity Provider app pool (IDP) account has read permissions.
