

Connecting to your deployment
There are different options of establishing a connection to your deployment.
To view video from your XProtect Essential+ installation on CloudFormation using XProtect Web Client and XProtect Mobile, see Connect using XProtect Web Client and XProtect Mobile.
To manage your XProtect Essential+ installation on CloudFormation with XProtect Management Client and view video using Smart Client, see Connect via Remote Desktop Protocol.
Connect using XProtect Web Client and XProtect Mobile
The XProtect Essential+ CloudFormation lets you access video from XProtect Essential+ using the XProtect Web Client and XProtect Mobile.
How you establish the connection depends on the network protocol you chose during your configuration and deployment of the XProtect Essential+ CloudFormation. No additional configuration through the VPC is needed.
For more information, see:
- Connect via secure network protocol (HTTPS) (recommended)
- Connect via non-secure network protocol (HTTP) (only for test and demo purposes)
Connect via secure network protocol (HTTPS)
After you deploy the XProtect Essential+ CloudFormation stack, you first establish secure communication between the XProtect components. You do this by connecting to the VPC using the RDP key pair that you specified during configuration and by generating and installing an SSL certificate.
You must secure the communication to XProtect Web Client and XProtect Mobile before establishing the connection. For more information, see Secure the communication.
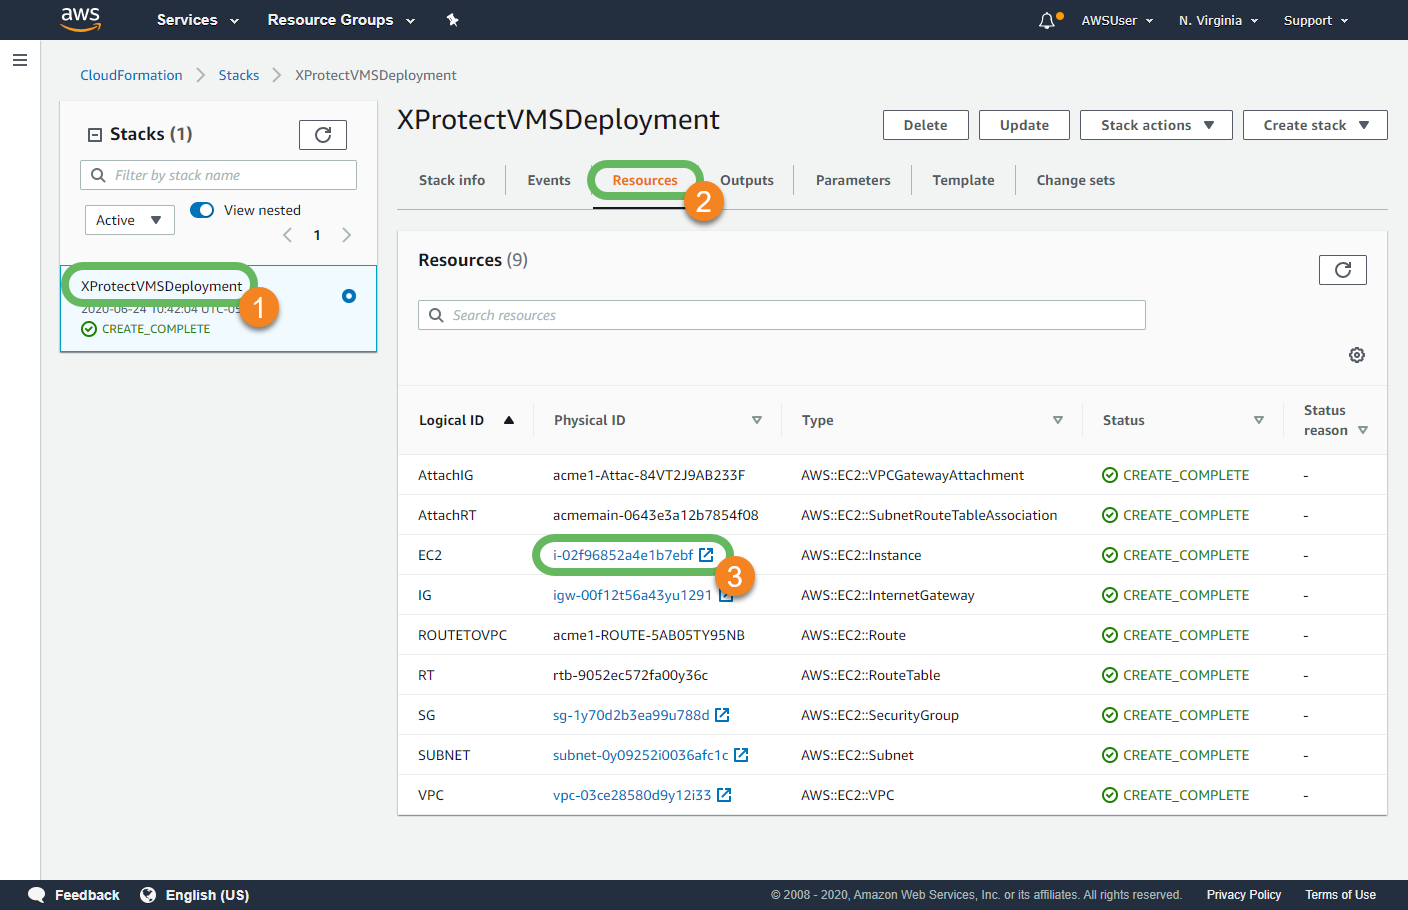
- In the AWS Management Console, open the CloudFormation page.
- Select the XProtect Essential+ CloudFormation stack that you created. It is identified by the Stack name
 that you specified during configuration.
 - In the Resources
 tab, you will see all the stack elements that were created by the XProtect Essential+ CloudFormation template. Select the Physical ID
 link that corresponds to the EC2 instance.

- In the AWS Management Console, open the CloudFormation page.
- Select the XProtect Essential+ CloudFormation stack that you created. It is identified by the Stack name that you specified during configuration.
- In the Resources tab, you will see all the stack elements that were created by the XProtect Essential+ CloudFormation template. Select the Physical ID link that corresponds to the EC2 instance.
- In the Description
 tab of the EC2 Instances
 page, locate the Instance ID
 and Public DNS (IPv4)
 fields.

- If the HTTP port 8081 is not used, remove port 8081 in the Security Group for improved protection of your installation.s
|
For XProtect Web Client: |
For XProtect Mobile: |
|---|---|
https://<Public DNS of the EC2 instance>:8082 You are now connected to your AWS deployment through XProtect Web Client. For more information, see the user manual for XProtect Web Client. |
Name: <Custom name for the server> Address: <Public DNS of the EC2 instance> User name: ec2-user Password: AWS<Instance ID of the EC2 instance> You are now connected to your AWS deployment through XProtect Mobile. For more information, see the user manual for XProtect Mobile. |
If you are having problems connecting, make sure that the IP address that you are accessing the EC2 instance from is part of the RDP Ingress CIDR Block.
Connect via non-secure network protocol (HTTP)
Milestone recommends that you use the secure network protocol (HTTPS). However, if you are deploying XProtect Essential+ CloudFormation stack for a simple test and demo scenario, you can use the non-secure network protocol (HTTP) which is simpler to configure. HTTP uses port 8081.
The XProtect Essential+ CloudFormation lets you access XProtect Essential+ using the XProtect Web Client and XProtect Mobile. No additional configuration through the VPC is needed.
- In the AWS Management Console, open the CloudFormation page.
- Select the XProtect Essential+ CloudFormation stack that you created. It is identified by the Stack name that you specified during configuration.
- In the Resources tab, you will see all the stack elements that were created by the XProtect Essential+ CloudFormation template. Select the Physical ID link that corresponds to the EC2 instance.
- In the Description tab of the EC2 Instances page, locate the Instance ID and Public DNS (IPv4) fields.
|
For XProtect Web Client: |
For XProtect Mobile: |
|---|---|
http://<Public DNS of the EC2 instance>:8081 User name: ec2-user Password: AWS<Instance ID of the EC2 instance> You are now connected to your AWS deployment through XProtect Web Client. For more information, see the user manual for XProtect Web Client. |
Name: <Custom name for the server> Address: <Public DNS of the EC2 instance> User name: ec2-user Password: AWS<Instance ID of the EC2 instance> You are now connected to your AWS deployment through XProtect Mobile. For more information, see the user manual for XProtect Mobile. |
If you are having problems connecting, make sure that the IP address that you are accessing the EC2 instance from is part of the RDP Ingress CIDR Block.
Connect via Remote Desktop Protocol
To configure the XProtect Essential+ CloudFormation installation through XProtect Management Client and view video using XProtect Smart Client, access the VPC you deployed via Remote Desktop Protocol (RDP):
- In the AWS Management Console, open the CloudFormation page.
- Select the XProtect Essential+ CloudFormation stack that you created. It is identified by the Stack name that you specified during configuration.
- In the Resources tab, you will see all the stack elements that were created by the XProtect Essential+ CloudFormation template. Select the Physical ID link that corresponds to the EC2 instance.
- At the top of the EC2 Instances page, select Connect.
- In the Connect to your instance window, select Get Password.
- The Key Name shows the name of the key pair that you specified during configuration. To associate the key pair with the Key Pair name, select Choose File and locate the key pair file on your local machine.
- Select Decrypt Password to view the password for the RDP connection.
- Select Back to return to the previous screen, then select Download Remote Desktop File.
- Open the downloaded .rdp file and select Connect on any identification warnings that may appear.
- Enter the password you decrypted in step 7 and select Connect.

You are now connected to the VPC, which is running XProtect Essential+.
If you are having problems connecting, make sure that the IP address that you are accessing the EC2 instance from is part of the RDP Ingress CIDR Block.
Secure the communication
You secure the communication between XProtect Essential+ and XProtect Web Client and XProtect Mobile by generating and installing an SSL certificate on your server. When installed, the XProtect components communicate through HTTPS and port 8082.
- Generate an SSL certificate. Si desea más información, consulte la guía de certificados sobre cómo asegurar sus instalaciones XProtect VMS.
- Connect to the deployed computer via a remote desktop protocol. For more information, see Connect via Remote Desktop Protocol.
- From the tray area, right-click the MilestoneXProtect Mobile Server tray manager
- From the menu, select Server Configurator.
- From the Encryption tab, enable Mobile streaming media certificate.
- Select your SSL certificate.
- Click Apply to start the installation of the SSL certificate.
- Wait until all services are restarted.