

Migration steps
Migrate these items from the XProtect Professional VMS system to the XProtect VMS system using Milestone Migration Assistant Tool:
- Cameras and devices
- Users
- Views
The following steps outline what to do when you run the tool:
- Locate the Milestone Migration Assistant Tool file that you downloaded on the computer running XProtect Professional VMS and run it. The login dialog appears.
- Specify the management server address of the XProtect VMS system that you want to migrate to.
- Select authentication type, enter user name and password, and then click Continue.
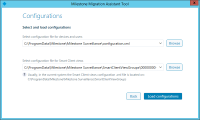
- Click Yes to confirm that Milestone Migration Assistant Tool selects the configuration files and click Load configurations.
If you run Milestone Migration Assistant Tool from another computer, you must locate the configuration files by yourself.
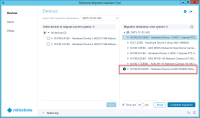
The Devices tab appears.
- If you migrate to a system with multiple recording servers, make sure to select the correct recording server.
- Select the cameras and devices that you want to migrate, and click Move.
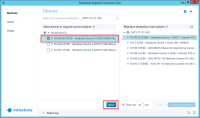
The selected devices are now in the Migration destination column.
Continue with users and views.
- Click the Users tab. Select the users and click Move to the corresponding roles you want to migrate to.
-
Only system administrators of the current system can be migrated to the administrative role on the new system.
- Click the Views tab. Select the views and click Move to the view group you want to migrate to.
- Click Complete migration.
- Verify in the Status log at the bottom that the migration completed successfully.
Recording now starts on the XProtect VMS recording server triggered by Default Record on Motion Rule.
Close Milestone Migration Assistant Tool.


The migration starts.