Installation and deployment steps
-
Check prerequisites
-
Run the installation script
-
Activate the BriefCam license
-
Set up the deployment
-
Define and activate the cameras
-
Disable face recognition and license plate recognition (optional)
-
Update the SSO address
-
Install BriefCam Embedded Client for Milestone XProtect plug-in
-
Using an HTTPS host (optional)
STEP 1 - Check prerequisites
XProtect Rapid REVIEW will not work if the minimum requirements are not met. For additional information, see the APPENDIX: XProtect Rapid REVIEW hardware recommendations.
Make sure an adequate site survey was performed.
| Server | At least one dedicated server for XProtect Rapid REVIEW (it cannot be installed on the same server with the VMS). |
| Memory | At least 64GB of RAM |
| Storage |
Refer to the APPENDIX: XProtect Rapid REVIEW hardware recommendations for recommended storage size. |
| GPUs |
At least one supported GPU. For additional information, see the list of recommended GPUs which is available on the specification sheet that you can download from the Milestone Content Portal: Collections / Rapid REVIEW. The GPU should not be used for any system task such as connecting a monitor to the GPU or running applications, such as Chrome, using the GPU. |
| CPU | For each GPU, at least 4 cores at base (non-turbo) frequency of 2.5GHz and above. |
| Drivers |
For the server with the GPU, make sure to download a supported version of the NVIDIA driver (470.94 or higher). Make sure to restart the computer after installing the NVIDIA driver. |
| Network connectivity between BriefCam and the VMS | Ensure a minimum of 1 Gbps of throughput is available. This is relevant for deployments with less than 300 cameras on site. For larger deployments, consult with your BriefCam Account Manager. |
| Operating System | Windows 10 Pro version 1803 or higher, Windows Server 2016 or Windows Server 2019 (You can check the Windows versions by running winver.exe.) For the Windows 10 'N' edition, you need to install 'Media Feature Pack' and 'Windows Media Player' via the Windows optional features menu. For more information, click here. |
| Windows Updates | Make sure that the latest Windows updates are installed. |
| .NET Framework |
If the computer is running Windows 10 or Windows Server 2016, download and install .NET Framework 4.7.2 Runtime or higher. Make sure to restart the computer after installing .NET Framework. |
| Permissions | Current logged in user has full local admin rights and full Registry Read/Write permissions. |
| Browsers |
Mozilla Firefox version 69.* and above Google Chrome version 77.* and above Microsoft Edge version 80 and above
|
| Ports | See the Firewall Consideration and Ports Availability section below. |
Firewall Consideration and Ports Availability
Internal (Local) Ports
On each server, the following ports should be opened for internal communication:
-
On each server, all outbound ports should be opened, to allow communicating with other servers as needed.
-
On each server, the following inbound ports should be opened according to the installed services. The BriefCam application listens for incoming traffic from these ports. The installer will create the relevant Windows firewall rules for these ports.
| Component | Port # |
|---|---|
| BI Face Recognition Service | TCP 13004 |
| Face Recognition Matching Service | TCP 13002 |
| Filtering Service | TCP 13001 |
| License Service | TCP 1947 |
| Lighthouse Service | TCP 2553, TCP 2554, TCP 2555, TCP 2556, TCP 2557 |
| LPR Matching Service | TCP 13003 |
| Milestone | TCP 554, TCP 8080 |
| MilestoneSSOProvider | TCP 8030 |
| Notification Service | TCP 7080 |
| PostgreSQL Redis | TCP 5432 |
| Redis | TCP 6379 |
| Storage | TCP 139, TCP 445 |
| Video Streaming Gateway Service | TCP 5010 |
| VSServer Service | TCP 1112, TCP 1113 |
| Web Services (BOA, ProWebApi, AdminWebApi) | HTTP (80) |
External Ports
The following ports should be opened to traffic coming from the end users’ browsers.
| Component | Port # | Comment |
|---|---|---|
| Web Services | HTTP (80) | |
| Video Streaming Gateway Service | TCP 5010 | Not needed when using a load balancer |
| Notification Service | TCP 7080 |
Additionally recommend prerequisites
-
Set the default system language to English during the installation. If the language is a language other than English, the installation may end with an error. The system language can be set to any preferred language after the installation.
-
Disable antivirus scans from all BriefCam folders. For more information, see the Antivirus guidelines from BriefCam.
STEP 2 – Run the installer
-
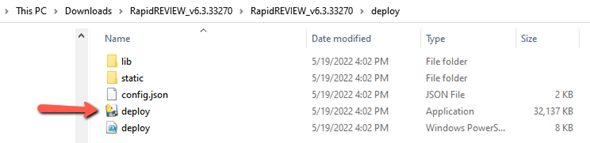
Extract the XProtect Rapid REVIEW package (RapidREVIEW_v6.3.xxxxx.zip)
- Open the deploy installation folder:
cd [your extracted folder]\deploy -
Click the deploy application to begin the installation.
If you are using the latest Windows Update and a Windows Defender alert appears, click the More info link and click Run anyway.
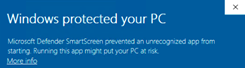
If you see a message about an unknown publisher, click Yes.
The following screen opens.
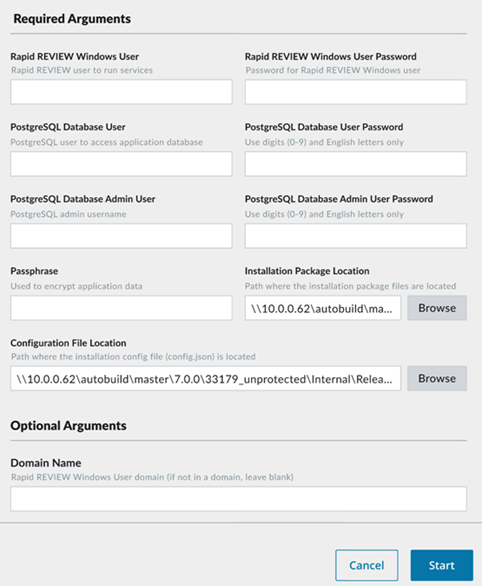
-
Fill in the following fields. Note, that all the fields should only have whole numbers and/or English letters.
Field Description Rapid REVIEW Windows User The Rapid REVIEW user that runs the service. Rapid REVIEW Windows User Password The Rapid REVIEW user's password. PostgreSQL Database User The PostgreSQL user that accesses the application database. This cannot be the same as the PostgreSQL Database Admin User mentioned below. PostgreSQL Database User Password The password of the user above (PostgreSQL Database User). PostgreSQL Database Admin User The admin user for the PostgreSQL database. This cannot be the same as the PostgreSQL Database User mentioned above. PostgreSQL Database Admin User Password The password of the user above (PostgreSQL Database Admin User). Passphrase This passphrase will be used to generate an encryption key to secure connection strings and other sensitive data. Installation Package Location The path where the instalation package files are saved. Configuration File Path The path where the installation configuration (config.json) file is located. Domain Name The Rapid REVIEW Windows User that runs the domain. If the user is not in a domain, leave this blank. -
Click the Start button.
The installation may take 10-25 minutes.
The extracted folder includes multiple BriefCam installer files, which are listed below. You do not need to run any of the BriefCam installers (except for the embedded client installer). The installer automatically installs XProtect Rapid REVIEW for you.
BriefCam Milestone plugin
BriefCam Embedded Client for Milestone XProtect plugin
BriefCam PostgreSQL
BriefCam RabbitMQ
BriefCam Server
BriefCam Web Services
Installation Troubleshooting
If the installation failed:
-
Investigate the log files (deploy.log and deploy-trace.log) files, to see which component of the installation has failed. The files are located in the deploy directory.
-
Investigate the relevant component’s log file and fix the issue according to the error in the log.
-
Reinstall BriefCam:
-
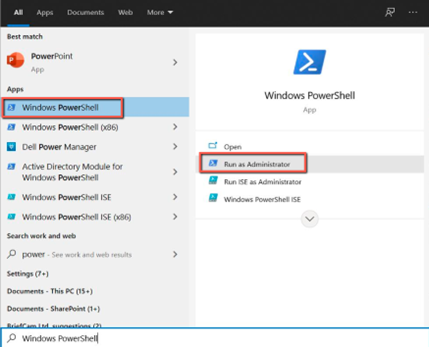
Open PowerShell as an administrator.
-
In PowerShell, run the following command to remove all installation components:
.\deploy.ps1 -uninstall -local -purge
For example:

Do not run this command after you have activated the license. You should only run this command if you were not successful in installingBriefCam.
-
Run the installer.
-
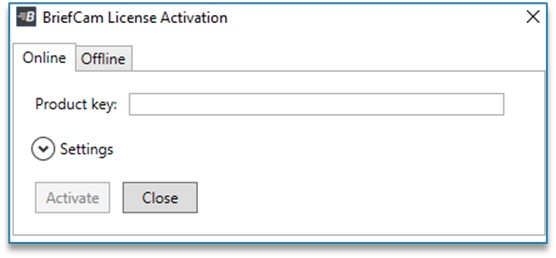
STEP 3 – Activate the BriefCam license
-
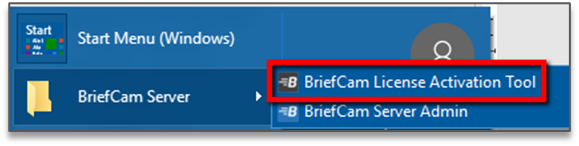
On the XProtect Rapid REVIEW computer, launch the BriefCam License Activation application from the Start menu.
-
Enter the product key that you received from BriefCam, and click Activate.
-
Upon successful activation, the following dialog box will appear.
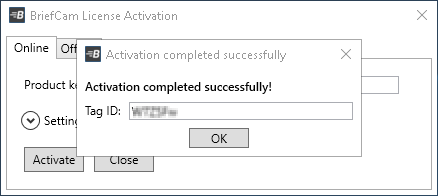
-
Click OK to close the dialog box, and then click Close in the main application window to close the License Activation application.
STEP 4 – Set up the deployment
-
In a browser, enter the hostname of the computer where XProtect Rapid REVIEW was installed followed by slash (/) and the word admin, that is: http://[computer name]/admin. The BriefCam Administrator Console will open.
-
Log into the console. The user is Administrator and the password is changeit.
-
Change the password.
You’ll now set up the deployment from the Deployment section.
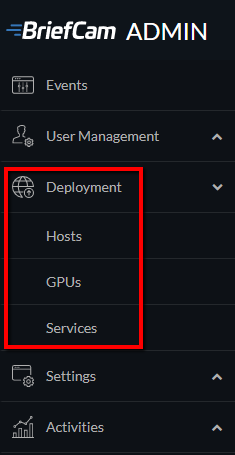
-
From the Deployment section, click Hosts.
-
Next to the host name, click on the settings icon
 .
. -
From the Templates menu, select All In One.

-
Clear the Alert Processing Server, BI Face Recognition Service, and BI Rule Engine Service check boxes (these options will not be needed).
-
Click Apply.
-
From the Deployment section, click GPUs and then select GPU OX5.
-
Click on the edit icon (
 ).
). -
If face recognition will be used, select the Face Recognition check box.
-
In the Mode column, select On Demand.

-
Verify that the number of workers under Workers is set to 4.
-
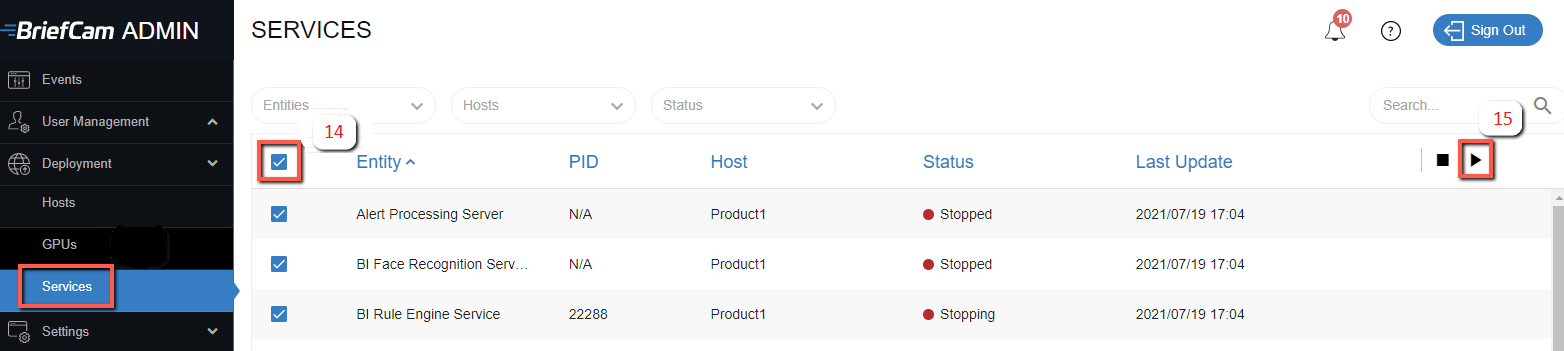
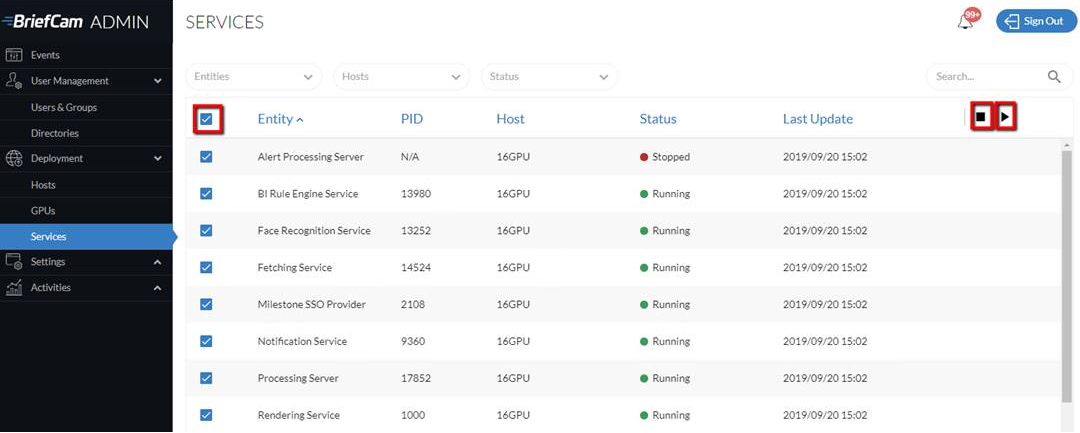
From the Deployment section, click Services.
-
Select the check box at the top left of the table.
-
Click the start button.
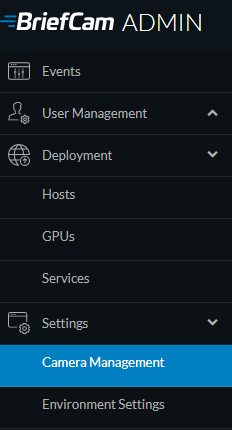
STEP 5– Define and activate the cameras
-
Open the Settings section and click Camera Management (as shown in the image below).
-
Click Add directory. The Add Directory dialog box opens.
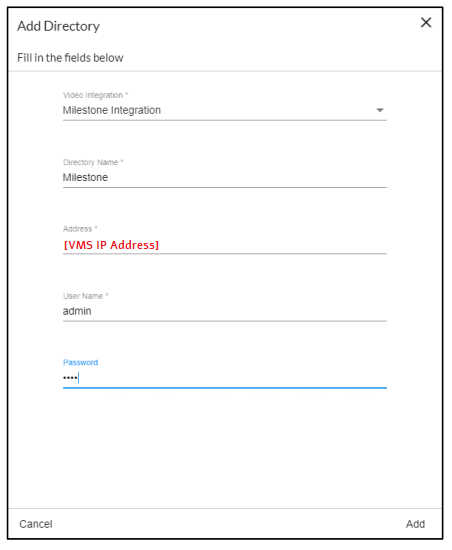
-
From the Video Integration field, select Milestone Integration.
-
In the Directory Name field, enter a display name for the user directory.
-
In the Address field, enter the IP address of the Milestone VMS server.
-
In the User Name and Password fields, enter an administrator user name and password of the VMS server. With an admin user you can make sure that all the cameras can be accessed.
-
Click Add to add the directory.
-
Click the zoom (
 ) icon to the right of the new directory and select the Add / Edit Cameras option.
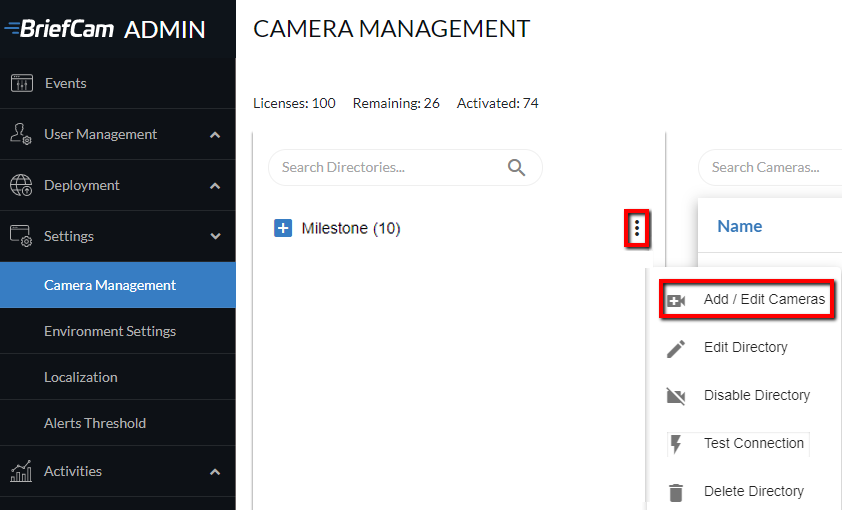
-
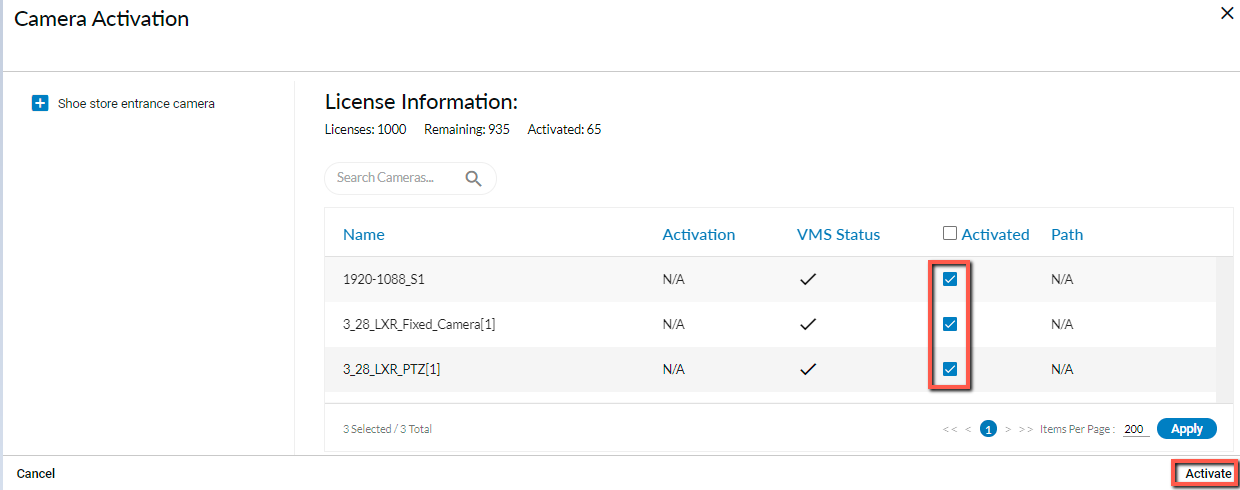
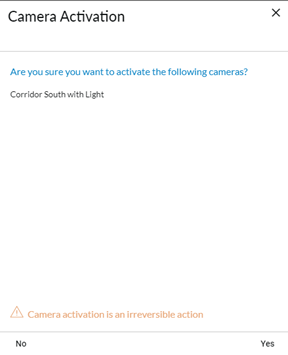
For all of the cameras, select the check box in the camera’s Activated column and click the Activate button (located in the bottom right corner), as shown in the image below.
-
The Camera Activation pane shown below will appear. If you are sure you want to activate the cameras, click Yes. Note that Camera activation is irreversible. It cannot be reset unless a special approved request is opened with BriefCam support.
STEP 6 – Disable face recognition and license plate recognition (optional)
If you want to disable face recognition and/or license plate recognition:
-
In the BriefCam Administrator Console, open the Settings section and click Environment Settings
- Set the clientEnableFaceRecognition environment setting to false. This removes the Face Recognition functionality from the UI.
-
Set the MetaData.EnableFaceRecognition environment setting to false. This disables the Face Recognition engine.
-
Set the EnableLPR environment setting to false. This removers the License Plate Recognition functionality from the UI.
STEP 7 – Update the SSO address
-
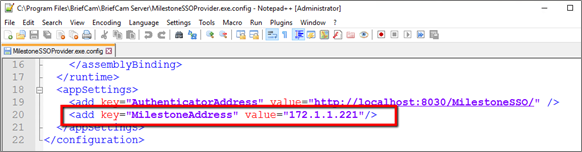
On the XProtect Rapid REVIEW computer, go to C:\Program Files\BriefCam\BriefCam Server and open the MilestoneSSOProvider.exe.config file.
-
Edit the MilestoneAddress setting with the IP address of the Milestone VMS server in the value portion of the line.
Note: If STEP 7 is performed later, you will need to restart the IIS services.
STEP 8 – Install BriefCam Embedded Client for Milestone XProtect plug-in
On each XProtect Rapid REVIEW client computer, install BriefCam’s embedded client for Milestone XProtect plugin.
-
Click the BriefCam Embedded Client for Milestone XProtect plug-in file to download it and then run it.
-
The installation checks for prerequisites, such as Microsoft .NET Framework 4.7.2 Full and Microsoft Visual C++ 2015 2017 2019 Redistributable Package (x64).
-
If anything is missing, you will be prompted to install the missing prerequisites and click Install.
-
In the Welcome screen, click Get Started.
-
Read the license, accept the License Agreement terms, and click Next.
-
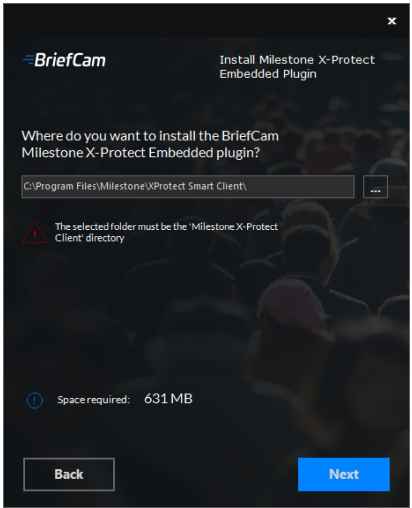
Select the installation destination path and click Next.
Note that the installation path must be the same directory where Milestone XProtect Smart Client is installed. (This may vary slightly between client computers and between Milestone versions.)
-
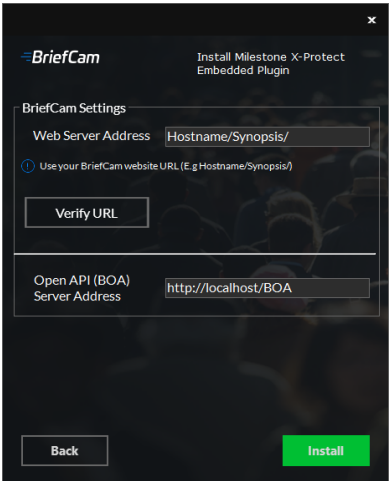
Enter the BriefCam Web Application URL (which is the hostname or IP address of the BriefCam computer followed by /synopsis and verify that the provided URL is correct by clicking the Verify URL button (as shown below).
-
In the BriefCam Open API (BOA) Server Address field, enter the hostname or IP address of the BriefCam computer followed by /BOA.
-
Click Next.
-
Click Install and then click Finish.
-
In the BriefCam Administrator Console, restart the services by selecting all of the services, clicking the stop button (
 ) and then the start button (
 ), as shown in the image below.
-
Restart IIS by opening the Windows services and right-click the World Wide Web Publishing Service. Then click Restart.
Note: An admin user is automatically created by the SSO when logging into the Milestone client using the Basic authentication or Windows authentication method.
If you want to log into the Milestone client using the Windows authentication (current user) option, add the BriefCam user (by default this is BCUser) to the Administrators group in MilestoneXProtect Management Client.

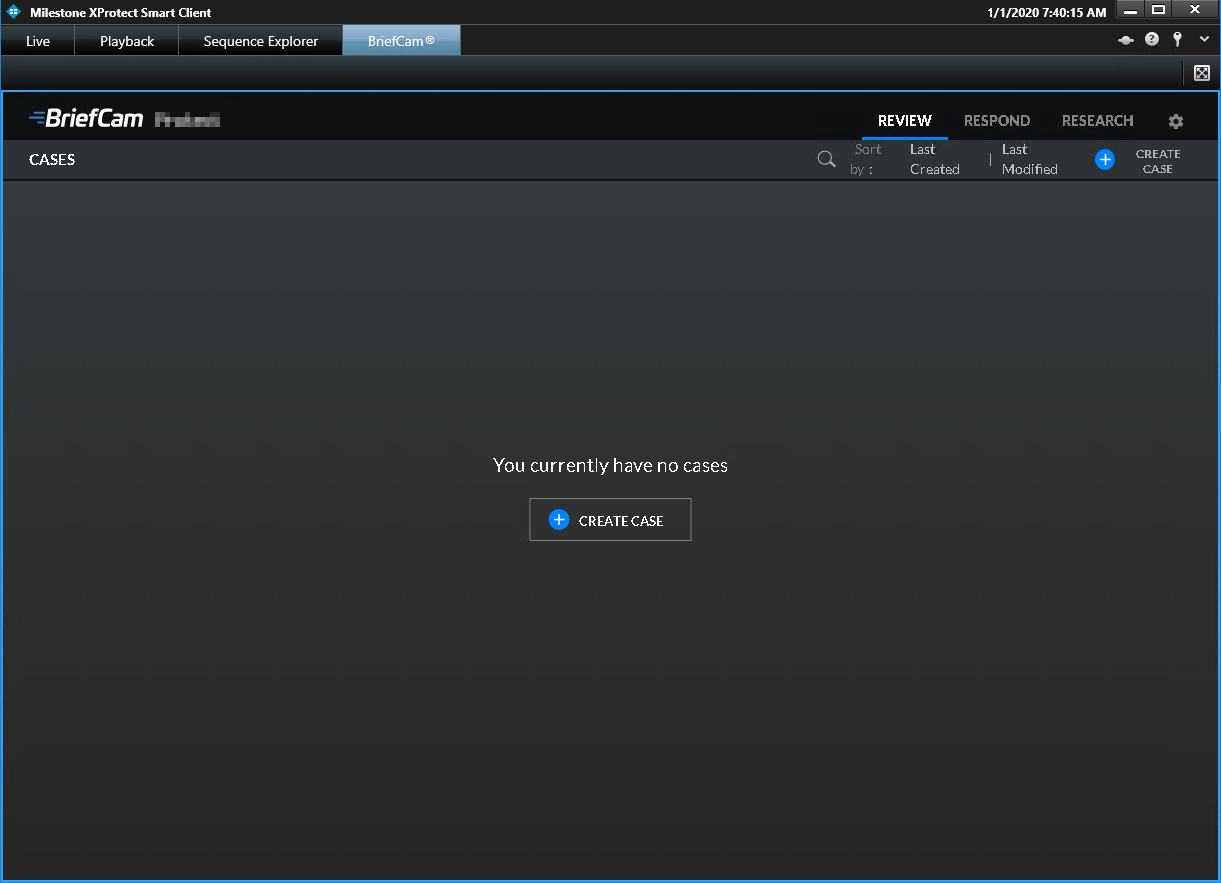
When you have completed the steps, a BriefCam tab will appear in the MilestoneXProtect Smart Client.
In BriefCam, for security reasons, users are automatically logged out if no activity is detected for 20 minutes. Therefore, a user may be automatically logged off the BriefCam functionality while the Milestone VMS is still running.
STEP 9 – Using an HTTPS host (optional)
To work with SSL and BriefCam, using a load balancer is required.
This section describes the steps to take to use the NGINX load balancer as an https host for BriefCam services.
Recommendations
BriefCam recommends using NGINX.
It is recommended to install the load balancer on a separate computer.
If you are working in a virtualized environment, the load balancer must be on a separate computer.
If you are working in a non-virtualized (physical servers) environment, you can have the load balancer on the same computer as the Web Services (although it is not recommended). However, if you install the load balancer on the same computer as the Web Services, IIS must be on a different port than port 80, since port 80 is for NGINX.
Prerequisites
-
Make sure that port 80 is not in use by another application.
-
If IIS is installed, make sure to stop it or change its default port.
Steps
-
Download NGINX 1.19.x load balancer or later from this link: http://nginx.org/en/download.html.
-
Extract the NGINX zip files to drive C:\. It is important to have the NGINX extracted so that the path is: C:\NGINX.
-
Create or use an already created self-signed certificate separated into two files: .crt and .key:
For information about how to create a certificate, see one of these links:
To use an already created certificate from the current folder, place both the certificate’s .crt and .key files in the following path: C:\NGINX\certificates\.
-
Download the nginx.conf file from: https://bcftpuser:BCreleases01!@bcftp.briefcam.com/nginx/nginx.conf and save it to c:\nginx\conf (replacing the existing file).
-
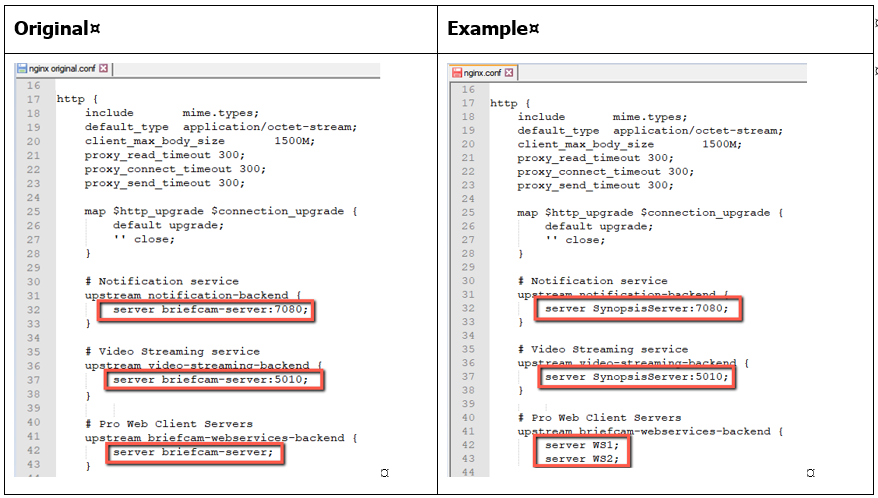
In the nginx.conf file’s http section, modify the server name where the components are running (web services, notification services, and Video Streaming Gateway Services).
-
If you have multiple nodes of a service, add a semicolon (;) after the first node and add a second row with the name of the second node. In the example below, there are two Web Services nodes.
-
In the nginx.conf file’s BriefCam System using SSL certificate section you set up HTTPS as follows:
-
In the server_name node, replace www.example.com with the address of the load balancer.
-
Comment the alias node by adding an ampersand (#) at the beginning of the row.
-
In the ssl_certificate row, enter the full path to the .crt file including the file name.
-
In the ssl_certificate_key row, enter the full path to the .key file including the file name.

-
-
If your SSL certificate is protected by a password, you need to configure NGINX to read a list of passwords that are stored in a separate file. If the private key is not in this file, NGINX will not start. You do this as follows:
-
Create a new text file named ssl_passwords.txt and save it to a separate folder than where the SSL certificate is located.
-
Set the file to be readable only to the user running NGINX.
-
Enter the certificate password into the first line of the ssl_passwords.txt file.
-
In the nginx config file, add the following line above the existing certificate lines: ssl_password_file /var/lib/nginx/ssl_passwords.txt;
-
Distribute this file separately from the configuration file.
-
Download the latest release of the NSSM zip files from this link: https://nssm.cc/download and place them on the load balancer computer.
-
Extract the NSSM zip file to a folder, for example: C:\NSSM\.
-
Open CMD as administrator, navigate to the new NSSM\win32 folder and run the following commands:
-
nssm install NGINX “C:\nginx\nginx.exe”
-
nssm set NGINX AppDirectory C:\nginx
-
nssm set NGINX DisplayName “NGINX Web Server”
-
nssm set NGINX Description “NGINX Web Server”
-
nssm set NGINX Start SERVICE_AUTO_START
For additional security measurements for SSL private keys, see the NGINX documentation.
In the examples below, replace the string www.example.com with the address of the load balancer.
For example: Load balancer = LB01.briefcam.com.
-
On any host that is running the application (browser), make sure the domains (or host name) can be resolved by the DNS. If no DNS is available, you can edit the hosts file and add the IP address of the load balancer using the following syntax:
• 10.x.x.x www.example.com
For example: 10.0.0.143 www.example.com
-
Restart the load balancer computer, open services.msc and try to start the newly created NGINX Web Server service.
-
If the service does not start, there may be an issue with its path. To try and solve this issue, run NSSM install on the same folder as described under step 8 and define the service via the NSSM GUI (making sure to specify the parameters properly).
-
Edit both web config .js files on the BriefCam server (located at C:\Program Files\BriefCam\WebServices\ProWebClient\webConfig.js and C:\Program Files\BriefCam\WebServices\ProWebAdminClient\web.config.js) using the syntax below. This syntax refers to the load balancer address. The endpoints in both files must point to the load balancer.
• //www.example.com/ProWebApi/
• //www.example.com/AdminApi/
-
In the BriefCam Administrator Console, set the environment settings with the following values:
• DB.LocalStorageAddress : “//www.example.com/ProWebApiStorage"
• BaseVideoUrl: “https://www.example.com/vsg”
• ClientNotificationEndPoint: “//www.example.com/signalr" (without port 7080)
-
You now need to update certain parameters, so that the embedded client will reach BriefCam using an HTTPS protocol. In order to do this:
a. Open the BriefCam.MilestoneEmbeddedViewer.dll.config file, which is located at: C:\Program Files\Milestone\XProtect Smart Client\MIPPlugins\BriefCam.
b. Change the URLs (highlighted below) to include HTTPS:
<appSettings><!--Client site address--><add key="serverAddress" value="https://SMB29/Synopsis/" /><!--Boa site address--><add key="boaServerAddress" value="https://SMB29/BOA" /><!--add key="boaVersion" value="1.0" /--><!--add key="keepAliveIntervalMS" value="60000" /--><!--add key="httpTimeout" value="5000" /--><!--add key="pageLoadTimeoutMS" value="1000" /--><!--add key="BrowserLogLocation" value="c:\DotNetBrowserLog.txt" /--></appSettings> -
Browse to the application and make sure that it works with https requests.
For example:
VideoProcessingGatewayUrl in https is not supported.
VideoProcessingGateWayUrl will use http and not https because it is communicating between two internal processes (real-time engine and Video Processing gateway web service). This is on purpose to save resources.
Generic configurations
For any other type of load balancer, you need to configure the following redirect rules based on the URL:
-
Notification Service
Search for: /signalr
Redirect to: notification-server:7080
-
Video Streaming Gateway
Search for: /vsg
Use rewrite rule to remove /vsg from the url
Redirect to: videostreaming-server:5010
-
Web Services>
Search for: /
Redirect to: briefcam-webserver
Logging
To handle the log rotation:
-
Download the log rotation text from here: Log rotation script and create a bat file:
-
Copy the text from the link to a .txt file and name it LogRotation.
-
Change the file extension from .txt to .bat.
-
-
Save the script (.bat file) to C:\NGINX.
-
Create an OS user (such as bcuser), a user on the OS level, or create a Windows user account. The user does not need admin rights.
-
Edit the C:\NGINX folder’s security options and assign full control to the user that you created in step 3.
-
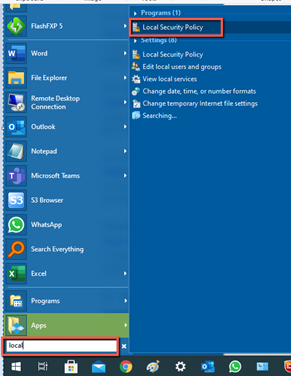
Click Start (Windows key) and type secpol.msc to open the Local Security Policy utility.
-
Go to Security settings > Local Policies > User Rights Assignment.
-
Right-click Log on as a batch job and add the user.
-
Add a daily scheduled task to run the C:\NGINX\LogRotation.bat file. Make sure to select Run whether user is logged on or not. By default, the last 10 days will be retained (retention period in days). If you want a different number of days, when running the batch file, enter the required number of days as a command line argument. For example, for 20 days, use: C:\NGINX\LogRotation.bat 20.
Upgrade Steps
To upgrade XProtect Rapid REVIEW:
-
Stop all BriefCam services and close all open applications before starting the upgrade process.
-
Extract the XProtect Rapid REVIEWXProtect Rapid REVIEW installation package (RapidREVIEW_v6.3.xxxxx.zip).
-
Open Windows PowerShell 64 bit as an Administrator.
-
Open the deploy installation folder:
cd [your extracted folder]\deploy
-
Set the following environmental variables by running each of the below commands separately. Replace the text in quotation marks (" ") with your values. Note that all the strings should only have whole numbers and/or English letters.
-
$env:BC_USR = "bcuser"
-
$env:BC_PWD = "Qwerty123"
-
$env:PG_BC_USR = "brief"
-
$env:PG_BC_PWD = "Cam"
-
- Run the following command:
.\deploy.ps1 -local -upgrade