

Configuring XProtect Smart Wall
You can configure any number of Smart Wall definitions. Configuring a Smart Wall definition is a two-step process. First, you configure your Smart Wall definition in XProtect Management Client, including setting user permissions and defining rules. Second, to enable operators to manually push content onto the video wall, Milestone recommends that you add a Smart Wall control![]() A graphical representation of a video wall that allows you to control what is displayed on the different monitors. to dedicated views in XProtect Smart Client. See also Smart Wall control (explained)
A graphical representation of a video wall that allows you to control what is displayed on the different monitors. to dedicated views in XProtect Smart Client. See also Smart Wall control (explained)
In XProtect Management Client:
- Create the Smart Wall definition and set the general properties, including the name and properties of the view items. See also Create Smart Wall definitions.
- Add the Smart Wall monitors, then set their size and position so they are consistent with the physical monitors of your video wall. See also Add Smart Wall monitors and Position Smart Wall monitors. The Smart Wall control in XProtect Smart Client uses these settings and shows how the monitors have been organized, for example next to or below each other.
- (optional) Create the empty Smart Wallpresets
 A predefined layout for one or more Smart Wall monitors in XProtect Smart Client. Presets determine which cameras are displayed, and how content is structured on each monitor on the video wall. that are required to define the monitor view layout and add the default cameras at a later stage. See also Create presets for your Smart Wall definition.
 -
(optional) For each monitor, select a preset, define its view layout, and add the default cameras. See also Define view layout and add cameras.
When to use presets? If you want operators to push cameras and views onto the Smart Wall manually, you do not need to create presets. However, if you plan to use rules to automatically change what to display on the video wall, you must define presets.
In XProtect Smart Client:
- To allow operators to push content onto the video wall, create the views you need and add the Smart Wall control. With the Smart Wall control you can drag-and-drop or send cameras, entire views, and other types of content to individual monitors.
- Change the view layout of individual Smart Wall monitors that have been defined in XProtect Management Client.
- Reset or change the presets already applied to the Smart Wall definition.
Create Smart Wall definitions
To configure a Smart Wall definition, you must first create it in XProtect Management Client. Repeat the following steps for each Smart Wall definition that you want to create:
- In XProtect Management Client, expand Client and select Smart Wall.
-
In the Smart Wall pane, right-click Smart Wall Definitions and select Add Smart Wall. A window appears.
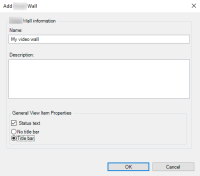
- Specify the settings for the Smart Wall.
- In the General View Item Properties settings, specify if you want system status information and title bars to appear above the cameras in the views.
- Click OK. The Smart Wall definition is added to the Smart Wall pane.
- Next, add the Smart Wall monitors. See also Add Smart Wall monitors.

Add Smart Wall monitors
When you have created your Smart Wall definition, you must add the Smart Wall monitors that your video wall consists of and specify the monitor settings.
You have created at least one Smart Wall definition. See also Create Smart Wall definitions.
Steps:
-
In the Smart Wall pane, right-click your Smart Wall definition and select Add Monitor. A window appears.
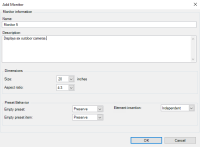
- Configure the size and aspect ratio of the monitor, so that it matches one of the physical monitors on the video wall.
-
Specify the
presetA predefined layout for one or more Smart Wall monitors in XProtect Smart Client. Presets determine which cameras are displayed, and how content is structured on each monitor on the video wall.
behavior.
-
Empty preset - control what happens in XProtect Smart Client when an operator applies an empty preset:
-
Preserve - keep what is currently being displayed
-
Clear - replace the current content with the empty preset
-
-
Empty preset item - control what happens in XProtect Smart Client to individual preset items when an operator applies a preset with empty preset items:
-
Preserve - keep what the preset item is currently displaying
-
Clear - replace the preset item with the empty preset item
-
-
Element insertion - control what happens in XProtect Smart Client when an operator
A professional user of an XProtect client application. drags a camera onto an item in the preset:-
Independent - replace the camera already in the preset item with the new camera
-
Linked - push the content from left to right from the view item where you inserted the new camera
-
-
- Click OK to save your changes.
- Keep adding Smart Wall monitors until the number of Smart Wall monitors matches the number of physical monitors.
- Next, position the monitors. See also Position Smart Wall monitors.

Position Smart Wall monitors
When you have added the monitors to your Smart Wall definition, you must position the different monitors to match the setup of the physical monitors on the video wall.

The image in the example shows the Smart Wall control in XProtect Smart Client. The four monitors are laid out in sequence and in two rows - starting with Monitor 1 and ending with Monitor 4.
You have added the monitors to your Smart Wall definition. See also Add Smart Wall monitors.
Steps:
- In the Smart Wall pane, select your Smart Wall.
-
In the Properties pane, click the Layout tab.

-
Click the Edit button. A window appears.
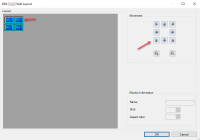
- Drag and drop the monitors to position them, or use the arrows.
- Click
 or
or  to zoom in or out.
 - If you have not already specified the size and aspect ratio of the monitors, you can do that now.
- Click OK to save your changes. The positioning and sizing of monitors are visualized in the Smart Wall control in XProtect Smart Client.
- Next, add presetsA predefined layout for one or more Smart Wall monitors in XProtect Smart Client. Presets determine which cameras are displayed, and how content is structured on each monitor on the video wall.. Adding presets is a requirement for specifying the layout of Smart Wall monitors and adding cameras to your monitors. See also Create presets for your Smart Wall definition.

Create presets for your Smart Wall definition
With presets, you can configure what your video wall or specific monitors show. Create as many presets as you need.
Steps:
- In the Smart Wall pane, select your Smart Wall.
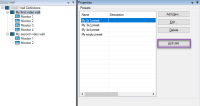
- In the Properties pane, click the Presets tab.
-
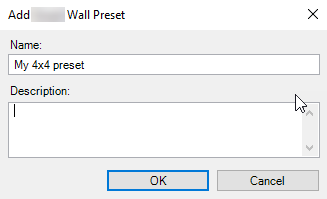
Click Add New. A window appears.
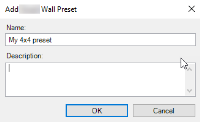
- Enter a type and add a description if you want to.
- Click OK to save your changes.
- Repeat the steps above for each preset that you want to add.
- Next, add view layout and cameras to the monitors. See also Define view layout and add cameras.
Define view layout and add cameras
To control what to display on a monitor, you must select a preset, define a view layout, for example 2x2, and then possibly add cameras.
-
One preset typically covers all the monitors of the video wall. For each of those monitors, select the same preset and configure it according to what the monitor shall display.
-
Presets can also be empty, which may be helpful if you are using blank screen monitoring. See also Blank screen monitoring (explained).
At least one preset has been created. See also Create presets for your Smart Wall definition.
Steps:
- In the Smart Wall pane, select the monitor that you want to add cameras to.
- In the Properties pane, click the Presets tab.
- Select the preset.
- Click Edit. A window appears.
-
Click
 . An additional window appears.
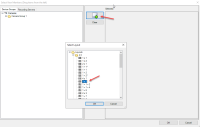
-
Select a layout and click OK. The layout is shown on the right-hand side of the first window.
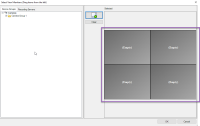
- From the Device Groups or Recording Servers tab, drag the cameras onto the preset items - one by one. You can also leave preset items empty.
- Click OK to save your changes.
- Repeat the steps above for each monitor.
- Now, you can start using your Smart Wall in XProtect Smart Client.


You must also configure the operators' user permissions for using XProtect Smart Wall. See also Specify user permissions for XProtect Smart Wall.
Activate presets for your Smart Wall definition
To view Smart Wall content in XProtect Smart Client, first you must activate the presets created for your Smart Wall definitions. You can also activate the presets in XProtect Smart Client.
Steps:
-
In the Smart Wall pane, select the Smart Wall definition.
- For each required preset, click Activate. You can also activate the presets manually in XProtect Smart Client.
