

Site Navigation: Servers and hardware: Hardware
Hardware (explained)
Hardware represents either:
- The physical unit that connects directly to the recording server of the surveillance system via IP, for example a camera, a video encoder, an I/O module
- A recording server on a remote site in a Milestone Interconnect setup
For more information about how to add hardware to your system, see Add hardware.
Add hardware
You have several options for adding hardware to each recording server in your system.
If your hardware is located behind a NAT-enabled router or a firewall, you may need to specify a different port number and configure the router/firewall so it maps the port and IP addresses that the hardware uses.
The Add Hardware wizard helps you detect hardware like cameras and video encoders on your network and add them to the recording servers on your system. The wizard also helps you add remote recording servers for Milestone Interconnect setups. Only add hardware to one recording server at a time.
- To access Add Hardware, right-click the required recording server and select Add Hardware.
- Select one of the wizard options (see below) and follow the instruction on the screen.
- After installation, you can see the hardware and its devices in the Overview pane.
Certain hardware must be pre-configured when adding the hardware for the first time. An additional Pre-configure hardware devices wizard will appear when adding such hardware. See Hardware pre-configuration (explained) for more information.
|
Name |
Description |
|---|---|
|
Express (Recommended) |
The system scans automatically for new hardware on the recording server's local network. Select the Show hardware running on other recording servers check box to see if detected hardware is running on other recording servers. You can select this option every time you add new hardware to your network and want to use it in your system. You cannot use this option to add remote systems in Milestone Interconnect setups. To add both HTTP and HTTPS hardware, run Express detection with the HTTPS (Secure) radio button selected, and then with the HTTP (Unsecure) radio button selected. |
| Address range scanning |
The system scans your network for relevant hardware and Milestone Interconnect remote systems based on your specifications of:
You can select this option when you only want to scan a part of your network, for example, when you expand your system. |
| Manual |
Specify details about each hardware and Milestone Interconnect remote systems separately. This can be a good choice if you want to add only a few pieces of hardware, and you know their IP addresses, relevant user names and passwords or if a camera does not support the automatic discovery function. |
| Remote connect hardware |
The system scans for hardware connected via a remotely connected server. You can use this option if you have installed servers for, for example, the Axis One-click Camera Connection. You cannot use this option to add remote systems in Milestone Interconnect setups. |
Hardware pre-configuration (explained)
Certain manufacturers require that credentials be set on out-of-the-box hardware before adding the hardware to a VMS system for the first time. This is referred to as hardware pre-configuration, and is done through the Pre-configure hardware devices wizard that appears when such hardware is detected by the Add hardware wizard.
Some important information regarding the Pre-configure hardware devices wizard:
- Hardware that requires initial credentials before being added to a VMS system cannot be added using the typical default credentials, and must be configured through the wizard or by connecting to the hardware directly
- You can only apply credentials (user name or password) to fields that are marked as not set
- Once the hardware status is set to configured, you cannot change the credentials (user name or password)
- Pre-configuration applies to out-of-the-box hardware and needs to be done only once. Once pre-configured, hardware can be managed like any other hardware in Management Client
- After you close the Pre-configure hardware devices wizard, pre-configured hardware will appear in the in the Add hardware wizard, and can now be added to your system
It is highly recommended that you add the pre-configured hardware to your system by completing the Add hardware wizard after you close the Pre-configure hardware devices wizard. Management Client will not retain the pre-configured credentials if you do not add the hardware to your system.
Disable/enable hardware
Added hardware is by default enabled.
You can see if hardware is enabled or disabled in this way:
 Enabled
  Disabled
- Expand the recording server, right-click the hardware you want to disable.
- Select Enabled to clear or select it.
Edit Hardware
Right-click on added hardware and select Edit Hardware to modify the network configuration and user authentication settings of hardware in Management Client.
For some hardware, the Edit Hardware dialog also lets you apply settings directly to the hardware device.
If the Edit Management Client settings radio button is selected, the Edit Hardware dialog displays the settings which Management Client uses to connect to the hardware. To ensure the hardware device is added to the system properly, enter the same settings you use to connect to the manufacturer's hardware configuration interface:
|
Name |
Description |
|---|---|
| Name |
Displays the name of the hardware alongside its detected IP address (in parenthesis). |
| Hardware URL |
The web address of the manufacturer's hardware configuration interface, typically containing the IP address of the hardware. |
| User name |
The user name used to connect to the hardware. The user name that you enter here does not change the user name on the actual hardware device. Select the Edit Management Client and hardware settings radio button to modify settings on supported hardware devices. |
| Password |
The password used to connect to the hardware. The password that you enter here does not change the password on the actual hardware device. Select the Edit Management Client and hardware settings radio button to modify settings on supported hardware devices. For information about how to change passwords on multiple hardware devices, see Change passwords on hardware devices. As a system administrator, you need to give other users permission to view the password in Management Client. For more information, see Roles settings under Hardware. |
If the Edit Management Client and hardware settings radio button is selected (for supported hardware), the Edit Hardware dialog displays settings which are also applied directly to the hardware device:
Applying the settings with this radio button selected will overwrite the current settings on the hardware device. The hardware will momentarily lose connection to the recording server while the settings are applied.
|
Name |
Description |
|---|---|
| Name |
Displays the name of the hardware alongside its detected IP address (in parenthesis). |
| Network Configuration |
The network settings of the hardware. To adjust the network settings, select Configure. |
| Configure |
Specify the Internet Protocol (for supported hardware devices) using the IP version dropdown list.
The Check button tests whether there is currently another hardware device in the system that is using the entered IP address. Check cannot detect conflicts with hardware devices that are turn off, outside of the XProtect VMS system, or otherwise momentarily not responding. |
| User name |
The user name and level used to connect to the hardware. Select another user from the dropdown list, and add a new password using the Password field described below. Add or delete users using the underlined actions at the bottom of the Authentication section (see Add a user or Delete users). Selecting a user that does not have the highest user level specified by the manufacturer could result in some features not being available. |
| Password |
The password used to connect to the hardware. View the currently entered text using the Reveal When changing the password, consult the manufacturer's documentation for the password rules for the specific hardware device, or use the Generate Password For information about how to change passwords on multiple hardware devices, see Change passwords on hardware devices. As a system administrator, you need to give other users permission to view the password in Management Client. For more information, see Roles settings under Hardware. |
| Add a user |
Select the underlined Add link to open the Add a User dialog and add a user to the hardware device. Adding a user will automatically set it as the currently active user and overwrite the previously entered credentials. When creating the password, consult the manufacturer's documentation for the password rules for the specific hardware device, or use the Generate Password The highest user level detected on the hardware device will automatically be preselected. It is not recommended to modify the User level from its default value. Selecting a User level that is not the highest specified by the manufacturer could result in some features not being available. |
| Delete users |
Select the underlined Delete link to open the Delete Users dialog and remove users from the hardware device. You cannot delete the currently active user. To set a new user, use the Add a User dialog described above, then remove the old user using this interface. |
 icon.
icon. icon to automatically generate a password that matches the requirements.
See also Manage Hardware.
Enable/disable individual devices
Cameras are by default enabled.
Microphones, speakers, metadata, inputs and outputs are by default disabled.
This means that microphones, speakers, metadata, inputs and outputs must be individually enabled before you can use them in the system. The reason for this is that surveillance systems rely on cameras, whereas the use of microphones and so on is highly individual depending on the needs of each organization.
You can see if devices are enabled or disabled (the examples show an output):
 Disabled
  Enabled
The same method for enabling/disabling is used for cameras, microphones, speakers, metadata, inputs, and outputs.
- Expand the recording server and the device. Right-click the device you want to enable.
- Select Enabled to clear or select it.

Set up a secure connection to the hardware
You can set up a secure HTTPS connection using SSL (Secure Sockets Layer) between the hardware and the recording server.
Consult your camera vendor to get a certificate for your hardware and upload it to the hardware, before you continue with the steps below:
- In the Overview pane, right-click the recording server and select the hardware.

- On the Settings tab, enable HTTPS. This is not enabled by default.
- Enter the port on the recording server to which the HTTPS connection is connected. The port number must correspond with the port set up on the device’s homepage.
- Make changes as needed and save.
Enable PTZ on a video encoder
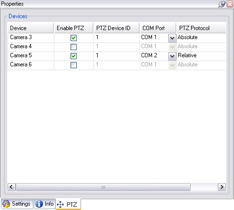
To enable the use of PTZ cameras on a video encoder, do the following on the PTZ tab:
- In the list of devices connected to the video encoder, select the Enable PTZ box for the relevant cameras:

- In the PTZ Device ID column, verify the ID of each camera.
- In the COM Port column, select which video encoder's COM (serial communications) ports to use for control of the PTZ functionality:

- In the PTZ Protocol column, select which positioning scheme you want to use:

- Absolute: When operators use PTZ controls for the camera, the camera is adjusted relative to a fixed position, often referred to as the camera's home position
- Relative: When operators use PTZ controls for the camera, the camera is adjusted relative to its current position
The content of the PTZ protocol column varies a lot depending on the hardware. Some have 5 to 8 different protocols. See also the camera documentation.
- In the toolbar, click Save.
You are ready to configure preset positions and patrolling for each PTZ camera:
Manage hardware
Info tab (hardware)
For information about the Info tab for remote servers, see Info tab (remote server).
Info tab (hardware)
|
Name |
Description |
|---|---|
| Name |
Enter a name. The system uses the name whenever the hardware is listed in the system and in the clients. The name does not have to be unique. When you rename hardware, the name is changed globally in the Management Client. |
| Description |
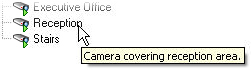
Enter a description of the hardware (optional). The description appears in a number of listings within the system. For example, when moving the mouse pointer over the hardware name in the Overview pane:
|
| Model |
Identifies the hardware model. |
| Serial number |
Hardware serial number as specified by the manufacturer. The serial number is often, but not always, identical to the MAC address. |
| Driver |
Identifies the driver that handles the connection to the hardware. |
| IE |
Opens the default home page of the hardware vendor. You can use this page for administration of the hardware. |
| Address |
The host name or IP address of the hardware. |
| MAC address |
Specifies the Media Access Control (MAC) address of the system hardware. A MAC address is a 12-character hexadecimal number uniquely identifying each piece of hardware on a network. |
| Password last changed | The Password last changed field shows the time stamp of the latest password change based on the local time settings of the computer that the password was changed from. |
Settings tab (hardware)
On the Settings tab, you can verify or edit settings for the hardware.
The content of the Settings tab is determined by the selected hardware, and varies depending on the type of hardware. For some types of hardware, the Settings tab displays no content at all or read-only content.
For information about the Settings tab for remote servers, see Settings tab (remote server).
PTZ tab (video encoders)
On the PTZ tab, you can enable PTZ (pan-tilt-zoom) for video encoders. The tab is available if the selected device is a video encoder or if the driver supports both non-PTZ and PTZ cameras.
You must enable the use of PTZ separately for each of the video encoder's channels on the PTZ tab before you can use the PTZ features of the PTZ cameras attached to the video encoder.
Not all video encoders support the use of PTZ cameras. Even video encoders that support the use of PTZ cameras may require configuration before the PTZ cameras can be used. It is typically the installation of additional drivers through a browser-based configuration interface on the device's IP address.
PTZ tab, with PTZ enabled for two channels on a video encoder.
Device password management (explained)
Available functionality depends on the system you are using. See https://www.milestonesys.com/solutions/platform/product-index/ for more information.
You can change passwords on multiple hardware devices in one operation.
Initially, the supported devices are models from Canon, Axis, Bosch, Hanwa, Panasonic, Sony, Hikvision, and ONVIF compatible hardware devices, but the user interface shows you directly if a model is supported or not. You can also go to our website to find out if a model is supported: https://www.milestonesys.com/community/business-partner-tools/supported-devices/
For devices that do not support device password management, you must change the password of a hardware device from its web page and then manually enter the new password in Management Client. For more information, see Edit Hardware.
You can choose to let the system generate individual passwords for each hardware device or to use a single user-defined password for all hardware devices. In passwords, only ASCII printable characters are supported.
The system generates passwords based on the requirements from the manufacturer of the hardware devices.
When you apply the new passwords, the hardware devices lose connection to the recording server momentarily.
After you have applied new passwords, the result for each hardware device appears on the screen. For unsuccessful changes, the reason for failure appears if the hardware device supports such information. From within the wizard, you can create a report of successful and failed password changes, but the results are also logged under Server logs.
For hardware devices with ONVIF drivers and multiple user accounts, only an administrator of XProtect with administrative rights of the hardware device can change passwords from the VMS.
For information about how to change passwords in one operation, see Change passwords on hardware devices.
Change passwords on hardware devices
Available functionality depends on the system you are using. See https://www.milestonesys.com/solutions/platform/product-index/ for more information.
You can change passwords on multiple hardware devices in one operation. For more information about the feature and supported models, see Device password management (explained).
- The hardware device model supports device password management by Milestone.
Steps:
- In the Site Navigation pane, select the Recording Servers node.
- Right-click the relevant recording server or hardware in the overview pane.
- Select Change Hardware Password. A wizard appears.
-
Follow the instructions on the screen to complete the changes.
The Password last changed field shows the time stamp of the latest password change based on the local time settings of the computer that the password was changed from.
- The last page shows the result. If the system could not update a password, click Failed next to the hardware device to see the reason.
- You can also click the Print report button to see the full list of successful and unsuccessful updates.
- In case you want to change the password on the hardware devices that failed, click Retry, and the wizard starts over with the failed hardware devices.
- If you click Retry, you can no longer access the report from the first time you completed the wizard.
- Due to security restrictions, some hardware devices might become unavailable for a certain period if you fail to change password several times in a row. Security restrictions vary for different manufacturers.