

Site Navigation: Devices: Working with devices
The devices appear in the Management Client when you add hardware with the Add Hardware wizard.
You can manage devices via the device groups if they have the same properties, see Site Navigation: Devices: Working with device groups.
You can also manage the devices individually:
- Cameras
- Microphones
- Speakers
- Metadata
- Inputs
- Outputs
Devices (explained)
Hardware has a number of devices that you can manage individually, for example:
- A physical camera has devices that represent the camera part (lenses) as well as microphones, speakers, metadata, input and output either attached or built-in
- A video encoder has multiple analog cameras connected that appear in one list of devices that represent the camera part (lenses) as well as microphones, speakers, metadata, input and output either attached or built-in
- An I/O module has devices that represent the input and output channels for, for example, lights
- A dedicated audio module has devices that represent microphones and speaker inputs and outputs
- In a Milestone Interconnect setup, the remote system appears as hardware with all devices from the remote system listed in one list
The system automatically adds the hardware’s devices when you add hardware.
For information about supported hardware, see the supported hardware page on the Milestone website (https://www.milestonesys.com/supported-devices/).
The following sections describe each of the device types with links to the tabs you can use to manage them.
Camera devices (explained)
Camera devices are added automatically when you add hardware to the system and are by default enabled.
Camera devices deliver video streams to the system that the client users can use to view live video or that the system can record for later playback by the client users. Roles determine the users' right to view video.
For information about supported hardware, see the supported hardware page on the Milestone website (https://www.milestonesys.com/supported-devices/).
The system comes with a default start feed rule which ensures that video feeds from all connected cameras are automatically fed to the system. Like other rules, the default rule can be deactivated and/or modified as required.
Enabling/disabling and renaming of individual devices take place on the recording server hardware. See Enable/disable devices via device groups.
For all other configuration and management of cameras, expand Devices in the Site Navigation pane, then select Cameras. In the Overview pane, you group your cameras for an easy overview of your cameras. Initial grouping is done as part of the Add hardware wizard.
Follow this configuration order to complete the most typical tasks related to configuration of a camera device:
- Configure camera settings (see Settings tab (devices)).
- Configure streams (see Streams tab (devices)).
- Configure motion (see Motion tab (devices)).
- Configure recording (see Record tab (devices)).
- Configure the remaining settings as needed.
Microphone devices (explained)
On many devices, you can attach external microphones. Some devices have built-in microphones.
Microphone devices are added automatically when you add hardware to the system. They are by default disabled, so you must enable them before use, either as part of the Add Hardware wizard or afterwards. Microphones do not require separate licenses. You can use as many microphones as required on your system.
You can use microphones completely independently of cameras.
Microphone devices deliver audio streams to the system that the client users can listen to live or the system can record for later playback by the client users. You can set up the system to receive microphone specific events that trigger relevant actions.
For information about supported hardware, see the supported hardware page on the Milestone website (https://www.milestonesys.com/supported-devices/).
Roles determine the users' right to listen to microphones. You cannot listen to microphones from the Management Client.
The system comes with a default start audio feed rule which ensures that audio feeds from all connected microphones are automatically fed to the system. Like other rules, the default rule can be deactivated and/or modified as required.
Enabling/disabling and renaming of individual devices take place on the recording server hardware. For more information, see Enable/disable devices via device groups.
For all other configuration and management of cameras, expand Devices in the Site Navigation pane, then select Microphones. In the Overview pane, you group your microphones for an easy overview. Initial grouping is done as part of the Add hardware wizard.
You can configure microphone devices on these tabs:
- Info tab (see Info tab (devices))
- Settings tab (see Settings tab (devices))
- Record tab (see Record tab (devices))
- Events tab (see Events tab (devices))
Speaker devices (explained)
On many devices you can attach external speakers. Some devices have built-in speakers.
Speaker devices are added automatically when you add hardware to the system. They are by default disabled, so you must enable them before use, either as part of the Add Hardware wizard or afterwards. Speakers do not require separate licenses. You can use as many speakers as required on your system.
You can use speakers completely independently of cameras.
For information about supported hardware, see the supported hardware page on the Milestone website (https://www.milestonesys.com/supported-devices/).
The system sends an audio stream to the speakers when a user presses the talk button in XProtect Smart Client. Speaker audio is only recorded when talked to by a user. Roles determine users' right to talk through speakers. You cannot talk through speakers from the Management Client.
If two users want to speak at the same time, the roles determine users' right to talk through speakers. As part of the roles definition, you can specify a speaker priority from very high to very low. If two users want to speak at the same time, the user whose role has the highest priority wins the ability to speak. If two users with the same role want to speak at the same time, the first-come first-served principle applies.
The system comes with a default start audio feed rule that starts the device so the device is ready to send user activated audio to the speakers. Like other rules, the default rule can be deactivated and/or modified as required.
Enabling/disabling and renaming of individual devices take place on the recording server hardware. See Enable/disable devices via device groups.
For all other configuration and management of cameras, expand Devices in the Site Navigation pane, then select Speakers. In the Overview pane, you group your speakers for an easy overview. Initial grouping is done as part of the Add hardware wizard.
You can configure speaker devices on these tabs:
Metadata devices (explained)
Metadata devices deliver data streams to the system that the client users can use to view data about data, for example, data that describes the video image, the content or objects in the image, or the location of where the image was recorded. Metadata can be attached to cameras, microphones, or speakers.
Metadata can be generated by:
- The device itself delivering the data, for example the camera delivering video
- A third-party system or integration via a generic metadata driver
The device-generated metadata is automatically linked to one or more devices on the same hardware.
For information about supported hardware, see the supported hardware page on the Milestone website (https://www.milestonesys.com/supported-devices/).
Roles determine the users' right to view metadata.
The system comes with a default start feed rule which ensures that metadata feeds from all connected hardware that supports metadata, are automatically fed to the system. Like other rules, the default rule can be deactivated and/or modified as required.
Enabling/disabling and renaming of individual devices take place on the recording server hardware. For more information, see Enable/disable devices via device groups.
For all other configuration and management of metadata devices, expand Devices in the Site Navigation pane, then select Metadata. In the Overview pane, you group your metadata devices for an easy overview. Initial grouping is done as part of the Add hardware wizard.
You can configure metadata devices on these tabs:
- Info tab (see Info tab (devices))
- Settings tab (see Settings tab (devices))
- Record tab (see Record tab (devices))
Input devices (explained)
On many devices, you can attach external units to input ports on the device. Input units are typically external sensors. You can use such external sensors, for example, for detecting if doors, windows, or gates are opened. Input from such external input units is treated as events by the system.
You can use such events in rules. For example, you could create a rule specifying that a camera should begin recording when an input is activated, and stop recording 30 seconds after the input is deactivated.
You can use input devices completely independently of cameras.
Before you specify use of external input units on a device, verify that the device itself recognize the sensor operation. Most devices can show this in their configuration interfaces, or via Common Gateway Interface (CGI) script commands.
Input devices are added automatically when you add hardware to the system. They are by default disabled, so you must enable them before use, either as part of the Add Hardware wizard or afterwards. Input devices do not require separate licenses. You can use as many input devices as required on your system.
For information about supported hardware, see the supported hardware page on the Milestone website (https://www.milestonesys.com/supported-devices/).
Enabling/disabling and renaming of individual devices take place on the recording server hardware. See Enable/disable devices via device groups.
For all other configuration and management of cameras, expand Devices in the Site Navigation pane, then select Input. In the Overview pane, you group your input devices for an easy overview. Initial grouping is done as part of the Add hardware wizard.
You can configure input devices on these tabs:
- Info tab (see Info tab (devices))
- Settings tab (see Settings tab (devices))
- Events tab (see Events tab (devices))
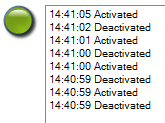
Activate input manually for test
With the rules feature, you define rules that automatically activate or deactivate input or you can activate them manually and check the result in the Management Client:
- In the Overview pane, select the relevant input device.
- Activate the input on the physical device.
- In the Preview pane, see if the indicator lights up green. Then the input device works.
Output devices (explained)
On many devices, you can attach external units to output ports on the device. This allows you to activate/deactivate lights, sirens, etc. through the system.
You can use output when creating rules. You can create rules that automatically activate or deactivate outputs, and rules that trigger actions when the state of an output is changed.
Output can be triggered manually from the Management Client and XProtect Smart Client.
Before you specify use of external output units on a device, verify that the device itself can control the device attached to the output. Most devices can show this in their configuration interfaces, or via Common Gateway Interface (CGI) script commands.
Output devices are added automatically when you add hardware to the system. They are by default disabled, so you must enable them before use, either as part of the Add Hardware wizard or afterwards. Output devices do not require separate licenses. You can use as many output devices as required on your system.
For information about supported hardware, see the supported hardware page on the Milestone website (https://www.milestonesys.com/supported-devices/).
Enabling/disabling and renaming of individual devices take place on the recording server hardware. See Enable/disable devices via device groups.
For all other configuration and management of cameras, expand Devices in the Site Navigation pane, then select Output. In the Overview pane, you group your input devices for an easy overview. Initial grouping is done as part of the Add hardware wizard.
You can configure output devices on these tabs:
Activate output manually for test
With the rules feature, you define rules that automatically activate or deactivate output or you can activate them manually from a client.
You can activate an output manually from the Management Client to test the functionality:
- In the Overview pan e, select the relevant output device.
- Typically, the following elements are shown for each output in the Preview pane:
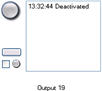
- Select/clear the check box
 to activate/deactivate the selected output. When an output is activated, the indicator lights up green:
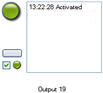
- Alternatively, click the rectangular button
 to activate the output for the duration defined in the Output Trigger Time setting on the Settings tab (this feature/setting may not be available for all outputs). After the defined duration, the output is automatically deactivated.
Enable/disable devices via device groups
You can enable/disable devices only via the configured hardware. Unless manually enabled/disabled in the add hardware wizard, camera devices are by default enabled and all other devices are by default disabled.
To locate a device via the device groups to enable or disable:
- In the Site Navigation pane, select the device.
- In the Overview pane expand the relevant group and find the device.
- Right-click the device, and select Go To Hardware.
- Click the plus node to see all devices on the hardware.
- Right-click the device you want to enable/disable, and select Enabled.
Status icons of devices
When you select a device, information about the current status appears in the Preview pane.
The following icons indicate the status of the devices:
|
Camera |
Microphone |
Speaker |
Metadata |
Input |
Output |
Description |
|---|---|---|---|---|---|---|
|
|
|
|
|
|
|
Device enabled and retrieving data: The device is enabled and you retrieve a live stream. |
|
|
|
|
|
Device recording: The device is recording data on the system. |
||
|
|
|
|
|
|
|
Device temporarily stopped or has no feed: When stopped, no information is transferred to the system. If it is a camera, you cannot view live video. A stopped device can still communicate with the recording server for retrieving events, setting settings etc., as opposed to when a device is disabled. |
|
|
|
|
|
|
|
Devices disabled: Cannot be started automatically through a rule and cannot communicate with the recording server. If a camera is disabled, you cannot view live or recorded video. |
|
|
|
|
|
Device database being repaired. | ||
|
|
|
|
|
|
|
Device requires attention: The device does not function correctly. Pause the mouse pointer over the device icon to get a description of the problem in the tooltip. |
|
|
|
|
|
|
|
Status unknown: Status of the device is unknown, for example, if the recording server is offline. |
|
|
|
|
|
Some icons can be combined, as in this example where Device enabled and retrieving data is combined with Device recording. |
Was this article helpful?
Thanks for your feedback!