The main timeline

The main timeline displays an overview of time periods with recordings from cameras and other devices in your current view. The main timeline is available on the views tabs and has various controls you can use to navigate your recordings during investigations or to select recording sequences for export, protection with evidence locks, addition of bookmarks, or other.
Select a views tab and switch to playback mode to show all the timeline controls.
You can adjust how your timelines look and behave. Select which recording types and other elements to show on the timeline tracks. For example, would you like to show recorded audio and bookmarks? You can also select how to play back gaps between recordings. You can also hide the main timeline during inactivity to free as much of the display for viewing video in XProtect Smart Client. See Configuration options for timelines.
The timeline tracks
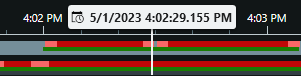
The upper timeline track shows the recording periods of the selected camera.
The lower timeline track shows the recording periods of all the cameras in the view, including the selected camera.
If you have detached windows that are synced in time with the main window, recordings from cameras and devices in these windows are also shown on the lower timeline track.
Color legend
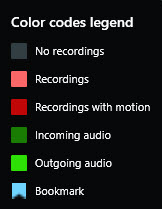
On the timeline track, the different types of recordings have different colors. The most important colors to know are:
Light-red indicates recordings
Red indicates recordings with motion
Light green indicates recordings with outgoing audio
Green indicates recordings with incoming audio
For a legend of all the colors currently shown on the timeline tracks, select Color codes legend  to the right of the timeline tracks.
Bookmarks
Timeline tracks show bookmarks with a blue bookmark icon  . To view the bookmarked video, place your mouse over the icon.
Additional markers
If additional data sources are available in your XProtect VMS system, incidents from these sources are shown as markers in colors other than blue. The incidents can appear as pop-ups in the timeline tracks.
The vertical line
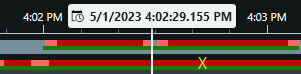
The vertical line shows the location of the playhead from where recordings are currently played back. This is called the main playback time, and the text above shows the exact date and time for the video currently played back. The main playback time applies to all the cameras in the view and any synchronized views unless you’re viewing independent playback from some of the cameras. If there is no recorded video from one or more cameras in the view matching the main playback time, the last frame from the camera database before the main playback time is shown, but the frame is dimmed.
The timeline controls
Controls | Description |
|---|---|
 | Switch between playback or live mode. |
 | Go back and forth in the video in different speeds. The further you drag the control to the sides, the faster the playback speed. |
   | Play backward |
  | Move to the frame just before |
  | Move to the start of the previous sequence |
  | Move to the first sequence |
  | There are two ways of selecting a period of recordings for export, creation of evidence lock or other. Select start and end time in timeline Select start and end time in calendar |
 | Change the playback speed. |
 | Specify the timespan of the timeline tracks. Alternative: use CTRL + scroll wheel. |