

XProtect Smart Wall (usage)
After configuring XProtect Smart Wall, you can start working with it in XProtect Smart Client. The system administrator defines the monitors that the video wall consists of, the layout and size of the monitors, and possibly also what cameras are displayed on the monitors.
Using XProtect Smart Wall is basically about the following:
-
Start your video wall by opening the Smart Wall monitors in different displays or floating windows. Then drag the floating windows onto the physical monitors. See also View Smart Wall content.
-
Push cameras and other types of content to the video wall and share it with the other operators who are using the video wall. See also Displaying content on video walls.
-
When content on a monitor is changed, you may need to reset the Smart Wall monitor back to its default state. You do this by reactivating the default Smart Wall preset
 A predefined layout for one or more Smart Wall monitors in XProtect Smart Client. Presets determine which cameras are displayed, and how content is structured on each monitor on the video wall.. See also Reset Smart Wall monitor after removing content.
You can also change the view layout of the Smart Wall monitors, for example if you need to add more cameras. See also Change view layout of Smart Wall monitors.
View Smart Wall content
You can view both live and recorded video on your video wall. If your video wall is not already up and running, you start the video wall by sending the Smart Wall monitors to your computer displays or to new floating windows. You can then drag the floating windows onto the physical monitors that are connected to the computer that drives the video wall. See also Smart Wall display options.
- To change or control what is displayed on a video wall, you must use the Smart Wall control. See also Smart Wall control (explained).
- Insufficient user permissions can prevent cameras from displaying video on your video wall
Steps:
- In the Views pane, expand Smart Wall.
- Expand your preferred Smart Wall definition.
- To view Smart Wall content in the main view, select the monitors one at a time.
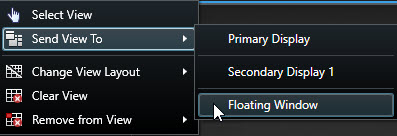
- To view Smart Wall content in any of your displays or in a new floating window:
- Right-click the monitors, one at a time.
- Click Send view to and select one of these options:
- Primary display - opens in full screen mode in your current display
- Secondary display - opens in full screen mode in your secondary display if any
Floating window - opens in a new floating window
Smart Wall control (explained)
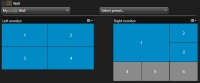
The Smart Wall control is a virtual representation of the video wall showing one Smart Wall definition at a time and the Smart Wall monitors that it consists of. The control allows operators to push cameras and other types of content onto the video wall.
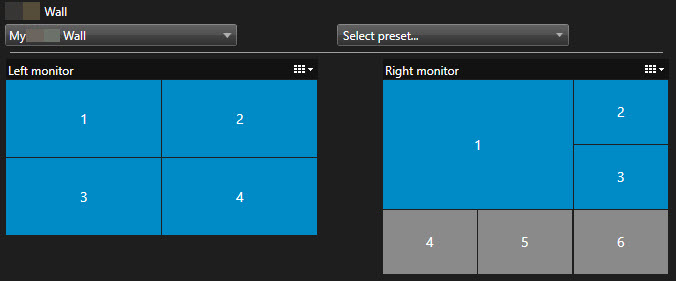
The Smart Wall control in the image above displays a Smart Wall definition with two monitors:
- Left monitor has a 2x2 layout
- Right monitor has a 1+5 layout
Blue items in the Smart Wall control are currently displaying content. Gray items are empty.
How does it work? Some elements you can drag directly onto the Smart Wall monitors in the Smart Wall control, or to specific view items within a Smart Wall monitor. Other elements you need to send to a video wall, for example images. See also Displaying content on video walls.
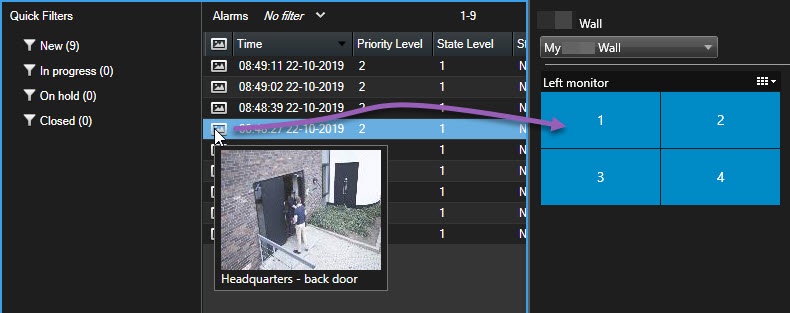
Example 1: Suppose you have a view containing the Smart Wall control and the Alarm List. An alarm goes off, and immediately you drag the alarm from the list onto any view item within Monitor 1. Operators who are looking at the video wall will now see the alarm on Monitor 1.
Example 2: Suppose you have a view containing the Smart Wall control and your smart map. You select four cameras on the smart map and drag them onto Monitor 2, which has a 2x3 view layout. Operators who are looking at their video wall will now see those four cameras in the first four view items of Monitor 2.
If your organization has multiple video walls, you can select the video wall you need in the Smart Wall list.
The Select preset list allows you to select and activate preconfigured Smart Wall presets.
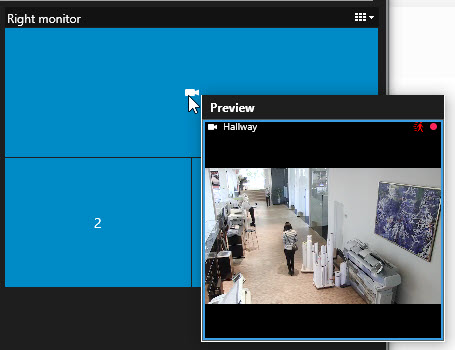
- Hover the cursor over a view item. The number of the view item changes to an icon that indicates the type of content. For example, a camera would indicate that the view item is showing video
- Click a view item to preview the content. The toolbar in the Preview window provides options for printing the content, or sending it to another video wall
Smart Wall display options
The following table describes ways to view Smart Wall content in a detached window.
|
Option |
Description |
|---|---|
| Primary display |
View content in full screen mode on the display that you are currently viewing. XProtect Smart Client remains open behind the Smart Wall content. |
| Secondary display |
View content on another display and continue to view existing content on the current display. |
| Floating window |
View content in a new floating window. This is useful, for example, if your video wall consists of multiple monitors. |
Disconnect Smart Wall monitors
You can disconnect your Smart Wall monitors, so that you can work with the video without interfering with what other operators are viewing on the video wall.
-
On the computer that is driving the video wall, go to the Smart Wall monitor that you want to disconnect.
-
Click Disconnect Smart Wall monitor.

Changes you make are reverted when you reconnect.

Displaying content on video walls
Your video wall may be preconfigured to display video from certain cameras. However, you can use the Smart Wall control to push cameras and other types of content to the video wall, for example alarms![]() Incident defined on surveillance system to trigger an alarm in XProtect Smart Client. If your organization uses the feature, triggered alarms are displayed in views that contain alarm lists or maps., hotspots
Incident defined on surveillance system to trigger an alarm in XProtect Smart Client. If your organization uses the feature, triggered alarms are displayed in views that contain alarm lists or maps., hotspots![]() A particular position for viewing magnified and/or high quality camera images in XProtect Smart Client views., images, and the smart map
A particular position for viewing magnified and/or high quality camera images in XProtect Smart Client views., images, and the smart map![]() A map functionality that uses a geographic information system to visualize devices (for example, cameras and microphones), structures, and topographical elements of a surveillance system in geographically accurate, real-world imagery. Maps that use elements of this functionality are called smart maps..
A map functionality that uses a geographic information system to visualize devices (for example, cameras and microphones), structures, and topographical elements of a surveillance system in geographically accurate, real-world imagery. Maps that use elements of this functionality are called smart maps..
Depending on the situation and the environment, you can combine different types of content to improve response times and effectiveness. For example, if you want to display a picture of a suspect so that people on patrol know who to look for, you can add an image. If you want to provide guidance for response measures, you can add text.
What can you display?
- Alarms
- Bookmarks
- Cameras or whole views
- Carousels
- Images and snapshotsAn instant capture of a frame of video at a given time.
- Hotspots
- HTML pages
- Maps
- Smart map
- Text
Most of these elements, you must add to the video wall through the toolbar of the view item.
 >
> 
Display or change cameras on video walls
You can change the cameras that are being displayed on the video wall. Immediately, other operators![]() A professional user of an XProtect client application. who are watching the same video wall will see the changes.
A professional user of an XProtect client application. who are watching the same video wall will see the changes.
You have set up a view that contains your Smart Wall control.
Steps:
- Make sure that your video wall is running. See also View Smart Wall content.
- Switch to live or playback mode.
- To add a camera from a view:
- Open the view that contains the camera that you want to add.
In the camera view item, click More > Send to Smart Wall. Then select the Smart Wall definition, the Smart Wall monitor, and finally the view item.
- To add a camera from the Cameras pane:
- Open a view that contains the Smart Wall control.
- In the Cameras pane, find the camera that you want to add.
Drag the camera to a view item in the Smart Wall control.
To verify that you added the correct camera, check the video wall or click the camera icon in the Smart Wall control. A preview appears.


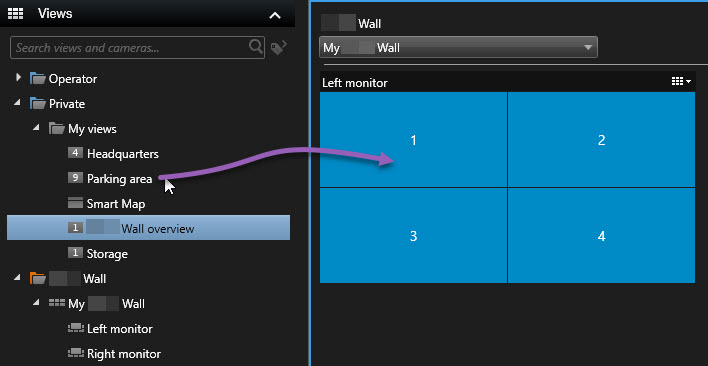
Add entire views to video walls
You can share an entire view with other Smart Wall operators by sending the view to a Smart Wall monitor. What is currently being displayed on that monitor is then replaced by the content of the view.
You have set up a view that contains your Smart Wall control.
Steps:
- Make sure that your video wall is running. See also View Smart Wall content.
-
In live or playback mode, open the view that contains your Smart Wall control.
Milestone recommends that you open the Smart Wall control in a new floating window.
-
In the Views pane, find the view that you want to send to the video wall.
-
Drag the view into a view item in the preferred Smart Wall monitor and then release.

Display text on video walls
Displaying text on your video wall is useful when you want to provide information to operators who are using the video wall.
Requirements
-
To send text from an existing view, first you must add the text to a view.
- To add text using drag-and-drop, make sure that your text editor supports drag-and-drop operations
Steps:
- To add text from a third-party text editor:
- Open the view that contains your Smart Wall control.
- Write the text in your preferred text editor.
- Select the text.
- Drag and drop the text into a view item in a Smart Wall monitor.
- In the window that appears, you can edit the text even further. Click Save.
- Immediately after, the text appears on the associated display or physical monitor.
- To add text that has already been added to a view:
- Open the view that contains the text.
Hover over the view item. The camera toolbar appears.

- Click More > Send to Smart Wall and then select the preferred video wall.
Select the Smart Wall monitor and finally the view item inside the monitor.

Immediately after, the text appears on the associated display or physical monitor.
Display alarms on video walls
You can share a prioritized overview of all alarms by adding the Alarm List to a video wall. This allows you to view and work with details about the alarm directly from the video wall.
You can also display individual alarms on your video wall by dragging and dropping the alarm from the Alarm List.
Display bookmarks on video walls
Sending a bookmark![]() An important point in a video recording, marked and optionally annotated so that you and your colleagues will easily be able to find it later. to a video wall can help you quickly share a still image or a video sequence of an incident, for example a suspicious person, with operators who are watching the video wall.
An important point in a video recording, marked and optionally annotated so that you and your colleagues will easily be able to find it later. to a video wall can help you quickly share a still image or a video sequence of an incident, for example a suspicious person, with operators who are watching the video wall.
Steps:
- Create a bookmark.
-
In the window that appears, click Display on Smart Wall and select the preferred video wall.
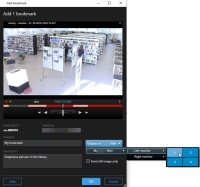
- Select a Smart Wall monitor and then a view item within the monitor.
- To send a still image instead of the video sequence, select the Send still image only check box.
- Click OK to save your changes. The bookmarked video sequence appears on the associated physical monitor.

XProtect Smart Wall and smart map (explained)
If you are using XProtect Smart Wall, you can view the smart map![]() A map functionality that uses a geographic information system to visualize devices (for example, cameras and microphones), structures, and topographical elements of a surveillance system in geographically accurate, real-world imagery. Maps that use elements of this functionality are called smart maps. on your video wall and share it with other operators who are using the same video wall. The current zoom level, the location that you have navigated to, and the layers that are visible are maintained when sent to a video wall.
A map functionality that uses a geographic information system to visualize devices (for example, cameras and microphones), structures, and topographical elements of a surveillance system in geographically accurate, real-world imagery. Maps that use elements of this functionality are called smart maps. on your video wall and share it with other operators who are using the same video wall. The current zoom level, the location that you have navigated to, and the layers that are visible are maintained when sent to a video wall.
Drag cameras from maps or smart maps to video walls
If a particular camera on your map or smart map![]() A map functionality that uses a geographic information system to visualize devices (for example, cameras and microphones), structures, and topographical elements of a surveillance system in geographically accurate, real-world imagery. Maps that use elements of this functionality are called smart maps. recorded an incident, and you want to share the video from that camera, you can drag the camera from the map to the monitors of your video wall.
A map functionality that uses a geographic information system to visualize devices (for example, cameras and microphones), structures, and topographical elements of a surveillance system in geographically accurate, real-world imagery. Maps that use elements of this functionality are called smart maps. recorded an incident, and you want to share the video from that camera, you can drag the camera from the map to the monitors of your video wall.
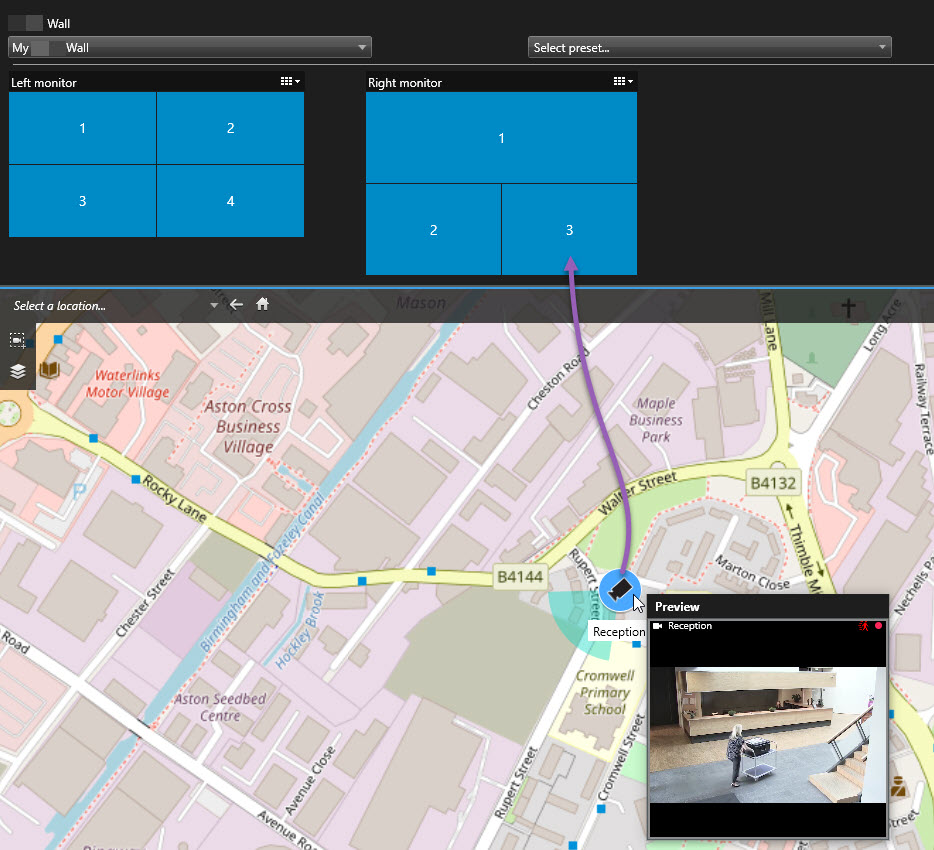
You can also drag cameras from maps in floating windows and secondary displays.
Stop displaying content on the video wall
You can stop displaying content on a video wall, for example when an incident is under control or the content is no longer relevant.
- In your Smart Wall control, go to the monitor that you want to clear.
- Click the
 icon.
icon. - Select Clear view. On the Smart Wall control, the view items turn gray, and all content is removed from the Smart Wall display.
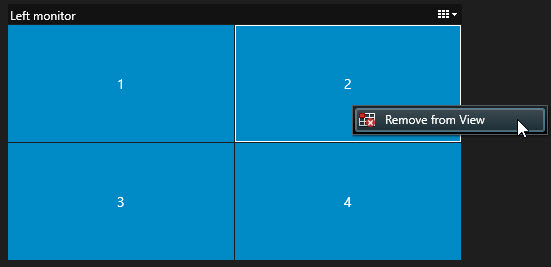
- In your Smart Wall control, go to the monitor that you want to remove specific content from.
-
Right-click the item that you want to clear and select Remove from view.

The item turns gray, and the content is removed from the associated view item in the Smart Wall display.
Other operators![]() A professional user of an XProtect client application. can manually change the content on a Smart Wall, and the content can change according to a schedule or rules. This means that the content that you remove can reappear later.
A professional user of an XProtect client application. can manually change the content on a Smart Wall, and the content can change according to a schedule or rules. This means that the content that you remove can reappear later.
Reset Smart Wall monitor after removing content
If you have removed content from a monitor, you can make it reappear by re-applying the Smart Wall preset![]() A predefined layout for one or more Smart Wall monitors in XProtect Smart Client. Presets determine which cameras are displayed, and how content is structured on each monitor on the video wall. that is associated with the monitor. See also Reset or change Smart Wall presets.
A predefined layout for one or more Smart Wall monitors in XProtect Smart Client. Presets determine which cameras are displayed, and how content is structured on each monitor on the video wall. that is associated with the monitor. See also Reset or change Smart Wall presets.